Engine hatch hinge suggestions
Moderators: CaptPatrick, mike ohlstein, Bruce
Engine hatch hinge suggestions
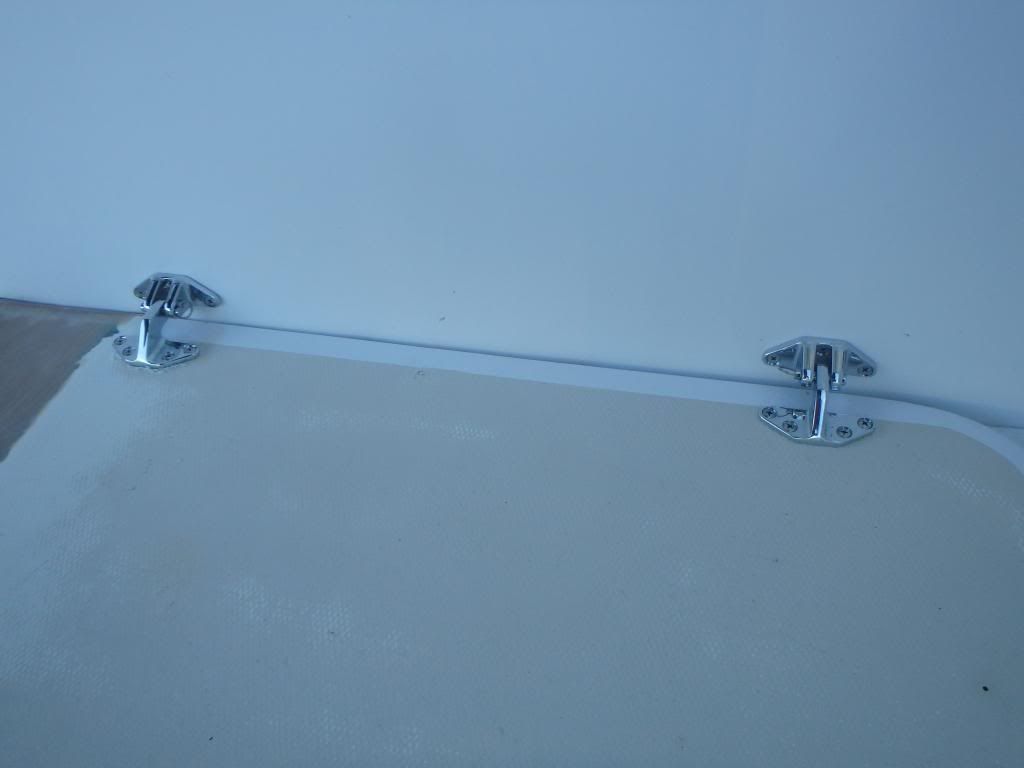
I have finally made my three main engine hatch covers into one. Been trolling the web for hatch hinges and so far the Seadog 3" hinge with removable pin looks the best/heaviest. What do the faithful think? The plan is using the bulkhead as the other mounting point. The hatch is rather heavy and I plan on using backing plates and would like to find some nice hinges that can use heavier bolts than the #10's that you need for the Seadog hinge. I will get a photo posted so you can see what I am doing.
- mike ohlstein
- Site Admin
- Posts: 2396
- Joined: Jun 29th, '06, 11:39
- Location: So many things seem like no-brainers until you run into someone with no brain.
- Contact:
Re: Engine hatch hinge suggestions
A single, properly torqued #10 24 grade 2 bolt should be able to safely withstand about 700 lbs in tension and 500 lbs in sheer (if I'm remembering correctly). Multiply by 3 for a 3 bolt hinge and then multiply by the number of hinges. If you still think that you need more, you can go with a coated grade 5 or grade 8 bolt. Grade 8 probably gets you up to about 1500 lbs per bolt in tension and 1100 lbs in sheer. I've used coated grade 8 hardware on my snow plow mounts for ten years and they still look brand new. (The bolts, not the mounts.)
Re: Engine hatch hinge suggestions
But Stainless bolts are a whole 'nother animal!
Rawleigh
1966 FBC 31
1966 FBC 31
Re: Engine hatch hinge suggestions
Kevin,
Not sure what your engine covers look like but . . .
On my Cabrera's I used a Sea Dog with removable pins and they do very well.
http://www.sea-dog.com/groups/1603-hatch-hinge
How bout dat?
Not sure what your engine covers look like but . . .
On my Cabrera's I used a Sea Dog with removable pins and they do very well.
http://www.sea-dog.com/groups/1603-hatch-hinge
How bout dat?
Mikey
3/18/1963 - -31-327 factory hardtop express, the only one left.
The difference between genius and stupidity is that genius has its limits.
-Albert Einstein
3/18/1963 - -31-327 factory hardtop express, the only one left.
The difference between genius and stupidity is that genius has its limits.
-Albert Einstein
- Pete Fallon
- Senior Member
- Posts: 1318
- Joined: Jun 29th, '06, 23:10
- Location: Stuart Fl. and Salem, Ma.
Re: Engine hatch hinge suggestions
Kevin,
It was good to see you at the Marathon Boat Yard on Wed afternoon, like you said 6 years is way too long. I know your looking for hatch hinges maybe these will work for you. Do they have to be flat(almost flush mounted ) or can the be raised up a bit?. I have 4 sets of old bronze hinges with 1/2" barrel pins, they are from my old 2 piece engine box covers, painted with Imron, they are 9-1/2" long with two holes in each section they will take 1/4- 20 flat head machine screws. The way they operate is you lift up the hatch and push it sideways about 3/4" that releases the pins from the receiver sections. I will e-mail you some pictures, If you can use them they are yours, they are 52 years old but in great condition heavy duty bronze castings. Anyway I should be back down in your area on the weekend of the 22nd of February. Maybe we can get together with John Brownlee if he's free and Bill Machovina, Talk soon.
Pete Fallon
1961 Express Vizcaya Hull 186 12-13-61
-
Preston Burrows
- Senior Member
- Posts: 271
- Joined: Jun 29th, '06, 13:30
- Location: Nassau,Bahamas
- Contact:
Re: Engine hatch hinge suggestions
Kevin:
Post up some photos of your new single piece hatch arrangement to give us a visual please.
Hatch weight and pivot wise I'm thinking your best bet might be to forgo the usual marine hardware manufacturers and look elsewhere.
Assuming you've built a new support for the single piece hatch on the forward section of the bulkhead ,widthways, space allowing you could incorporate heavy duty stainless steel butt hinges or a piano hinge along the forward bulkhead as its pivot?
Good on you for making modifications to your B28 that I wish I had on mine instead of being on my project list!
Preston Burrows
1976 B28 FBC
BERF1398M76J-285
1976 B28 FBC
BERF1398M76J-285
Re: Engine hatch hinge suggestions
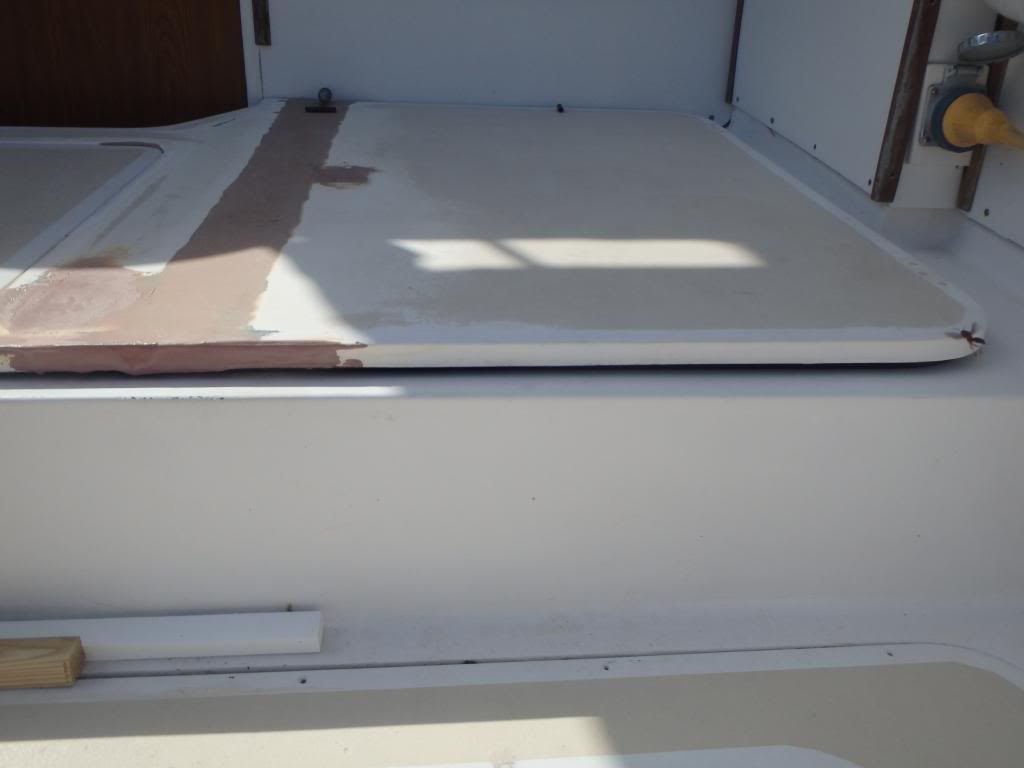
Pete, it was great talking to you the other day. If you have time next time you are here we should do it again. Thanks for the offer on the hinges but I don't think those will work in this application.
After thinking about what Mike was saying about properly fastening and shear strength I think I can pull it off with two hinges on each side of the door like the Sea Dogs that are posted in the link. The eyes for my bimini top straps are bolted in with much smaller bolts and they have held up to about 40 knots of wind pressure dragging on the top without shearing.
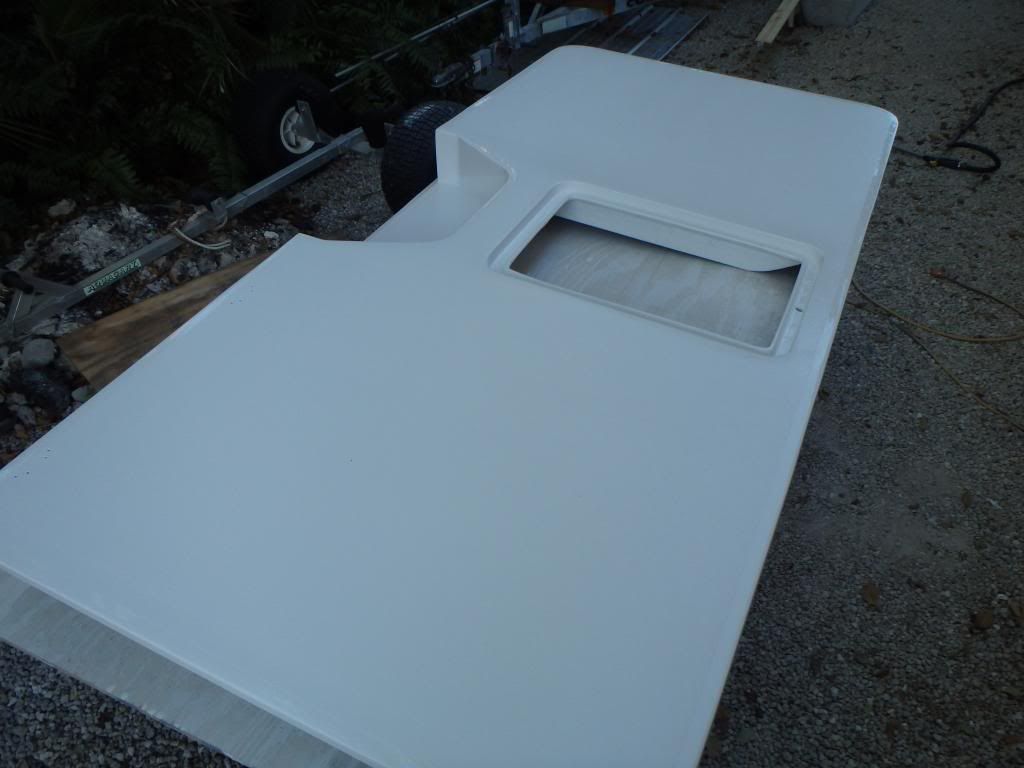
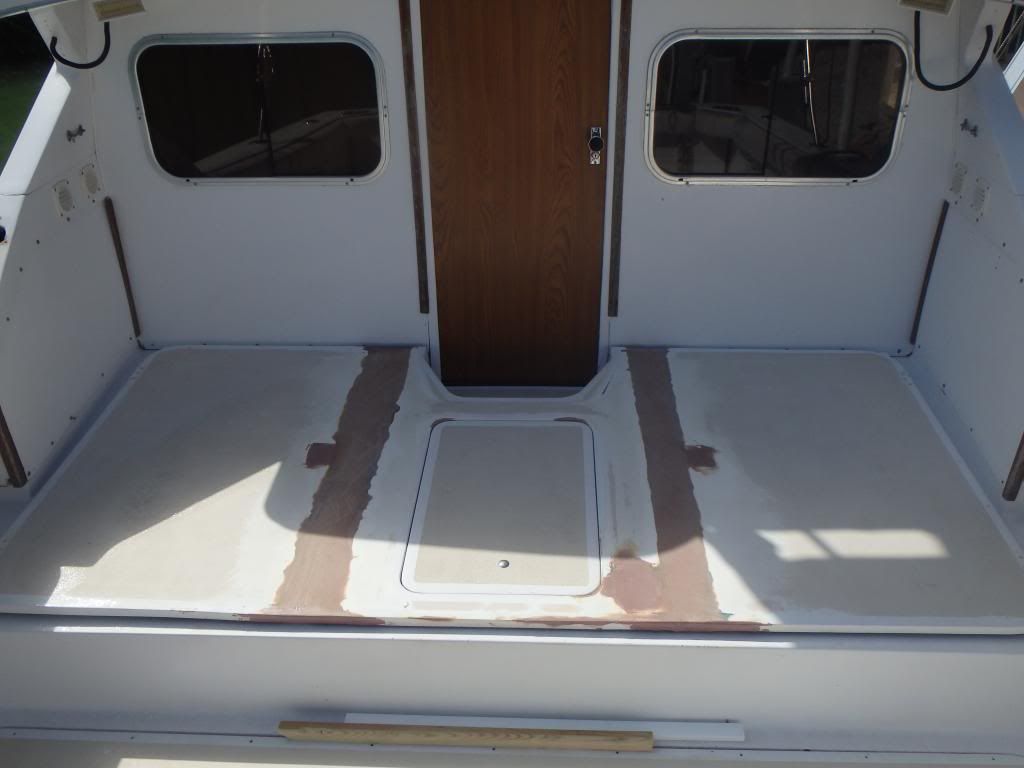
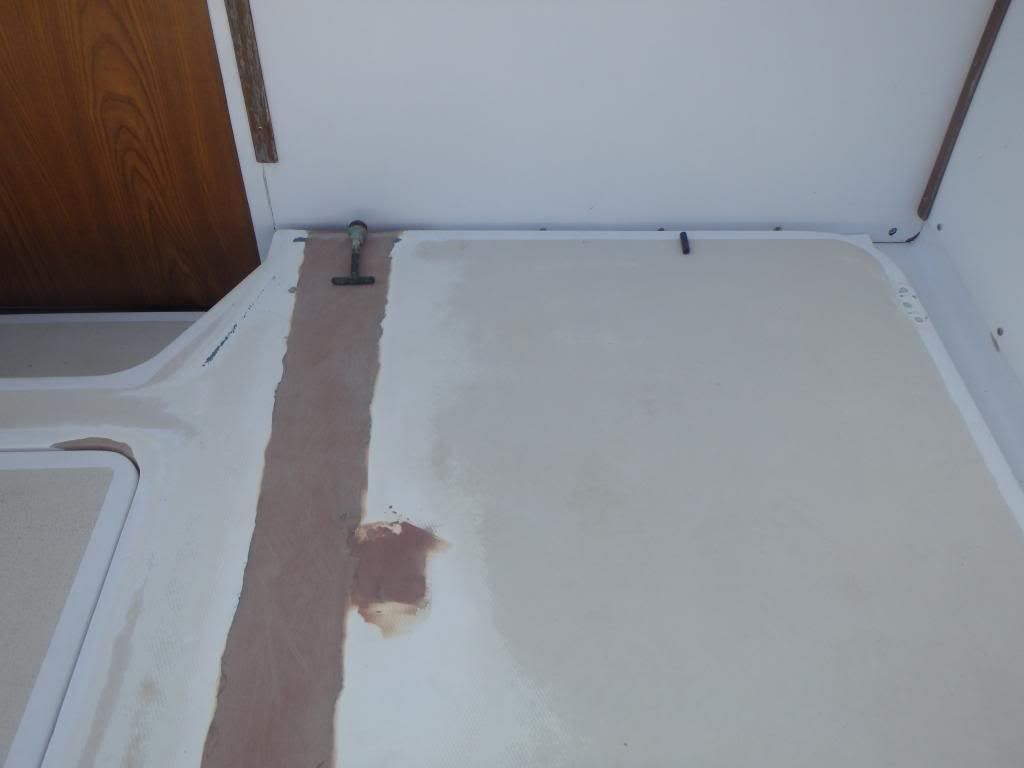
As you can see the job is still very ugly. Lots of filling and block sanding left to do. I widened the hatches so there is about 1/2 inch overhang on deck rather than the hatches dropping into the deck. I used West systems epoxy and biaxle on the top and bottom side of the hatches. The hatches will be about 1/2 inch aft from the bulkhead. Against the bulkhead I filled the depression where the hatches used sit with Starboard. That should allow a smooth pivot point for the edge of the hatch to transition on while opening and closing. The rest of the track/gutter I have fiberglass angle bolted in and it keeps the whole assembly higher and in line with the bulkhead starboard modification. My goal is to eliminate water from getting into the gutters and obviously the engine height clearance. The center hatch will still have a drain but will not get the mounts or starters wet. I am thinking that a byproduct result will be slightly less engine noise coming through deck as these hatches have NEVER been properly sealed!
Preston, when I start working on it again this week I will take some photos of the track mods so you can get a better idea of what I did to make it function.
Re: Engine hatch hinge suggestions
OOPS, Kevin, forgot, Hyena Boat. Thinking 31.
Will be in Key West first two weeks in April. Maybe get together?
Will be in Key West first two weeks in April. Maybe get together?
Mikey
3/18/1963 - -31-327 factory hardtop express, the only one left.
The difference between genius and stupidity is that genius has its limits.
-Albert Einstein
3/18/1963 - -31-327 factory hardtop express, the only one left.
The difference between genius and stupidity is that genius has its limits.
-Albert Einstein
Re: Engine hatch hinge suggestions
http://www.homedepot.com/s/stainles%252 ... ges?NCNI-5" onclick="window.open(this.href);return false;
Sportsmen Conservation Sustainable Harvest Accountability Integrity with the spirit of a Warrior.
- Hyena Love
- Senior Member
- Posts: 309
- Joined: Jun 30th, '06, 09:54
Re: Engine hatch hinge suggestions
Run the hatches all the way to the edge of the step. So, its just one step up, not a step plus the toe grabber on the edge of the hatch.
Are you still going to have water draining on the sides of the hatches and along the bulkhead. If so, how are you going to channel that water to the deck? Gasket under the hatch and them use the weight of the hatch to seal it?
Are you still going to have water draining on the sides of the hatches and along the bulkhead. If so, how are you going to channel that water to the deck? Gasket under the hatch and them use the weight of the hatch to seal it?
Re: Engine hatch hinge suggestions
Mikey, let's get together. You want to fish from the Hyena?
Ernest, I have debated that hatch being flush for aesthetic purposes also. It has been raised since 2006 and believe it or not I have never heard "ouch" my toe! I think I could do it with a little re-design. Who am I kidding though, I have not been working off of plans; just kind of designing it as I go as you can all tell by the mess. One of the most difficult parts of this is developing the sealing area that is at the front of the hatches. If I were to put the hatch aft I would have a much more complicated sealing system that incorporates the step down into the cabin.
After all the time and money so far, now I am thinking there is no way I am going to use a broom stick to prop the hatch open. That would be the easy way out. I am going to bone up on my geometry and install some electric actuators. Still sleeping on how the hell I am going to pull that off.
I think when I get back to working on this I will start a new thread with a more appropriate title and include some photos as I progress. For anyone with a repowered 28 it may lend some ideas for the folks that need the clearance.
Re: Engine hatch hinge suggestions
Kevin, Gas shocks work very well for holding up hatches, alot cheaper, simpler and less likely to fail than electric actuators. Not as cool as pressing a button an watching it rise, though!
- mike ohlstein
- Site Admin
- Posts: 2396
- Joined: Jun 29th, '06, 11:39
- Location: So many things seem like no-brainers until you run into someone with no brain.
- Contact:
Re: Engine hatch hinge suggestions
I like the gas shock idea better too. Latch the hatch shut, and have the shocks open it like the hood on your F250.
-
Preston Burrows
- Senior Member
- Posts: 271
- Joined: Jun 29th, '06, 13:30
- Location: Nassau,Bahamas
- Contact:
Re: Engine hatch hinge suggestions
Kevin:
You are almost there..... engineer the hatch being flush to the cockpit step-down and use gas struts instead of electric for the hatch holders is what I would do !
Anything is better than this arrangement of mine [though I did see the light and had a major upgrade from a mop handle to an 1 1/4" diameter wood dowel for the hatch holder some years back!]
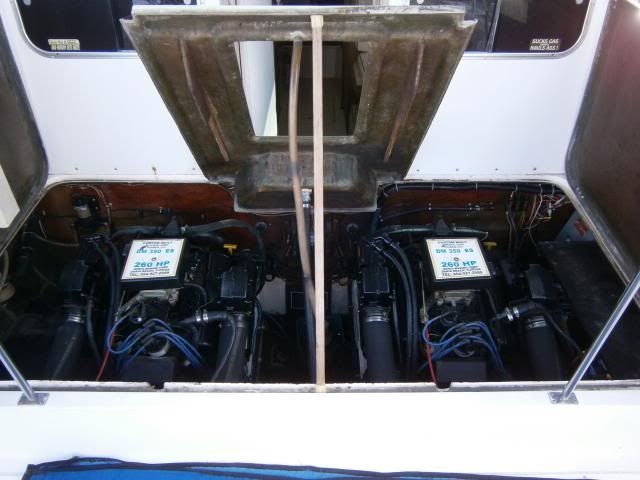

Re: Engine hatch hinge suggestions
Thanks for the idea with the gas shocks. Buddy came over yesterday and he had a couple old shocks and mounting brackets so we started checking for mounting points. I think I can make it work. It will cost a fraction of the price of a single actuator and like you said less stuff to fail.
-
Captn Bruce
- Posts: 20
- Joined: Jun 29th, '06, 23:18
- Location: Woodland Hills, CA
Re: Engine hatch hinge suggestions
Hi Kevin,
I toyed with this idea of a single hatch on my 28 when I repowered 5 years ago. Kind of wish I had moved forward with this idea. It looks like you are headed in the right direction. Gas shocks would a good choice and are affordable. If you call some of the gas piston manufacturers they can give you the optimum location points.
Please continue to post your progress.
Bruce Derksen
28 Bertram "Noelle Mae"
- Pete Fallon
- Senior Member
- Posts: 1318
- Joined: Jun 29th, '06, 23:10
- Location: Stuart Fl. and Salem, Ma.
Re: Engine hatch hinge suggestions
Kevin,
I have to come back down to Key Colony Beach on Thursday and possibly Friday to re-check some work that was done on the boat I surveyed on the 29th-30th of January. Could you e-mail me your telephone number or call me. I need a licensed captain to run the boat while I do the inspections. Do you have a license? My client is paying the cost of a captain. Call me today if you can. 561-310-7179 cell. Thanks,
Pete Fallon
Re: Engine hatch hinge suggestions
Kevin,
How will you be climbing on to the bridge? The same way as before, or with an SS step to the port and then a couple of hanging steps from the bridge rim?
Yannis.
How will you be climbing on to the bridge? The same way as before, or with an SS step to the port and then a couple of hanging steps from the bridge rim?
Yannis.
Re: Engine hatch hinge suggestions
Kevin-
two s.s. 90lb gas lifts and a s.s. slam latch would be the ticket.
I just did the large, almost full beam, bench/hatch on my skiff rebuild with a single 90lb and a slam latch. Works great.
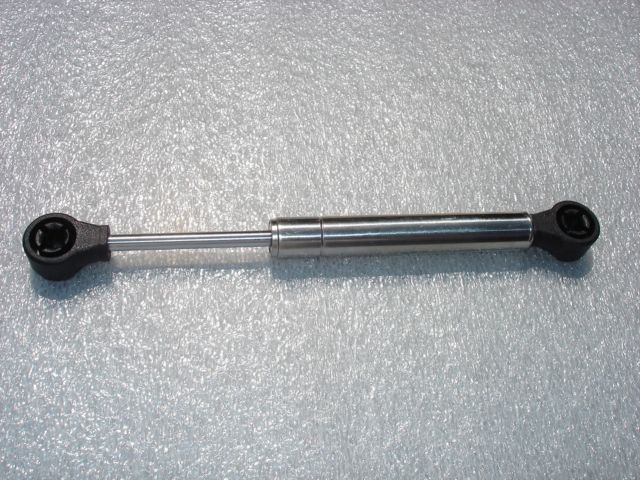

two s.s. 90lb gas lifts and a s.s. slam latch would be the ticket.
I just did the large, almost full beam, bench/hatch on my skiff rebuild with a single 90lb and a slam latch. Works great.


Re: Engine hatch hinge suggestions
...oh, and s.s. piano hinge full width on either side of the cabin door, if that'd work for how your hatch is oriented.
Re: Engine hatch hinge suggestions
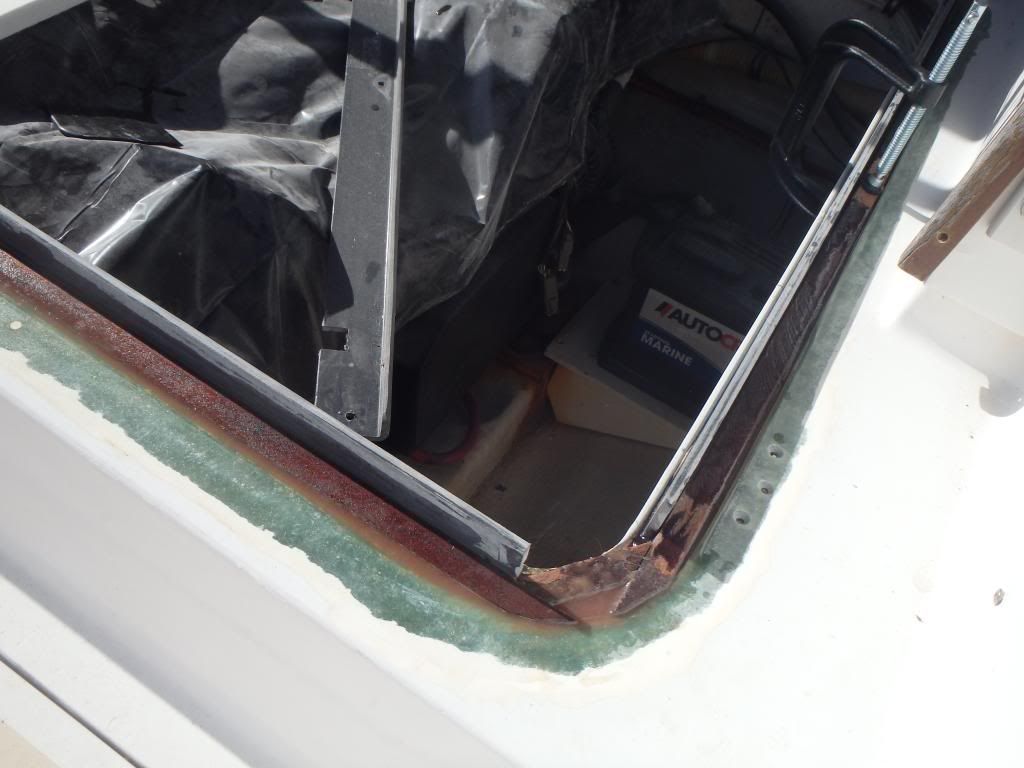
Gutters filled in.
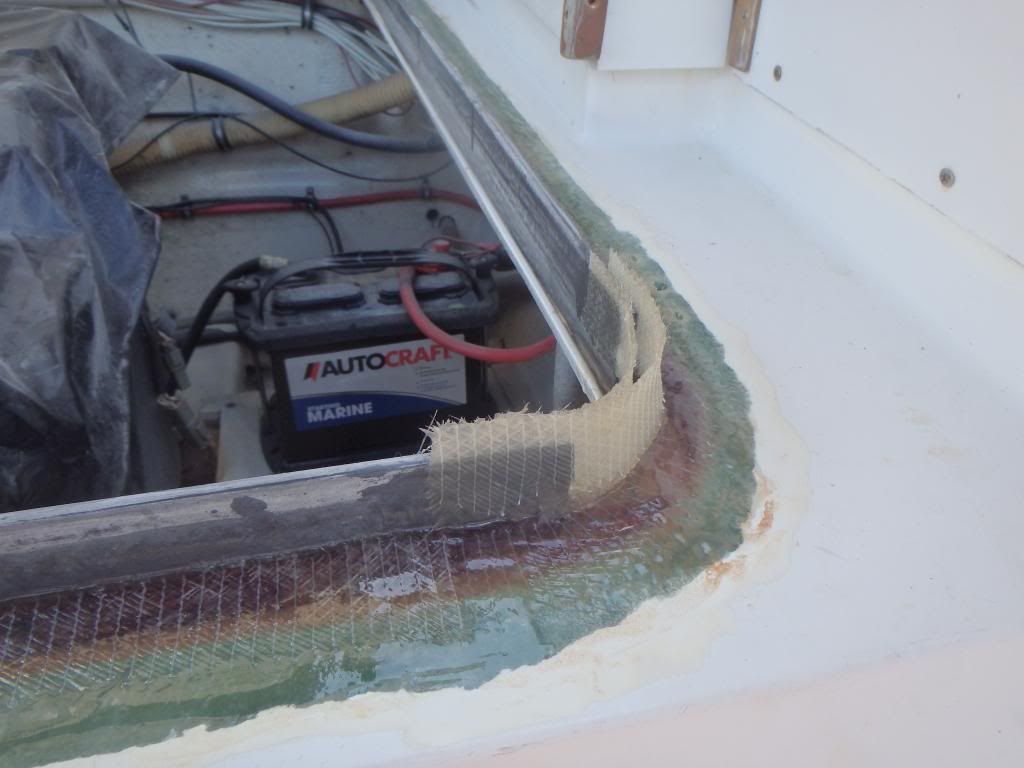
Bi axle added in corners to fill the gap.
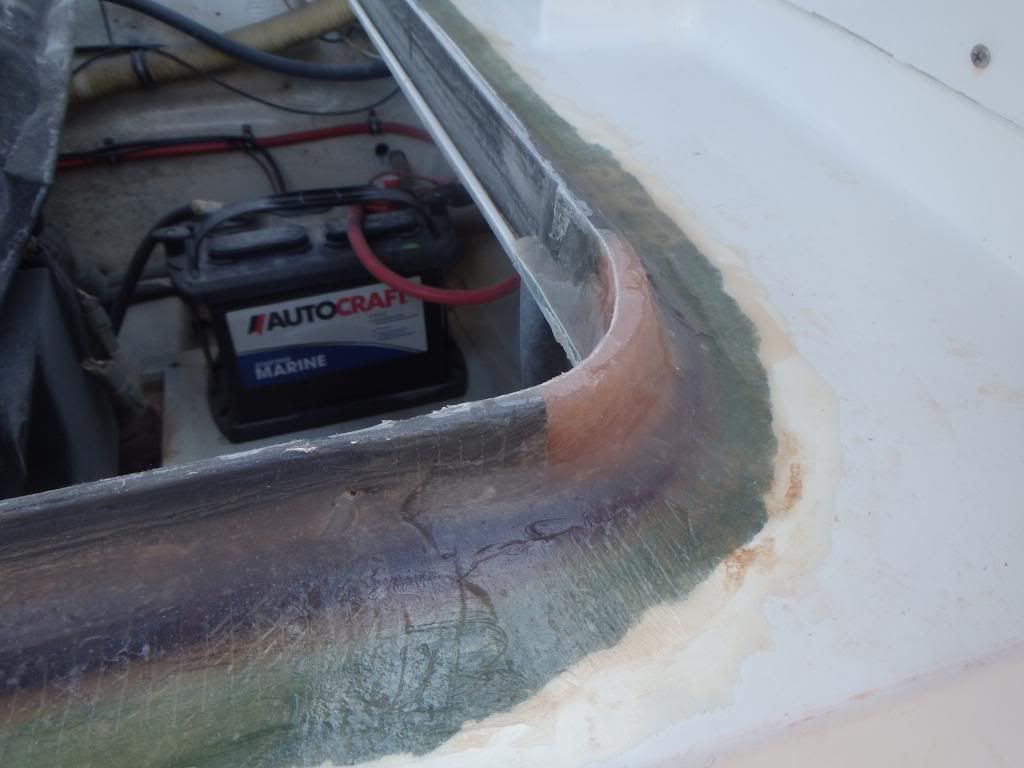
Filled and evened out corner.
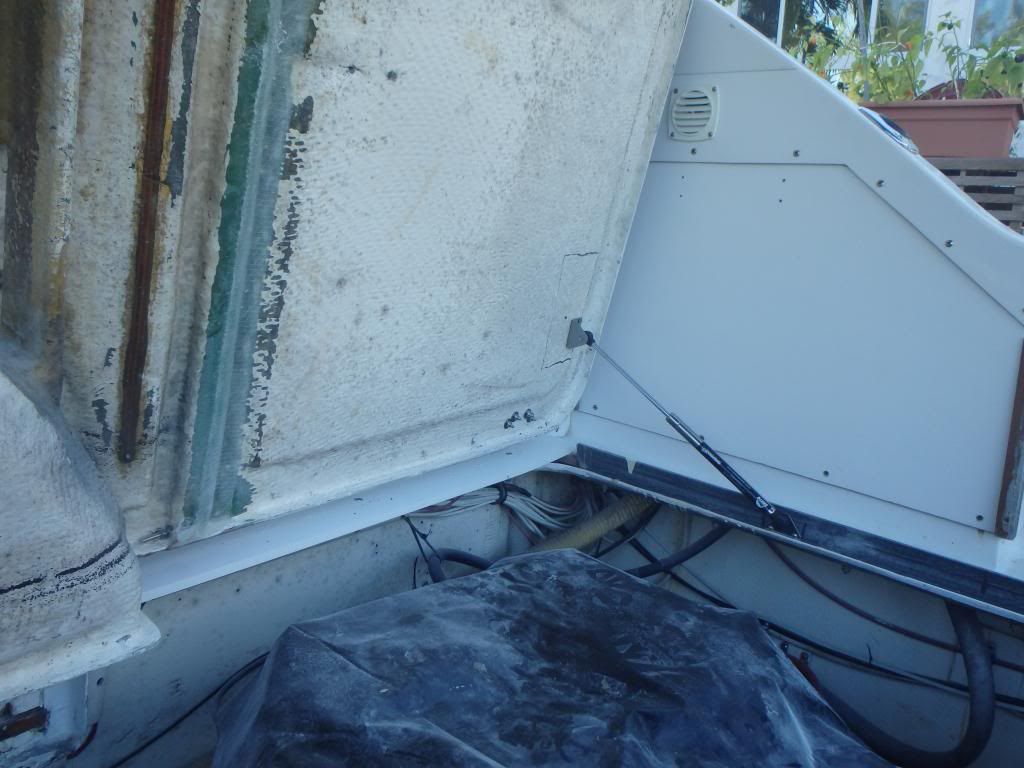
Functioning gas strut.
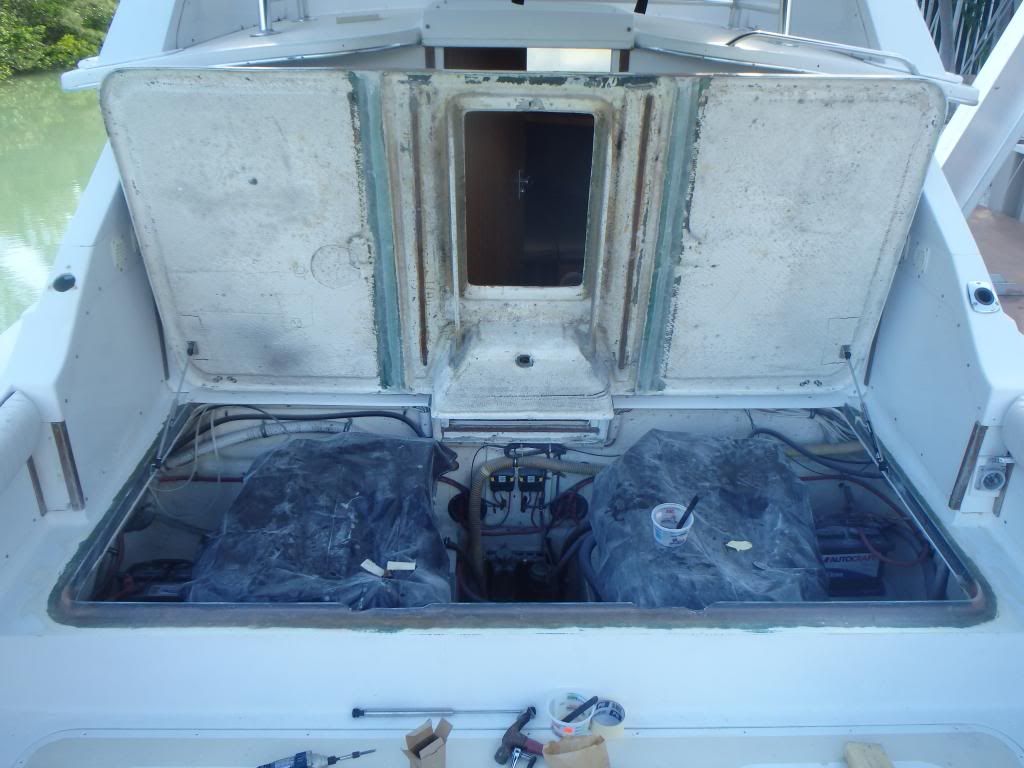
Open hatch overall.
I just go from the gunwhale and step up to the bridge, no ladder, never used it. The big old bench seat is the grab/hang on point.
The way the struts worked out is great. It takes at least 30 pounds of lift to open the hatch with these 90 pounders. Once it is around half way open they start to take over and hold it open very secure. No latch needed to keep it closed.
I used hinges with the removable pin. It is really coming together!
-
Preston Burrows
- Senior Member
- Posts: 271
- Joined: Jun 29th, '06, 13:30
- Location: Nassau,Bahamas
- Contact:
-
Captn Bruce
- Posts: 20
- Joined: Jun 29th, '06, 23:18
- Location: Woodland Hills, CA
Re: Engine hatch hinge suggestions
Kevin,
Looks like it is coming together, keep us posted.
Bruce
Looks like it is coming together, keep us posted.
Bruce
Bruce D.
28 Bertram "Noelle Mae"
28 Bertram "Noelle Mae"
Re: Engine hatch hinge suggestions
Looks good Kevin… Lemme know if you need some help with the finish.
Also, we're going to be getting into crawfish boilin season soon… Gonna put on the pressure to get the Mehagan clan up north to KL land for some fun.
Also, we're going to be getting into crawfish boilin season soon… Gonna put on the pressure to get the Mehagan clan up north to KL land for some fun.
I don't know what the world may want,
But a good stiff drink it surely dont,
Think I'll go and fix myself...a tall one.
But a good stiff drink it surely dont,
Think I'll go and fix myself...a tall one.
Re: Engine hatch hinge suggestions
We like the boils so count us in.
Picked up second set of hinges yesterday. Going to install the stuff tonight and then take it all apart for final filling and fairing followed by primer.
I plan on rolling and tipping the shiny part of the hatch edges. Let it dry and then mask the line so the inner non skid can be put down.
I just am not too familiar with the best method of properly distributing the sand.
Am I on the right track or should I bust out my spray gun? I hope you say no because I will have to do some areas in the cockpit and hope roll and tip will work so I don't have to mask/cover the whole damn boat.
Also when painting with awlgrip, am I correct in thinking scuff up existing awlgrip with 320, clean with alcohol and put down paint or do I need to prime that too? The 545 primer is only for "green glass" that has not already been painted with awlgrip, right?
-
Preston Burrows
- Senior Member
- Posts: 271
- Joined: Jun 29th, '06, 13:30
- Location: Nassau,Bahamas
- Contact:
Re: Engine hatch hinge suggestions
Kevin:
Do you have backer plates behind the new hatch hinges, or have you just screwed them on to the bulkhead?
The cabin's hull liner denies access to the back of the bulkhead at the hinge's height unless you cut access holes, correct?
I've found getting a uniform application of the non skid particles is literally hit and miss.
I've applied the particles by way of a large plastic 'salt shaker' when tipping /rolling with Awlgrip, as well as by hand...... and have even resorted to sprinkling it on by way of a spoon as you would parmesan cheese on spaghetti bolognese! Or maybe I should say sour and pepper over a bowl of boiled fish, whatever.
In your case I would apply a light coat of the non skid with your first coat of Awlgrip, trying to match the density of the rest of the hatches non skid - then go again with the non skid particles in your further coats of Awlgrip if your first application was off /needs to be more uniform non skid particle coverage looks wise.
As to the application of the new Awlgrip paint itself from my experience yes you can apply as you intend however unless you repaint the entire hatch it's likely you will be left with the outline of the hatches old smooth perimeter band regardless of what you do simply because the Awlgrip paint applies so 'thin' - sanding/prepping the hatch areas down to 'feather edges' closest to the centre hatches perimeter band may alleviate this but it's unlikely to entirely hide the old centre hatches perimeter band.
Buju will probably have the 'bees knees' how to answer for you!
If you are closing off the centre hatch after all now maybe it would be best to add a filler piece to the single piece hatch by cutting the entire hatch in half so as to add a filler section and thus extend it flush to the edge of the cockpit step down and repaint and non skid the entire hatch over again so you have a more uniform finish look?
Preston Burrows
1976 B28 FBC
BERF1398M76J-285
1976 B28 FBC
BERF1398M76J-285
Re: Engine hatch hinge suggestions
I dunno about bees knees, but I'll do what I can…
For the non skid aggregate application. By far, the best way to get even distribution of the aggregate is to mix it with the paint and spray it through a gravity fed gun. I have done it with great success with a siphon gun as well.
But, if your not wanting to spray it then your two options are what I call the Toby Keith method (red solo cup w/ holes - salt shaker)
…and the other is to put it into the coating and roll it. Of those two, the solo cup will give you the most even distribution.
When the grit is added to the poly and rolled, you have very little to no control on how evenly is distributed and you'll have very heavy areas, and very light areas… no bueno.
I always prime before laying on new awlgrip… But, if your existing awlgrip is in good condition, then you should be fine to to sand, solvent clean, and apply. You'll definitely need to epoxy prime your new glass/filler work prior to awlgrip.
I'd do it like this:
Once your all sanded/faired out and cleaned up, apply epoxy primer (with reducer for brushing) to all bare glass and filler areas.
Sand your primer with 320 to get rid of any brush marks, then solvent clean.
Mix up your awlgrip with the brushing converter, add the brushing reducer, and roll/tip all of your glossy areas.
Mask off your gloss borders
Mix up more 'grip. Apply a good wet coat to your non-skid area. Employ the Toby Keith method as quickly as possible to get the aggregate to bite into the polyurethane.
Remove your masking.
Mix up your final batch of awlgrip. Apply a final coat over ALL areas… two coats over all areas is better, but one will do.
If you don't do an additional coat over the sprinkled grit, it will be exposed and wear very, very poorly. It'll also hold dirt and generally make you regret not doing the final coat every time you look at it.
I don't know what the world may want,
But a good stiff drink it surely dont,
Think I'll go and fix myself...a tall one.
But a good stiff drink it surely dont,
Think I'll go and fix myself...a tall one.
Re: Engine hatch hinge suggestions
No backer plates, I used screws and it seems to be ok. I could use bolts because the hinge point is just above the cabin liner so that will be my back up plan.
Gravity fed gun, got it. Well, with the hatch sitting in the yard I can do the nonskid with out masking the whole boat so that is what I shall do. Roll and tip for the rest of the cockpit. Thanks for all the great tips on application. It makes sense!
When I get done with this I think we need to get together with John and Bill and do some fishing. Less talking and more doing!
Re: Engine hatch hinge suggestions
So then no Toby Keith? Should maybe still listen to the song while your spraying it…
Fishing, whats that?
Fishing, whats that?
I don't know what the world may want,
But a good stiff drink it surely dont,
Think I'll go and fix myself...a tall one.
But a good stiff drink it surely dont,
Think I'll go and fix myself...a tall one.
- Pete Fallon
- Senior Member
- Posts: 1318
- Joined: Jun 29th, '06, 23:10
- Location: Stuart Fl. and Salem, Ma.
Re: Engine hatch hinge suggestions
Kevin,
I will not be coming down to Marathon on Friday and Saturday, Mark has a change of plans. I'll let you know when I am coming back down. Hatch looks good in the pictures.
Pete Fallon
I will not be coming down to Marathon on Friday and Saturday, Mark has a change of plans. I'll let you know when I am coming back down. Hatch looks good in the pictures.
Pete Fallon
1961 Express Vizcaya Hull 186 12-13-61
- CaptPatrick
- Founder/Admin
- Posts: 4161
- Joined: Jun 7th, '06, 14:25
- Location: 834 Scott Dr., LLANO, TX 78643 - 325.248.0809 bertram31@bertram31.com
Re: Engine hatch hinge suggestions
Kevin,
That's the best looking B28 engine hatch I've ever seen...
That's the best looking B28 engine hatch I've ever seen...
Br,
Patrick
Molon labe
Patrick
Molon labe
Re: Engine hatch hinge suggestions
That right there is a pretty damn solid compliment. And I'm agreeing, nice work Kevin...CaptPatrick wrote:Kevin,
That's the best looking B28 engine hatch I've ever seen...
I don't know what the world may want,
But a good stiff drink it surely dont,
Think I'll go and fix myself...a tall one.
But a good stiff drink it surely dont,
Think I'll go and fix myself...a tall one.
Re: Engine hatch hinge suggestions
Thanks gents. I am pleased with it. I little bit of junk in the paint from working outside.........near trees on a windy day. The track system where the gutters used to be won't be 320 grit as I have run out of patience. The visible parts will be smoov with the hatch closed. With he hatch open you will see rough finish, but that gets beat up all the time from working in the engine space.
As you can see I made a last minute decision to leave the access hatch in the middle.
I hope to mount it all up this weekend and get some finished photos.
This was another project that I thought would not take so much time, effort and money. Fortunately, you all kept me going and gave me some great ideas and tips on how to get it done. It was a serious undertaking and it was the first time I did "cosmetic" plastic surgery without adult supervision.
The sandbox is a wonderful place.
-
Captn Bruce
- Posts: 20
- Joined: Jun 29th, '06, 23:18
- Location: Woodland Hills, CA
Re: Engine hatch hinge suggestions
Kevin,
That looks really great! Can't wait to see the installed version.
Bruce D.
28 Bertram 'Noelle Mae"
That looks really great! Can't wait to see the installed version.
Bruce D.
28 Bertram 'Noelle Mae"
Bruce D.
28 Bertram "Noelle Mae"
28 Bertram "Noelle Mae"
Re: Engine hatch hinge suggestions
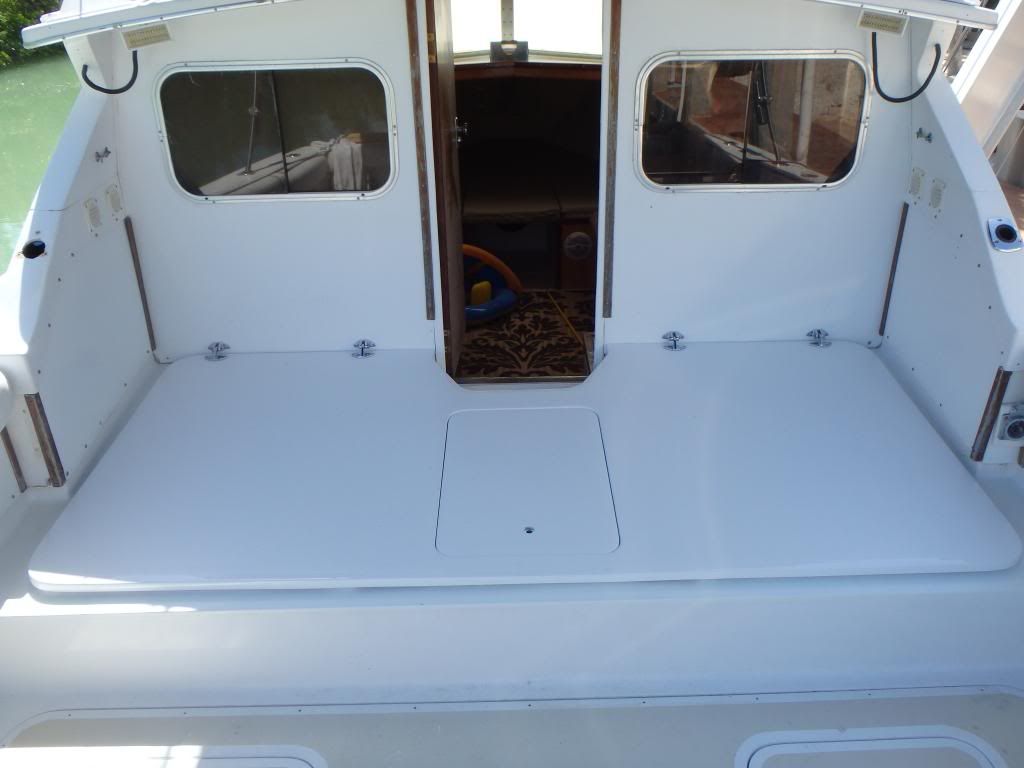
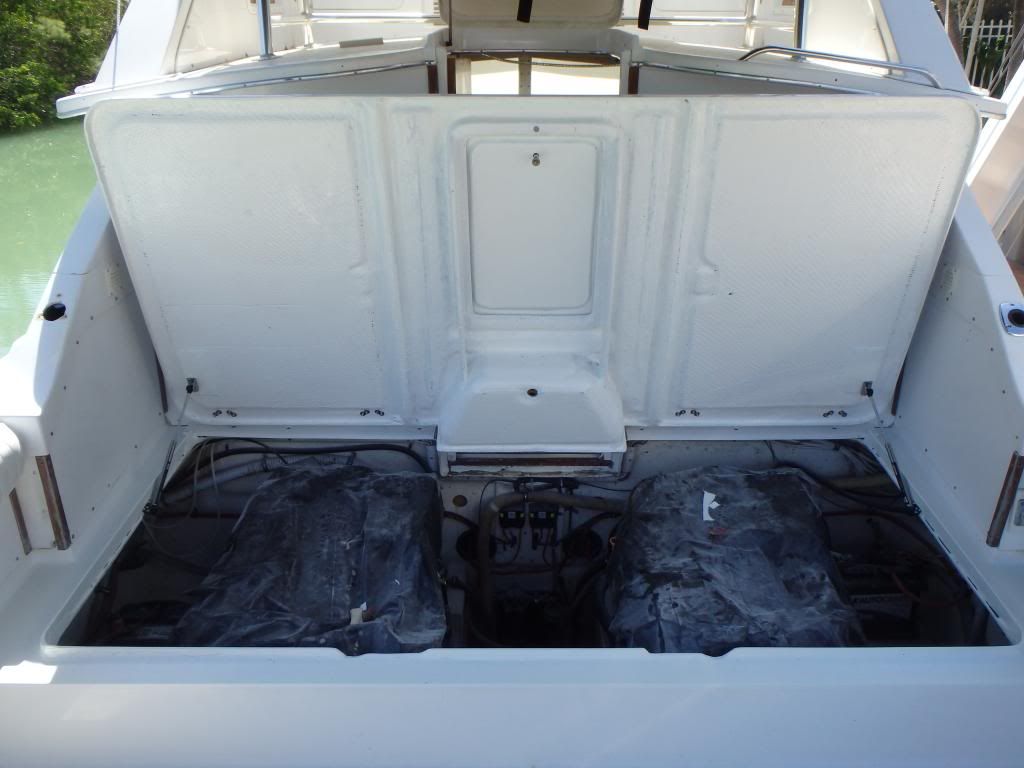
I did not paint the new elevated portion of the deck where the hatch rests yet, I only put primer down but it is hard to tell in the photo. I have some other spots around the boat to repair so I am going to get all the priming and painting done in steps so as to not waist product.
Thanks again for all the suggestions.. It made this project a lot easier. I know it is not a show boat type finish but I think it will serve me well.
-
Captn Bruce
- Posts: 20
- Joined: Jun 29th, '06, 23:18
- Location: Woodland Hills, CA
Re: Engine hatch hinge suggestions
Kevin,
Looks great installed. What are your plans for sealing on the main bulkhead side? I can't tell from the images, do you have a gutter on the backside or is it flush? Your making great progress.
Bruce D.
Looks great installed. What are your plans for sealing on the main bulkhead side? I can't tell from the images, do you have a gutter on the backside or is it flush? Your making great progress.
Bruce D.
Bruce D.
28 Bertram "Noelle Mae"
28 Bertram "Noelle Mae"
- Pete Fallon
- Senior Member
- Posts: 1318
- Joined: Jun 29th, '06, 23:10
- Location: Stuart Fl. and Salem, Ma.
Re: Engine hatch hinge suggestions
Kevin,
It's amazing how a little Yankee ingenuity can get things looking great, actually it is better than what came for the factory. Looks great.
Looks like I might be coming to the Keys again either the first of next week or toward the end of that week, I'll let you know.
Pete Fallon
It's amazing how a little Yankee ingenuity can get things looking great, actually it is better than what came for the factory. Looks great.
Looks like I might be coming to the Keys again either the first of next week or toward the end of that week, I'll let you know.
Pete Fallon
1961 Express Vizcaya Hull 186 12-13-61
Re: Engine hatch hinge suggestions
Not wanting to necessarily bring up an old thread, but i've only just found this Kevin - it looks amazing!
I'm currently repowering with 330hp Vortec motors, and center risers are replacing the old logs. I'm keen to add a bit of height to the hatches, since they currently touch the flame arrestor and risers, so i know i'm going to have a problem. I'm also keen to put a layer of sound insulation on the underside, so i think adding a few inches of height overall would be wise. Would also provide some more versatile options for mounting other hardware.
My boat is still in the water (nowhere to put it on land), but doing something like you've done with a 1-piece hatch would solve MANY problems (the current hatch setup is horrible, especially with no hinges).
I think making a single piece like this would be far less work overall than increasing the height of all three hatches and trying to get it all to still work as designed.
Definitely given me the desire to take this approach. Very nice job indeed!
Re: Engine hatch hinge suggestions
Also Kevin... having gone through this process...
If you were to do this job again, would you still use the original hatches and bond them together etc as you did, or would you suggest simply making a new 1-piece hatch?
I can think of pro / con on both options.
Cheers,
Rob
If you were to do this job again, would you still use the original hatches and bond them together etc as you did, or would you suggest simply making a new 1-piece hatch?
I can think of pro / con on both options.
Cheers,
Rob
Re: Engine hatch hinge suggestions
The single hatch option has one important drawback.
You cannot work onto the engines from the cabin side, especially when two people have to work together.
Also, you cannot go into the cabin to get a tool or to the flybridge to start the engines or monitor the gauges while the hatch is open.
Otherwise it should be a better option when it comes down to waterproofness.
1973 B28 FBC/2007 4LHA STP's - "Phantom Duck" - Hull "BER 00794 1172"
Re: Engine hatch hinge suggestions
I think I would use the existing hatches again. I would be tempted to make my own with foam core but you need a big flat surface for lay up. Existing hatches are heavier than modern foam core so that is a draw back.
Yannis brings some points that are not a factor for me. I can still get on bridge as my seat design allows it from either side. No ladder. I have never worked on engine from cabin. The whole hatch can be unpinned and removed if I want it out of way. I have never had to remove it so far. I don't have lower helm so no gauges to monitor. Hook up a laptop to engine if I need engine data.
I'm not sure you need sound proofing with gassers. I don't have it and all I hear is wind from up top unless I lean back and really listen. Would make it nicer for the folks on deck though.
Side note, I still have center hatch so not true one piece hatch. Just use some hose for water to drain and only bilge gets wet. Engines stay dry.
Re: Engine hatch hinge suggestions
I tend to use the lower part of the cockpit as my tool chest and stand on the manifolds (though that will stop with the change to center risers). So not too worried about getting into the cabin.Yannis wrote:The single hatch option has one important drawback.
You cannot work onto the engines from the cabin side, especially when two people have to work together.
Also, you cannot go into the cabin to get a tool or to the flybridge to start the engines or monitor the gauges while the hatch is open.
Otherwise it should be a better option when it comes down to waterproofness.
I struggle with the current 3-piece setup anyway. I have no hinges, so have to pull them out and put them in the main cockpit area anyway.
It doesn't bother me enough to change them for no reason, but since i have to increase the height anyway?
I've considered putting a basic ignition control into the engine bay before now - perhaps that solves both problems.
It's too far away to crank / see what's going on at the same time anyway (lower helm doesn't work and is being removed).
Would be an easy addition and improve control over what i have now too.
Re: Engine hatch hinge suggestions
Interesting - thanks Kevin. I'll have a ponder about whether to make a new one or not. I would extend the hatch to the "step", so can't figure out if starting again would prove useful.Kevin wrote:I think I would use the existing hatches again. I would be tempted to make my own with foam core but you need a big flat surface for lay up. Existing hatches are heavier than modern foam core so that is a draw back.
Yannis brings some points that are not a factor for me. I can still get on bridge as my seat design allows it from either side. No ladder. I have never worked on engine from cabin. The whole hatch can be unpinned and removed if I want it out of way. I have never had to remove it so far. I don't have lower helm so no gauges to monitor. Hook up a laptop to engine if I need engine data.
I'm not sure you need sound proofing with gassers. I don't have it and all I hear is wind from up top unless I lean back and really listen. Would make it nicer for the folks on deck though.
Side note, I still have center hatch so not true one piece hatch. Just use some hose for water to drain and only bilge gets wet. Engines stay dry.
The engine noise isn't bad, and doesn't bother me on the flybridge either - just thinking of my guests. They still produce quite a bit of noise when cruising. I figure for an extra inch of space (or no extra height if i cut around the tallest points), it's worth doing.
I'm not too experienced with fibreglass, so am taking that into consideration too.
Could perhaps start new using Coosaboard to cut / form my structure and glass over the top. It's one large flat piece, not including the step down, after all.
My existing hatches also flex under foot, so probably need some firming up too.
Do you have any more pics you are willing to share Kevin?? Am keen to see as much detail as possible.
Rob
Re: Engine hatch hinge suggestions
Rob,
I don't have any more pictures. I don't think I have posted a picture since Photobucket. Might be time for me to re-train.
If you have not done any patch work or repairs with fiberglass I would not recommend starting with hatch cover project. It's a significant project. Structurally and aesthetically.
If you PM me with you email I could send what ever pics you want.
Re: Engine hatch hinge suggestions
Kevin wrote:Rob,
I don't have any more pictures. I don't think I have posted a picture since Photobucket. Might be time for me to re-train.
If you have not done any patch work or repairs with fiberglass I would not recommend starting with hatch cover project. It's a significant project. Structurally and aesthetically.
If you PM me with you email I could send what ever pics you want.
Hi Kevin,
Thanks mate - i'll PM you my email address.
I have worked with fibreglass before, just not alot.
I'm better with timber... epoxy'd (or painted) marine ply would be an easier achievement with my skills, but i'm not sure about longevity? Make one large flat panel, add the step...
Perhaps painted coosaboard would be the way to go...
Rob
Re: Engine hatch hinge suggestions
Rob,
If you have gas engines, or if your engines are not in the way, you may wish to consider making two separate engine boxes (like in the 31) and eliminate the step in your way to the cabin....big improvement not having to go up before you go down again.
And still make everything removable for access to the engine room.
1973 B28 FBC/2007 4LHA STP's - "Phantom Duck" - Hull "BER 00794 1172"
Re: Engine hatch hinge suggestions
I had thought about this, however the space between both manifolds isn't huge - by the time an air-gap was added as well as fibreglass etc, i'd say there's only about 8-10" of space available (at a guess without measuring) - not alot to walk through. Since the inboard manifold / riser sits under the centre hatch, not the outer hatches, it doesn't gain as much space as it could perceptually.Yannis wrote:Rob,
If you have gas engines, or if your engines are not in the way, you may wish to consider making two separate engine boxes (like in the 31) and eliminate the step in your way to the cabin....big improvement not having to go up before you go down again.
And still make everything removable for access to the engine room.
It would also interfere with the removable seating i have added to the cockpit which runs right up to the "step". Would also be a more substantial undertaking than a new 1-piece lid.
All a compromise one way or another i suppose.
Rob
Re: Engine hatch hinge suggestions
Yeah, I also wish our boats were a couple of feet wider! especially in the middle section.
1973 B28 FBC/2007 4LHA STP's - "Phantom Duck" - Hull "BER 00794 1172"
Who is online
Users browsing this forum: No registered users and 21 guests
