mid cabin floor design
Moderators: CaptPatrick, mike ohlstein, Bruce

mid cabin floor design
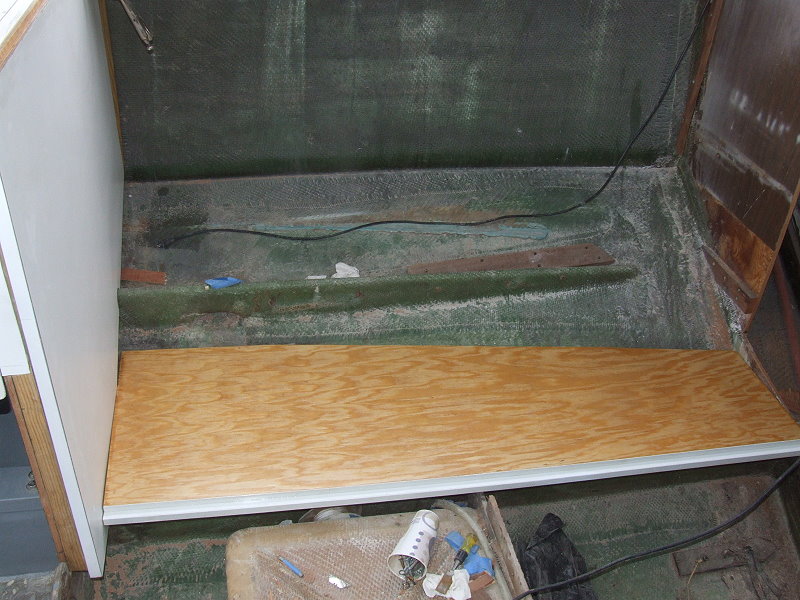
Hi guys, been trying to find on the site some really good pics and design of floor "profile" and design especially were the hull comes up and the floor tapers to the shape of the hull. it looks like on the dinette/port side Bertram used some thickened epoxy to create a sort of ledger for the edge of floor, but on the starb. side mine was questionable at best. Capt. Pat or someone who's been there before any ideas? All of my mid cabin interior is stripped upon building new front of engine bulkheads, so now is the time for a new cabin floor as well. Slow process with a couple of hours a day after work! Thanks.
-
CaptPatrick

- Founder/Admin
- Posts: 4161
- Joined: Jun 7th, '06, 14:25
- Location: 834 Scott Dr., LLANO, TX 78643 - 325.248.0809 bertram31@bertram31.com
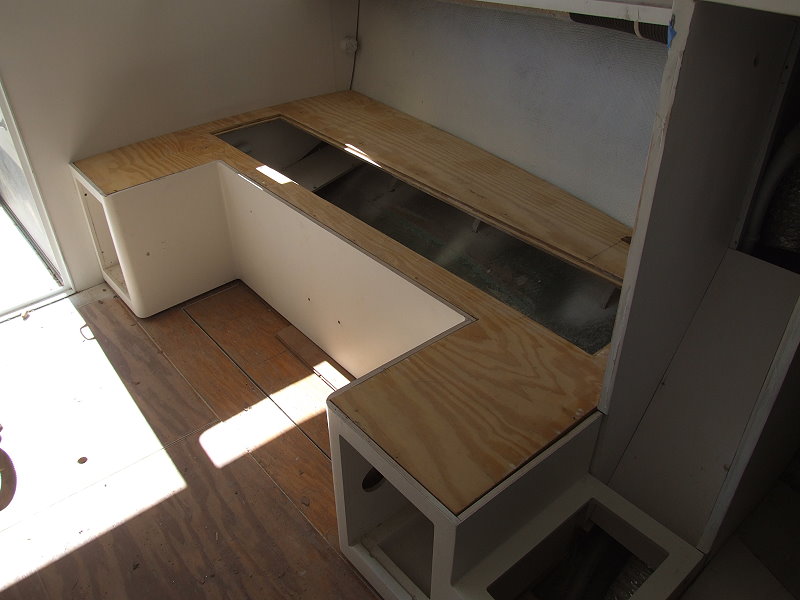
Layout your subdeck to sit on top of the inboard stringers. That will get your deck as low as it'll go.
Carry the deck outboard as far as it will go, with the outboard edges scarfed to compensate with the dead rise. The deck will taper from wide aft to more narrow forward. This will give you the most width possible.
The subdeck should be at least 1/2", but not over 3/4" thick.
Draw a center line on the subdeck from fore to aft. Measure the distance from the center line to the outboard edge of the subdeck at the furthermost point forward, (both sides). From the furthermost aft point of the center line, make the same measurement. Draw a line on both sides connecting those four points, (parallel to the center line).
Those measurements and lines will dictate the maximum deck within any dead rise area.
Configure your cabinetry to extend from outboard and overlap the outboard lines.
Thanks Capt. Pat, exactly what I was looking for. Is that support on the edge of ply subfloor a McMaster fiberglass product? So I take it the mahogany stringers that go fore and aft from bulkhead to bulkhead are eliminated. I really like this interior layout utilizing lower helm(west coast weather). http://bertram31.com/listings/slainte.htm


-
CaptPatrick
- Founder/Admin
- Posts: 4161
- Joined: Jun 7th, '06, 14:25
- Location: 834 Scott Dr., LLANO, TX 78643 - 325.248.0809 bertram31@bertram31.com

Marlin do you have any progress pics of your Coosa setup, and did you have to epoxy both sides of floor or just top for finished look? Also I noticed on the front of engine bulkheads, Bertram did not use a one piece bulkhead, it is more like three pieces were the centerbottom piece is floor support, then the bulkheads rest on top of this center piece. Just copy this design or better to use a one piece like rear of engine bulkhead? Sorry to bore with these questions. Thanks for all the help and advice.
So I am still questioning the economics of Coosa VS Okume marine ply.
Thanks for everyone's input on the subject of bulkhead materials. Coosa has some great attributes, but let's face it, it is very expensive. If I have to buy a 5x12' solid piece to span across front of engines for the bulkhead, the piece alone is over $650.00 shipped. If I have to cover it with an epoxy that adds to it. If I get a Okume 5x12' ply, the cost is roughly one third, but I have to 1708 both sides. I do need to decide soon to get rollin on this though. Anybody have any thoughts, just say it! Com'on mean team!
Do I have to run the span a solid piece here? Bertram as you see in pics used the two port/starb pieces, then one center piece not even touching the other outers.Why? To allow the hull to flex at these areas? Thanks guys.
[/img]
-
CaptPatrick
- Founder/Admin
- Posts: 4161
- Joined: Jun 7th, '06, 14:25
- Location: 834 Scott Dr., LLANO, TX 78643 - 325.248.0809 bertram31@bertram31.com
Nothing needs to be made from a single piece of factory material... large pieces, exceeding a standard 4'x8' dimension can be made by joining smaller pieces in most cases.
You'll be laminating over which ever material you use, either with fiberglass, plastic laminate, wood or what ever your design calls for.
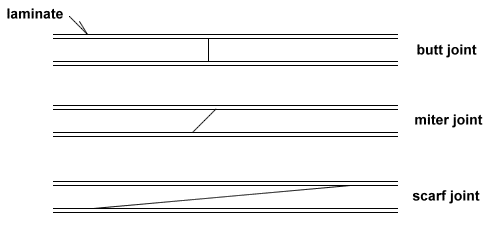
Joints between two smaller pieces, to make the large piece, can be butt, mitered, or scarf joints. Simple non-structural joints that aren't subjected to any stress can be butt jointed. A miter joint will have more surface area than a butt joint and be a bit stronger. A full scarf joint is the strongest, but not necessary for anything you'll be doing.
Here's a linear image progression of some of the bulkhead assembly that I did on Hancock's B31: http://bertram31.com/hancock/img/bulkhead/

You'll be laminating over which ever material you use, either with fiberglass, plastic laminate, wood or what ever your design calls for.
Joints between two smaller pieces, to make the large piece, can be butt, mitered, or scarf joints. Simple non-structural joints that aren't subjected to any stress can be butt jointed. A miter joint will have more surface area than a butt joint and be a bit stronger. A full scarf joint is the strongest, but not necessary for anything you'll be doing.
Here's a linear image progression of some of the bulkhead assembly that I did on Hancock's B31: http://bertram31.com/hancock/img/bulkhead/

When I replaced the bulkhead aft of the engines, I used 4x8 marine ply and made it up--its not one piece.
I like the idea of coosa, but the bulkhead in my boat was ply that was not epoxied or glassed, and just had the mat tabbing around the edges to hold it in. It lasted 40 years. The bulkhead I did was built per Cap. Patrick's instructions--epoxied, glassed, etc., and it should last longer than the original bulkhead.
If the 12' sheet of ply is readily available and not that much more than making the bulkhead up out of 4x8 sheets, I'd go with that and save myself the step of joining the pieces together.
In the end though, just do whatever Capt. Patrick says and you'll have the right answer.

-
CaptPatrick
- Founder/Admin
- Posts: 4161
- Joined: Jun 7th, '06, 14:25
- Location: 834 Scott Dr., LLANO, TX 78643 - 325.248.0809 bertram31@bertram31.com

O.K. Capt Pat, I guess I was under the wrong assumption you did not need to laminate over the Bluewater26 but it really is just a core material like plywood. I am torn between the two with the Coosa not being effected by humidity and things, but ply being a LOT cheaper! Oh well, it's good to know I can't go wrong with either if I prep correctly, thank you.
I've been studying your work on Hancock's boat and just taking it all in, noticed you applied formica on all visual areas. I gather that's to save fairing time, epoxy bonded to the ply? My local hardware store cannot get thicker formica, can you tell me the company you use? That edging you used looks like a thick colored material, what did you use for that?
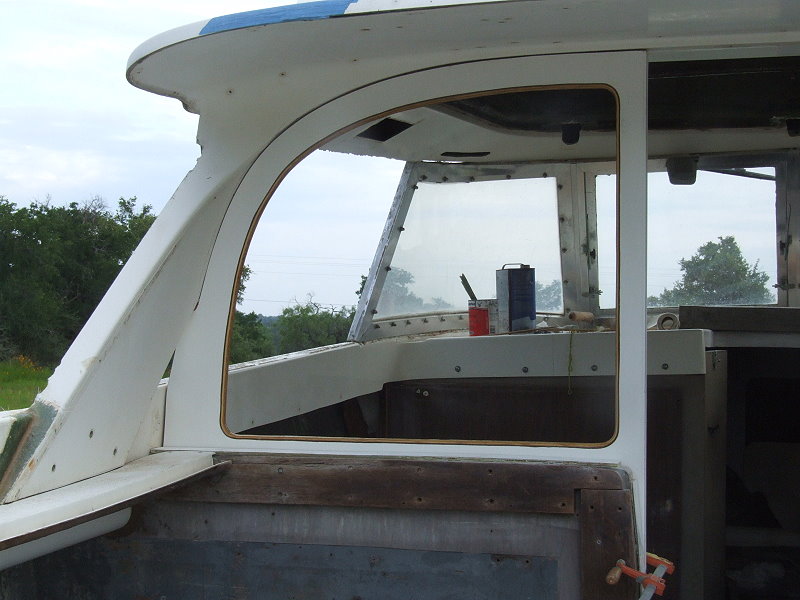
I know now's the time to go windows and door or remain sportfisherman style, I do love that design you made of windows Capt!
By the way, the inboard engine beds I now do not wonder why made engines move inboard to the point exhaust manifolds interfered with boxes. The damn things had one timber on top of another with just the thin wood skin sandwiched between! Here's a picture of it.Thanks John for your input as well.

[/img]
 [/img]
I've been studying your work on Hancock's boat and just taking it all in, noticed you applied formica on all visual areas. I gather that's to save fairing time, epoxy bonded to the ply? My local hardware store cannot get thicker formica, can you tell me the company you use? That edging you used looks like a thick colored material, what did you use for that?
I know now's the time to go windows and door or remain sportfisherman style, I do love that design you made of windows Capt!
By the way, the inboard engine beds I now do not wonder why made engines move inboard to the point exhaust manifolds interfered with boxes. The damn things had one timber on top of another with just the thin wood skin sandwiched between! Here's a picture of it.Thanks John for your input as well.
[/img]
[/img]Hi Matt, it's good to know someone thinks I'm goin too fast, it feels like I'm dragging along! I think there is a lot of anticipation, and good thing we're fishermen with the patiance already built into us! Trying to get this and that done after a full work day every day is just not cool.
I wish I was putting in Yanmars, but oh well, I like 454's for a while. This teardown stuff is kind of like climbing up a tree, you have to retain the knowledge/responsability of how you got up so you can get down in the same order. I think I've gone through two rolls of white vinyl tape marking wire orientations and locations with a perm. marker.
But it's all in the name of FUN, right?!!
-
CaptPatrick
- Founder/Admin
- Posts: 4161
- Joined: Jun 7th, '06, 14:25
- Location: 834 Scott Dr., LLANO, TX 78643 - 325.248.0809 bertram31@bertram31.com
Normally that's true... Two reasons: Pressure treated lumber is normally too high in moisture content and the chemicals used are not very compatible with epoxy, especially uncut external mill surfaces.resin or epoxy will not bond to PT wood correct?
The vertical pieces that I used were old and well seasoned in the central Texas sun and low humidity, moisture content was probably less than 15%. They're attached to the engine bulkhead by screws. The fiberglass plate covering was epoxied on, but the bond is also reinforced by the plywood of the engine bulkhead and the new bulkhead. The lower section, engine box down, has 1/4" plate on top of that forms a lip to keep the free edge of the box from flexing out when closed. Those plates were both glued and screwed, so there will be no future bond problem with the PT wood in this case.
O.K., so I thought I was going to simply remove this epoxy on the stringers were engine beds were sandwiched, but it is extremely hard and tuff stuff to remove from stringer without taking fiberglass off at the same time. Since it is on there so tenaciously and it has a flat face for sistering new beds onto, leave it?

[/img]
[/img]
-
CaptPatrick
- Founder/Admin
- Posts: 4161
- Joined: Jun 7th, '06, 14:25
- Location: 834 Scott Dr., LLANO, TX 78643 - 325.248.0809 bertram31@bertram31.com
Thanks Capt. Pat, had a feeling you'd say that! Good tip on wider chisel, I was using a 1/2". Also, tonight my wife and I were talking about enclosing like the fbc bulkhead as you had done (my vote), but got outvoted, she likes it open. I'll have to get a good quality/designed canvas with windows after all this is done I guess.
-
In Memory Walter K

- Senior Member
- Posts: 2912
- Joined: Jun 30th, '06, 21:25
- Location: East Hampton LI, NY
- Contact:
I have the Sportsfisherman and had a 3 piece stern canvas that had eisenglass windows in the center of each side. When I had them redone the canvas guy forgot to put in the windows and said he'd come back to put them in. After chasing him for half a season, we realized we liked it without the windows for several reasons so we left them that way. 1. When we are out, they are always rolled up against the bridge top. Without the eisenglass it rolls up easier and tighter. 2. Our slip has the boat stern end in. At night, if staying on the boat, we put down the canvas. Much more privacy without stern eisenglass. 3. Given our past history, the canvas lasts longer and looks better without it. We annually put them in the Washing machine a side at a time and they look brand new. 4.Especially because the Sportsfisherman has no locked stern door, we saw no need for anyone to be able to see what we stored or had in the dinette area (rods, instruments, TV, liquor, etc). Zip and snap everything closed and it's clean, sealed, and no temptation to anyone walking around the docks.
For what it's worth. Walter
For what it's worth. Walter
Who is online
Users browsing this forum: Google [Bot] and 349 guests