Fuel Tank Design & Installation
Replacing an Old Fuel Tank? Here's a few tips to get the most out of your investment...
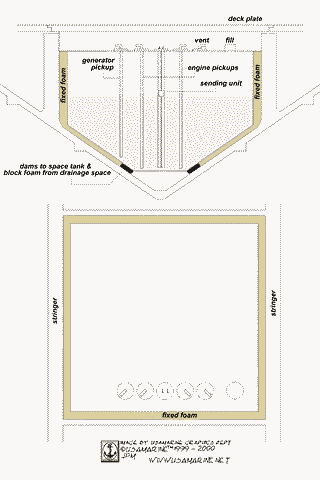
Using 2 Part Polyurethane Foam One of the most commonly used materials is aluminum. You'll have little problem finding either a prefabricated tank or having one custom fabricated locally. The main concern with aluminum is oxidation pitting which will lead eventually to leaking. This can be averted by applying a 16 - 18 mil exterior coating of coal tar epoxy, (about $50 per gallon), prior to installation. Don't consider coal tar epoxy as optional... It should be a "MUST DO STEP". ( Benjamin Moore Coal Tar Epoxy ) ( Also recommended: DEVTAR® 5A Contains No Coal Tar. A high performance, two-component, chemically-cured high-build epoxy coating for use in areas where coal tar epoxy is normally used. Uniquely formulated to provide corrosion protection for steel and masonry surfaces exposed to water immersion or chemical splash, spillage and fumes. Self-priming on most surfaces. Outperforms Coal Tar Epoxies in all respects, including improved recoatability, toxicity, film embrittlement and application properties. http://devoecoatings.com/msds.html For aluminum, you'll want to prep first with ALUMIPREP® 33 CLEANER & CONDITIONER ) Other materials include, (in order of desirability): Monel (no coating required, but still a good idea.) Do not bond or bed your new tank into the boat. To achieve a form fit, first wrap the tank tightly with polyethylene sheeting, (Visquene), center the tank where you want it, and cast in the voids with a 2 part, 4 lb density polyurethane foam. You'll want to support the tank above the hull surface with either strips of PVC foam, (Divinycell for example), or thick rubber. Allow enough space for the foam mix to easily fill in under the tank. An inch of thickness is fine. You'll also need to temporarily lock the tank down so that the foam wont float it up during the expansion phase. After the foam cures trim it back flush with the top of the tank. After all of your foam work is done, remove the tank and discard all of the poly sheeting. You now have a form fitted cavity and will have no problem with removing the tank at some future date if need be, and your tank should meet or exceed the life expectancy of the boat.
If you are having your tank custom built, be sure to use a fabricator that is qualified to build Marine Fuel Tanks. If you are currently powered with inboard gasoline engines, remember that you, (or the next owner), may want to convert to diesel power. While gas power doesn't require fuel return fittings, diesel does, and also they need to be 1/8" larger in diameter. Have these fittings installed now so that the tank will not have to be refitted later... The returns can simply be capped off for gasoline use. The same applies to fittings for a generator. On the pickup tubes: The engine tubes should drop to a lower level than the generator tube. This will act as a warning system since the generator will run out of fuel before the engines do. All pickup tube ends should be cut at a 45° angle and not extend all the way to the bottom of the tank. DO NOT use any sort of strainer devices inside of the tank. They'll just plug up eventually and you'll have to dismantle the system to clean or replace. Not fun... Have fun! Feel free to download and print this article, but please don't use it on a website without linking it to Bertram31.com. Capt Patrick McCrary Bertram31.com 834 Scott Dr., LLANO, TX 78643 Telephone 325.248.0809 Web site questions or comments to: bertram31@bertram31.com |

