

Bertram31.com
Bertram 31 Strut and Shaft Alley Installation
In addition to making the repairs on Richard's B31, I'll be making several upgrades in anticipation of his gas to diesel re-power next year. This will include upgrading the shafts to 1 1/2" Aquamet 22, High Tide's aftermarket struts, and fiberglass shaft alleys.
 The shaft and strut is jigged up, shaft coupled tightly to the transmission, and then the shaft jig is adjusted to get perfect alignment. The strut jig is adjusted to keep weight off of the shaft until the shaft turns freely. At that point both jigs are adjusted until the strut is in nearly perfect contact with the hull, the shaft again turns freely, and shows even pressure within the cutlass bearing. The shaft and strut is jigged up, shaft coupled tightly to the transmission, and then the shaft jig is adjusted to get perfect alignment. The strut jig is adjusted to keep weight off of the shaft until the shaft turns freely. At that point both jigs are adjusted until the strut is in nearly perfect contact with the hull, the shaft again turns freely, and shows even pressure within the cutlass bearing.
 At this point the strut base shows a slight gap at the inboard aft corner. Two thin pieces if fiberglass plate are edge tapered and fitted into the gap areas. The rest of the gap will be filled with thickened epoxy and the two shims will assure that the strut to hull contact will remain constant after the epoxy cures and shrinks. The shrinkage rate of the epoxy could be enough the change the alignment without these shims. The strut base is held securely in place with three course thread deck screws & fender washers. The machine bolt holes will be drilled after the epoxy pad has cured. At this point the strut base shows a slight gap at the inboard aft corner. Two thin pieces if fiberglass plate are edge tapered and fitted into the gap areas. The rest of the gap will be filled with thickened epoxy and the two shims will assure that the strut to hull contact will remain constant after the epoxy cures and shrinks. The shrinkage rate of the epoxy could be enough the change the alignment without these shims. The strut base is held securely in place with three course thread deck screws & fender washers. The machine bolt holes will be drilled after the epoxy pad has cured.
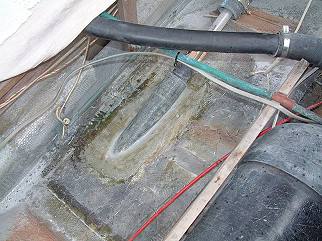
 After the epoxy has cured over night, the strut is dropped down to reveal the raw pad. You can see the two fiberglass shims and note that I used waxed paper to separate the strut base & epoxy. Rather than trying to inject epoxy into the void, I simply buttered up the strut base and hull with the epoxy, secured the strut to the hull & cleaned up the resulting squeeze out. Four of the 3/8" machine bolt holes were drilled prior to dropping the strut... After the epoxy has cured over night, the strut is dropped down to reveal the raw pad. You can see the two fiberglass shims and note that I used waxed paper to separate the strut base & epoxy. Rather than trying to inject epoxy into the void, I simply buttered up the strut base and hull with the epoxy, secured the strut to the hull & cleaned up the resulting squeeze out. Four of the 3/8" machine bolt holes were drilled prior to dropping the strut...
 With the shafts and struts now properly aligned, the shaft tubes are ready to install. The tubes and stuffing boxes were slid onto the shaft prior to alignment so that the shafts would not have to be removed later. The tubes are adjusted fore and aft, then using wedges at both ends, centered to the shaft. The holes in the hull have been ground back in the same manner as the strut damage repair With the shafts and struts now properly aligned, the shaft tubes are ready to install. The tubes and stuffing boxes were slid onto the shaft prior to alignment so that the shafts would not have to be removed later. The tubes are adjusted fore and aft, then using wedges at both ends, centered to the shaft. The holes in the hull have been ground back in the same manner as the strut damage repair

 At each end of the tube there is a gap between the hull and the tube. Again, to keep epoxy shrinkage from changing my alignment, I'm adding fiberglass shims. At each end of the tube there is a gap between the hull and the tube. Again, to keep epoxy shrinkage from changing my alignment, I'm adding fiberglass shims.

 The first layer of fiberglass is 12 oz. biaxle applied to the interior of the hull. It laps from inboard hull, over the tube, and back to the outboard hull. Where the glass bridges the hull opening, the glass is allowed to protrude slightly down into the hole to the exterior of the hull. The first layer of fiberglass is 12 oz. biaxle applied to the interior of the hull. It laps from inboard hull, over the tube, and back to the outboard hull. Where the glass bridges the hull opening, the glass is allowed to protrude slightly down into the hole to the exterior of the hull.
 After the initial layer of glass is cured, the depressions around the tube are faired in with thickened epoxy. Note that the alignment wedges will not be removed until the entire glassing of the tubes is complete. After the fairing has cured, the remaining fiberglass layup schedule will be one more course of 12 oz. biaxle, followed by a layer of 24 oz. fabmat onto the hull, but lapping up onto the tube. It should be noted that between each course of fiberglass or fairing mix, the surfaces are lightly ground and glass edges are feathered into the background. After the initial layer of glass is cured, the depressions around the tube are faired in with thickened epoxy. Note that the alignment wedges will not be removed until the entire glassing of the tubes is complete. After the fairing has cured, the remaining fiberglass layup schedule will be one more course of 12 oz. biaxle, followed by a layer of 24 oz. fabmat onto the hull, but lapping up onto the tube. It should be noted that between each course of fiberglass or fairing mix, the surfaces are lightly ground and glass edges are feathered into the background.
 The remaining layup schedule is cut, fitted and glasses in to complete the interior section. The remaining layup schedule is cut, fitted and glasses in to complete the interior section.
 Once the glass has been applied to the interior, the exterior can be addressed. Any protrusion of the first layer of glass is ground back flush and any remaining voids are filled with thickened epoxy. Once the glass has been applied to the interior, the exterior can be addressed. Any protrusion of the first layer of glass is ground back flush and any remaining voids are filled with thickened epoxy.
 After fairing and grinding are complete, two strips of 12 oz. biaxle are applied. The strips should lap slightly onto the tube and not extent over to the perimeter of the hull scarf. Once this has cured, all glass edges are feathered back and will be faired over with high density epoxy fairing compound. After fairing and grinding are complete, two strips of 12 oz. biaxle are applied. The strips should lap slightly onto the tube and not extent over to the perimeter of the hull scarf. Once this has cured, all glass edges are feathered back and will be faired over with high density epoxy fairing compound.
 This image clearly shows the two stages of the exterior layup and feathering of the glass. The final step will be the addition of two layers of epoxy fairing compound. This image clearly shows the two stages of the exterior layup and feathering of the glass. The final step will be the addition of two layers of epoxy fairing compound.
 CAUTION! Do not use fairing compounds that contain microballoons for underwater fairing! One excellent epoxy compound for underwater fairing use is the FASCO #26 FAS-FAIR. It is a pre-thickened compound with silicone as one of the thickeners, but must be made thixothropic by the addition of cabosil. FASCO makes several good general purpose epoxies that are mixed with a 1:1 ratio. Most fiberglass suppliers carry these products. CAUTION! Do not use fairing compounds that contain microballoons for underwater fairing! One excellent epoxy compound for underwater fairing use is the FASCO #26 FAS-FAIR. It is a pre-thickened compound with silicone as one of the thickeners, but must be made thixothropic by the addition of cabosil. FASCO makes several good general purpose epoxies that are mixed with a 1:1 ratio. Most fiberglass suppliers carry these products.
 The addition of cabosil will make the epoxy compound thixothropic, changing it from a semi-fluid state to a gel state and allowing a non-flowing paste. This is especially necessary where the application is done on a vertical or inverted surface. The addition of cabosil will make the epoxy compound thixothropic, changing it from a semi-fluid state to a gel state and allowing a non-flowing paste. This is especially necessary where the application is done on a vertical or inverted surface.
 Once fully mixed, the fairing compound is ready to apply with an appropriate drywall knife, putty knife, or spatula. I usually find that at least two fairing applications are necessary. The first application will generally give you the the basic surface, but after sanding, a second skim layer will be called for to complete the job. Once fully mixed, the fairing compound is ready to apply with an appropriate drywall knife, putty knife, or spatula. I usually find that at least two fairing applications are necessary. The first application will generally give you the the basic surface, but after sanding, a second skim layer will be called for to complete the job.
 Here's the final fairing after two applications of the #26 FAS-FAIR and sanding with 80 grit paper on a DA, (dual action), sander. Here's the final fairing after two applications of the #26 FAS-FAIR and sanding with 80 grit paper on a DA, (dual action), sander.
A final note for this design shaft tube:
If you are going to use a standard flax style packing gland, you will need to flush the excess tubing back to the hull. At high speed this design shaft alley will lose water needed to cool the shaft at the packing contact point.
This operation will not be necessary if you will be using packless shaft seals since there will be a water injection port on the seal itself...
Have fun! Feel free to download and print this article, but please don't use it on a website
without linking it to Bertram31.com.
Capt Patrick McCrary
Bertram31.com
site creation and maintenance by:Capt Patrick McCrary
©
834 Scott Dr. LLANO, TX 78643
Telephone 325.248.0809
Web site questions or comments to:
bertram31@bertram31.com
|


