Installing External Strainers
Inboard raw water strainers for engines are large, expensive, and very much space hogs.
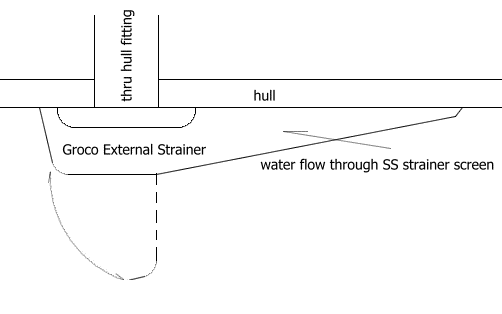
 An alternative that I use is the APHS Series External Strainers by GROCO®. These are wedge shaped bronze body strainers with a polished stainless steel strainer plate. The plate is perforated with about the same sized holes that are used for internal strainer baskets. In addition, there is little or no maintenance.  Since the water enters directly through the strainer plate, there is no grass, growth, or other debris to clean out. Strainer baskets are usually made of fairly thin sheet metal. When the engines have not been run for extended periods of time, the water in the internal strainers becomes acidic, causing the light weight strainer basket to corrode, requiring periodic replacement. One of the nice features of the GROCO® external strainer is the hinged drop down that easily exposes the mouth of the through hull fitting for cleaning and inspection. 
Installation of the wedge style external strainer is nearly the same as adding a clam shell strainer over a standard through hull fitting, but with the following refinements: When a boat is underway, the water path over the hull bottom is not in a straight flow. It actually is moving diagonally aft and up. The dead rise of the hull and speed of forward movement dictate the flow angle. The flow angle reduces with reduced dead rise and increased forward speed. On a deep V planing hull, (such as the Bertram 31), at moderate speed the flow angle is quite pronounced. If the external strainers are mounted to the hull parallel to the keel line, the water is flowing at an angle across the strainer also. Since the strainer is wedge shaped, part of the water flow is reduced to the strainer plate by the vertical profile of the strainer.  For this reason, the strainer body should be angled into the keel line on the forward end.  Because of the hull curvature of the Bertram 31, the inboard forward corner will, at rest, not conform to the hull shape. This will be your indication as to how much toe-in to apply. Simply increase the toe angle until the space between the hull and the corner of the strainer body is at least 3/16" but not more than 3/8". This will adjust the the angle for better water pick up. Use a through bolt on at least this corner to chinch it down to the hull. The slight warp in the strainer body will not affect the fit of the strainer plate. Another installation/maintenance technique is to treat the strainer screen with a release agent. This will help keep barnacles and other growth from gripping onto the plate and covering some of the holes. One way is to use REXCO® PVA Mold Release Wax. This should be done using several applications, allowing at least a 30 minute curing interval between applications. Another good technique would be to treat the screen with Super TefGel. The stuff is virtually water proof, tenacious, and, due to the high content of Teflon®, will almost completely deter barnacles or other organisms from getting a good hold. Don't paint the screen... I have been operating various boats utilizing the external strainers for almost 20 years, and have been installing them for almost ten years. Without exception, there has never been any problems that could have been averted by having internal strainers... Since GROCO® came out with the hinged back section, even the ease of under water maintenance was greatly improved. Have fun! Feel free to download and print this article, but please don't use it on a website without linking it to Bertram31.com. Capt Patrick McCrary Bertram31.com 834 Scott Dr., LLANO, TX 78643 Telephone 325.248.0809 Web site questions or comments to: bertram31@bertram31.com |
