Bertram 25 - Advice needed on changes.
Moderators: CaptPatrick, mike ohlstein, Bruce
-
- Posts: 13
- Joined: Mar 26th, '13, 18:06
- Location: Sag Harbor, NY
Bertram 25 - Advice needed on changes.
I’m looking for some advice on changes/upgrades that should be made on my 69 Bert 25 convert and hope to be doing the work in the next 6 weeks starting this weekend - hampered by the fact that I’m in upstate NY most of the time and the boat is on Long Island. I have just read Kieth Poe’s “Opinions Please “ thread, and it has raised numerous concerns as to how well the boat is setup for heavy weather and dealing with the water that inevitably gets in. Now is the time to plan and make changes - hopefully based on your recommendations. ( long lead up to some specific questions below )
I purchased the boat in August 2011 from a PO owner on Cape Cod who in theory had it professionally serviced and cared for each year - including replacement in 2006 of the original fiberglass tanks with an aluminum 90 gallon replacement. One of the reasons for purchasing the boat was the conclusion that the tank issue had been taken care of and it was otherwise in good shape. It was in the water, had been used every year, and so was in theory in good seaworthy condition - ready to use without a lot of work. At least it was in good enough condition to make it the 100 miles from Cape Cod to to Sag Harbor on Long Island in partly stormy conditions.
There have been some issues with the engines Mercruiser 3.7 L 4s and Alpha I sterndrives - but nothing serious. The props which appear to be the original ones that came with the engines and sterndrives when installed in the 80s were at least 4 inches off in pitch. The fact that two owners could run the boat for 25 years with props that far off started me looking for what else might be wrong
I started to find out last summer. I did some minor repairs. Figured out most of the electrical wiring with help from Walter K - and got the navigation lights and other electrics working after having not been used in many years. By the first day of my vacation in August I thought I was ready to take a trip. The tank was full, the weather was good. The dog and wife were on board, and then I found fuel in the bilge. So the rest of the vacation was taken up with getting the boat out of the water, draining and removing the tank and dropping it off for repairs. I had planned a quick fix and replace in order get it back in the water before the end of the boating season, until I discovered the amount of wood rot and poor design underneath. Not to mention having to let it air and dry out for a good bit before it was safe work on.
The tank was repaired in Greenport based on a recommendation by White Bear - and the new rear panel is 3/16 “ compared to the otherwise 1/8 “ tank. Probably should have followed Cam’s advice on the Bert 25 forum and done a whole new tank, but by the time I connected with him the repair process had already started. Its been etched and epoxy coated and is reported to be real clean on the inside.
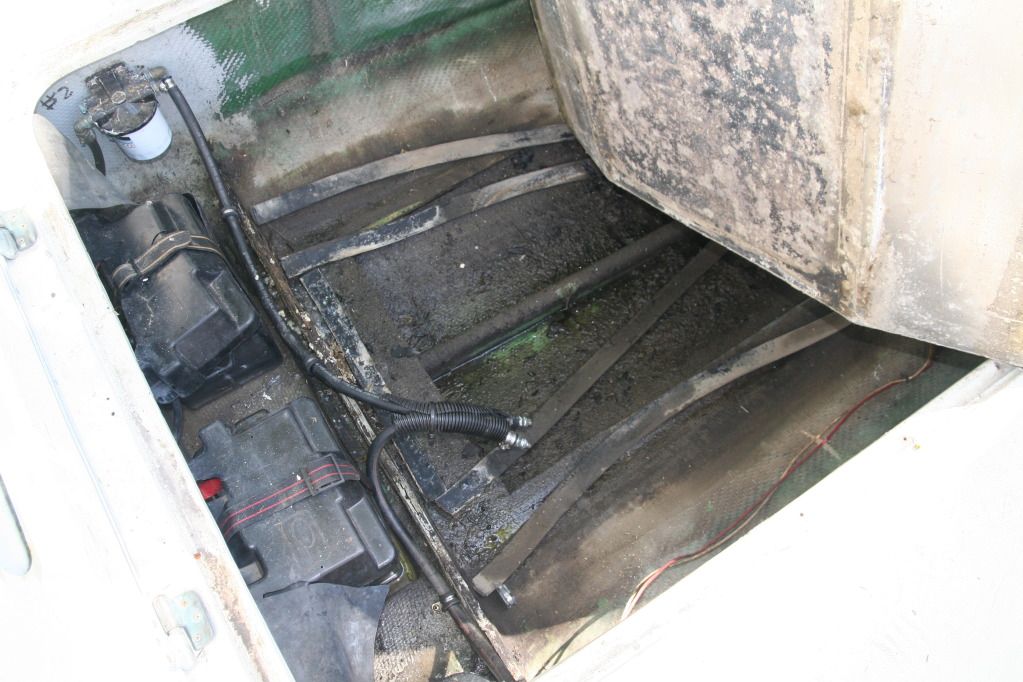
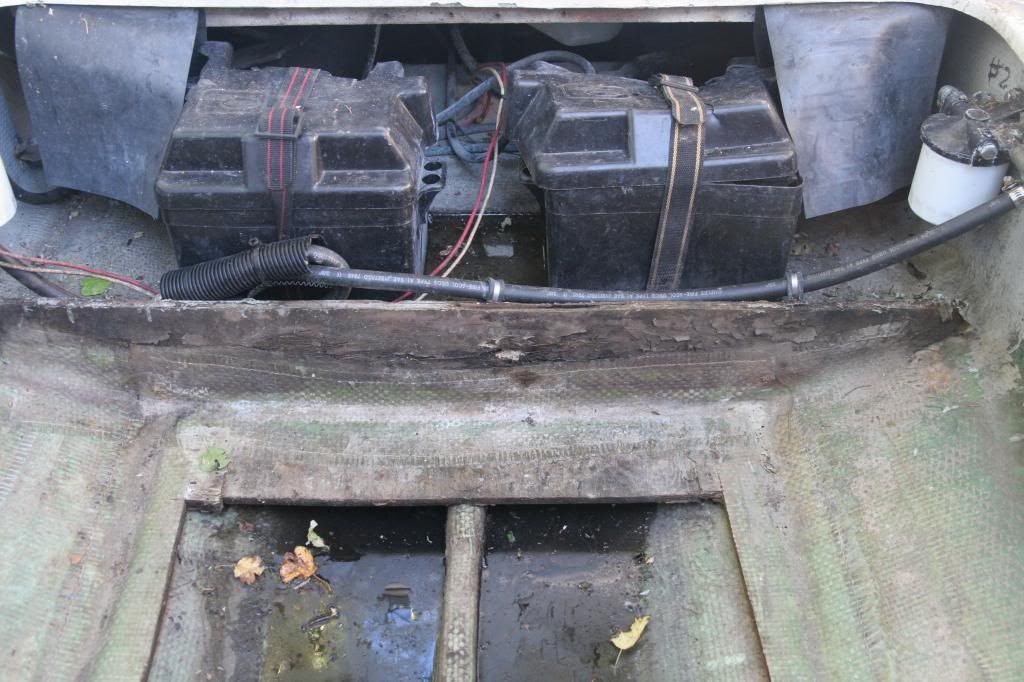
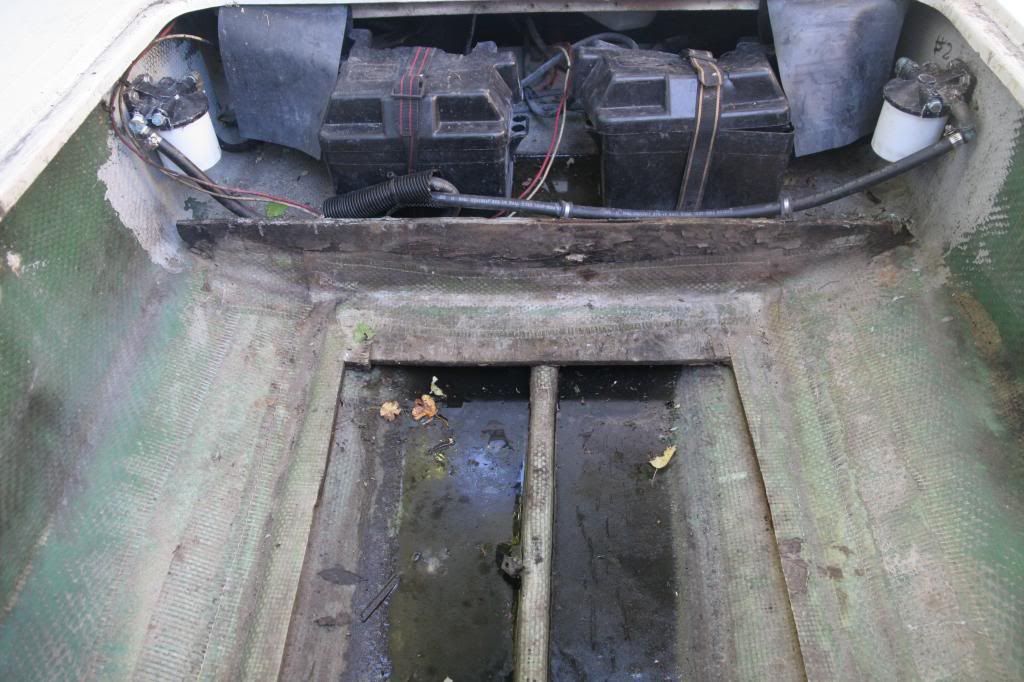
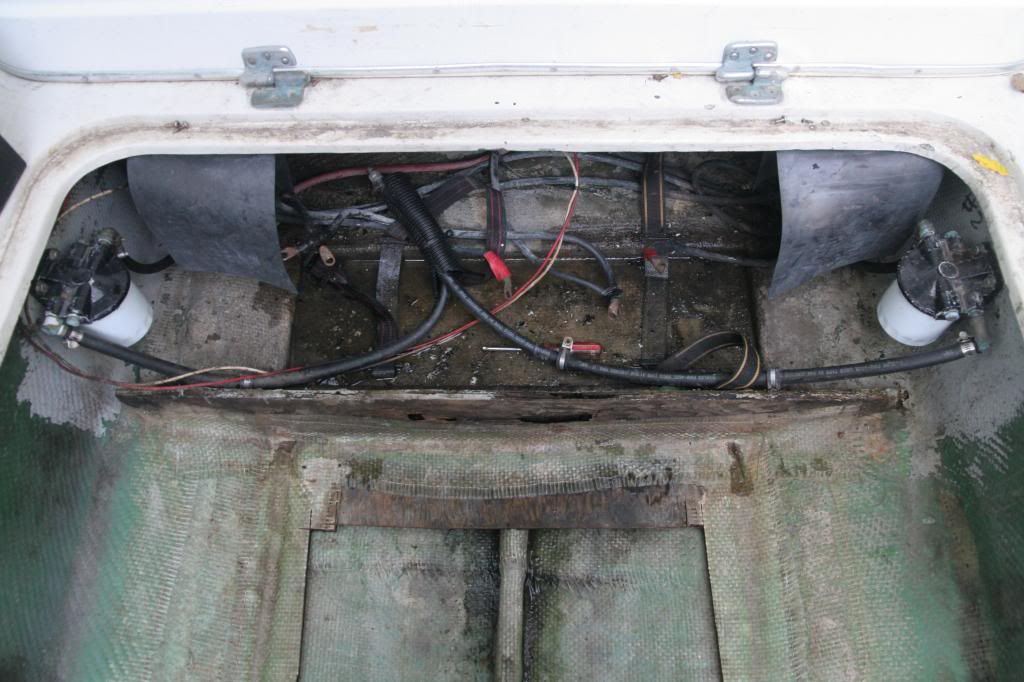
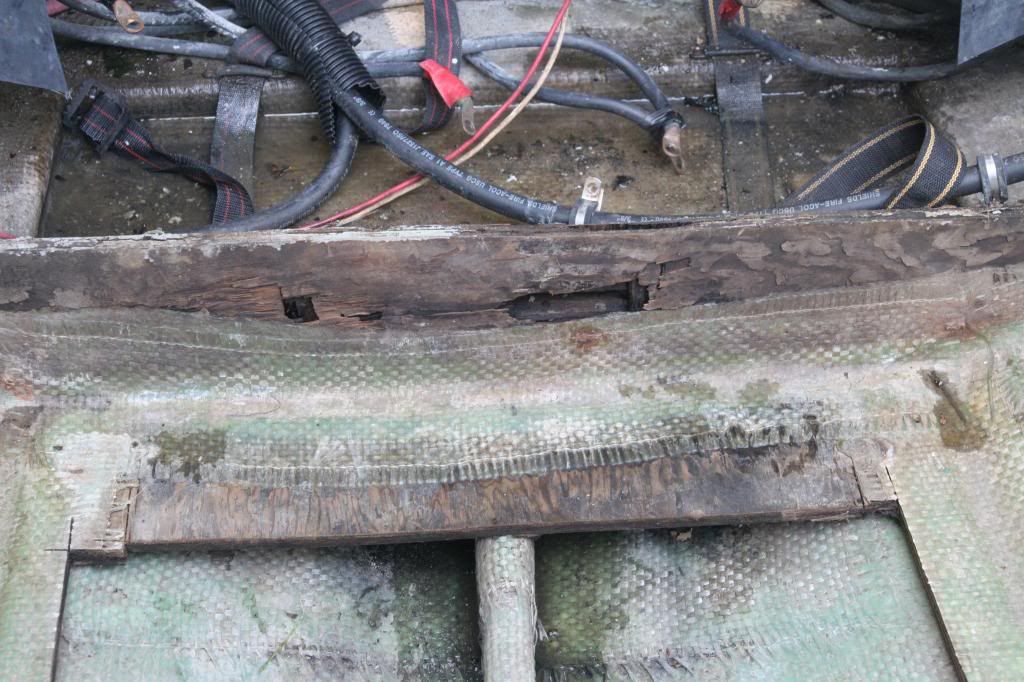
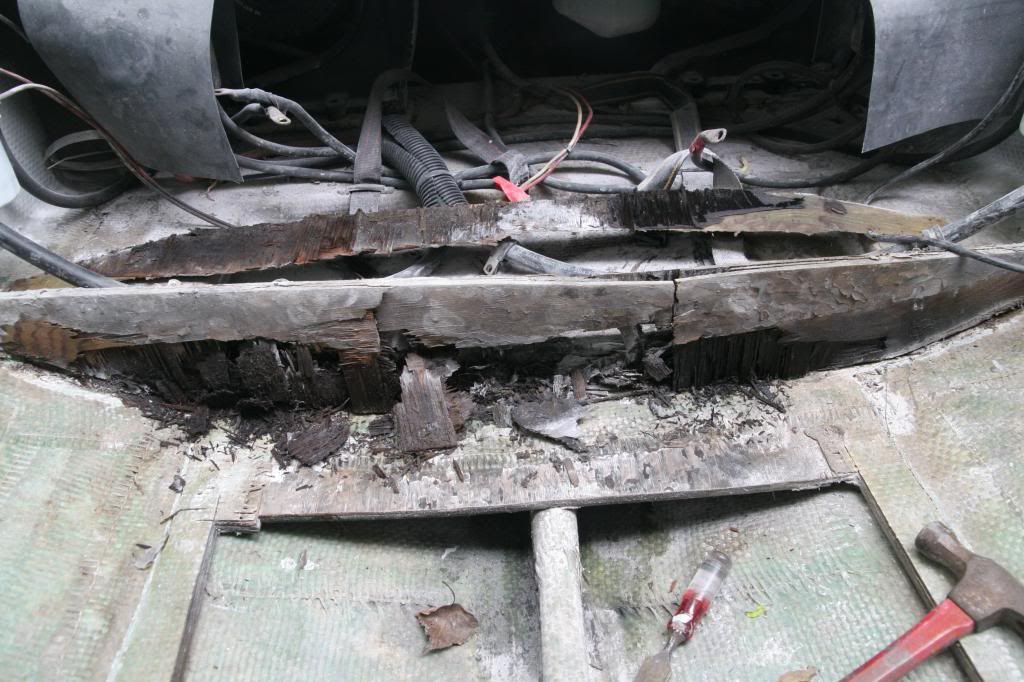
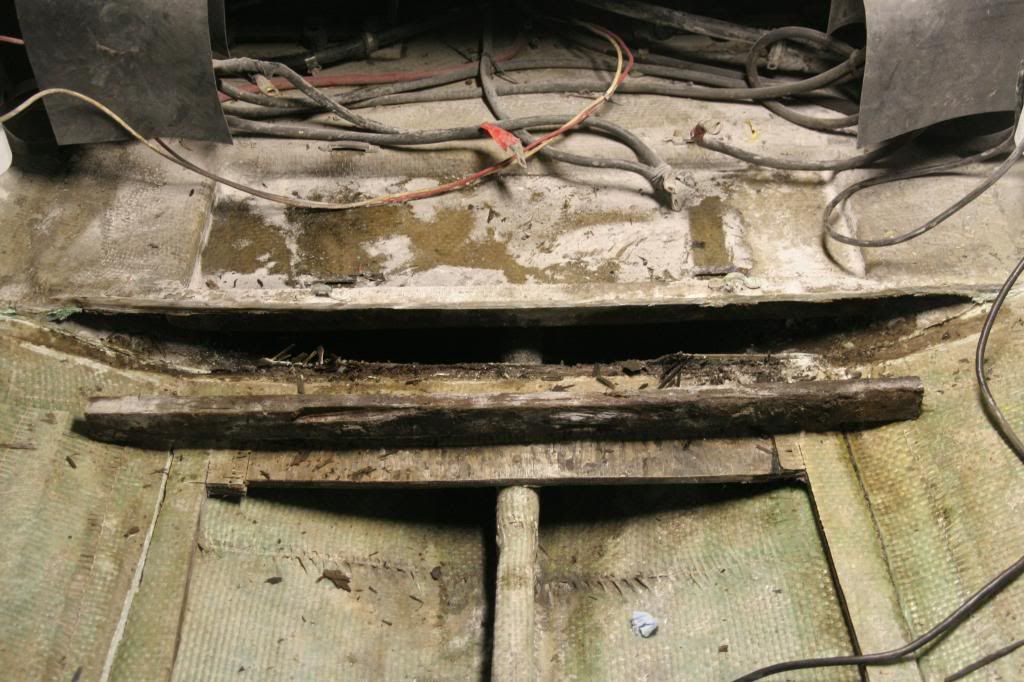
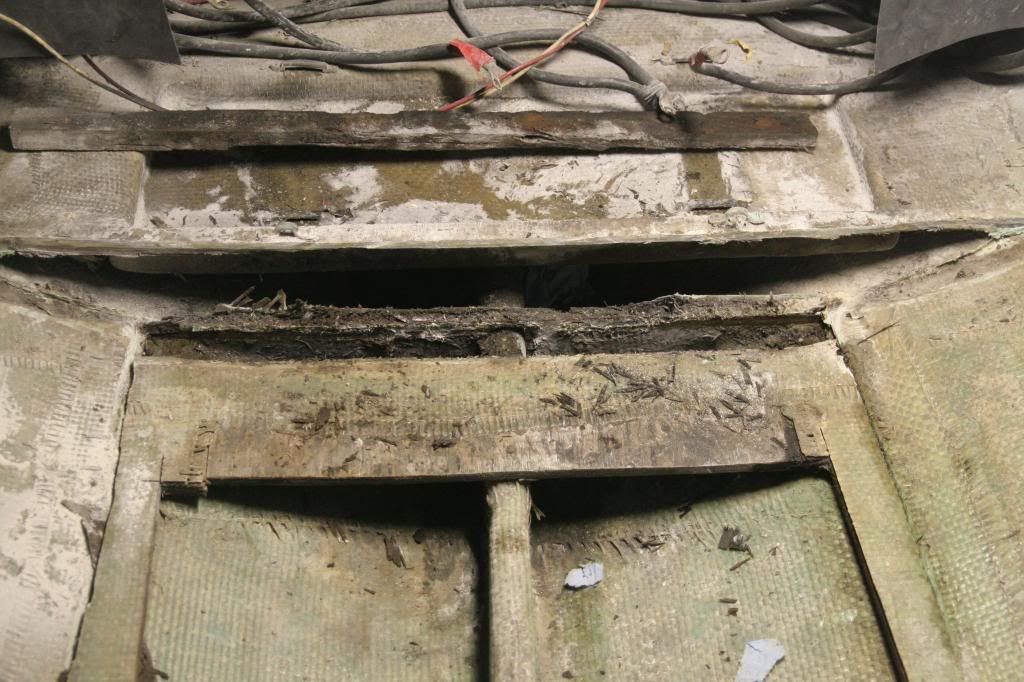
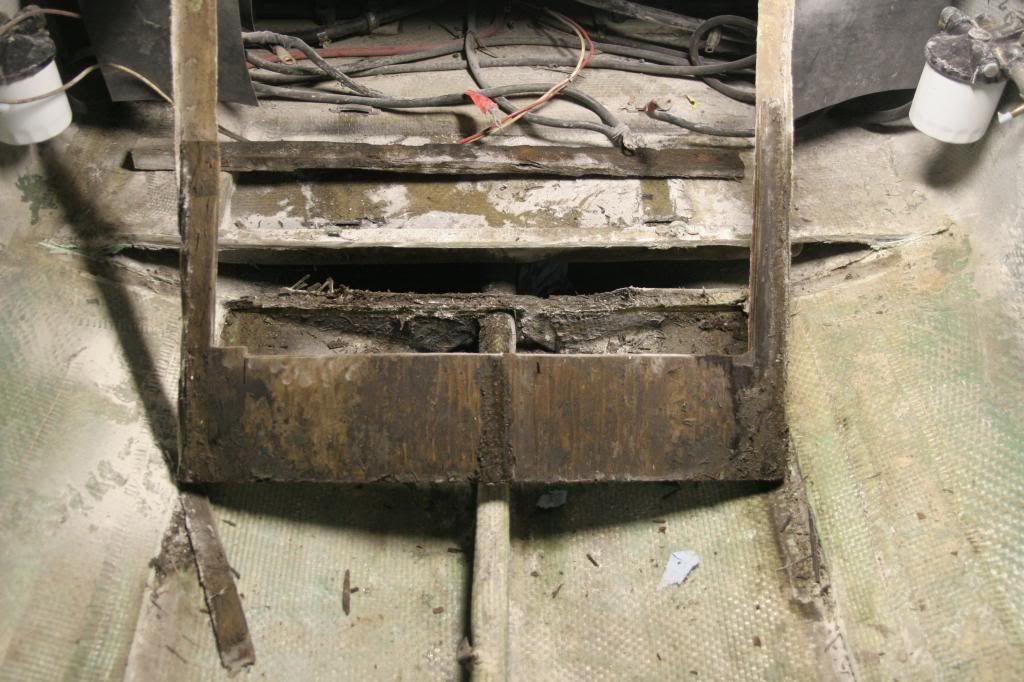
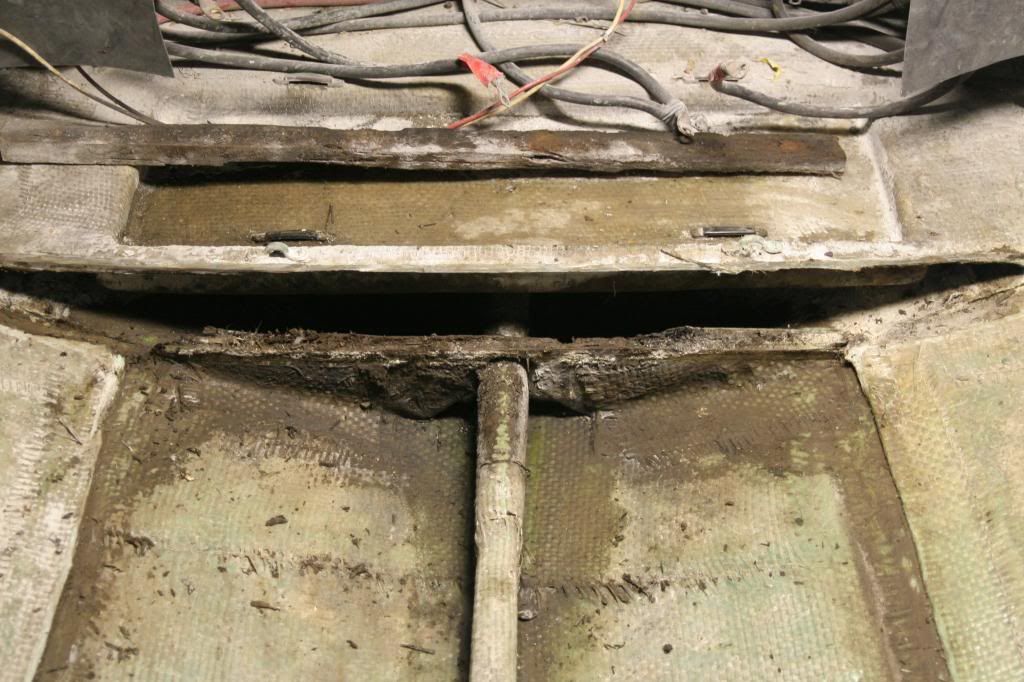
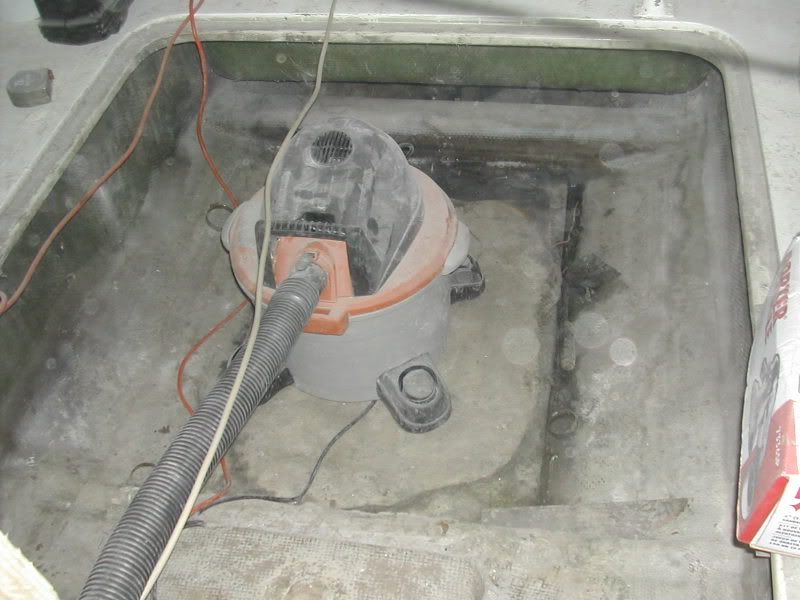
I am not happy at all with the way it was originally installed - as you can see from the photos that I will hopefully be able to post below. The plywood panel underneath the original tanks was apparently cut away, maybe because it was rotting. The tank was only supported at the sides where it rested on several soft rubber strips right on the hull. Plywood behind the tank was also uncoated, just painted. It did not appear too bad inspecting with the tank in place, but was actually rotting lower down where it was in close proximity to the rear of the tank. Probably trapped moisture against the tank and caused the corrosion. This wood has been pulled out along with other rotting pieces and replacement is planned to be done in the next week with epoxy coated marine plywood. The tank will be elevated off the hull and plywood underneath by 4 - 5 longitudinal strips of some type of pvc board - starboard, etc., with the strips glued to the bottom of the tank with 5200. Possibly with some rubber strips underneath board strips to provide some give. Not sure how I am going to hold it in place, certainly not in the same manner with 2x4s as used previously.
But there are some planning issues for improvements that need to be decided, especially as to how water drains through the boat and hopefully out. I want to relate how a 25 should be setup to the discussion on Poe’s 31 and how it should be setup for rough water.
Some issues re: how water drains through the boat.
The foot well in the cockpit drains onto what was the uncoated plywood under the fuel tank, putting water right where you don’t want it - around the tank. I plan to redirect this to under the new panel under the tank which will be epoxy coated marine plywood.
The tank is under a two part hatch. The front half is sealed. The rear half is not and lifts out to provide access to fuel filters and batteries, but allows water to leak around the rear section of the tank.
Scupper drains - on the 25 these are just drain plugs. And with the heavy I/O engines all the way in the back, these drains are uncomfortably close to or under the water line. Stand in the back next to the engine and pull the plugs and water comes in, not out. And so close to the engine cover that the thought is that under the right conditions and the weight of additional water that water would drain in - not out - and into the engine compartment. Yes, two bilge pumps under the engines.
Take a look at the photos below and let me know what you think.
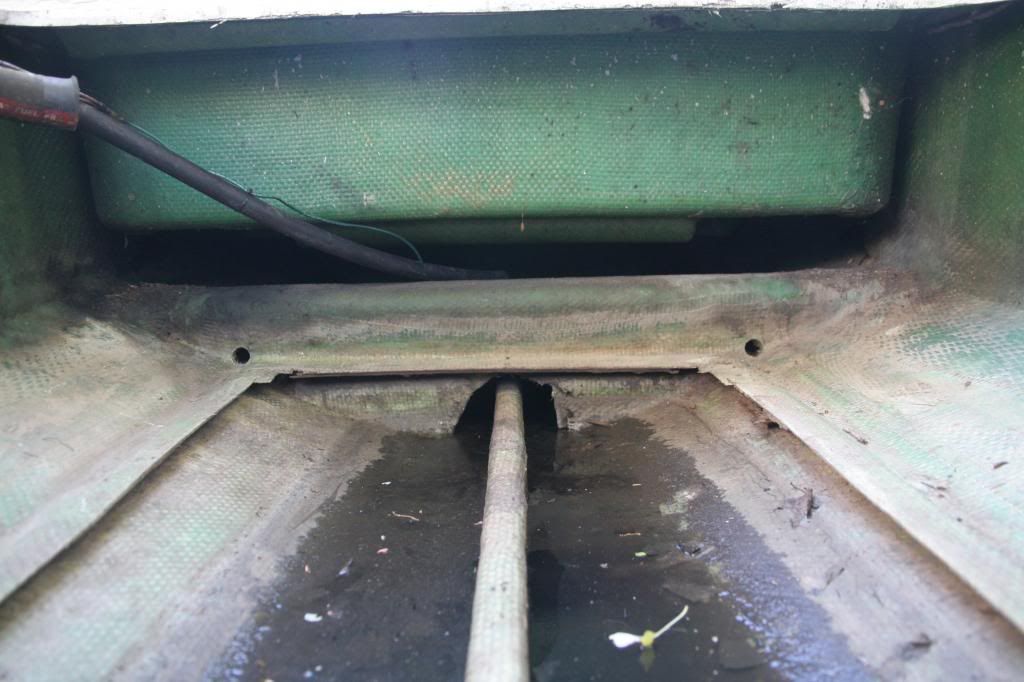
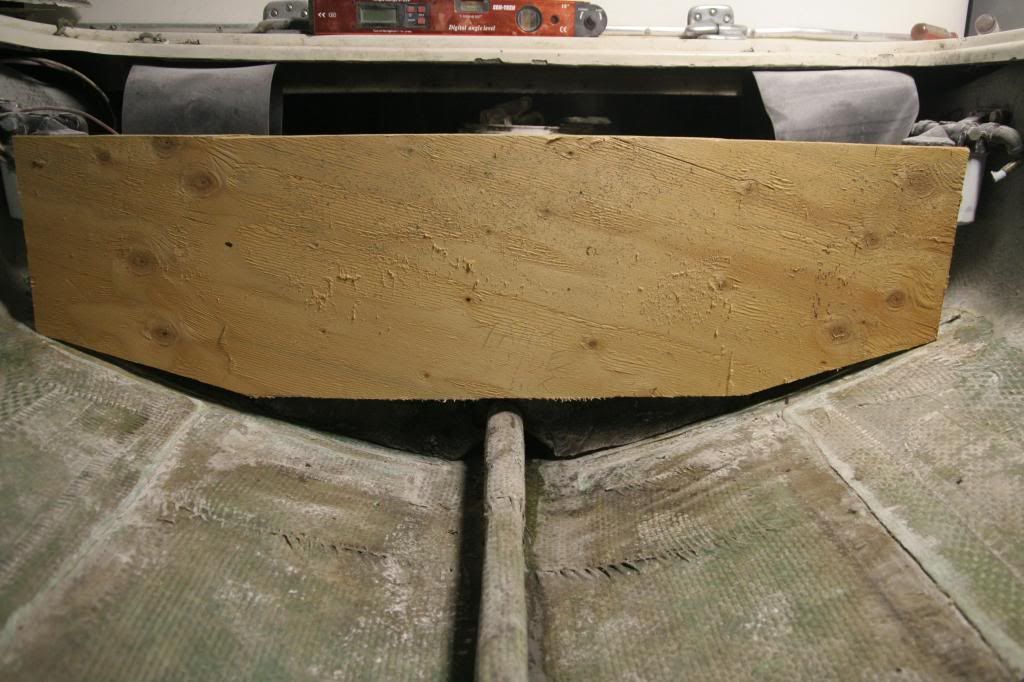
The last image above is a mockup of the tank profile.
I purchased the boat in August 2011 from a PO owner on Cape Cod who in theory had it professionally serviced and cared for each year - including replacement in 2006 of the original fiberglass tanks with an aluminum 90 gallon replacement. One of the reasons for purchasing the boat was the conclusion that the tank issue had been taken care of and it was otherwise in good shape. It was in the water, had been used every year, and so was in theory in good seaworthy condition - ready to use without a lot of work. At least it was in good enough condition to make it the 100 miles from Cape Cod to to Sag Harbor on Long Island in partly stormy conditions.
There have been some issues with the engines Mercruiser 3.7 L 4s and Alpha I sterndrives - but nothing serious. The props which appear to be the original ones that came with the engines and sterndrives when installed in the 80s were at least 4 inches off in pitch. The fact that two owners could run the boat for 25 years with props that far off started me looking for what else might be wrong
I started to find out last summer. I did some minor repairs. Figured out most of the electrical wiring with help from Walter K - and got the navigation lights and other electrics working after having not been used in many years. By the first day of my vacation in August I thought I was ready to take a trip. The tank was full, the weather was good. The dog and wife were on board, and then I found fuel in the bilge. So the rest of the vacation was taken up with getting the boat out of the water, draining and removing the tank and dropping it off for repairs. I had planned a quick fix and replace in order get it back in the water before the end of the boating season, until I discovered the amount of wood rot and poor design underneath. Not to mention having to let it air and dry out for a good bit before it was safe work on.
The tank was repaired in Greenport based on a recommendation by White Bear - and the new rear panel is 3/16 “ compared to the otherwise 1/8 “ tank. Probably should have followed Cam’s advice on the Bert 25 forum and done a whole new tank, but by the time I connected with him the repair process had already started. Its been etched and epoxy coated and is reported to be real clean on the inside.
I am not happy at all with the way it was originally installed - as you can see from the photos that I will hopefully be able to post below. The plywood panel underneath the original tanks was apparently cut away, maybe because it was rotting. The tank was only supported at the sides where it rested on several soft rubber strips right on the hull. Plywood behind the tank was also uncoated, just painted. It did not appear too bad inspecting with the tank in place, but was actually rotting lower down where it was in close proximity to the rear of the tank. Probably trapped moisture against the tank and caused the corrosion. This wood has been pulled out along with other rotting pieces and replacement is planned to be done in the next week with epoxy coated marine plywood. The tank will be elevated off the hull and plywood underneath by 4 - 5 longitudinal strips of some type of pvc board - starboard, etc., with the strips glued to the bottom of the tank with 5200. Possibly with some rubber strips underneath board strips to provide some give. Not sure how I am going to hold it in place, certainly not in the same manner with 2x4s as used previously.
But there are some planning issues for improvements that need to be decided, especially as to how water drains through the boat and hopefully out. I want to relate how a 25 should be setup to the discussion on Poe’s 31 and how it should be setup for rough water.
Some issues re: how water drains through the boat.
The foot well in the cockpit drains onto what was the uncoated plywood under the fuel tank, putting water right where you don’t want it - around the tank. I plan to redirect this to under the new panel under the tank which will be epoxy coated marine plywood.
The tank is under a two part hatch. The front half is sealed. The rear half is not and lifts out to provide access to fuel filters and batteries, but allows water to leak around the rear section of the tank.
Scupper drains - on the 25 these are just drain plugs. And with the heavy I/O engines all the way in the back, these drains are uncomfortably close to or under the water line. Stand in the back next to the engine and pull the plugs and water comes in, not out. And so close to the engine cover that the thought is that under the right conditions and the weight of additional water that water would drain in - not out - and into the engine compartment. Yes, two bilge pumps under the engines.
Take a look at the photos below and let me know what you think.
The last image above is a mockup of the tank profile.
Re: Bertram 25 - Advice needed on changes.
Replace the tank deck just as it was from the factory. Epoxy mat onto the top and bottom and glass it back into place for a flat surface for the tank to sit on. The bilge water will still travel under that tank deck like it did originally. This allows the front compartment to drain to the rear. It does not matter if there is water under that tank deck as it will be sealed. The flat surface is ideal for the tank to sit on and provide support.
I would also replace the tank for piece of mind. Coat the tank and leave the rubber off of it. Do it once and you are good for 25+ years without a worry.
Both of my hatches above the fuel tank compartment come up and I like it. I allows me huge access to that compartment.
Just my 2 cents.
I would also replace the tank for piece of mind. Coat the tank and leave the rubber off of it. Do it once and you are good for 25+ years without a worry.
Both of my hatches above the fuel tank compartment come up and I like it. I allows me huge access to that compartment.
Just my 2 cents.
- Pete Fallon
- Senior Member
- Posts: 1318
- Joined: Jun 29th, '06, 23:10
- Location: Stuart Fl. and Salem, Ma.
Re: Bertram 25 - Advice needed on changes.
John,
Replace the tank with at least 3/16, 3/8 is better, 6061 is the best grade for the tank. There has been years of water damage to the bulkhead bottoms and they should be replaced. I am concerned about how deep the saw cuts are into the laminate schedule where the old tank support was cut out. I would grind down those cuts and add a few layers of glass to strenghten the area ( 2 layers of bi-ax glass)( 12" wide over the cuts) Then build a new sub floor glassed on both sides for the tank support .
As for the deck drains they are almost at water level with compression plugs that are totally useless, They are just like the 20' Bertram deck drains. Other than raising the height of the cockpit sole there is not much that can be done about the drains. I would add 2-2200 gph Johnson Pumps with auto switches to the aft bilge area, wire one as a high water alarm pump. Replace all the old battery cables and have the ends made up with compression fitting tool. You have a lot of work ahead of you just take it slow, Good Luck with this project.
Pete Fallon
1961 Express Vizcaya Hull 186 12-13-61
Re: Bertram 25 - Advice needed on changes.
The drain holes / scuppers / etc are very close to the water line. When I had my 1962 Sport Convertible water would enter if I was standing at stern on the side of the engine box.
What I have seen and would recommend doing is building a dam around the engine well such that if water does enter or if you do get water on deck, it will not go directly into the bilge.
I think with scenario you could safely leave the plugs out while at dock, anchor or mooring.
Those are my thoughts.
Ian.
-
- Posts: 13
- Joined: Mar 26th, '13, 18:06
- Location: Sag Harbor, NY
Re: Bertram 25 - Advice needed on changes.
Thanks for the comments.
In reply to Captbone - one of my issues is that I don't have a photo of the original factory setup. I assume it was plywood all the way across under the glass tank, and was cutout in the middle when the AL tank was installed. Also not sure whether the plywood sitting upright in front of the battery tray was/is original. A closeup photo below shows how that caused the problem holding moisture next to the tank.
Note also that water collects in the battery tray which comes down from the unsealed hatch above it. The wood under the tray is also deteriorating, but the fiberglass of the battery tray appears to be thick enough to support the batteries without it, with additional support on the end. So I am planning to leave that in place and just treat it as if its only use was as a form for the glass.
For the tank to stay dry it is going to have to be raised off the plywood base, as water also drains from the hatch onto the base.
I am going to look into building a seal for the hatch that would still allow it to be opened, but seal out most of the water.
The forward foot well also drains on top of the plywood tank base, which you only realize by watching where it drains. I am going to try and re-route this.
The original plywood tank base looks to have been installed as bare wood, only glassed at the edges, and not even painted.
And yes, the last support removed was at least one cloth layer into the hull, so that area will be built up level of the rest of the hull before the support is replaced.
I realize at this point that a whole new tank would be optimal, but up to this point have been basing plans on using the repaired tank with extra support. The company that repaired it recommended fixing and re-using although I had originally authorized building a new one.
I am at the boat today, so will take a few more photos. Unfortunately, on wife's orders, have to spend most of the day working to repair steps and access to the beach destroyed by Sandy.
-
- Posts: 13
- Joined: Mar 26th, '13, 18:06
- Location: Sag Harbor, NY
Re: Bertram 25 - Advice needed on changes.
Captbone - your photo is looking forward toward the foot well.
My photo below shows drain holes at the corners which allow water to drain from the foot well onto the base that the tank sits on, assuming there was a base on place.
I don't see any reason not to just plug the wholes and let the water drain forward and under the tank base.
Does anyone have a photo of the original setup at the rear of the tank where the batteries are located?
Re: Bertram 25 - Advice needed on changes.
You can even leave those holes. The water would have to be really high in the bilge to pass water. That would be the least of your worries at that point.
You can see the step up at the bottom of my picture, That height continues until just before the engines front pulley.
Re: Bertram 25 - Advice needed on changes.
Here's a shot of the OEM tank and battery area from 1963. Your's should be similar, without the center fiberglass stringer. You have holes in the center of the cross stringers.
All water should drain to the keel and flow aft along that raised hull seam. The stringers have drain holes to allow water flow from the sides of the boat to the center.
This is an in progress picture of the tank bed made for a single tank. 3/4" coosa glassed both sides. It rests on top of the raised hull seam and is bonded to the boat. Water flow under the tank bed. Water passages are also located fore and aft to drain water from the tank to the bilge. The site crops these photos...battery area to the right (unchanged from OEM). My tank rests on strips of 1/4" SBR rubber that are bonded to the tank. The idea is to prevent water from resting against the tank. This appears to be the failure mode of your tank system.
Here's an earlier shot:
My solution to the scupper height is to raise the deck and scuppers 3/4". Ian's dam idea is a good one to keep the flood out of the engine compartment.
1963 Bertram 25
1973 Boston Whaler 13 - sold!
1998 Scout 172 SF - beach taxi
1973 Boston Whaler 13 - sold!
1998 Scout 172 SF - beach taxi
Re: Bertram 25 - Advice needed on changes.
John,
Here's a fuzzy shot of the tank installed for a test fit. This after I decided to blow out the forward cross stringer to enlarge the tank to 130 gallons. We added bulkheads fore and aft of the tank area as well. Also shows the Coosa on the stringers to raise the deck height and the backing pieces that we used when sealing up the transom scuppers.
This is just a small example of my insanity with this boat. I don't recommend you follow my lead...it's just one way to get 'er done.
1963 Bertram 25
1973 Boston Whaler 13 - sold!
1998 Scout 172 SF - beach taxi
1973 Boston Whaler 13 - sold!
1998 Scout 172 SF - beach taxi
Re: Bertram 25 - Advice needed on changes.
Here are some great photos.
http://www.thehulltruth.com/boats-sale- ... rdtop.html" onclick="window.open(this.href);return false;
Re: Bertram 25 - Advice needed on changes.
That will work. It appears that the tank bed was extended all the way to the engines. I'll bet there is a step in the bed to contain the tank in the aft direction. Simple solution.
1963 Bertram 25
1973 Boston Whaler 13 - sold!
1998 Scout 172 SF - beach taxi
1973 Boston Whaler 13 - sold!
1998 Scout 172 SF - beach taxi
-
- Posts: 13
- Joined: Mar 26th, '13, 18:06
- Location: Sag Harbor, NY
Re: Bertram 25 - Advice needed on changes.
Captbone and Cam,
Its good to get comments from some of the Bert 25 site crew.
I have seen those photos of "Scrappy5"s boat. And also some others from before he replaced the fiberglass tank.
But I still don't have any clear photos showing what the original setup was on a 69 and still trying to find some.
Its good to get comments from some of the Bert 25 site crew.
I have seen those photos of "Scrappy5"s boat. And also some others from before he replaced the fiberglass tank.
But I still don't have any clear photos showing what the original setup was on a 69 and still trying to find some.
Who is online
Users browsing this forum: Bing [Bot] and 378 guests