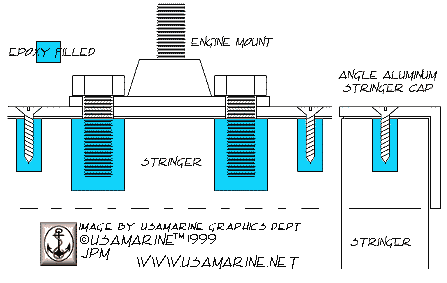
engine mount lag bolts
Moderators: CaptPatrick, mike ohlstein, Bruce
engine mount lag bolts
Hi guys, just tightening things down like I do on a regular basis,(hose clamps,engine bolts,steering components,etc) and found what looks like Bertram used for the engine mounts to bed, long lag bolts in which one of them keeps turning without any torque value. My question, is there a way to remove this bolt from engine bed and put an epoxy down that stripped(maybe some rot) hole, then a release agent on the lag bolt and screw it back in? Or am I asking for never getting that bolt out again? Any clever ideas welcome. Thanks, Rocky.
- CaptPatrick
- Founder/Admin
- Posts: 4161
- Joined: Jun 7th, '06, 14:25
- Location: 834 Scott Dr., LLANO, TX 78643 - 325.248.0809 bertram31@bertram31.com
See: Hardware Mounting in Composites

Mark the exact placement of the motor mount. Wedge the engine so that you can remove the offending mount completely. Soak the bolt/screw in CX, wipe off the excess and let it dry.
Over drill the hole to 3/4" and fill with thickened epoxy. Thicken with high density filler or milled fiber. Leave the hole about 1/4 empty to allow for the mass of the bolt.
Cover the hole with clear celophane tape. Replace the motor mount aligned with the original marks and replace the good bolt, snugging it slightly. Now replace the other bolt, allow the epoxy to cure over night.
When removing the epoxied bolt, first tighten it by 1/16th turn, then loosen and remove. Wire brush the bolt to remove any residual epoxy film and replace. Tighten both bolts, re-adjust the motor mount as necessary.
You can do any or all bolts the same way but it's best to only do one mount and one bolt at a time. The more bolts and mounts you do, the greater the likelyhood that you'll need to re-align your shafts...
- CaptPatrick
- Founder/Admin
- Posts: 4161
- Joined: Jun 7th, '06, 14:25
- Location: 834 Scott Dr., LLANO, TX 78643 - 325.248.0809 bertram31@bertram31.com
Hi Rawleigh,so it seems really crude of a fastener but all of my bolts going into the beds are lag bolts that have a very course thread for wood applications. I was surprised to find those in there, but then again they are very long (6")into the stringers. It seems time had taken it's toll with salt water and wood!
Who is online
Users browsing this forum: No registered users and 199 guests