Page 1 of 2
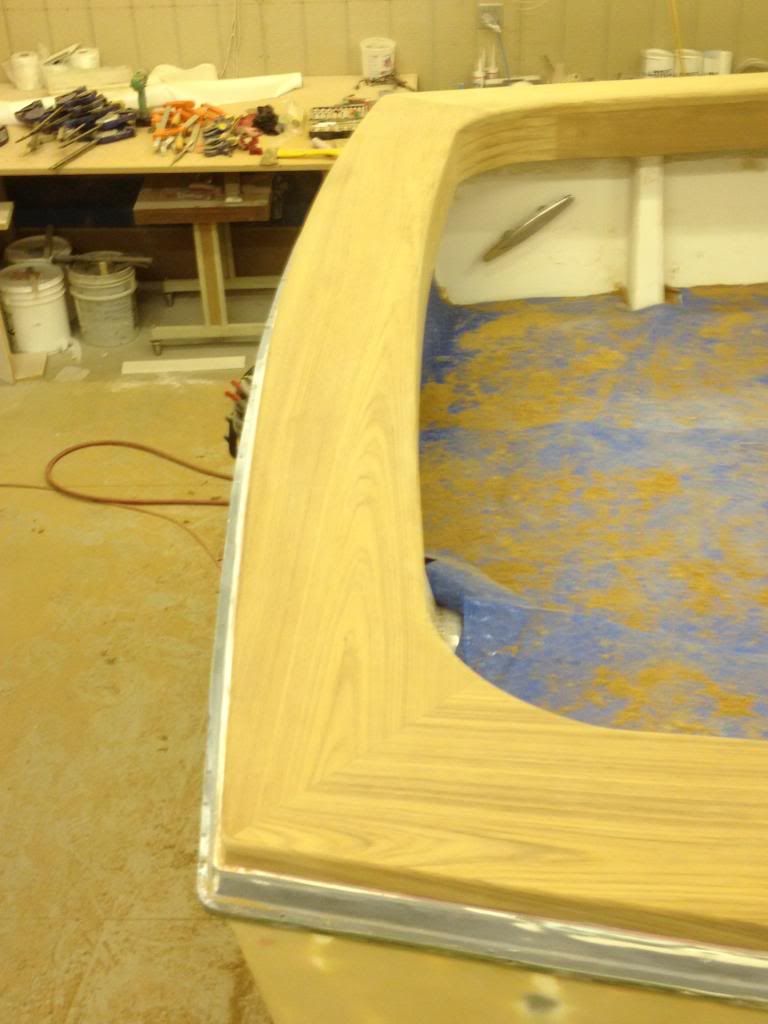
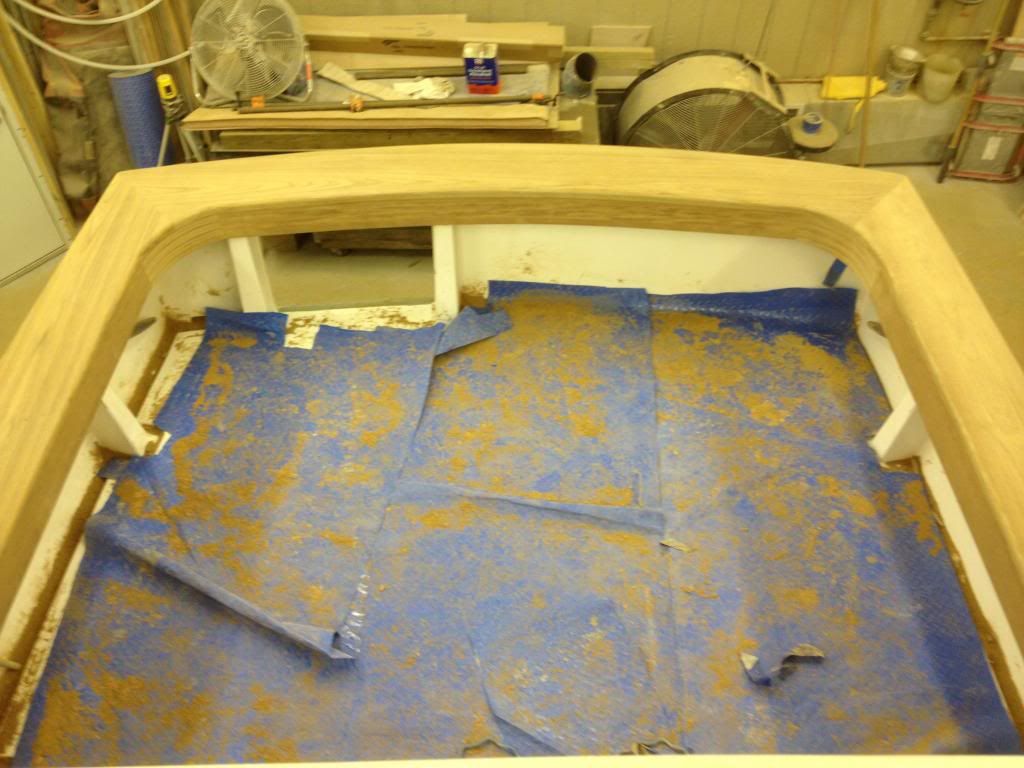
Teak Cap & Coaming
Posted: Jan 9th, '13, 21:09
by Bob H.
Re: Teak Cap & Coaming
Posted: Jan 9th, '13, 21:21
by Harry Babb
Your very handy and clever with your Skilsaw my friend.......looks great.
Are you sure that you wanna get fish blood all over that beautiful work???
I can hear water lapping aganist the hull already!! ! !
hb
Re: Teak Cap & Coaming
Posted: Jan 9th, '13, 21:35
by CaptPatrick
Bob, if I were younger I'd come up and be your apprentice...
Re: Teak Cap & Coaming
Posted: Jan 9th, '13, 22:17
by mike ohlstein
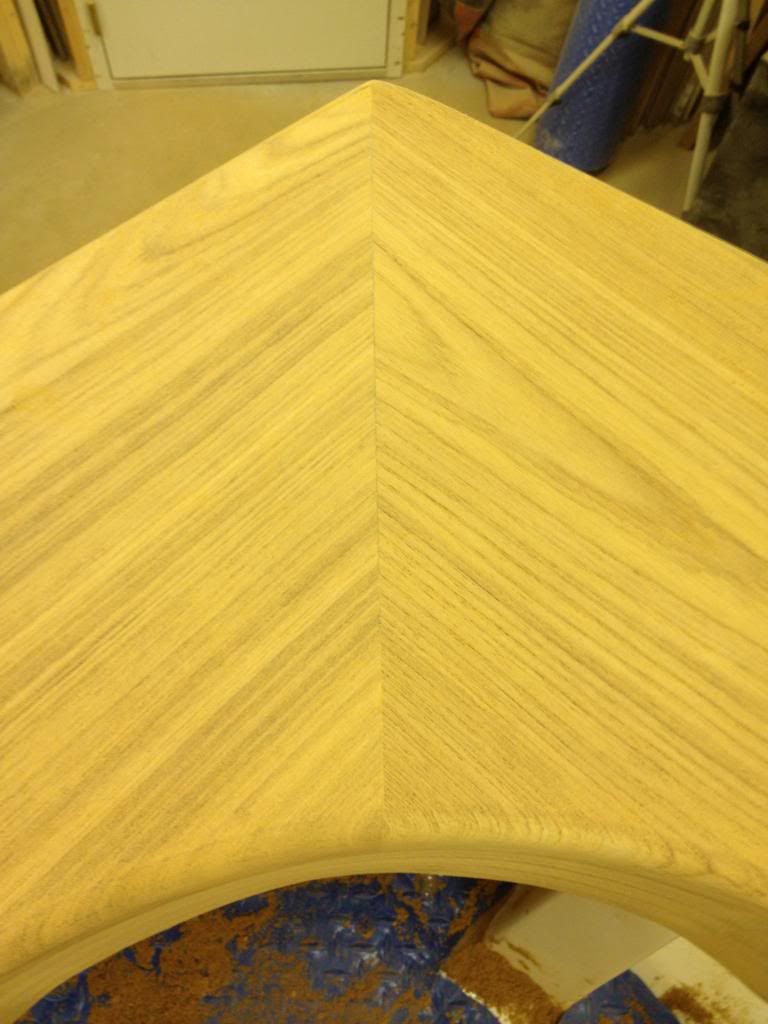
Bob H. wrote:Guess how I cut those sweet miters on the radiused corners? BH
You called Randall, who eyeballed it for 8 seconds and cut the boards with a grapefruit spoon?
Re: Teak Cap & Coaming
Posted: Jan 9th, '13, 22:23
by Tony Meola
Bob
Looks great. I bet if you wanted we can find you 30 or more of these to do with ease. That is some sweet looking work there.
Re: Teak Cap & Coaming
Posted: Jan 9th, '13, 22:29
by John F.
Bob-
That looks just great.
Re: Teak Cap & Coaming
Posted: Jan 10th, '13, 07:58
by Charlie J
very nice bob, looks outstanding
Re: Teak Cap & Coaming
Posted: Jan 10th, '13, 08:16
by Kiffa
Very Very Beautiful Bob.
Re: Teak Cap & Coaming
Posted: Jan 10th, '13, 08:44
by Bertramp
VERY NICE !!
Re: Teak Cap & Coaming
Posted: Jan 10th, '13, 08:56
by JH_B28
Great job Bob! You sure have some outstanding skills & craftmanship.
Keep up the good work
-G
Re: Teak Cap & Coaming
Posted: Jan 10th, '13, 11:18
by Stephan
Uh, I know I'm a week late but but I think 3 of us need to visit bearing -um...:
Patron
CorrosionX
Plexus

Re: Teak Cap & Coaming
Posted: Jan 10th, '13, 19:31
by Bob H.
Stephan if you have patron in your saddle bags, barn door is always open....Harry your right on with the skillsaw cut...Mike we did back cut it with Randalls spoon...Capt. Pat I would never have even tried such projects without watching you build some top shelf rides...Took off my training wheels...Ive just got a knack for figuring stuff out, Harry and I talk about it all the time, the ability to see what you want and the steps you need to get there..moving on to prime and paint..BH
Re: Teak Cap & Coaming
Posted: Jan 10th, '13, 20:23
by gplume
Stephan-
What do you say we skip the corrosion x and plexis and just bring a second bottle of patron.....though being winter i may opt for some "black bush" irish whisky.
Bob- truly a fine job...i need to get up and see the progress. Looks like you are getting very close......and thats a good feeling....let me tell you and i only got into mine at about 5 percent of what you have undertaken.
All the best
Giff
Re: Teak Cap & Coaming
Posted: Jan 10th, '13, 22:03
by ianupton
Fantastic!
Re: Teak Cap & Coaming
Posted: Jan 10th, '13, 22:04
by BOBMX
Beautiful work! Can mine be next?
Re: Teak Cap & Coaming
Posted: Jan 11th, '13, 01:06
by Pete Fallon
Bob,
The teak planks have come a long way since I picked them out of the stack of boards, in a storage locker, great work. I was talking to Rose & Mark at M&R wood supply and they asked if you had used the boards yet. I was going to call you and ask what was going on, with your permission I will show them to Mark next week. They might want to use your pictures for their web page, I will tell them to contact you about permission to use the pictures.
Thanks, Pete Fallon
Re: Teak Cap & Coaming
Posted: Jan 11th, '13, 20:31
by Bob H.
Pete, Feel free to show them to Mark & Rose, those planks were beautiful. All thats left is to oil them up, what do the Bertarm brothers recommend I use? Thanks again for your help. Gif you know the doors always open to you and all the bertram brothers, stop by any time..Ill take you up on the black bush..BH
Re: Teak Cap & Coaming
Posted: Jan 11th, '13, 20:43
by CaptPatrick
what do the Bertarm brothers recommend I use?
Tip Top Teak only......
Re: Teak Cap & Coaming
Posted: Jan 12th, '13, 09:35
by Rick Kral
Bob,
Beuatiful work. I am about 2-3 weeks out from working on my covering boards as well. I am waiting on my fuel tank to finish any last minute deck modifications. Couple of quick questions. first, your inside corners appear to be layed up blocks and then cut or are they full width blocks of material? Did you biscuit joint or just butt and glue? What is your finished dimension from the top of deck to the top of the teak in the aft corner of the boat?
Thanks for the tips.
Rick Kral
Re: Teak Cap & Coaming
Posted: Jan 12th, '13, 09:49
by Charlie J
bob feel free to come down and do mine, looks great
Re: Teak Cap & Coaming
Posted: Jan 12th, '13, 10:01
by mike ohlstein
Going out the back with hawse holes, or through the wood?
Re: Teak Cap & Coaming
Posted: Jan 12th, '13, 19:23
by Bob H.
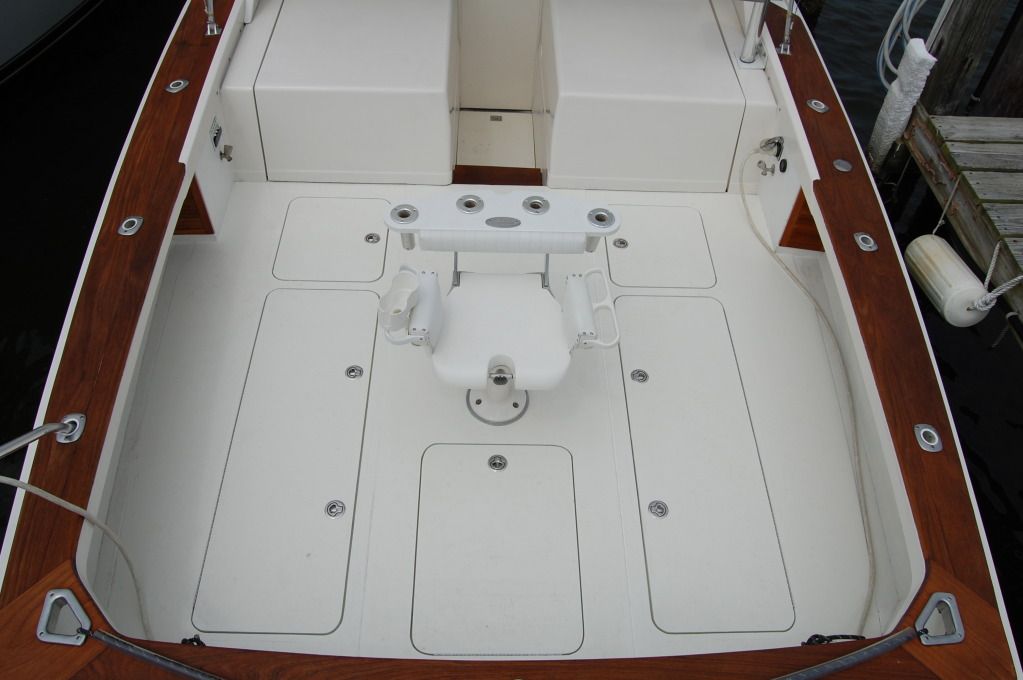
Rick, I bonded the planks to the gunwale using west system unthickended to each surface then mixed up 403 with west system applied with notched trowel, key is to cut angled notches under each plank to give it more area to bite, Capt Pats Trick.
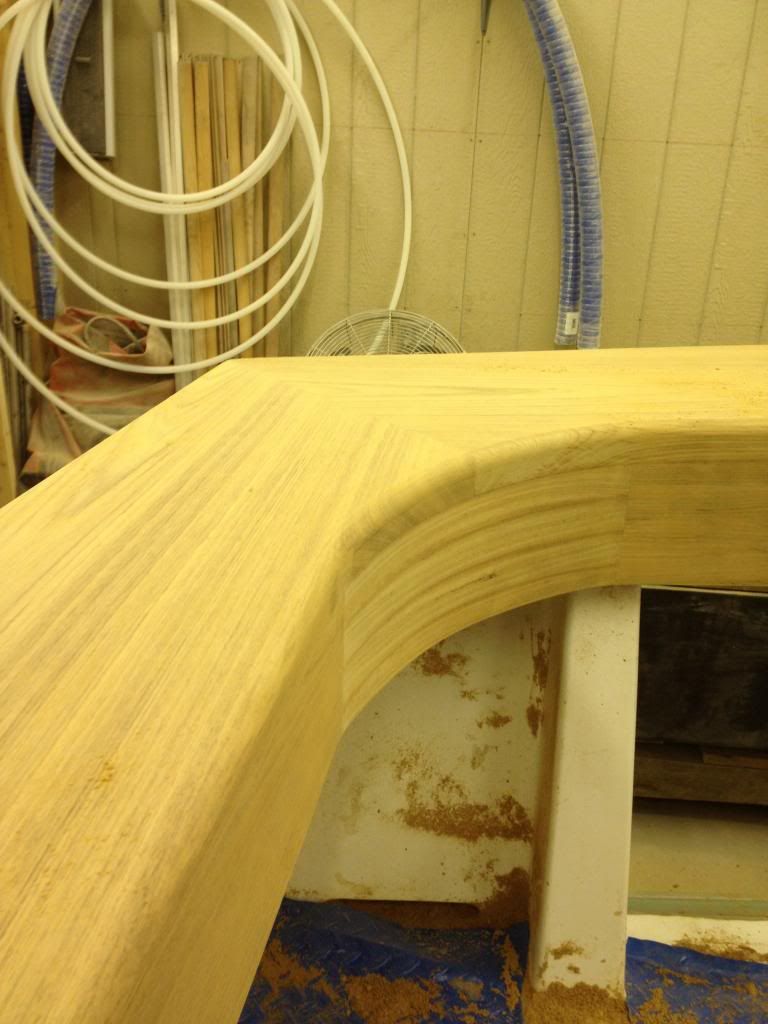
I like the look of the grain rounding the corners, I stacked up 4 1/4 planks 16" long then cut out the radius making the plank about 1" thick, to give me plenty to sand down the road. If you like the end grain you can go that route as well.
The rear inside plank also has a crown to match the boats crown, I did this by cutting the 1 1/4" planks square and bonding them onto a jig I made to match the curve. Personal preference but I like to see the grain follow the boats lines. The glue joints are not even visible due to the nice grain on each plank, I did plane each piece prior to bonding to assure super tight fit.
No biscuits here, the west has 11,000psi tensile strength, should keep things right where I clamped them. Finished height is now close to 25" which is above my knee, total gunwale thickness is close to 2" thick, I removd the bertram "lip" and made all new gunwales prior to planking. Mike I went hawse pipes out the back like JP has. Tip Top its is, Thanks Capt Pat.
Re: Teak Cap & Coaming
Posted: Jan 12th, '13, 23:48
by AndreF
Wow, Bob. really nice!
Re: Teak Cap & Coaming
Posted: Jan 13th, '13, 10:33
by RAWicklund
BEAUUUUTIFUL Bob, do you have any pics of your saw sled or track set up to cut those miters??
I almost bought a dewalt Trac saw last year when I was trimming out some cypress beams at my camp.... it would have been a great tool for your project... My miters didn't need to be near that tight since there 20' up in the air..... so the chainsaw sufficed..
Ray
Re: Teak Cap & Coaming
Posted: Jan 13th, '13, 12:25
by Rick Kral
Bob - Thank you for the info. I used a similar system to bond the mahogny to my transom. bullet proof. I read the peice on the mufflers and we are using the same mufflers for the same HP motors. My finished deck height will be about 2 inches less than yours. I moved my exhaust outlets to the side of the boat to save room on the inside by not having to install surge tubes. As i am coming up on final lay out i may reconsider surge tubes. I am also going to talk with Centex about the rating on the muffler. I will let you know what i find out.
Cpt. Pat - Thank you for thoughts. i am going to double check on the hp rating. What are your thoughts on side exhaust with or with out surge tubes? seems to be a point of debate.
Rick Kral
Re: Teak Cap & Coaming
Posted: Jan 13th, '13, 14:00
by CaptPatrick
What are your thoughts on side exhaust with or with out surge tubes? seems to be a point of debate.
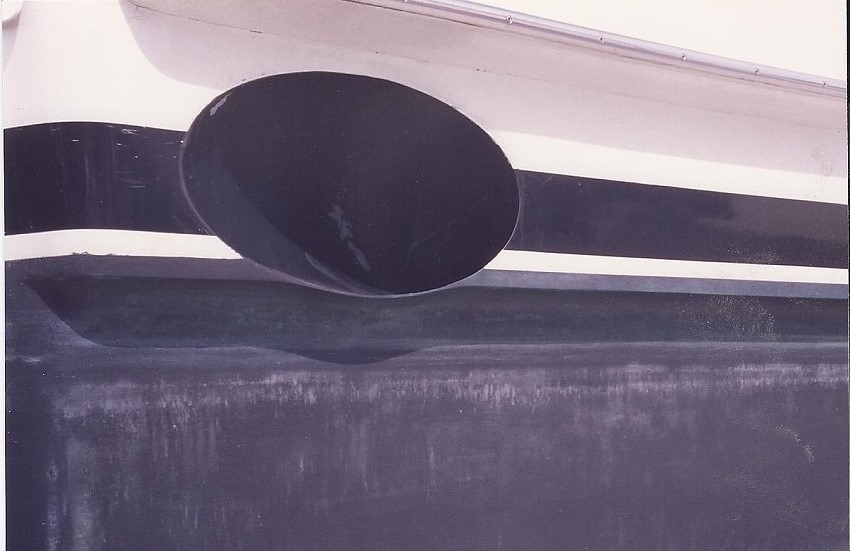
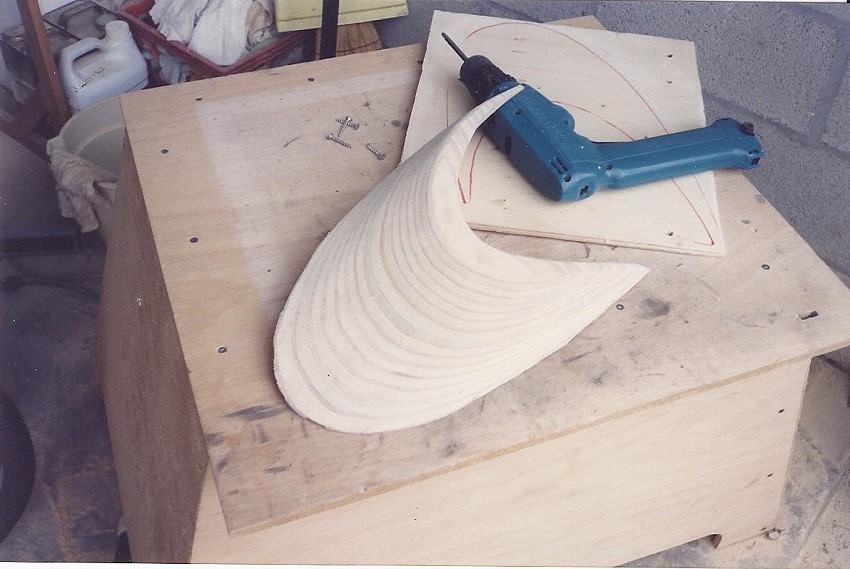
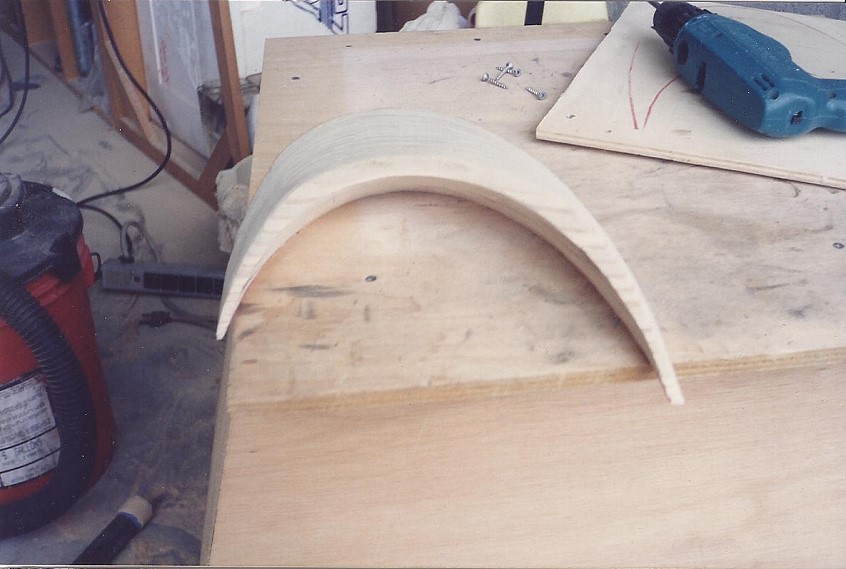
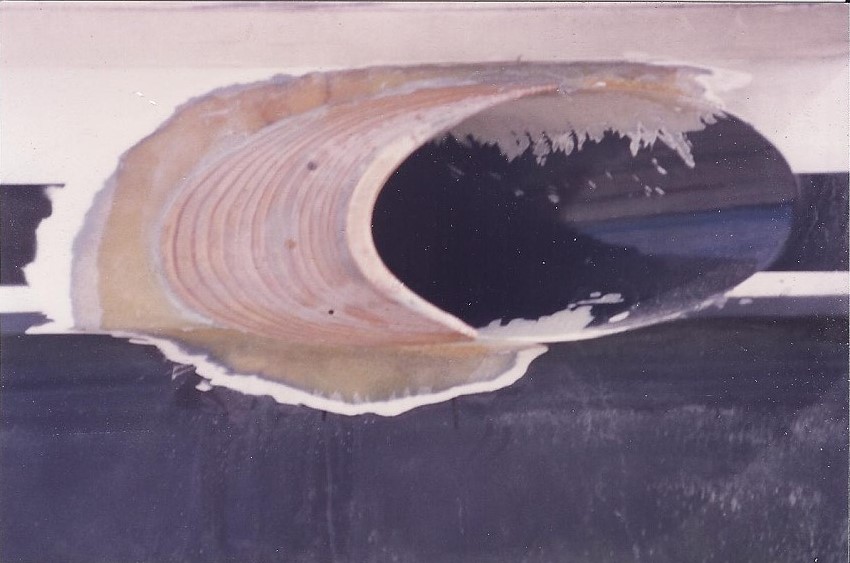
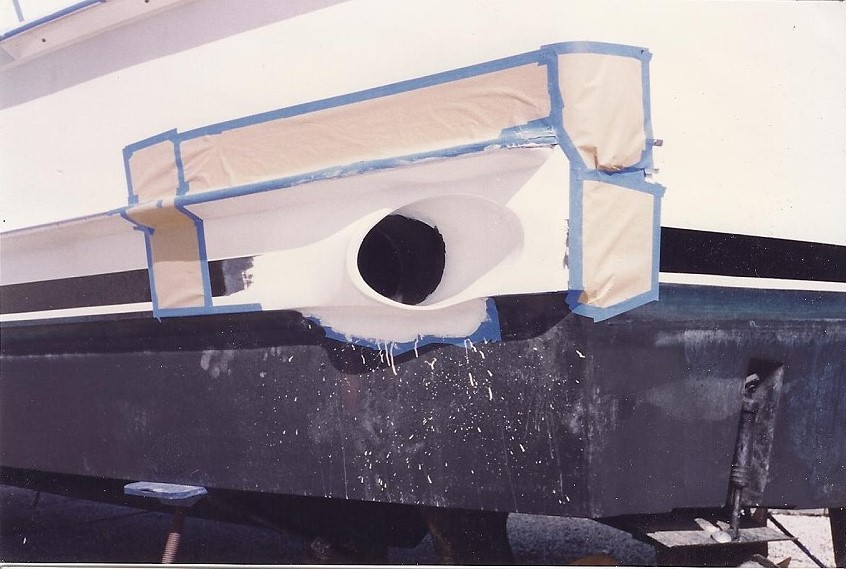
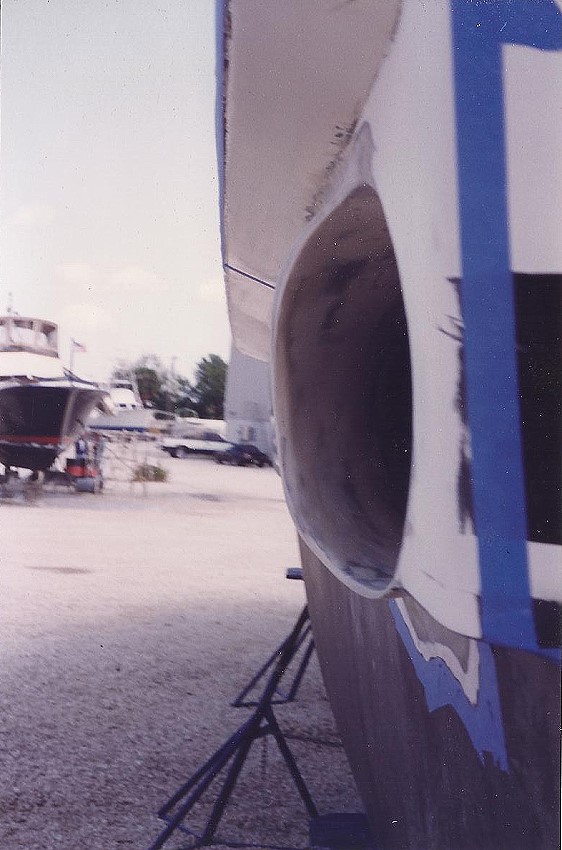
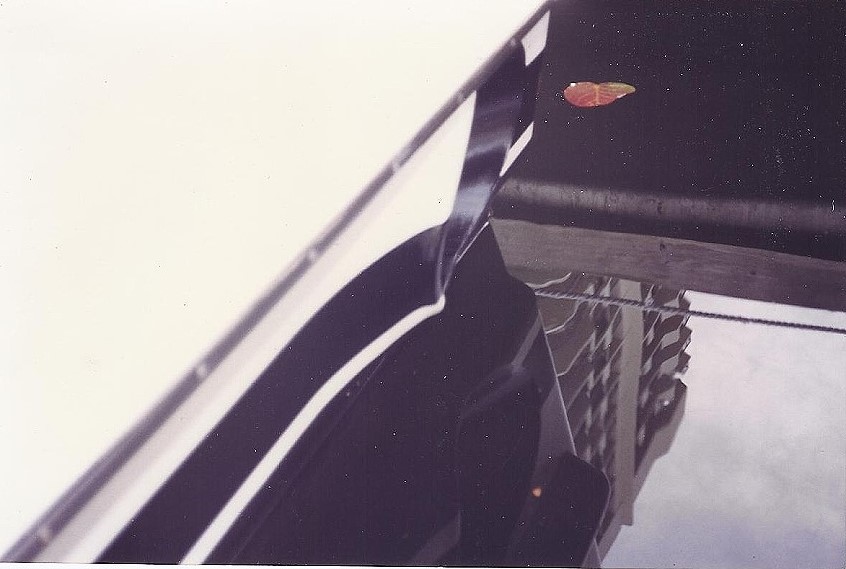
I personally don't like side exhaust... But if you do go that way, make solid flares on the forward half to deflect water flow when in forward gear at less than planning speed. Water flowing directly over an un-flaired, (flush), side exhaust port can create significant back pressure...
This is a set of flairs I did on a 50 Hatteras back in the dark ages...
Flush side exhaust
plywood build up
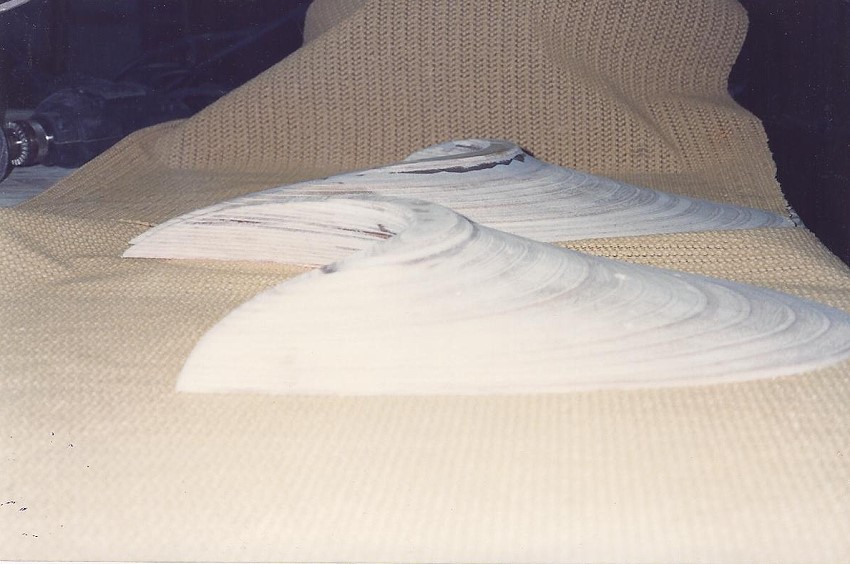
mounted
Re: Teak Cap & Coaming
Posted: Jan 13th, '13, 15:52
by bob lico
Bob nice job .when i built mine I had no help or advice.i wish I had access to those wide boards ,as usual i had to do it the hard way trying to book match side by side grain so i had to I used a spline the entire length .i was completely against the hawse pipe out back so I went with the double splice at corners so the hawes pipe would not have a splice thru it.i use cardboard then pine for template before I made splice cuts .i wish I would have seen Jp's boat or your first and went with teak inside a much better look then my first through of soft stamoid Coaming with Azak back board. I cannot change because there is no teak overhang to put inside teak under and there is a quarter round on top board edge so I have no options to correct! Some day I I would like to consult with a expert and make a Inside quarter round then cut away 1/4" of the remaining wood and try to make a " disappearing splice line as you look at it from the top.do to the fact this would be a very thin out piece it would be subject to flake off.any suggestions?
Re: Teak Cap & Coaming
Posted: Jan 13th, '13, 20:34
by Bob H.
Ray, I didnt use a saw sled just got the side planks really close clamped them in place then got the rear plank even closer, clamped it in place with the transom crown, clamp a guide block in place along the mitre the exact distance from saw blade,then cut each plank simultaneously, nibble each piece, tap the transom plank in closer,cut and repeat, keeping an eye on the angle, I did this about 25 times per side, in the end your cutting both planks at the same time, when your happy stop. Sorry no pics of this process.Thanks for all the feedback guys..BH
Re: Teak Cap & Coaming
Posted: Jan 13th, '13, 20:56
by CaptPatrick
I'd say that you have the right be 'bout as proud as a buck in rut...
Re: Teak Cap & Coaming
Posted: Jan 13th, '13, 22:51
by RAWicklund
Your description draws a great picture... Thanks
Re: Teak Cap & Coaming
Posted: Jan 14th, '13, 15:37
by Bob H.
Thanks Capt Pat, This project came out way beyond my expectations, I had help from a good carpenter, put the two of us together and you see the results. Not bad for having no idea of what we were getting into, just took our time hand planed the boards, made the fit "JUST RIGHT" and glued them up and sanded them down, routered them into shape and there you go.BH
Re: Teak Cap & Coaming
Posted: Jan 14th, '13, 20:12
by Capt.Frank
Bob,
Don't understate yourself you have become a true craftsman in your own rights. The boat is looking awsome.
Re: Teak Cap & Coaming
Posted: Jan 14th, '13, 23:24
by bob lico
bob here is the problem the coaming boards are cut flush with fiberglass on inside of cockpit and the boards are radius on edges.i cannot come up with a way to m ake teak on inside like yours. anybody help.
Re: Teak Cap & Coaming
Posted: Jan 15th, '13, 07:46
by Charlie J
i would not worry about it bob, it looks great the way it is
Re: Teak Cap & Coaming
Posted: Jan 15th, '13, 08:00
by bob lico
Thank you Charlie ,what do think about white stamoid Coaming to protect your knee's?
Re: Teak Cap & Coaming
Posted: Jan 15th, '13, 08:31
by Charlie J
up keep would be a bitch, they most always rip
personally dont care for them
Re: Teak Cap & Coaming
Posted: Jan 15th, '13, 08:35
by bob lico
As a good fisherman in all kinds of weather your opinion is well taken.
Re: Teak Cap & Coaming
Posted: Jan 15th, '13, 08:41
by PeterPalmieri
Bob Lico, I agree with Charlie. You lost a lot of the spring to that deck and most of the fall to Sandy. You've got a great boat, just go fishing!
Re: Teak Cap & Coaming
Posted: Jan 15th, '13, 08:50
by Dug
Oh my god Bob. That is amazing work. From one teak fan to another, I bow to you...
Dug
Re: Teak Cap & Coaming
Posted: Jan 15th, '13, 13:01
by Stephan
Bob Lico-
How did you hinge your engine covers? My hinges are on the outside of the engine cover and claim a banged toe at a rate of a couple per season...
Thanks,
Stephan
Re: Teak Cap & Coaming
Posted: Jan 15th, '13, 21:19
by bob lico
I eliminated the outside hinge but much more important I corrected a serious flaw in a 31 Bertram.my son works the cockpit while we fish. He keeps the cockpit floor clean of fish guts,blood bait , whatever spills by using wash down pump.the salt water goes thru space between engine covers and floor and drips on gears causing rust so instead of wire brush and paint I came up with a game plan to seal that opening and have inside hinges.i cut a piece of mahogany to go from wing cover to companion way then coated with epoxy all sides.i then laminated on all sides with Biax cloth and epoxy.i then laminated to bulkhead along with 316 SS screws. Now I removed engine box and after prepping cover I rough up half of of a 3" hinge on both sides and put repeated layers of Biax and epoxy the other half of hinge gets screw to that laminated mahogany strip I installed that was 1" thick by 4" high and the width of the box . Engine/ gears are totally seal from water from cockpit.
Re: Teak Cap & Coaming
Posted: Jan 15th, '13, 23:05
by bob lico
Stephan worst then the toe ,hinge ordeal is the engine hatch lift handle when in a rush to get out of cabin the handle hit you right in the sensitive hip bone ----onch! Use marginrine plastic tub and dill hole slightly smaller ,let dish ring rest on outside.brush on mold release on inside and laminate with glass ,cloth to inside of hatch. Let it set up and remove tub .paint inside of cup to match hatch and drill and install 1/4" SS rod with nuts . Now you have safe internal handle to lift hatch.
Re: Teak Cap & Coaming
Posted: Jan 16th, '13, 20:38
by Bob H.
Bob, Id keep the gunwale just the way you have it, to add teak coaming would be a bear. I started by laying out & rebuilding gunwales, removing bertram lip ,making the surface flat and much easier to lay woodwork on. I planed on teak top to bottom from the start.The seam for the coaming would end up on top which I dont see as a good idea. My dad has coaming pads and we had a mako tied off in the cockpit, about an hour into the ride home all hell broke loose, the mako proceeded to eat the coaming pads, I mean shredded it. I like the look of Phoenix just as you have it. Simple n clean. my 2cents. Thanks Dug, tip top teak on the way cant wait to see it all oiled up.BH
Re: Teak Cap & Coaming
Posted: Jan 16th, '13, 21:01
by bob lico
Bob as always I appreciate your opinion and can see some problems inherited In a top seam or splice.i really like the looks and functionality of your set up . Well I just have to suck it in and keep what I have. I can foresee one of the guest putting a gaff into the soft Coaming and I hate the black/ green mold that inevitably starts underneath due to wet conditions you cannot avoid.probaly drool over that teak job this year in Greenport---------- you will have the boat there no excuses!
Re: Teak Cap & Coaming
Posted: Jan 17th, '13, 19:43
by Bob H.
Yes Sir Mr Lico...been working overtime since hunting season..almost ready to prime and paint...almost..BH
Re: Teak Cap & Coaming
Posted: Jan 18th, '13, 06:55
by neil
bob you are picking up the lobsters this year ,no excuses
Re: Teak Cap & Coaming
Posted: Jan 18th, '13, 08:14
by bob lico
As long as your driving I have no idea where I am in that area.
Re: Teak Cap & Coaming
Posted: Jan 18th, '13, 14:53
by neil
Was referring to Bob H
Re: Teak Cap & Coaming
Posted: Jan 18th, '13, 19:20
by bob lico
Ok I started to get nervous. I have a problem with the dock Nazi at Greenport whom wants me to abhold the 5 mph limit that starts 1/2 mile out of the harbor and not exceed 5 mph or he will turn me over to Southhold police. I have family on shelter island canal front so I go to diner 3 or 4 times a year with family and have to back up into harbor from the 1/2 mile buoy at 5 mph. No way in hell I can come in forward at 5 mph unless one engine then go 30' then off to stop ------ ridiculous the prick is gunning for me!
Re: Teak Cap & Coaming
Posted: Jan 25th, '13, 18:45
by tunawish
Bob....
Very Very Nice...!!!!
Ray