Page 1 of 2
Bow chock
Posted: Aug 22nd, '11, 07:35
by PeterPalmieri
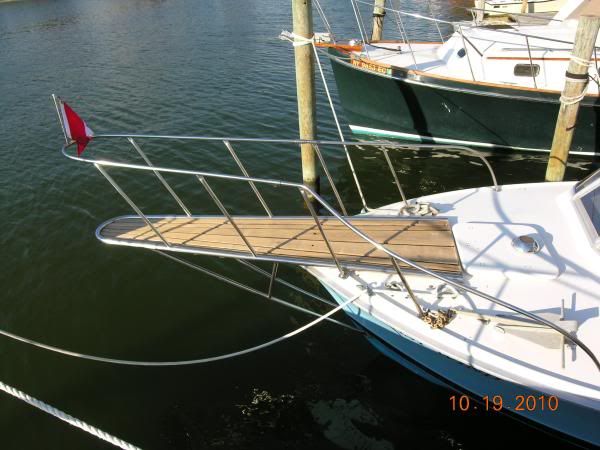
Pretty simple question. I picked up a bow chock from Charlie F.
I'm not sure if they are all the same or not. This particular one has 3 holes, anybody know what size screws/fasteners are used. Washers or a backing plate?
Thanks.
Posted: Aug 22nd, '11, 09:45
by Mikey
Bolts, not screws. Backing plate for sure. Bolts size? Take it to a hardware store and match an oval-head screw that fills the mounting holes. Assume you don't have a bow chock at present. Dreamsicle came that way, it was removed for an ugly bow pulpit. When I removed the pulpit I looked under the deck (in the chain locker) and found the original holes had been filled with Bondo. I took a small drill bit and drilled from underneath through the Bondo and set the chock on the holes and they matched. Then bought the bolts (I used stainless) to fit and made a backing plate from a piece of aluminum. Made the plate as large as possible, drilled it to match the chock, set the plate in thickened epoxy to give it equal distribution of force and bolted the whole thing together with a bit of sealant around the bolt holes and 5200 under the chock.
Posted: Aug 22nd, '11, 10:04
by PeterPalmieri
Miley,
Exactly what I was looking to know, thanks. Ive got a big old ugly pulpit, guessing I also have filled holes for the chock below it.
Any long island guys have a referral of someone that can make a backing plate for me?
Posted: Aug 22nd, '11, 10:16
by mike ohlstein
I can probably make one for you.
Tell me the size and shape.
Posted: Aug 22nd, '11, 10:22
by PeterPalmieri
I will have to poke my head into the anchor locker this week and see if I can see the old mounting holes and the space around it.
Mike if you can do it, I can either draw a template from the chock I have or drive it over to you.
Posted: Aug 22nd, '11, 12:35
by CamB25
Those chocks look to be the same as used on the 25. Mine had a 3/4" plywood backing plate and used #12 or 1/4" machine screws for attachement.
Any idea where I can find replacement lens and light sockets? thanks

Posted: Aug 22nd, '11, 13:25
by mike ohlstein
I have a spare chock, so no need for a template. I really just needed to know if you were putting it on the pulpit, or back where it belongs.
Posted: Aug 22nd, '11, 14:40
by PeterPalmieri
Mine is not the same as the one pictured above. Instead the entire top is removable no cap.
Mike planning on putting it back where it belongs, just have to pop my head in and make sure there is no backing in place already or other obstructions.
Posted: Aug 22nd, '11, 18:26
by Preston Burrows
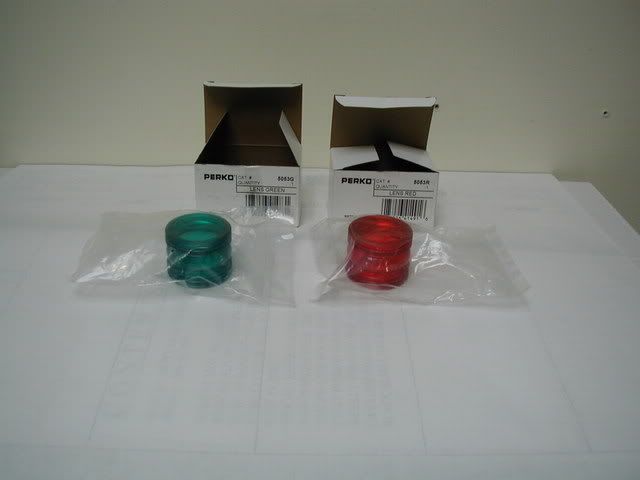
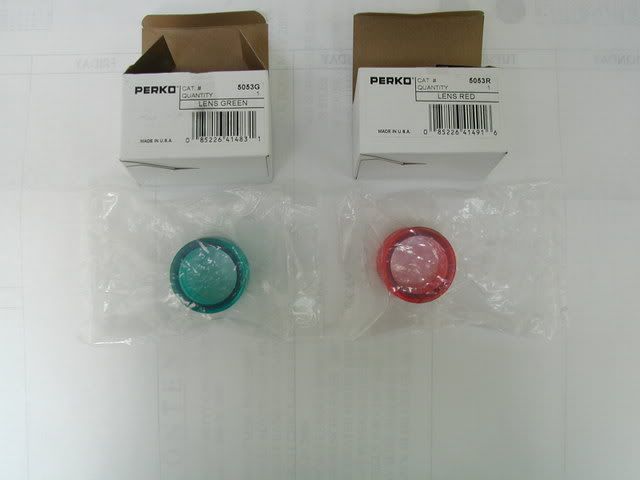
Danny at High Tide Marine had a run of replacement lenses made by Perko, I believe they would fit both the 'open' top and 'solid' tops, perhaps he still has some.
For the bulb's bases I use double contact bayonet sockets, either Cole Hersee p/n 26100BP or Perko p/n 0052DP, both of which fit, and I caulk them in place with high temp RTV sealant whenever I replace them.
For my 'solid' top style bow light the holes in the base are 5/16" diameter and I shaped a 1/4" piece of aluminum plate to act as a backer to the plywood reinforced area the light bow chock assembly is bolted on to.
These are the new lenses I pruchased from High Tide Marine:
Hopefully Hurricane Irene will not continue to bear down on them almost directly as she is presently...............
Preston
Bow chock
Posted: Aug 22nd, '11, 19:01
by Marlin
keep us posted on Irene, be safe
Posted: Aug 22nd, '11, 21:18
by CamB25
Thank you, Preston. I'll contact High Tide.
Posted: Aug 22nd, '11, 23:46
by mike ohlstein
PeterPalmieri wrote:Mine is not the same as the one pictured above. Instead the entire top is removable no cap.
Mike planning on putting it back where it belongs, just have to pop my head in and make sure there is no backing in place already or other obstructions.
I have the same one that you have, so no problem.
Posted: Aug 23rd, '11, 08:24
by PeterPalmieri
Took a look this morning.
It's a long reach in there and it's hard to get an idea of where the chock will mount. It may make sense to pull out the old and temporarily mount the chock with washers. Instead of a having a backing plate made only to find out it needs to be modified.
Makes sense?
Posted: Aug 23rd, '11, 10:47
by mike ohlstein
If you prefer.
Rip that plywood out of there and trace the underside of the deck on some paper. Poke holes where the chock will mount. I'm guessing that those holes are from the original chock, but best to check? I'll make you something out of aluminum.
And you know that the ring there is to tie off the bitter end of your anchor line, right?
Posted: Aug 23rd, '11, 14:31
by PeterPalmieri
Yeah mike. I'm getting there. There are bolts everywhere from the pulpit so it's hard to see what's what. The line isn't properly tied off yet.
The anchor chain and line that came with the boat are in bad shape. In the locker is a spare anchor and line as well. I haven't addressed this yet as I've been considering a windlass and would obviously need to match up the chain and line size. That's out so this will all come out with the pulpit.
Posted: Aug 23rd, '11, 15:13
by PeterPalmieri
While I'm at it I might as well ask the question.
Planning on upgrading the anchor rode. While I do use the anchor ball when I'm often short handed, I still plan on storing everything in the locker.
I'm thinking 30' of 1/4 chain and 300' of 1/2 3 strand line. Should I be considering anything different?
Posted: Aug 23rd, '11, 15:31
by TailhookTom
At least 1 more 300' section of 1/2". Preferably 2 more!
Posted: Aug 23rd, '11, 16:39
by Mikey
Preston,
Called Danny at High Tide and ordered the lenses. He said they fit the solid top but he isn't sure they fit the open top. I have a solid top on Dreamsicle and an open top as a paper weight. Will try lenses in both and report.
bow chock
Posted: Aug 23rd, '11, 17:06
by bobfioresi
peter i bought a set of bulbs and a set of bulb holders from hi tide sit down the cost is $110.00 per set
Posted: Aug 23rd, '11, 18:57
by mike ohlstein
PeterPalmieri wrote:I'm thinking 30' of 1/4 chain and 300' of 1/2 3 strand line.
That locker will hold about 2400 feet of 1/2" line. (Guess how I know that....) 300 feet isn't enough to anchor in 50 feet of water in a storm. If you find yourself outside and a storm kicks up, and you don't feel good about the inlet......you might just want to set the hook in about 50 feet. I would go 600 feet to start. Wait until winter. There are deals to be had in winter.
I have about 6 feet of rubber coated 3/8" chain and it has always been fine for me, although I also keep another 20 feet or so in case of a real blow. (Also a parachute anchor and a larger Danforth anchor than I have on deck)
Are you still planning on having a pulpit? You 'sort of' need one if you are going with the winch, and that will 'sort of' screw with your bow chock plan. I have no use for pulpits myself. They cost $120 per foot at the marina every year. The anchor ball is fine for me, and when push comes to shove in a shitty sea, you just throw the line in a basket on the deck until you can stow it properly.....though I admit I'm pretty damn close to insalling a 3" hawsehole for my rope locker. That 1" hole is absurd to deal with when you have any more than 40 feet of line out.
Posted: Aug 23rd, '11, 19:03
by In Memory Walter K
Get a set from any auto or marine store. The circular bases usually fit. If they're larger, grind them down, of they're smaller, no matter. Spray and/or grease the hell out of them before you set them into a bed of silicone. No matter what you do or how well you do it, if you get more than two seasons without having to open it up again, consider yourself lucky.
Posted: Aug 23rd, '11, 20:27
by PeterPalmieri
No interest in a pulpit. Weighing the benefits and draw backs of the zero cavity layout. I can live without and spend money elsewhere.
When having more then 300' are you guys connecting multiple lines and if so what connects them. I could imaging 600' Plus of line can be difficult to manage and keep from twisting and tangling.
Posted: Aug 23rd, '11, 20:54
by Tony Meola
mike ohlstein wrote: I also keep another 20 feet or so in case of a real blow. (Also a parachute anchor and a larger Danforth anchor than I have on deck)
Mike & Peter
The other option to carrying around 20 more feet of chain is a sash weight or make a lead weight up. I have to make up a new one one day but I had one that weighed about 2lbs and worked like a charm. Just wire tie it or secure it in someway to the shackle. Helps the chain lay flat if it gets a little snotty.
Posted: Aug 23rd, '11, 20:55
by Pete Fallon
Peter,
Minimum size for the anchor chain should be 3/8", I have 12' section of vinyl covered chain for everyday use on a Danforth 17S anchor, when anchoring in deep water I have another 20' section of plain galvinized 3/8'' that I schackle on. I have 600' of 1/2" line and another 300' of line in the locker to add when it gets snotty. Always used a ball to raise up anchor, chain and line. Make sure that the stainless ring is large enough to go over the 1st schackle and slides down to the top of the anchor shank schackle. I also carry a 23 Danforth for snotty conditions, a Fortress 13 S is a good hook for nice conditions, the 23 gets a little had to handle if it starts to blow, especially on the forward deck. I drop the 23 from the cockpit then walk the line forward.
Posted: Aug 23rd, '11, 21:19
by mike ohlstein
PeterPalmieri wrote:When having more then 300' are you guys connecting multiple lines and if so what connects them. I could imaging 600' Plus of line can be difficult to manage and keep from twisting and tangling.
You need an anchor swivel, and a book (or two).
http://www.thefind.com/sports/browse-st ... hor-swivel
http://www.amazon.com/Ashley-Book-Knots ... 0385040253
http://www.amazon.com/Complete-Riggers- ... 0070648409
Posted: Aug 24th, '11, 11:05
by Rawleigh
Mike: What pound working load swivel do we need?
Posted: Aug 24th, '11, 11:16
by mike ohlstein
1/2 inch twisted nylon breaks at about 5500 lbs, so it doesn't pay to go much past that. You really just need to be able to fit it over the chain on one end and the rope thimble on the other end.
Posted: Aug 27th, '11, 11:14
by charlie falkenstein
Peter- glad you recieved the chock,sounds like just another project, boats are incredible, every one hour job seems to turn into a major project, got to love it!
good luck
Posted: Aug 27th, '11, 16:30
by PeterPalmieri
I just hope Irene doesn't remove the pulpit for me.
Posted: Aug 27th, '11, 18:09
by Preston Burrows
Peter:
From what I'm seeing of Hurricane Irene's reports you guys Stateside should be fine provided you've tied off well / removed canvas / are in reasonable shelter etc.
Nassau escaped major damage,as did most islands with the exception of some of our southern islands - some of which suffered fair roof / structural damage.....likely as,for the most part, the further south the lesser the strength in building construction practices........
I was without electricity from 2am 25/8/11 until 2pm today..........amazing how much you can get done in life without electronic distractions...........Hurricane Michelle in '01 was 3 1/2 weeks without electricity.....
Mikey:
I'd be interested to hear if the lenses do fit the 'open tops.'
I would have thought they would as if otherwise Perko would have had to re-tool the lenses for production and thus have 2 different types of lenses for the 2 different 'tops' which is unlikely?
The bulb bases which High Tide sell as replacements are I believe the Perko # 0134 type which have a large circular disc as the base.....hence the price versus using simpler double bayonet bulb sockets as Walter comments/suggests.....and no matter how much silicone etc I use I'm lucky to get 3 years out of the lights before replacing due to our favourite friend mother nature..........
A Bertram 'parts cross reference' page would be a neat addition to the site.
Posted: Aug 28th, '11, 19:22
by Mikey
O.K., guys. Got the lenses from Danny at High Tide and they fit the solid-top bow chock, but do not fit the open-top.
Since Dreamsicle is on the hard I tried the lenses. Pretty cool. Too bad I have added new lights to the cabin sides.
Ah, well. The lenses look good.
Style over substance. Always look good.
Posted: Aug 30th, '11, 08:44
by CamB25
Also confirming that the 5053 lens and the flanged bulb socket do not fit the solid top chocks...not even close. The sockets could be ground down, but at these prices, I can make my own for much less. I was hoping for a plug in solution! ha! UPS is making money on both ends of this deal!
Any other thoughts for replacement lenses?
Posted: Aug 30th, '11, 11:52
by Whaler1777
I ordered a set, told him that I needed 2 sets he said theyre $37. each... I thought that was $37. per pair, nope... Its $37. each... Little more than I thought they would be...
Posted: Sep 7th, '11, 09:39
by PeterPalmieri
This project is being delayed a few weeks. Was going to bring the boat over to a friends marina where the dock bulkheads are low and allow the work to be easy. Of course with the storm they pulled all their boats and still working to get everything back in and the yard in order. It's always something.
John I have those cans of CX for you in the garage if and when we bump into each other.
Posted: Sep 7th, '11, 09:49
by Whaler1777
Still wanna check out the boat so def someday soon pete...
Posted: Sep 7th, '11, 12:36
by PeterPalmieri
Whaler1777 wrote:Still wanna check out the boat so def someday soon pete...
I'll have the seats installed and swordfish pulpit removed in a few weeks. Will have you down for a beer when she's looking better.
Posted: Sep 15th, '11, 13:41
by PeterPalmieri
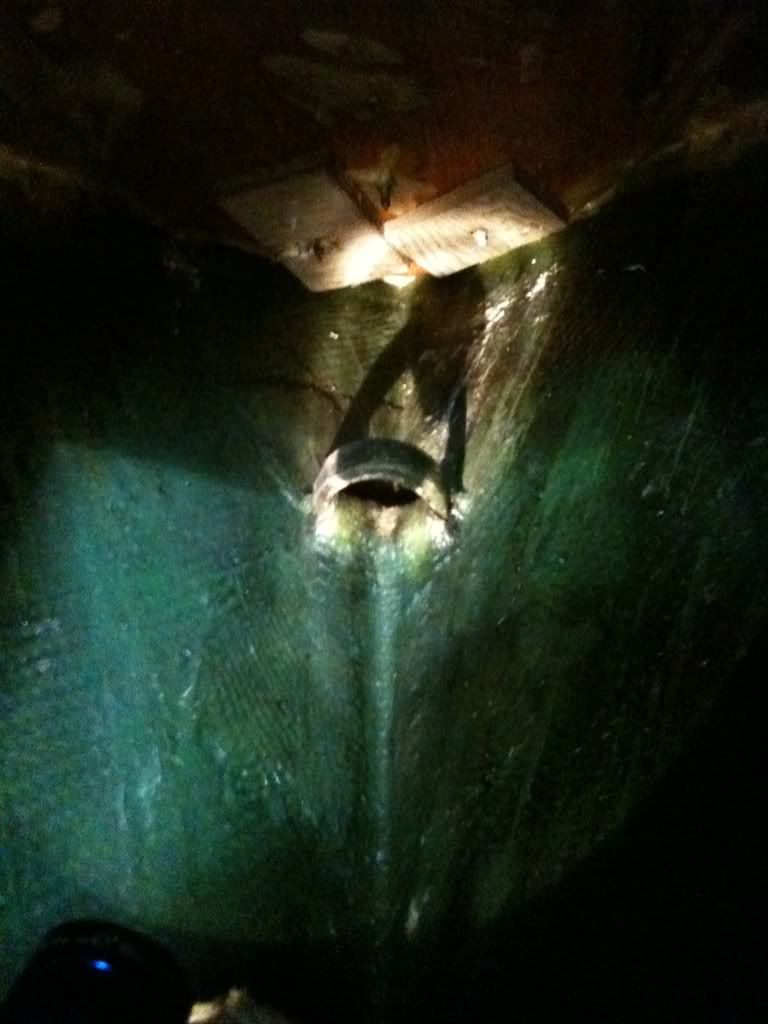
The pulpit is no more! I had the boat yard remove it this morning.
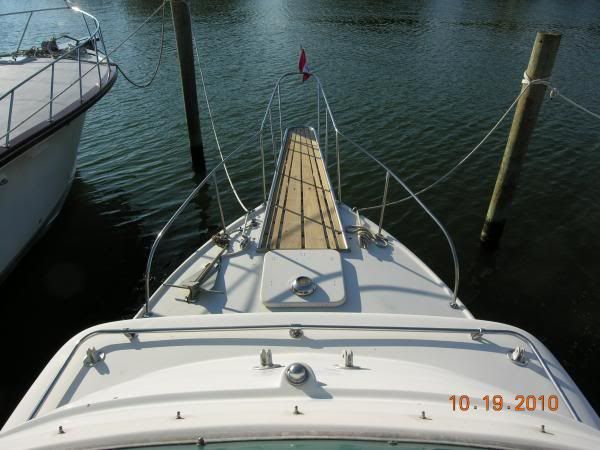
Apparently there are also plenty of abandoned screws that were hidden under the pulpit, sounds like a can of worms. I'll be back in the morning to see my Swiss cheese foredeck.
Posted: Sep 15th, '11, 20:22
by jspiezio
She looks good without it. I saw her when I was on my bike this afternoon, so I rowed down and checked it out. Going to be very nice.
Posted: Sep 15th, '11, 20:29
by PeterPalmieri
She is coming along. Looks a million times better, from ten feet away.

Up close you can see it's not gonna be easy

And since I had the rare occasion of both babies together figured I'd shoot a quick family photo.

Posted: Sep 15th, '11, 20:42
by Tony Meola
Peter
Not so bad. Since it is the deck, you could fill and fair the holes. Then roll and tip on Awl Grip and add non skid. Good excuse to paint the deck from the bow back. Figure a couple of weekends in the spring.
Posted: Sep 18th, '11, 16:09
by PeterPalmieri
Gerry could you give me more details of the functionality of this setup?

Posted: Sep 18th, '11, 16:17
by In Memory Walter K
Peter- Normally you would have a port and starboard bow line coming through that bow chock. I would suggest two side by side cleats, one for each line. In times of storm tie-ups you would be able to use heavier lines as two bow lines on one cleat will be bulky, to say nothing about the stress on that one cleat. Mine came that way and I would never think of changing it. Walter
Posted: Sep 18th, '11, 16:28
by PeterPalmieri
Thanks Walter. I'm planning on having two cleats.
Thinking about the idea of a windlass with no roller or pulpit. Let the windlass do most of the work just the last few feet by hand.
Posted: Sep 18th, '11, 17:58
by In Memory of Vicroy
Pete - before you go with the windlassl (sorta of a mess without a pulpit) consider using a round blow-up fender float - say 18" diameter - and a stainless snap ring to clip on your anchor line, then motor at about a 30 degree angle to the anchor and let the float bring the anchor to the surface, then have someone in the cockpit reach the anchor line with a boat hook and just flake the line down in a basket or bucket in the cockpit. Works great every time and you can hose the chain and anchor off right alongside the boat. I added a large clip on a short line off one of the stern cleats to snap over the anhor line to keep it out from under the boat when motoring forward.....no need to go on the bow other than to clip the float on the anchor line when you first set tha anchor - from there everything is done from the cockpit, except threading the line back into the anchor locker, which you can do at the dock. I use a 5 gallon bucket to flake the anchor line into since I usually anchor in pretty shallow water, but a cheap plastic laundry basket would do fine for a lot of line. I googled up the anchor line snap ring and got mine from some guy in Mobile, Alabama that makes 'em....thing it was about $35 and top notch.
One of the better KISS methods around.
UV
Posted: Sep 18th, '11, 18:56
by PeterPalmieri
Vic I've already got an anchor ball system and use it on occasion. My problem is I don't always have an extra hand on the boat. Just wife and two year old son. When fishing with the guys it's no problem.
While the liner is down and repairing holes I want to weigh some options my default is the bring it back to original with two cleats.
Vic I am however interested in how you clip your line off in the stern. Just a short line and a caribiner clip?
Posted: Sep 18th, '11, 19:51
by In Memory of Vicroy
Yep, just a short line with a clip on the end that the anchor line can easily slide thru - I use a stainless Witchard clip. The line should be no longer than to reach the waterline at most....its purpose is to have the anchor line "turn the corner" at the transom and stream astern - and not go under the boat and into the wheels. It also frees up the deck man to just haul in the loose anchor line without having to worry with keeping it from getting away from him as it does when using just a boat hook.
UV
Posted: Sep 19th, '11, 01:00
by Pete Fallon
Pete,
May I suggest completely beefing up your forward deck, with heavier plywood backing, the original forward decks are pretty flexable. I know Capt Pat did it to Buddy Boy and more than likely on Rattle & Hum, it makes the deck alot stiffer.
While the head liner is down you should check on the tightness of your bow rail stanchion bases, hawse hole pipes and the rub rail screws and thru bolts. I took my original rub rail off, sanded and repainted the aluminum, filled the hull deck joint with thickened epoxy, then thru bolted with 21/2" 1/4-20 machine screws with fender washers all the way around. It is also a good time to redo the wall coverings in the V-berth. I know I'm making more work for you but it will pay off if your going to keep the boat for a long time. If you have your heart set on a windlass make sure it's going to be large enough to handle a lot of chain and line, your going to be anchoring in a lot deeper water than Zero Cavity ever though of.
You have to use some heavy duty wire for the windlass, I ve seen wiring almost melted and windings burnt up because they didn't use heavy enough wire sizing.
I love making work and spending other peoples money just think of it as Obama's jobs project. Good luck
Pete
Posted: Sep 19th, '11, 11:18
by mike ohlstein
I use a single stainless Sampson Post, and have been very happy with it.

Posted: Sep 19th, '11, 12:00
by TailhookTom
To UV's system, I never anchored my B31 from the bow, nor retrieved the anchor from the bow -- I removed the bowrail for appearance purposes. I had a short length of line which I put through the cleats prior to leaving dock, that length of line was long enough to bring into the cockpit. The anchor, chain and rode all road in a large plastic laundry basket in the cockpit. When it was time to deploy the anchor the crew would attach the short line already secured on the bow cleats to the anchor line via a large D Shackle and then lower the anchor away. I kept the rode in 400 foot lengths and would add as necessary.
As UV said, no need to step foot on the bow, ever, via this system. And without a bowrail -- the only time anyone ever set foot on the bow was as I was coming into my slip.
Tom
Posted: Sep 19th, '11, 13:39
by In Memory Walter K
I kept the bow rail but I run my anchor line from the basket, to the starboard side of the boat, through the bow chock and back to the basket. then I pull the entire length of the rope into the basket via the bow chock. Before I go out, I pull out the approximate amount of rode I think I'll need, from the anchor back and cleat the rope down on the starboard midships cleat. I clip the ball on at the basket and feed the line back into the basket backwards. When anchoring, the anchor is fed out until the ball is reached, then the ball is thrown out and the boat drifts back till the line tightens...running through the chock to the starboard cleat, where it was previously tied down. Should I want more scope, I run the boat up a few feet to take off the pressure, release the line from the cleat and feed more rope out as needed, then cleat it again. The reverse if you want to shorten it. To avoid any chance of rope/prop problems, once the ball and anchor pops up, I turn the boat broadside so the pulling is midships. You DO have to pull fast as you're drifting back on it, but you're not dealing with any pressure.