Page 1 of 1
Seating options for B31
Posted: Mar 23rd, '11, 09:17
by Diego
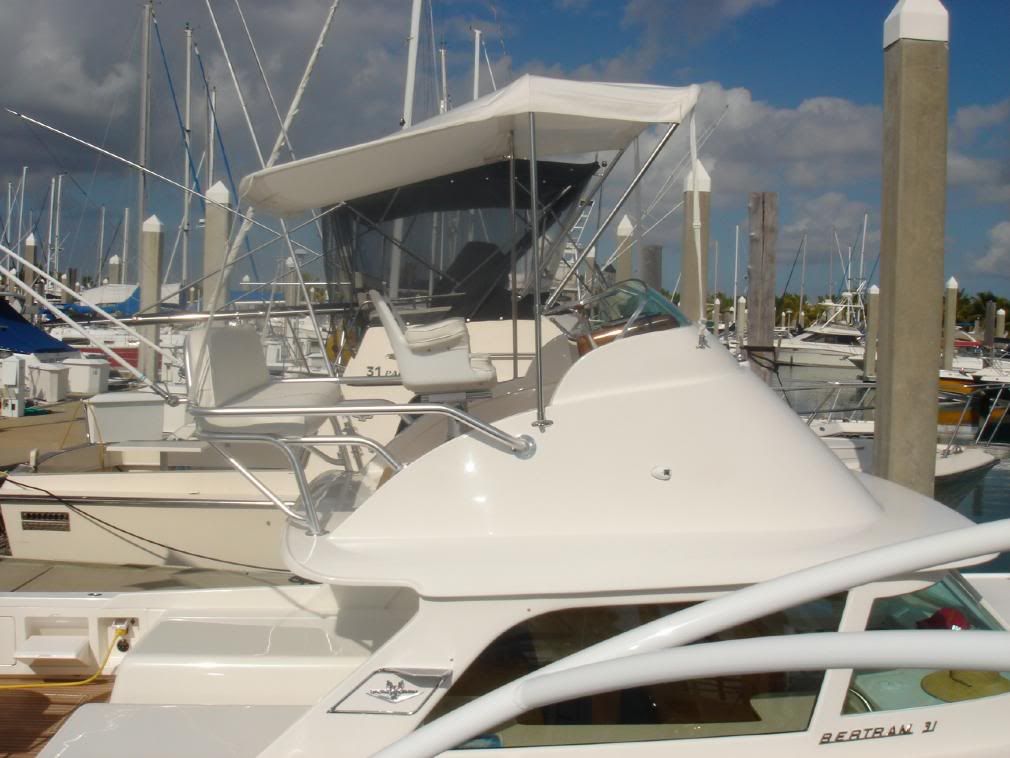
I currently have a single Captains chair (Ladder style), it takes up a bit of space on the bridge but im trying to see how i can add two forward facing seats on the rear part of the bridge. I currently have two cooler/seats on the sides of the bridge but they are rear facing and passengers that want to be up on the bridge don't really want to be facing aft.
I was thinking of somehow adding two button style or fold away, or even a small bench style leaning post that runs across the bridge that could be attached to the horizontal aluminum rail which is part of the tower, so that two people can be up top with me facing forward.
Anyone have any ideas?
Posted: Mar 23rd, '11, 09:24
by PeterPalmieri
Sounds like
zero cavity's set up is what you are looking for.
Posted: Mar 23rd, '11, 09:53
by Charlie J
i remmember somone saying the bridge had to be beefed up some, am i correct ??
Posted: Mar 23rd, '11, 11:06
by CaptPatrick
If done thoughtfully, no addition beef up of the bridge or overhang needs to be done...
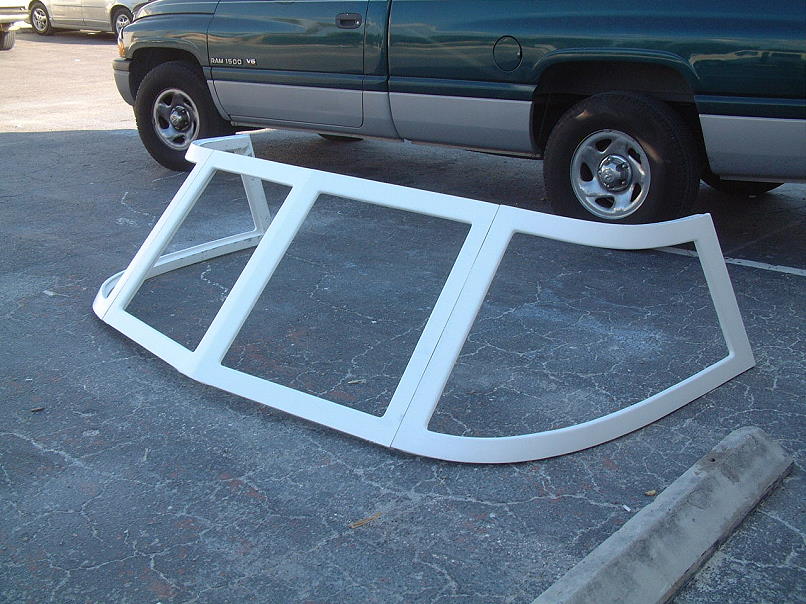
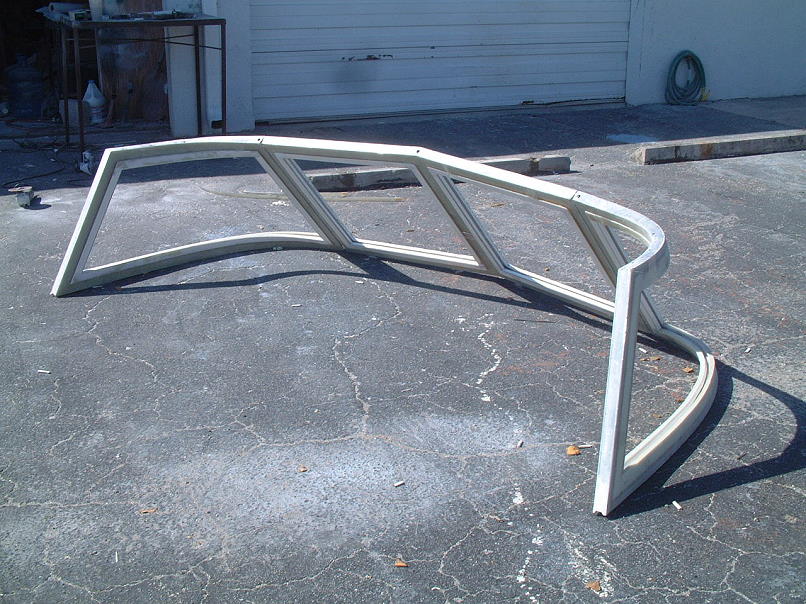
Notice that, on Gerry's B31, the two deck contact points are placed near the transition from deck to coaming; very strong structural area. The 4 points that attach to the flybridge coaming spread the load greatly. So even if he loaded 400# of passengers onto the rumble seat, the average load would only be around 67# per contact point. Actually the deck contacts probably carry 60% of the load, or about 120# each.
Because the seat is aft of all contact points, the whole load is cantilevered rather than a direct vertical load.
Posted: Mar 23rd, '11, 14:00
by PeterPalmieri
Capt pat added a link to my post and ironman's setup would also work if you are currently using a bridge ladder. It seems like his seat could be added to an existing tower possibly. I'm just a looker not a structural expert. While Zero cavity is beautifully done it may not work for a guy that is up and down the bridge a lot landing fish.
BTW of all the boats that have been redone Zero Cavity is one of the nicest in my eyes I especially love that you kept the windows and didn't glass them in, perfectly thought out warm weather family boat. Very different from chimera and Phoenix which are customized for the NE canyons. Both equally well done.
Posted: Mar 23rd, '11, 15:45
by CaptPatrick
PeterPalmieri wrote:I especially love that you kept the windows and didn't glass them in
As Paul Harvey would say: Here's the rest of the story:
Glassing Over Bertram 31' Front Aluminum Window Frames
Posted: Mar 23rd, '11, 16:43
by Gert van Leest
Hi Cap , what would be the cost of those window frames ??
Posted: Mar 23rd, '11, 16:46
by Gert van Leest
i saw the link to late , this looks a precision job
Posted: Mar 23rd, '11, 17:37
by CaptPatrick
Gert,
That was one of those "I know I can do it" & "too bullgog to quit" projects... It was also, by the time I finished, one of those projects that I swore never to do again. Took about 2 weeks of full 10 hour days to get it to an installation point, including glazing in the glass and new plexi corner windows. Regino Cabrera's crew did the installation on Gerry's boat.
Posted: Mar 23rd, '11, 19:19
by Tony Meola
Capt. Pat
If one of the windows crack, does the whole piece have to come out?
Posted: Mar 23rd, '11, 19:23
by Brewster Minton
Alot of work, but it looks great.
Posted: Mar 23rd, '11, 19:39
by Bob H.
Capt Pat, TWO WEEKS @10 hr days....no quit in your game...every one admires the quality...not many want to pay the price...great work.BH
Posted: Mar 23rd, '11, 20:25
by CaptPatrick
Tony Meola wrote:Capt. Pat, if one of the windows crack, does the whole piece have to come out?
Nope, all four sections, (2 tempered mineral glass, 2 acrylic), are replaceable from the inside. Remove the 360º fiberglass trim, dig the offending piece out, and glaze in a new piece...
Posted: Mar 23rd, '11, 20:51
by PeterPalmieri
Just went through the blow by blow on that. Some work you did there, doesn't look like fun but the final product is amazing.
Posted: Mar 23rd, '11, 21:34
by CaptPatrick
doesn't look like fun but the final product is amazing.
Thanks, but believe me, Pete, rarely has there been any project that I've done over the past 40 years that has been "fun"during the "blow by blow" phase... It
IS the final product that keeps me motivated and moving forward.
Randy can attest to the concept of just seeing something in the minds eye and then doggedly going about making it happen in the real world.
Posted: Mar 24th, '11, 07:43
by PeterPalmieri
Capt Pat. Looking back on that project do you now think there is a better way to go to get the same end result?
Sorry to be so far off from the seat project.
Posted: Mar 24th, '11, 08:00
by CaptPatrick
Nope, I'd pretty much do it the same way IF I did again, but I'd know in advance what to charge....
Posted: Mar 24th, '11, 08:51
by Whaler1777
Capt, I would love love love to do that to the sedan... Its an amazing alternative to glassing in the windshield completely... (For those that need to see out of them) lol...
Posted: Mar 30th, '11, 14:49
by Diego
Thanks a lot everyone for the input im going to investigate a little more into the zerogravity, and see if thats an option.