Time to remove old gas tank on my 26 Bertram FBSF.
Questions, What is the fesibility of removing this thing intact rather than cutting it into pieces?
Would this be possible for one man, me?
I see it would be easy to cut the fiberglass tabs away, but how would it be posible to get straps under it for the pull?
What would you think of putting a couple of 4x4's across the gunnels and a floor jack on them connect straps and jacking till it pops free?
Anybody actually do this on a 26 footer?
any info would be greatly appreciated, Thank You.
Newbe here 26 Bert gas tank switch
Moderators: CaptPatrick, mike ohlstein, Bruce
-
In Memory of Vicroy

- Senior Member
- Posts: 2340
- Joined: Jun 29th, '06, 09:19
- Location: Baton Rouge, LA

I believe there is a very thorough and detailed discussion about this on the 25 site. Peter has a 26', and did a well documented R&R on a tank.
http://simplifying.net/phpbb/index.php
http://simplifying.net/phpbb/index.php
registering
I am trying to register on that site so I can ask them.
I don't think I can grow 5'.
I don't think I can grow 5'.
-
Brewster Minton

- Senior Member
- Posts: 1795
- Joined: Jun 30th, '06, 07:44
- Location: Hampton Bays NY
- Contact:
Yes, I did this job myself on my 26FBSF. It's not too bad a job... but unlike the 31 tanks you can't get under the edge with wedges easily.
Yes, somewhere on the 25 board there is a detailed thread with pics etc.
I replied to Rocket's post about your question over there:
http://simplifying.net/phpbb/viewforum.php?f=1
You don't need to be registered just to read the posts, but I hope you will anyway. I think you will find the community over there as friendly and helpful as here.
I will see if I can find the old thread, but either way I am happy to help and to answer any questions you may have.
Peter
Peter, Thanks Greatly for your reply.
Yes with all due respect I realize its to close to wedge the 26 unlike the 31 and still the 25 isn't similar at all. So really need info as I am planning on doing this alone. Hang around I may have to ask some things. But I am still searching on the 25 site and have repeatly tryed to register. Cannot read the code have e-mailed admin a bunch.
I have had this B26 23+ yrs and owned boats big and small for 50+ yrs and this B26 is perfect for my use and gets enormous attention an many offers to purchase. Will post pics on 25 site, I Hope.
I have had this B26 23+ yrs and owned boats big and small for 50+ yrs and this B26 is perfect for my use and gets enormous attention an many offers to purchase. Will post pics on 25 site, I Hope.
-
Skipper Dick

- Senior Member
- Posts: 330
- Joined: Jun 29th, '06, 08:22
- Location: Cape Coral, Florida
- Contact:
Chanse,
When I removed the 190 gallon tank from my 28, I backed up under my lift and put a chain with a hook in the siphon tube hole and lifted the tank out. It took a few minutes for the up pressure to pull the tank up from it's seated position, but it worked. Then I took a sawzall and cut it up so I could handle it by myself..
Dick
1983 Bertram 28 FBC w/300 Merc Horizon
Dick,
When I did mine I considered something similar to your proceedure but rejected it... here is why:
In the 26 the tank under the deck is wider than the hole through the deck.
Mine was on its trailer at the time. I figured as I lifted from an external foundation point, i.e. a lift on the ground beyond the hull and trailer, I would unload the trailer suspension. So the whole boat would rise up a little as I lifted that way. Then when the tank broke loose there wouldn't be anything lifting the hull and trailer anymore, so it would fall; and then the tank would slam into the deck above it as the boat fell away. This could have caused damage.... maybe not, but maybe.
So I chose a method whereby the foundation point for the lift was 100% hard-connected to the hull: A strong back across the gunwales to support a jack to lift the tank. That way when the tank pops loose the hull doesn't drop away. For the same reasoning I used a chain for lifting, not a rope. Stretch in the rope could have caused the tank to pop up into the underside of the deck.
In the end the zero stretch of the chain and a strongback across the gunwales did the trick with a floor jack used to provide the muscle. The floor jack turned out to be overkill and a stout lever would have worked just as well and would have been simpler.
The external lift system would work just fine in other cases where the boat wasn't on a compliant foundation like a trailer, or if the hull was a lot heavier, or if the hole in the deck was big enough.
Chanse,
I couldn't find the old thread on the 25 site. Too bad. But I am here and also over there a lot so ask away and I will do my best to provide answers to the best of my knowledge.
re: the replacement tank... yeah, you aren't there yet but you will be soon enough.... In my 26 nothing about its build was precise. Under the hatch there are stringers. Under the tank there are stringers, under the deck forward of the hatch there are stringers. None of these were parallel!
Around the hull stringers there was a lot of extra glass and resin to make fillets. None of that was precise.
Strong and functional to be sure, but not precise.
My point is that you should not spec your new tank until you get the old one out and carefully measure EVERYTHING. What fits between deck stringers to port may not fit to starboard. What fits between hull stringers aft may not fit forward and so on. Even the deck, which in the 26's was installed as a single module, wasn't exactly level to the chines of the hull!
BUT by careful design I was able to increase my fuel capacity none the less. I think the original tanks were deliberately made undersize to accomodate the aforementioned production variances.
Because of the big hatch over the tank and because the tank itself has a section form in the shape of a T you will want it to be fabricated out of 3/16 stock, not the usual 1/8. That is because with the hatch out sooner or later someone will stand on the top of the tank. Also supporting the outboard ends of the T sections is problematic so it is easier if the tank is robust enough to be self supporting, which in 3/16 stock it will be.
I got a lot of quotes to fab my tanks from a lot of vendors. About half of them ignored my request for 3/16 stock and quoted 1/8 anyway, so check carefully.
Peter
Rocket and Peter, Thanks greatly for your assist
I have registered unto the 25 site but have to wait admin approval from a Russ I believe.
Sounds like you really got this thing down Peter. Those pic's would be invaluable. I am also waiting for the weather to clear to sling the boat out. It will be on a heavy tandum trailer inside my storage building the first thing I will do is open that hatch over the tank and really eyeball this thing. I thought the wall inbetween the tank and batt compartment was a solid bulkhead, But it sounds as though I should cut it away to access and free up the rear of tank.
I definately will not order a new tank until this one is out. Thank you for that advice and the thickness caution.
Skol!
-
CaptPatrick

- Founder/Admin
- Posts: 4161
- Joined: Jun 7th, '06, 14:25
- Location: 834 Scott Dr., LLANO, TX 78643 - 325.248.0809 bertram31@bertram31.com
Capt Patrick,
Thanks for that. Somewhere on the 25 baord the whole thread exists, I'd like to find it. But in the meantime I don't have alot of time to put the pics up. However, if Chanse hasn't gotten his registration straightened out with Russ shortly I will probably take you up on the offer. It is a lot better to have the dialog where we can both post.
Peter
Here are a few pics to get you thinking:
Click on the pic below for a little slide show:
OK a few quick notes:
The tank top had a few wood shims on it that were placed there by some prior owner to support the battery hatch cover. Not a good fix. I fixed the battery hatch cover properly and eliminated them.
The "Andy Vou" tank is from a later model 26 inboard from the '80's, but that T-like section is similar to the FBSF tank. (Aside: Some of the guys will recall a very recent thread about a fellow looking to buy one of these 1980's inboard 26's and he was worried about getting the tank out. Well, here it is. Not at all hard to do.) In my FBSF the tank was wider than the hole in the deck, so I had to do a little slice and dice with a sawsall.
The pic with the battery shelf shows the back face of the tank at the top of the frame; Starboard is to your right.
NEXT:
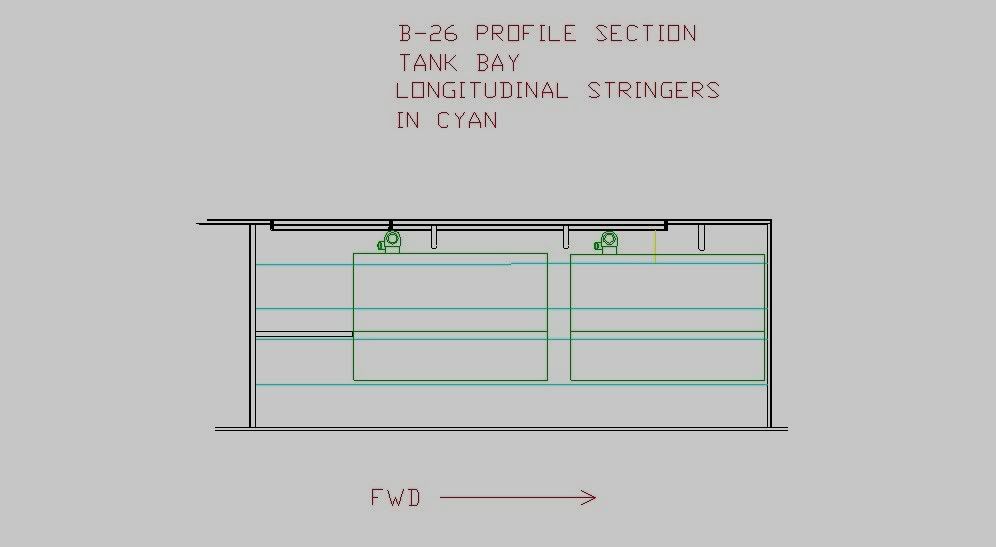
A single shot of a section view of what is under the tank

Think of this as a section view about mid-tank; with the tank removed; looking aft.
Along the hull note a keel stringer, two inboard stringers, and two outboard stringers.
The black horizontal line just above the two inboard stringers is the battery shelf. It is glassed in, but not structural.
The blue line below the level of the deck represents athwartships deck stringers. There are a couple of them under the removeable hatch and another forward of under the permanent deck.
Not shown, (because I didn't know it was there when I made this drawing) is a piece of marine ply making a lower deck just above the keel stringer running outboard to about the base of the inner hull stringers. That is what the tank sits and is bedded on. It is bedded in an kind of adhesive putty probably made up of polyester resin and some sort of filler.
The tank has a T shape because it sits down on this lower deck and rises up between the inner hull stringers, and from there extends outward over them to just about the outboard stringer tops, where it was tabbed in place with fiberglass.
In the pic of Andy's tank you can see that Bertram originally also put a bevel on the bottom of the cross of the T to match the deadrise of the hull. For my replacement tank(s) I eliminated this extra step, but was still able to increase capacity. What you choose to do is up to you.
The white line part of the cockpit deck in the picture depicts the lip of the hatch.
A single shot of a section view of what is under the tank
Think of this as a section view about mid-tank; with the tank removed; looking aft.
Along the hull note a keel stringer, two inboard stringers, and two outboard stringers.
The black horizontal line just above the two inboard stringers is the battery shelf. It is glassed in, but not structural.
The blue line below the level of the deck represents athwartships deck stringers. There are a couple of them under the removeable hatch and another forward of under the permanent deck.
Not shown, (because I didn't know it was there when I made this drawing) is a piece of marine ply making a lower deck just above the keel stringer running outboard to about the base of the inner hull stringers. That is what the tank sits and is bedded on. It is bedded in an kind of adhesive putty probably made up of polyester resin and some sort of filler.
The tank has a T shape because it sits down on this lower deck and rises up between the inner hull stringers, and from there extends outward over them to just about the outboard stringer tops, where it was tabbed in place with fiberglass.
In the pic of Andy's tank you can see that Bertram originally also put a bevel on the bottom of the cross of the T to match the deadrise of the hull. For my replacement tank(s) I eliminated this extra step, but was still able to increase capacity. What you choose to do is up to you.
The white line part of the cockpit deck in the picture depicts the lip of the hatch.
NEXT
Singles:
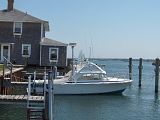
A decent shot of the tank before I started.

It is a tight fit under the side of the deck with a 5" angle grinder and a diamond cutting blade, but it just makes it (in this shot I have not changed the grinding wheel out for the diamond blade yet); In a few spots I could only fit a Dremel with a little abrasive wheel on it. The Dremel cuts the glass like butter, but the wheels wear out really fast. Get the set up with replaceable disks on a spring loaded holder that you chuck into the Dremel. Those disks are reinforced and last a few minute instead of several seconds that the non-reinforced last. The same Dremel is a good tool for cleaning up some of the rough edges later too, so don't skrimp and try to do the job without it. The price to buy a decent one isn't too much and is worth every penny.

Here is my jack on the strongback. I discovered later I could have used a lever just as easily.

Singles:
A decent shot of the tank before I started.
It is a tight fit under the side of the deck with a 5" angle grinder and a diamond cutting blade, but it just makes it (in this shot I have not changed the grinding wheel out for the diamond blade yet); In a few spots I could only fit a Dremel with a little abrasive wheel on it. The Dremel cuts the glass like butter, but the wheels wear out really fast. Get the set up with replaceable disks on a spring loaded holder that you chuck into the Dremel. Those disks are reinforced and last a few minute instead of several seconds that the non-reinforced last. The same Dremel is a good tool for cleaning up some of the rough edges later too, so don't skrimp and try to do the job without it. The price to buy a decent one isn't too much and is worth every penny.
Here is my jack on the strongback. I discovered later I could have used a lever just as easily.
Last edited by Peter on Oct 23rd, '10, 07:45, edited 1 time in total.
Another little slide show:
Click the image to start:

The third shot is of the hole after the diced up tank was out. I a on the fly bridge looking down. THe battery shelf is at the left of the frame. Port is top of frame.
I'll post a few more when I have a few more minutes.
Peter
EDIT: THis is probably some sort of screw up at Photobucket, but if you first click on the above thumbnail for the slide show, you can then click on the "next" button to the upper right of the slideshow window. This will step you through my complete photo album pic by pic. Most of what is there has something to do with the Bert, there is nothing of a personal nature so go ahead if you wish. A lot of the shots are the singles that make up the slide shows too.
Th first click of the "next" button after this slide show is another slide show. A few clicks on after that you will find additional views of the strongback set up and so on.
I'll still try to put any really important relevant information up directly because I don't know if Photobucket is going to "fix" this issue any time soon. In the meantime anyone who cares to can go ahead and rummage around.
Peter
Click the image to start:
The third shot is of the hole after the diced up tank was out. I a on the fly bridge looking down. THe battery shelf is at the left of the frame. Port is top of frame.
I'll post a few more when I have a few more minutes.
Peter
EDIT: THis is probably some sort of screw up at Photobucket, but if you first click on the above thumbnail for the slide show, you can then click on the "next" button to the upper right of the slideshow window. This will step you through my complete photo album pic by pic. Most of what is there has something to do with the Bert, there is nothing of a personal nature so go ahead if you wish. A lot of the shots are the singles that make up the slide shows too.
Th first click of the "next" button after this slide show is another slide show. A few clicks on after that you will find additional views of the strongback set up and so on.
I'll still try to put any really important relevant information up directly because I don't know if Photobucket is going to "fix" this issue any time soon. In the meantime anyone who cares to can go ahead and rummage around.
Peter
OK... you have seen enough photos that you probably are getting a good mental picture of what I did and what you will have to do.
I have said repeatedly that the tank won't come out in one piece, but maybe, just maybe it will..... You see I didn't take the battery shelf out until I had the tank out and could look underneath it. I didn't know what was under there or if it was structural.
The tank itself extends beyond the hatch forward under the deck (but not all the way to the next bulkhead). It is also wider than the hole above it. Since the forward part of the tank would have bumped up under the deck forward if I tried to roll the tank, it prevented me from rolling it to sneak one wing out, and then lift it free. So I sliced mine up in place. It wasn't difficult but it did take some effort and time and grunt work.
However, IF the battery shelf is cut out first, then the tank might be able to be slid aft enough to have the forward part of the tank clear the deck and then MAYBE you can accomplish the roll-over maneuver, extracting the tank in one piece.
If I knew then what I know now, I would have at least given that a try. In the end the battery shelf is going to go anyway, and it is no biggie to replace. You will spend less time taking it out and discarding it, and replacing it new than you will trying to work around it. And you will want it out of the way to put your new, bigger tank back in.
While I am on the subject, the old battery shelf was glassed directly to the tank. Since you will be putting in aluminum tanks you will want to consider a few things regarding that.
The aluminum tanks will not seal to the stringers with fiberglass like the old tank, so stuff can find its way under there. For that reason you will want a way to inspect and clean the bilges in that part of the boat. So it will be best if the new battery shelf is desigend to be removable. Next the stringers are not parallel or level across the tops, so just resting the new shelf on top of them isn't really a great method.
Sooo.. you will end up putting some sort of cleats on the aft bulkhead between the battery compartment and the engine compartment to support the aft side of the new shelf.... and scribing and beveling the outboard ends to the hull. A good fit up against the back of the tank and a little lip there to keep stuff from rolling off the shelf into the bilge at that point is a good feature too.
Mine comes out by removing a couple of big phillips head screws after you take the batteries and whatever else you store in there out. It is pretty quick and simple for the once or twice a season I do it (usually at comissioning and de-comissioning)
Peter

Chanse,
I'm sure you have already addressed this, but be sure the gas and the fumes have been fully evacuated before doing in cutting, grinding or banging that could produce a spark (not sparks from the fiberglass, but from a stray screw, bolt or fastener). We lost a guy up this way years ago when fumes ignited during work on a metal fuel tank.
I'm sure you have already addressed this, but be sure the gas and the fumes have been fully evacuated before doing in cutting, grinding or banging that could produce a spark (not sparks from the fiberglass, but from a stray screw, bolt or fastener). We lost a guy up this way years ago when fumes ignited during work on a metal fuel tank.
Tommy,
AMEN!
Be freaking careful..... but don't be afraid. BLOW the fumes out of the empty tank. Sucking them through the vac moter WILL explode things. And remember they sink in air....
How many of us have worked on cars where ventallation isn't an issue?... fumes blow away from under the vehicle... but in a blige they can build up.
Chanse....
You are just getting started. As questions come up ask away. I am a firm believer that the only dumb question is the one not asked..... Also that my answers are only as good as the source....But around here the Faithful will point out in an instant if I am misdirected.
Combined, you can't go wrong.
Peter
Thanks for the warnings, do plan on being very careful.
Winterized and now in building. Removing hatch over tank tommorow and checking it out. I am guessing I have abt 15 or so gals of gasoline in the tank that I need to get out. Was thinking of the fuel pick-up that branches to the engines, connecting a barb and some plastic hose run thru a scupper and syphoning it out. Or would there be a better way?
Thanks.
A siphon would work. I used an inexpensive electric automotive fuel pump myself. I also set it up with those little in-line disposable filters and I pumped the gas into the truck and the wife's car. I went through 3 or 4 filters!
BUT There is a trick.
Either method once started doesn't want to stop. The only way to stop the siphon is to either bleed air into the hose or to lift the output end up high enough that it is above the input end. It doesn't seem like an issue, but it is pretty dramatic when the output end is near the ground and the input end is way up high inside the boat on a trailer! A pump basically starts a siphon, so both methods will have this problem.
Be prepared to squeeze off the flow if you need to, or to "spoil" the siphon effect with bleed air.
There will always be a little gas left in the tank and you will need to scavange it somehow. Once the bronze plate is off I am sure you will get many ideas. Patience is a virtue at this step as a little gas evaporates quickly.
For the last few dregs of gas that come out of the tank you will want to put them in a bucket and place that bucket somewhere well away from your house or shop, but protected from dew and rain. The gas willl evaporate away in a few days.
Peter
Well I Finally have the gas drained. May be a 1/2 gal or so left. Gas fumes everywhere so don't even want to pump air into the fuel fill yet.
Open both ends of the building and all windows and hatches just going to do that for abt 5 days. My tank is different, no bronze opening like yours. Just the fuel pick-up and a opening for the gauge only forward and centered on the tank then the fill pipe. Do have two cables running across tank that look like there going to be a pain if there for the shift.
But its a start.
I did not have any cables across the top of my tank.
My shift and throttle cables for both motors and both stations are up under the starboard gunwale. From there they run aft to the transom where they run behind the trim panel that makes up the aft face of the cockpit, emerging into the engine compartment to connect to their respective points on both motors.
However, when I took ownership of the boat I also had it repowered that first winter. As part of the repowering the yard put in new cables, so I can't say for certain that the old ones didn't run across the tank.
When I designed my new tank I had to do some careful planning to place all the fittings, hoses etc. such that they wouldn't hit the deck stringers. If there had been cables over the top of the tank it might have made that process all the more challenging.
I am guessing that your port motor cables run over the top of the tank, through the bulkhead at the back of the battery shelf and to the motor??? If so how difficult is it to just disconnect them at the motor and un-reeve them enough to be able to secure them out of your way?
Do you have the lower station? My set up is 4 cables to each side: upper and lower station; throttle and shift from each. But maybe yours goes from bridge to inside station and then from there to the motor?
Glad to hear you got the tank dry and aired out. You are well on your way now.
Peter
Yes full controls all gauges both upper and lower. Hydraulic steering on three stations (one separate for benmar 210 auto pilot)
I think I should be able to somehow disconnect and pull them thru. Gotta look at it harder tommorow. Just need to clear them so I can begin cutting tank free. I gotta move faster as its going to snow and temps drop.
I think I should be able to somehow disconnect and pull them thru. Gotta look at it harder tommorow. Just need to clear them so I can begin cutting tank free. I gotta move faster as its going to snow and temps drop.
Chanse
When cutting and deconstructing fiberglass cold weather isn't so bad.... After all you will want to suit up from head to toe to avoid the itch!
I used a couple of disposable Tyvec bunny suits complete with hood and booties available from my local paint store. If you are normally a large, buy extra large. You will still want to put a sweat band on your head under the hood to keep sweat out of your eyes. I taped the suit at my ankles after the first go due to the booties moving in awkward ways around my feet.
I made sure to have a big garbage bag nearby to stuff the suit into when I was done. All in all it wasn't bad... but I am glad I didn't have to do it on a hot Texas afternoon or a humid Florida day. How those guys put up with it I'll never know!
Things will start to go quickly for you from here.
Peter
Chanse,
Good show. Glad you got it out in one piece.
As you draw up plans for the new tank keep a few things in mind.
First:
the vent needs to be at the highest point on the tank when you are filing it. My fill port is on my starboard deck. When I stand there with the fuel hose the boat lists to starboard, so I made sure to put my vent over to port and forward. I had to run extra hose to do that, but it works great. No "burps" back through the filler hose or overflow through the vent.
Second:
Plan on how you will make the tank fast in the boat. I had tabs welded on the outside of the tank during the fab process to make attachment points at the places I wanted them. The hard points on my hull for hold down are through bolted sst eye pads in the outer hull stringers.
Third
Make sure you provide for electrical bonding.
Fourth:
now is the time to upgrade to a better fuel level sender. The tank maker will want to know what you are going to use because he will want to mount it and pressure test the tank assembled before shipping it to you.
This is what I used and I am very pleased
http://www.wemausa.com/
Fifth;
It is pretty inexpensive at this stage to add fuel return ports even if your current engines don't require them. In the future they may be needed for Diesel or some fuel injected gasoline motors. The retuns need a provision to run the return fuel to the bottom of the tank, don't just dump it back in at the top.
Sixth:
DO NOT order the tank built until you make a quick mock up from scrap luan or hardboard or styrofoam or whatever and verify the fit. Do not assume that anything is straight square or level in that part of the boat.
Be sure that if you ask for 3/16 Al in your request for a price, that hey actually quote it and not the more common 1/8.
Peter
Good show. Glad you got it out in one piece.
As you draw up plans for the new tank keep a few things in mind.
First:
the vent needs to be at the highest point on the tank when you are filing it. My fill port is on my starboard deck. When I stand there with the fuel hose the boat lists to starboard, so I made sure to put my vent over to port and forward. I had to run extra hose to do that, but it works great. No "burps" back through the filler hose or overflow through the vent.
Second:
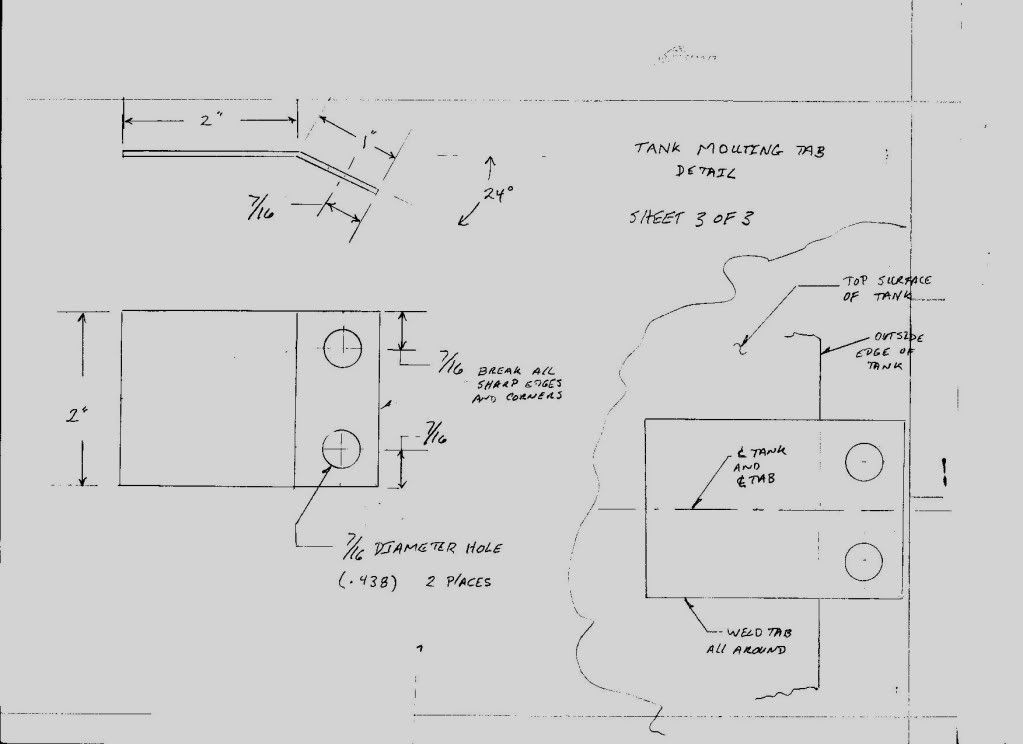
Plan on how you will make the tank fast in the boat. I had tabs welded on the outside of the tank during the fab process to make attachment points at the places I wanted them. The hard points on my hull for hold down are through bolted sst eye pads in the outer hull stringers.
Third
Make sure you provide for electrical bonding.
Fourth:
now is the time to upgrade to a better fuel level sender. The tank maker will want to know what you are going to use because he will want to mount it and pressure test the tank assembled before shipping it to you.
This is what I used and I am very pleased
http://www.wemausa.com/
Fifth;
It is pretty inexpensive at this stage to add fuel return ports even if your current engines don't require them. In the future they may be needed for Diesel or some fuel injected gasoline motors. The retuns need a provision to run the return fuel to the bottom of the tank, don't just dump it back in at the top.
Sixth:
DO NOT order the tank built until you make a quick mock up from scrap luan or hardboard or styrofoam or whatever and verify the fit. Do not assume that anything is straight square or level in that part of the boat.
Be sure that if you ask for 3/16 Al in your request for a price, that hey actually quote it and not the more common 1/8.
Peter
Chanse:
When I did my tank I replaced the single tank with twin tanks. But I put one forward of the other so that when drawing from only one tank the boat doesn't develop a list. This was a matter of my personal preference of how I use my boat. I don't often go on long trips, so with the new corn gas I didn't want a lot of fuel sitting around all summer going sour. So I fill only one tank most of the time, but have the option of filling both for a longer journey.
Here is a drawing of how my tanks fit in the boat and the actual fab drawings I used for the tanks.
Don't assume that you can simply use these for your boat as is.... but they might be useful as a starting point.
The section T shape dimensions should be close. the general layout of the sender, pick ups, vent and fill as well as the electrical bonding tab ditto. My fore-and-aft dimension of 25.5 inches would only be appropriate for the 2 tank fore-and-aft tandem set up.
RE: Sheet 1of3 Note A: a removable inspection plate is only allowed for a Diesel tank and had to be omited. The sensor I found was 100% compatible with the original gauges in the boat.
I ditched the original copper fuel lines and replaced with rubber. It is my understanding that ethanol in the fuel makes it electroconductive, so you have to bond all the shut off valves and fuel filters in the system if you eliminate the metal fuel lines. Maybe all that bonding is overkill, but it is what I did. Frankly it would have been no harder to have made new copper fuel lines and saved the electrical bonding issues.
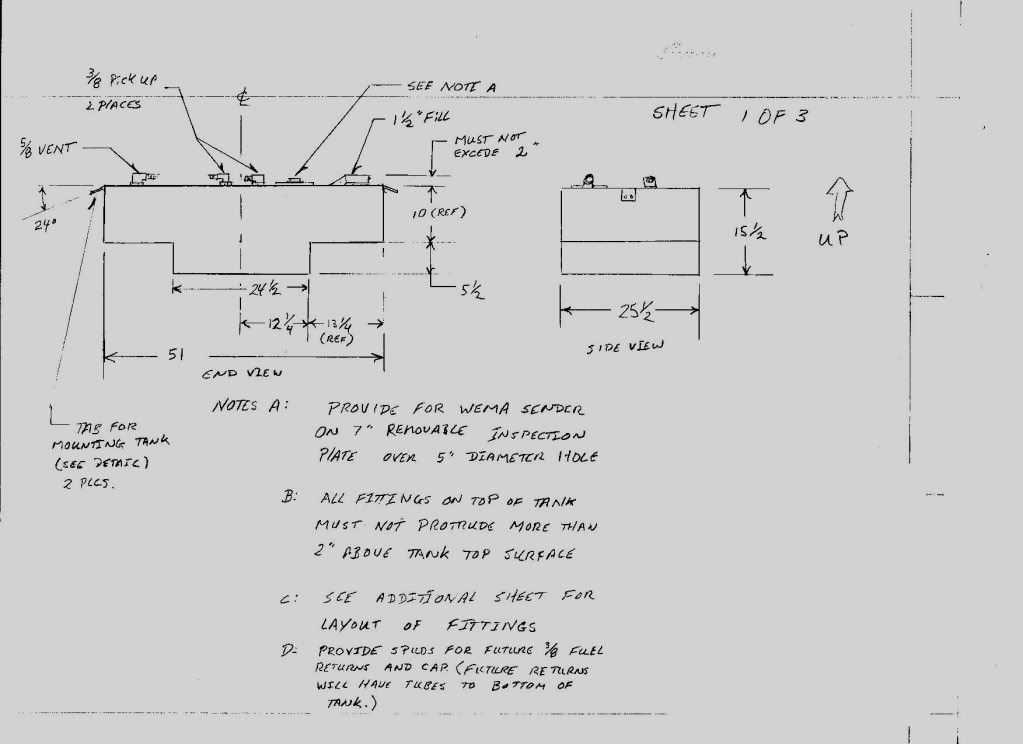
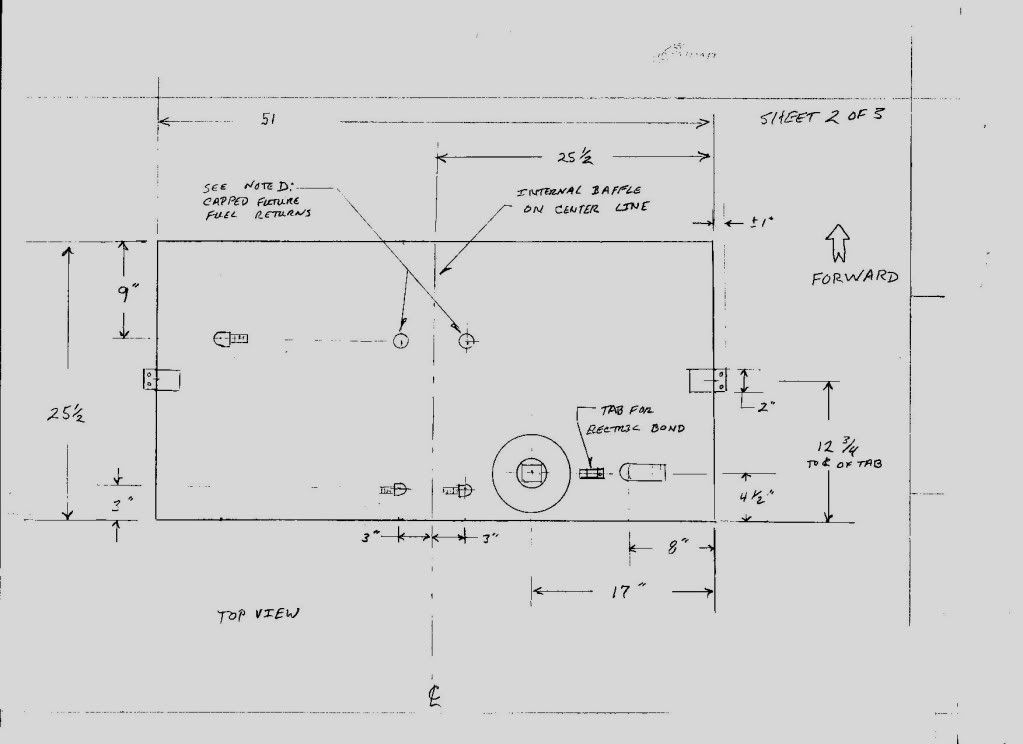
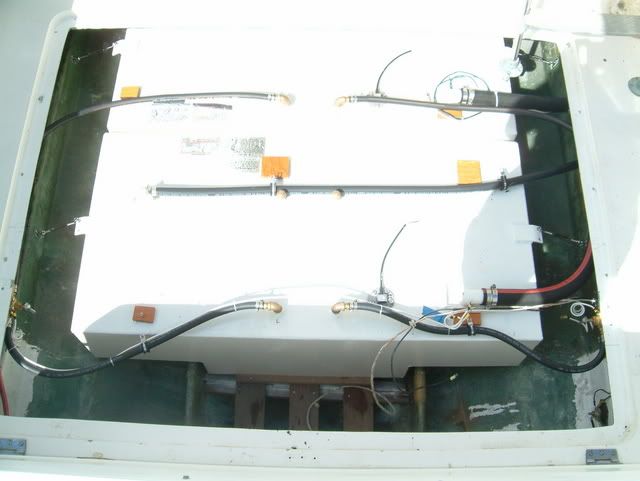

In these last two pics the yellow squares on the tank top are bits of ply which were later used to make fastening points for tie downs for wires and hoses. I bonded them to the top of the tank where I needed them using 5200
Peter
When I did my tank I replaced the single tank with twin tanks. But I put one forward of the other so that when drawing from only one tank the boat doesn't develop a list. This was a matter of my personal preference of how I use my boat. I don't often go on long trips, so with the new corn gas I didn't want a lot of fuel sitting around all summer going sour. So I fill only one tank most of the time, but have the option of filling both for a longer journey.
Here is a drawing of how my tanks fit in the boat and the actual fab drawings I used for the tanks.
Don't assume that you can simply use these for your boat as is.... but they might be useful as a starting point.
The section T shape dimensions should be close. the general layout of the sender, pick ups, vent and fill as well as the electrical bonding tab ditto. My fore-and-aft dimension of 25.5 inches would only be appropriate for the 2 tank fore-and-aft tandem set up.
RE: Sheet 1of3 Note A: a removable inspection plate is only allowed for a Diesel tank and had to be omited. The sensor I found was 100% compatible with the original gauges in the boat.
I ditched the original copper fuel lines and replaced with rubber. It is my understanding that ethanol in the fuel makes it electroconductive, so you have to bond all the shut off valves and fuel filters in the system if you eliminate the metal fuel lines. Maybe all that bonding is overkill, but it is what I did. Frankly it would have been no harder to have made new copper fuel lines and saved the electrical bonding issues.
In these last two pics the yellow squares on the tank top are bits of ply which were later used to make fastening points for tie downs for wires and hoses. I bonded them to the top of the tank where I needed them using 5200
Peter
Last edited by Peter on Nov 10th, '10, 06:47, edited 1 time in total.
Chanse
You might also enjoy this site if you haven't found it yet:
http://ccridlin.home.mindspring.com/
Look under Technical Info for a magazine review.
Chiles has since sold his boat.
Peter
You might also enjoy this site if you haven't found it yet:
http://ccridlin.home.mindspring.com/
Look under Technical Info for a magazine review.
Chiles has since sold his boat.
Peter
I think I will stay with a single tank. Abt same dimensions as yours
but 48" long I'll guess it will come out abt 105/110 gals down from original 120. I kinda like the original bronze pick-up with the filter screen I don't know abt doing that or not. The stringers and things are all slightly out of wack with each other so I am now doiing a mock-up which originaly I told myself I would'nt need to do. Beter safe...
Your tanks look white is that just a reflection or did you coat them?
I was reading that you shoul not coat and allow good air circulation. 5200 bond strips to bottom and lay a bead on them and put in place. I don't like the idea of bonding with 5200 to boat. Do you trust those turnbuckles to not loosen and hold the tank down? I was thinking of having tabs on back of tank to use as battery bottom suports and bolting tabs to eng bulkhead to prevent fore and aft movement of tank with a beefy alum channel bolted to the tabs. Also turnbuckles to stringers.
Yea I am aware of the Mazda's. I had contacted owner abt the time he sold it. I think he was asking 37,500 OBO. I didn't know Mazda made marine versions. I'll bet it screamed and was as loud as a Banchee fighter jet. Not a combo I would care for. I did like the insulation he used in the eng box. I wish I knew how to do that.
I am aware of the B26 article that apeared in the Lakeland Mag as I subscribed to it and held onto that issue for along time.
-
In Memory Walter K

- Senior Member
- Posts: 2912
- Joined: Jun 30th, '06, 21:25
- Location: East Hampton LI, NY
- Contact:
-
CaptPatrick
- Founder/Admin
- Posts: 4161
- Joined: Jun 7th, '06, 14:25
- Location: 834 Scott Dr., LLANO, TX 78643 - 325.248.0809 bertram31@bertram31.com
Determine where you can have tabs welded to the tank that will correspond to points that they will be bolted or screwed to the stringers.
Take into account the thickness of any foam board strips that will be added to the bottom of the tank acting as buffers between the tank and hull.
The best tabbing will be from aluminum angle welded to the tank sides that project outboard over the stringers.
Once the tank is complete, scrub it clean with an abrasive soap and water combination to remove any grease or oils. Rinse well and alodine the entire tank. Alodine is an acid & chromate solution that will clean all aluminium oxide from the surface and leave a microscopic film, preventing new formation of oxidation. This leaves you with a clean, oxide free surface that is then coated with an epoxy.
The epoxy coating can be coal tar epoxy or any of the epoxy truck bed liners that are sprayed or rolled on.
After the final coating has cured, 5200 the buffer strips to the bottom of the tank. Don't use any adhesive between the strips and the hull.
Drop the tank in place, bolt or screw it down, and your pretty much done.
Don't forget to both bond the tank to your zinc bonding system and ground the fuel fill, both at the tank and at the gunnel.
Thanks CaptPatrick, I relieved to know that the tank can be placed
securely WITHOUT using the 5200.
Will complete my mock-up tank and check that all dimensions are good
than draw it up. Try getting quotes for the build on Monday. At least I will have it to start the coating in spring when I return from my winter break in Mexico. It is certain to be below freezing soon. And my fully insulated building isn't warm enough for painting, the brand new modine heater that has been sitting on a pallet for 4yrs now waiting for help to install doesn't do much good..
Always another project waiting .... always!And my fully insulated building isn't warm enough for painting, the brand new modine heater that has been sitting on a pallet for 4yrs now waiting for help to install doesn't do much good..
My tank came from the fab shop with the white epoxy coating you see in the photos. One less thing I had to do myself....
The turnbuckles have so far worked perfectly, but yes I did have some concerns about them at first. Fortunately with that big hatch it wasn't going to be hard to revisit that solution if it had not proved satisfactory. But it has worked out great.
The tandem tank thing was just my personal preference (a.k.a. idiosyncrasy) I don't think anyone else gives a hoot about copying it!I think I will stay with a single tank. Abt same dimensions as yours
but 48" long I'll guess it will come out abt 105/110 gals down from original 120
If you go with one tank the 48 inch length should be able to get into the range of 51 with a little planning. Then the new tank would extend forward of the deck stringer under the deck just behind the entrance to the salon... so hold your fittings back from that area so as not to interfere. That is why the vent and future fuel returns on my tank design are 9 inches back from the front edge. ( I had both of my tanks fab'ed to identical drawings. It was just easier that way.)
I haven't done the calculations for that exact set up but it should exceed the original 120 gallons by a little. Also you could make the tanks wider across the top if at the outer bottom edges of the "T" you beveled them to match the deadrise like the original.
My overall width was chosen because that was the point where the bottom corner of that "T" just about touched the hull.
Peter
A Couple of more if I may.
The old tank was resting on 1/2" x 26" x 54" plywood. Its rotten so I was wondering if there isn't something better to replace it with. Ive seen a number of Polymer, Taco & King starboard materials or would anyone have any opinions or should I stick with marineply?
The 1/4" plastic strips im going to 5200 to the bottom of tank. Should they run athwart or fore and aft? Also if I can buy the tank coated is it ok to bond them unto the coated tank as opposed to the bare alu?
Thank you all.
-
In Memory Walter K
- Senior Member
- Posts: 2912
- Joined: Jun 30th, '06, 21:25
- Location: East Hampton LI, NY
- Contact:
Walter is right about the fore-and- aft orientation of the neporene strips. Think drainage.
As far as adhereing them to the coated tank: I think this is preferable to bonding them to the bare aluminum. That is because the coating on the tank will be continuous and will protect tthe tank from corrosion even under the neoprene strips. If you bond the strips first and coat afterwards the coating will then have a point adjacent to the strips where it will be likely to fail. This would allow water to get trapped between the strip and the tank. Not good.
As for the plywood deck replacement:
Mine looked realy bad when I got the tank out; Slimey, nasty gooey. I figured it needed to be replaced.... and I did. But after I cleaned up what was there it really wasn't as bad as it looked. I might have been OK leaving it. BUt it did need a good cleaning and a week or so to dry out before it was self evident that the slime was just sitting on the ply, not a result of rot.
However, in our particular boats the area under the tanks was pretty well sealed off from getting water or crap in the bilge with the old tanks. The wings of the tanks went right out to the outer stringers where they were bonded to the tops of the stringers with a continuous unbroken tab of fiberglass. Water that found its way to the top of the tank had to drain off outboard of the outer stringers, not down into the bilge below the tank.
With the new arragement I could see that this would no longer be the case. Crap and water on top of the tank will now fall inboard of the outer stringers. Stuff going aft off the tank top would not be sealed off from going all the way to the keel after finding its way past the new and no longer sealed-in battery shelf.
So I wanted to be able to see into (and access if need be) the bilges in the area under the tank. Therefore I replaced my plywood tank deck with floor boards with wide spacing. Wide enough to get a small shop vac hose or a hand in between if I needed to clean under there or retrieve a dropped washer or something.
It could be done with marine ply that has been encapusulated in resin, or with other sheet stock like maybe Coosa board. If I had used a sheet material I would have put access holes in it before glassing it over.
Along these same lines check the aft end of the inboard stringers for a drainage provision (limber holes.) In my boat the bulkhead between the battery area and the engine box was glassed solid to the inboard stringers leaving water no where to drain. I had to open this up to make limber holes aft to the engine area. There the water eventually drains to the center of the boat at the transom through existing limber holes.
Alternatively I could have made athwartships limber holes in these inboard stringers at the aft end of the battery area to drain to the center line there instead, but I didn't know then how much glass was on the bottom of the boat and I feared creating a soft spot. I needn't have feared. The hull is plenty strong in that regard. A half inch wide drain hole in the stringer at that point wouldn't make a bit of difference.
Once I got the old deck out I was faced with the floors under the deck. (Floors here doesn't mean a flat surface you stand on, but rather the nautical version of the word meaning beams that held the old deck up.) One of mine was apparently knocked about in the factory when they ade the boat. It was all askew and had wound up tabbed in like that withthte tabbing cured, but obviously disturbed before it had cured. I cut that one out to re-tab it, and wound up just replacing it. I also added an additional one at the aft part of the space. Making these floors wasn't too much of a challenge, but fitting them turned out to be!
The originals were not precise and did not "plane out" properly. That is to say that a straight edge placed across two of them didn't contact the others. I fiddled and adujusted and scratched my head. It seems like it ought to be an easy problem to solve, but it had me going for a while! There is straight but cocked in regards to the the hull; straight but tilted; and then there is twisted. I'm sure if Capt Patriick had been watching he would have had a good chuclkle at my inexperience and confusion while solving this simple puzzle!

Hey guys!
I'm sorry I missed this thread. My old B26 is now in Duluth MN area and the new owner just pulled the tank. Aparantly, that tank came out without removing the ladder or cutting the tank. He changed the Racor's when winterizing and saw strands of glass floating in the bottom. That was the last straw.
Since I sold it, the new owner pulled most everything off and had it re-chromed. While she was naked, he also removed a lot of the the gel-coat and painted her. I wish I had pictures to post. He has put over 160 hours hours on the boat this year and was happy to report that the Mazda rotary engines have really exceeded his expectations. I had a set of stainless props that I never put on boat. He put them on and hit knot 38 knots and that was with full fuel AND a new hard top. This winter, she is getting a third station in the back as well as electronic shifters. I'm happy that he is happy, and that someone is taking such good care of her. It "almost" makes up for the loss I took in letting her go.
He's researching materials for a new tank. For what ever reason, he does not want to use aluminum. There is a poly tank manufacturer near him that he is researching now.
I'll keep you updated.
-Chiles
-
BCBertie
- Senior Member
- Posts: 163
- Joined: Nov 3rd, '06, 14:08
- Location: California, British Columbia
Poly tank
Chiles-
If your friend has any luck with a poly tank, please let me know. My 26 needs a new tank, and I also am not interested in metal. I'm leaning towards a Poly-u-mac glass tank, but I'd love a more reasonable option...
Cheers!
John
If your friend has any luck with a poly tank, please let me know. My 26 needs a new tank, and I also am not interested in metal. I'm leaning towards a Poly-u-mac glass tank, but I'd love a more reasonable option...
Cheers!
John
Hello Chiles!
Good to hear from you! And good to hear that the new owner of your 26 is enjoying her!
I spent hours and hours looking for a good production poly tank option for my 26 to no avail. I'll bet I downloaded and examined over 100 drawings from various suppliers.
The trick is the way the tank is T shaped. A simple rectangular tank won't get the capacity if it fits between the inner stringers. I even looked into an "Over and under" set up with a low tank below the inner stringers and a wide tank above that which reached out over the outer stringers. I just couldn't find a combination that worked.
So then I looked into stainless ... CG regs be darned... but the cost was prohibitive.
In the end having the tank built from 3/16 aluminum made the most sense. There is a big difference in the rugedness of the 3/16 vs. the usual 1/8. I am very happy with the results.
Peter
For anyone thats intrested.
You do not have to remove the bridge ladder or cut the tank up to remove it. It will come out intact.
The key is to clear out the battery compartment area which is easily done a 15 min job. this alows you to swing the tank aft. the tank is 48" in length and your opening is 49-1/2". The width of the tank is wider than the opening. But not a problem.
The first thing I did was drill a couple of feeler holes on the stb side between tank and stringer, Than ran my recip saw with 12" blade from aft to just about where it starts to go under the support stringer. abt 8" from end forward.
thats 15 min. Then went to port side aft where the tank was tight on the stringer ran a 4" elec grinder with 1/16" metal grinder blade aft to again just abt 8" from forward end. This was a little harder to get at so also used a 3" air grinder and cut a second run along side to widen the gap to abt 3/8" to 1/2" and then did the same on stb side. This was because when you pull tank aft it won't bind. Then cleared tabs at stern of tank both side with 3" grinder. fast work. Ran a couple of feeler holes outboard of the stringers under the batt deck. Good news the bit was wet, dry rot! ran recp saw from aft of tank up to eng bulkhead. both sides. took heavy hand sledge smacked the hell out of it and easily lifed out both sides, middle gave up no fight.
Okay every thing is clear except the tabbing running under that forward support stringer. easy. use your air hammer with a ripper bar. Dress the bar on your floor grinding like the bow of a ship razor sharp the bottom sticks out flat and will hold the bit down while driving forward.
Both sides 1 min each! now your tank is completely free.
I swung some chain over the steel beam on the roof of building and connected my smallest comalong to a small chain going into tank opening with a bolt. jacked it a few times when it got tight. I did a war dance on the tank and pounded it with my hand sledge. jacked a few times and you could hear the ply ripping and it just gave up, a real wimp! no fight!
easily side it back to batt comp area. slide tank under deck on stb and place small blocks between deck and tank. then when you lift the port side will start coming up. with a little wiggling it will clear.
Jacked tank up enough out of the hole to slide some 2/4's under and get a better bite with a nylon sling. jacked high enough to clear transom, pulled boat forward, lower tank. Job done.
My thoughts:
It was not a big deal at all. I did this myself and I think better done alone instead of debating with someone else. Plan it but don't over intellectualize it and just do it. This is easily done in an afternoon.
I agree. You don't have to remove the bridge ladder.... it sort of tweaks out of the way enough to slide the hatch out from under it.
BUT wait 'till try to put the hatch back and that bugger will give you fits!
When taking the hatch out you are sliding aft and to port and the ladder gives just enough to get the hatch out... but putting the hatch in you are sliding it to starboard and forward which tweaks the ladder in a way to jam the hatch.
If you are working alone take a length of light line from the port corner of the bottom rung of the ladder aft to the hawshole on the starboard side. Snug it up enough to tweak the ladder out of your way and save yourself some salty language!
Peter
-
In Memory Walter K
- Senior Member
- Posts: 2912
- Joined: Jun 30th, '06, 21:25
- Location: East Hampton LI, NY
- Contact:
Peter, on that hatch cover over the last 23+ years I have had that thing off more times than I can count. I just pull back on the stb side of ladder where it meets the deck and run a carpenters type of wedge under it. It raises it up and you will have lots off room, just slide hatch straight back and up in front of engine box. the ladder screw plate will just snap back.
5 min, TOPS!!!!
5 min, TOPS!!!!
Who is online
Users browsing this forum: Google [Bot] and 21 guests