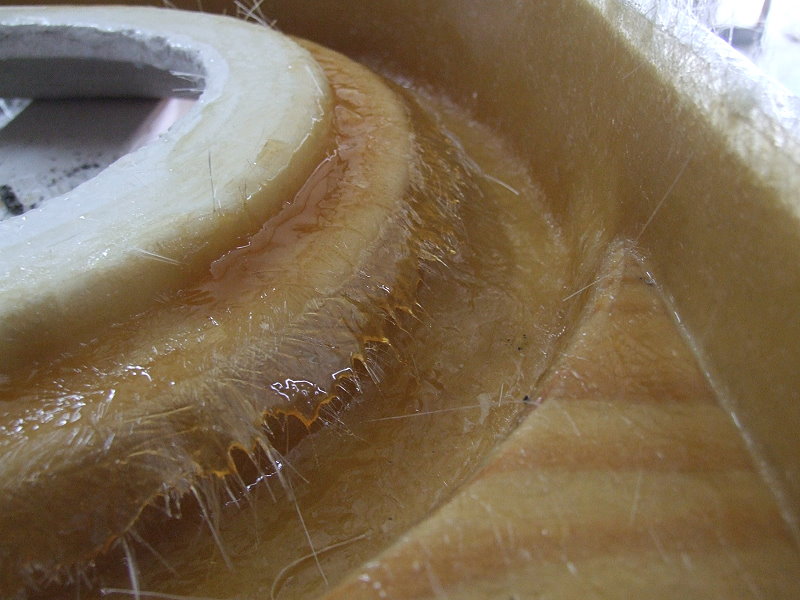
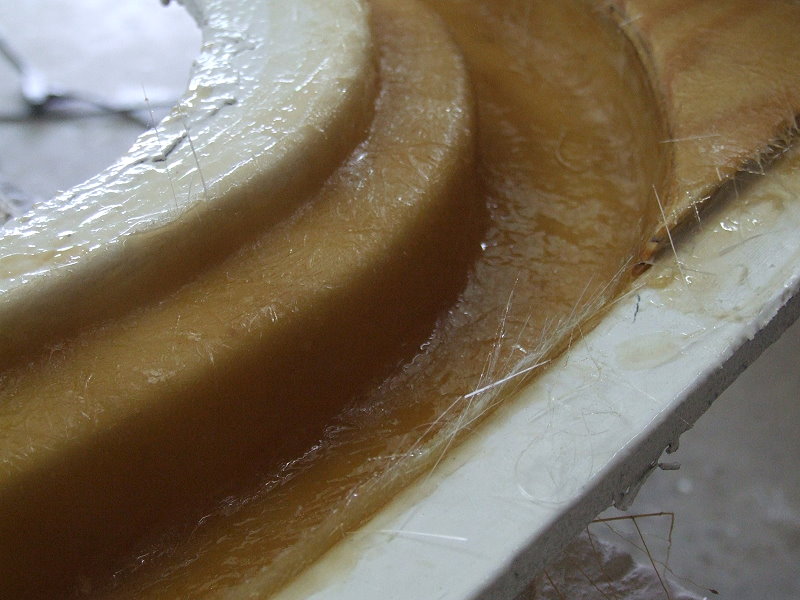
I am adding some glass to the foam sringers that I have installed.
I have 1708 cut into pieces that are 20" X 50".
I am laying them on the tall side of the stringers and should have about 7" extending down onto the hull bottom.
I pre-wet the glass before going to the boat. I could not for the life of me get the piece positioned without severly disrupting the weave pattern and constantly battling gravity pulling the piece down.
I finally got everything rolled out, but it SHOULD not have been this hard.
My only thought for next time is to start placing an edge on the hull bottom along a scribed line and working up instead of down as I previously did.
Suggestions?
Ian.
Fiberglassing techniques needed
Moderators: CaptPatrick, mike ohlstein, Bruce
-
martinciarpella
- Posts: 47
- Joined: Jun 30th, '10, 07:29
- Location: baltimore


Ian, When I retabbed my stringers I used a large flat tupperware container aout 24" x 16" by 3" deep, using a large flat pan it makes it easier to wet out the cloth, and slows down the kick. With rubber gloves on I saturated the 1708 then squeezed out all excess epoxy. I also put a coat of epoxy on the stringer. The cloth sequence I used was 1708, 8" then a layer of roven 7", then 1708 6", forming an L using the larger piece to the smaller. I then roll and squeeze out all the air possible.
Cut a piece of peel n ply and set into the wet epoxy, smooth out the bubbles again, next morning go out and peel off the fabric leaving a smooth pro looking finish that also lifts the amine blush off the top of the epoxy. You can reuse the flat pan by giving a good twist and pop the epoxy free. Last but most important tip CLEAN UP all excess epoxy, unless you like grinding runs n drips. BH
Cut a piece of peel n ply and set into the wet epoxy, smooth out the bubbles again, next morning go out and peel off the fabric leaving a smooth pro looking finish that also lifts the amine blush off the top of the epoxy. You can reuse the flat pan by giving a good twist and pop the epoxy free. Last but most important tip CLEAN UP all excess epoxy, unless you like grinding runs n drips. BH
1966 31 Bahia Mar #316-512....8 years later..Resolute is now a reality..Builder to Boater..285 hours on the clocks..enjoying every minute..how many days till spring?
I think I'm using too large of a piece. Everything was wet out on a large sheet of plastic. no issues there.
I have not tried the peel ply. Might give that a shot as I have some of it.
Once I overcome the gravity, I got everything rolled out nicely, might have a bit of grinding to do, but not much.
Perhaps it is simply practice... practice.. practice.
Let's hope tomorrow goes better.
Ian.
I have not tried the peel ply. Might give that a shot as I have some of it.
Once I overcome the gravity, I got everything rolled out nicely, might have a bit of grinding to do, but not much.
Perhaps it is simply practice... practice.. practice.
Let's hope tomorrow goes better.
Ian.
-
CaptPatrick

- Founder/Admin
- Posts: 4161
- Joined: Jun 7th, '06, 14:25
- Location: 834 Scott Dr., LLANO, TX 78643 - 325.248.0809 bertram31@bertram31.com
Ian,
First, you need to working with a layup resin. A layup resin, (polyester, vinylester, or epoxy), in my terminology is a thin low viscosity, (not thinned as in adding styrene, alcohol, or acetone), that will allow you to fully and easily wet out the fabric, cloth, or mat that you're working with. Some fiberglass suppliers use the term "laminating resin". If your resin is thicker than maple syrup, it's too high of a viscosity to work with easily...
Second, the technique you described is called a wet layup. It's an advanced technique and, as you've already found out, can be a real pain in the ass.
Use a dry layup instead...
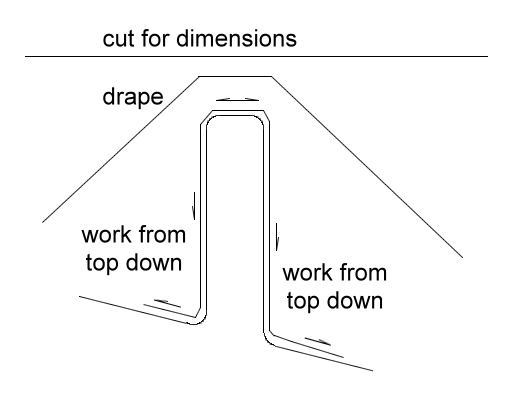
Cut your fabric the length you need and wide enough to drape over the stringer, down both sides, and onto the hull.
Start wetting out the fabric at the top of the stringer and working you way down. Let gravity be your buddy...
As you approach the bottom of the stringer on the first side, go back to the top and work down the other side. At this point use a fiberglass roller to work out any bubbles. Again always work from top to bottom.
This will also push out excess resin. The excess on the outboard side of the stringer will puddle. Use your brush to work this excess onto and wet out the remaining fabric. On the inboard side the excess will be trying to run down past the fabric and into the bilge. You'll need to work with the roller and the brush simultaneously to keep the resin from getting past the fabric.
Add more resin only as you need it. Your finished layup should be fully weted out, but not drippy wet and with no bubbles. Dab up excess resin with your brush agter you've squeezed the brush almost dry.
If you only want to one side at a time, cut the width of the fabric so that the top overlap by an inch or so to the opposing side.
Also, your angle intersections should be radiused so that you're not trying to work the fabric over or through an acute bend... The fibers just won't bend like that and you'll have a hellofa time trying to chase out the air. The fibers will try to straighten and just pull in the air that you tried to roll out...
Remember that epoxy, if that's what your using, won't fully wet out chopped strand mat. CSM has a binder to hold the strands together and the binder only dissolves in the presence of styrene.
First, you need to working with a layup resin. A layup resin, (polyester, vinylester, or epoxy), in my terminology is a thin low viscosity, (not thinned as in adding styrene, alcohol, or acetone), that will allow you to fully and easily wet out the fabric, cloth, or mat that you're working with. Some fiberglass suppliers use the term "laminating resin". If your resin is thicker than maple syrup, it's too high of a viscosity to work with easily...
Second, the technique you described is called a wet layup. It's an advanced technique and, as you've already found out, can be a real pain in the ass.
Use a dry layup instead...
Cut your fabric the length you need and wide enough to drape over the stringer, down both sides, and onto the hull.
Start wetting out the fabric at the top of the stringer and working you way down. Let gravity be your buddy...
As you approach the bottom of the stringer on the first side, go back to the top and work down the other side. At this point use a fiberglass roller to work out any bubbles. Again always work from top to bottom.
This will also push out excess resin. The excess on the outboard side of the stringer will puddle. Use your brush to work this excess onto and wet out the remaining fabric. On the inboard side the excess will be trying to run down past the fabric and into the bilge. You'll need to work with the roller and the brush simultaneously to keep the resin from getting past the fabric.
Add more resin only as you need it. Your finished layup should be fully weted out, but not drippy wet and with no bubbles. Dab up excess resin with your brush agter you've squeezed the brush almost dry.
If you only want to one side at a time, cut the width of the fabric so that the top overlap by an inch or so to the opposing side.
Also, your angle intersections should be radiused so that you're not trying to work the fabric over or through an acute bend... The fibers just won't bend like that and you'll have a hellofa time trying to chase out the air. The fibers will try to straighten and just pull in the air that you tried to roll out...
Remember that epoxy, if that's what your using, won't fully wet out chopped strand mat. CSM has a binder to hold the strands together and the binder only dissolves in the presence of styrene.
Thanks again.
I have a nice radius at the intersection of stringer and hull.
I am using a vinylester resin (unwaxed) for laminating. The resin might have been a bit thick today because my wife made me take it out of the house (something about the smell...) and put it in the garage.
When I was working on the transom, I tried the wet layup because of issues with the resin kicking off too fast before I could work it into the fabric and wet it out fully. I guess now that the weather is cooled I might try going back to dry.
I really thought the wet layup went well when putting on several layers filling in the drive cutout in the transom.
She is coming along... just not fast enough.
http://simplifying.net/phpbb/viewtopic. ... 28&start=0
Thanks!
Ian.
-
CaptPatrick
- Founder/Admin
- Posts: 4161
- Joined: Jun 7th, '06, 14:25
- Location: 834 Scott Dr., LLANO, TX 78643 - 325.248.0809 bertram31@bertram31.com
If your resin mix is kicking too fast, cut back on the MEKp, even by as much as 50%. Normally 2% MEKp to resin is a good starting point, but in the summer I cut back to 1% and in the winter I'll go as high as 4%.
Vinylester can have a trick up it's sleeve...
If you allow a course of your layup to fully cure to hard, you must sand the surface well before laying the next course. As long as the previous course is still tacky you can keep the layups coming. Polyester can cure as long as a couple of days without sanding before proceeding with the next course.
Interesting on the times for adding next layer. I have been sanding with 60 grit between layers if it was not right after each other.
I had thought that the vinylesters and polys were both safe for a few days without sanding good thing I've been sanding.
I had been at 1% all summer. Didn't think I could go as high as 4%.
THanks again.
Ian.
I had thought that the vinylesters and polys were both safe for a few days without sanding good thing I've been sanding.
I had been at 1% all summer. Didn't think I could go as high as 4%.
THanks again.
Ian.
-
CaptPatrick
- Founder/Admin
- Posts: 4161
- Joined: Jun 7th, '06, 14:25
- Location: 834 Scott Dr., LLANO, TX 78643 - 325.248.0809 bertram31@bertram31.com
The 4% would be if I were looking to kick with inside of 4 hours on a 40ºF day without any form of heat generation other than the exotherm from the resin.
Last winter, I did a lot of layups in my spray booth, which is the only room in the shop that I can economically control the temperature, so the 2% worked fine.
I won't even try to glass below 40º...
Last winter, I did a lot of layups in my spray booth, which is the only room in the shop that I can economically control the temperature, so the 2% worked fine.
I won't even try to glass below 40º...

Captain Patrick -
Used the dry layup technique this afternoon and if you compare starboard to port stringer, one might have thought I was hitting the bottle a bit early yesterday.
I really like the wet layup for smaller sections, but this was too much for me.
Thanks again.
Ian.
Used the dry layup technique this afternoon and if you compare starboard to port stringer, one might have thought I was hitting the bottle a bit early yesterday.
I really like the wet layup for smaller sections, but this was too much for me.
Thanks again.
Ian.
Last edited by ianupton on Oct 6th, '10, 20:06, edited 1 time in total.
-
CaptPatrick
- Founder/Admin
- Posts: 4161
- Joined: Jun 7th, '06, 14:25
- Location: 834 Scott Dr., LLANO, TX 78643 - 325.248.0809 bertram31@bertram31.com
Ian,
I frequently use a wet layup technique, but it's always with small areas, like tabbing bulkheads, tanks, tacking larger pieces together, and rolling out seams. Generally there might be a number of wetted strips varying from 2" to 6" wide and up to 6' long, but rarely any larger than that.
I wet the strips out on a mold released glass top table, roll them up loosely, transfer to a sheet of 1/4" plywood covered with black plastic sheeting. Take up to 8 pieces to the project area and quickly lay out all of them. Give the bonding joint or surface a quick swipe of resin before laying out the wet fabric.
Once down, then I work them in with the brush and roller, using the transport board as a resin reservoir.
Very neat and efficient technique once you get the hang of it, but limit the individual pieces to around 3 - 4 sq ft., and avoid complex shapes and drapes.
However, 90% of my work is done as a dry layup. Most of my molds are afixed to tilting dollies so that I rarely have to work on a pure vertical surface...
Wanna' see complexity? See the livewell just finished a couple of weeks ago for Jose Astrain. This one is going into the transom of his 46' 6" Bertram. Very long vertical page of over 100 large images. Take a coffee break while it loads... If you have slow connection and any of the images hang up, (X), just refresh the page.
Another sequence is the livewell I did about a month ago for Russ Swift. Same design, but fillin some of "blank spaces" left out of Jose's.
-
CaptPatrick
- Founder/Admin
- Posts: 4161
- Joined: Jun 7th, '06, 14:25
- Location: 834 Scott Dr., LLANO, TX 78643 - 325.248.0809 bertram31@bertram31.com
-
CaptPatrick
- Founder/Admin
- Posts: 4161
- Joined: Jun 7th, '06, 14:25
- Location: 834 Scott Dr., LLANO, TX 78643 - 325.248.0809 bertram31@bertram31.com
The bristle rollers are my preferred tool. Can't even remember the last time I used a standard ribbed roller. They leave the layup a little wetter than a ribbed roller, but I'm more concerned with trapped air than lower resin/glass ratio.
The rollers should be available from your local glass supplier or, if not, then from Fiberglast.

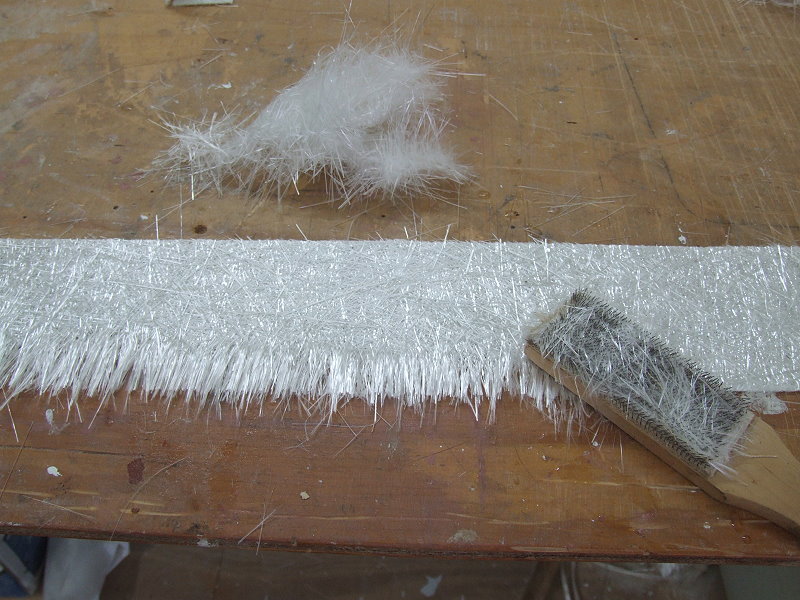
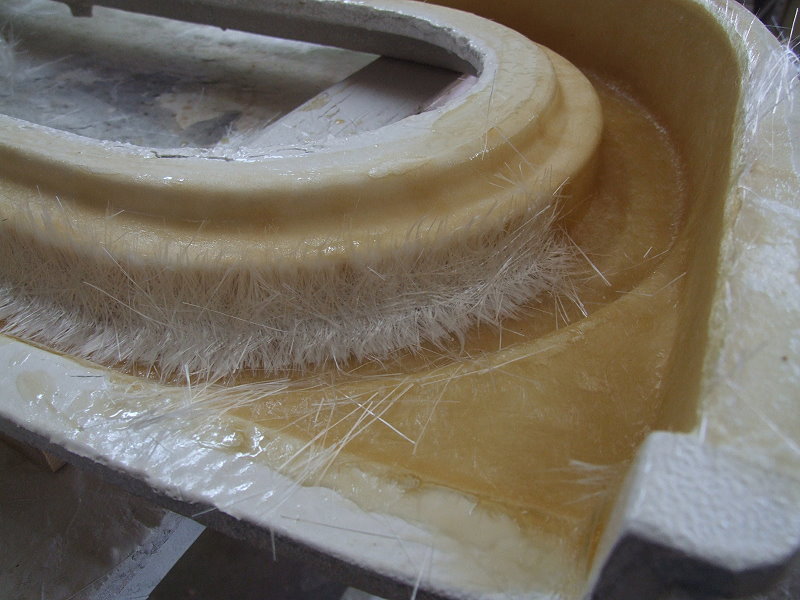
The file card, designed for cleaning files, is perfect for fraying out edges of mat to avoid hard cut edges that trap air and look bad. A frayed edge blends overlapping joints, reduces overlap build up, and allows the glass to form easier around bends and radiuses.
Off topic, but it just reminded me of another off the wall technique....
Do you have problems with grass burrs? Tired of brushing them out of your pet's fur?
Drag a 4' x 4' piece of carpeting, face down, behind your mower. It's like a burr magnet.
The rollers should be available from your local glass supplier or, if not, then from Fiberglast.
The file card, designed for cleaning files, is perfect for fraying out edges of mat to avoid hard cut edges that trap air and look bad. A frayed edge blends overlapping joints, reduces overlap build up, and allows the glass to form easier around bends and radiuses.
Off topic, but it just reminded me of another off the wall technique....
Do you have problems with grass burrs? Tired of brushing them out of your pet's fur?
Drag a 4' x 4' piece of carpeting, face down, behind your mower. It's like a burr magnet.

-
CaptPatrick
- Founder/Admin
- Posts: 4161
- Joined: Jun 7th, '06, 14:25
- Location: 834 Scott Dr., LLANO, TX 78643 - 325.248.0809 bertram31@bertram31.com
Me too, for years... Then one day I was cleaning a file in the fiberglass shop and the light bulb went off.Wow did I waste a lot of time.

What I want to do now is make one with a rotating barrel, built in cleaner, and operating on a rechargable battery like my fabric cutter.

-
CaptPatrick
- Founder/Admin
- Posts: 4161
- Joined: Jun 7th, '06, 14:25
- Location: 834 Scott Dr., LLANO, TX 78643 - 325.248.0809 bertram31@bertram31.com
Who is online
Users browsing this forum: Bing [Bot], Google [Bot] and 150 guests