Page 1 of 1
One Off 70 gal Composite Water Tank
Posted: Oct 19th, '09, 09:35
by CaptPatrick
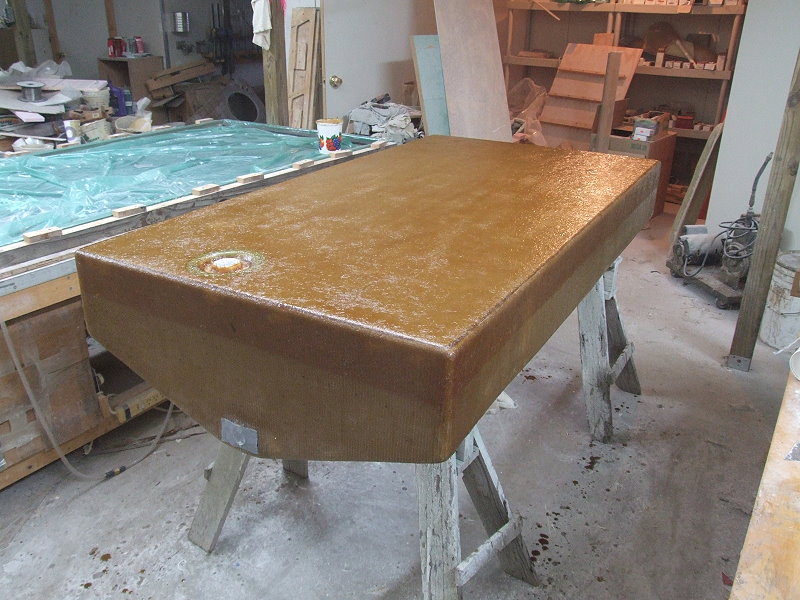
OK, Guys, about time for another massive image dump... This time on the fresh water tank I'm just about through doing for Marlin Younkers' B31...
One Offing a Composite Water Tank
Posted: Oct 19th, '09, 09:49
by Rawleigh
That is a lot of water. Is it freshwater or ballast?
Posted: Oct 19th, '09, 09:52
by CaptPatrick
Fresh water....
Posted: Oct 19th, '09, 09:59
by Rawleigh
You must be putting the mega head with the full body shower in it!!
Posted: Oct 19th, '09, 10:00
by Tommy
Patrick,
You never cease to amaze me; that series of photos on the construction of that tank is nothing short of amazing. It occurs to me that given enough time (and funds), that you could build a 31 Bertram from scratch. By the way, the yard at your home/shop looks great; must've had plenty of rain this year.
Tommy
Posted: Oct 19th, '09, 11:48
by MarkS
Tommy I would like to just hang around and watch for a month or so just to maybe learn a few things via osmosis! But of course I would eventually be in the way and then Patrick would start swearing at me..........
Very cool Capt. very cool.....
Posted: Oct 19th, '09, 13:08
by bob lico
wait rawleigh just wait you will find out shortly ----------------yes dear--but , but ,but i thought you said ------don`t think " i will think you just do what i say!!!!"i will make this bertram suitable for a lady
Posted: Oct 19th, '09, 13:14
by CaptPatrick
Most likely, there'll be cockpit fresh water wash down in addition to fresh water head, and galley service water. Fresh water wash down can drain a big tank fast...
Posted: Oct 19th, '09, 13:17
by CaptPatrick
I would like to just hang around and watch for a month or so just to maybe learn a few things via osmosis!
Just hangin' out watchin' will get ya' a couple of days, after that I'll put ya' to work at apprentice wages... Door's always open, bring it on!
Posted: Oct 19th, '09, 15:00
by randall
if you go i hope you like to sand by hand.
Posted: Oct 19th, '09, 15:40
by Bertramp
I look at that and realize just how little I know ... that's art !!
Posted: Oct 19th, '09, 15:58
by ianupton
Would this be the same way that you would build a fiberglass fuel tank?
Your pictures make it look easy... I know better though!
Ian.
Posted: Oct 19th, '09, 16:13
by CaptPatrick
Ian,
Yup, pretty much the same way... The differences would be choice of resin and if the tank were larger, more layers of glass and baffle for more compartments. Also the use of bronze or stainless manifolds instead of the PVC fittings seen on this tank.
For a solid fiberglass tank, but using a one off form as was done here, you could use 1/8" structural panels rather than the Divinycell.
BR,
Patrick
Posted: Oct 19th, '09, 18:02
by tunawish
Capt. Pat,
How many hours did that take including layout from start to finish.?
Posted: Oct 19th, '09, 18:38
by Capt. DQ
Capt. Pat You DA'Man thats really sweet 70 gals. That will make the woman really happy with all that fresh water.
I keep telling my wife when she is on the boat, she only has 7-10 gals of fresh water so don't waste it.
DQ
Posted: Oct 19th, '09, 19:08
by Wingnut
Wow!
Posted: Oct 19th, '09, 22:18
by scot
OK so I quit.
Posted: Oct 20th, '09, 05:53
by CaptPatrick
scot wrote:OK so I quit.
Like hell you will!
My only purpose in going to the trouble to post this sort of stuff is to stimulate minds, plant the seeds of creativity, and show not just a finished product, but the entire progression of how I got to that finished product...
Believe me, if a scrawny, old, broke dick, boat captain can do this stuff, just about any one of you guys can do it too! It ain't rocket science.
When I started this web site, almost ten years ago, very few of those following the site were being brave enough to tackle big and difficult projects themselves. Those that were brazen enough to experiment were often grouping around in the dark and had little reference to rely on.
Today, you guys, by and large, have become some of the most Hands On boat owners in the world. I like to think, that in some small way, I had a hand in that evolution...
Now get back to work!
Br,
Patrick
Posted: Oct 20th, '09, 06:08
by CaptPatrick
tunawish wrote:Capt. Pat,
How many hours did that take including layout from start to finish.?
Ray,
I'm not great as a clock watcher, and number crunching isn't one of my long suits either... I started the project on Tuesday and pretty much finished it by Monday morning. 7 straight days, blinders on, one or two short days, one or two long days, in all, maybe 45 hours...
Br,
Patrick
Posted: Oct 20th, '09, 06:18
by CaptPatrick
Tommy wrote:Patrick,
You never cease to amaze me; that series of photos on the construction of that tank is nothing short of amazing. It occurs to me that given enough time (and funds), that you could build a 31 Bertram from scratch. By the way, the yard at your home/shop looks great; must've had plenty of rain this year.
Tommy
Thanks Tommy... Rain has still been in short supply but not too bad. We usually get a fairly consistant wetter period in the fall so things green back up. 6 weeks ago the landscape was getting pretty brown and trees even dropping leaves. The summer was hot and bone dry... Looks like we'll get another wet event in a couple of days.
Br,
Patrick
Posted: Oct 20th, '09, 08:04
by Carl
Very interesting. I love how the fabrication is so simple in it's complexity.
Two questions-
What is the purpose of the stuff that looks to be gravel or metal chips. Spacer for resin, like flour when rolling dough so you can release after...
Why do you make an insert for the fittings, it would seem simpler and have less chase of being comprimised if you just counterbored the original structure and set the fitting into place. I'm thinkin maybe the tank structure is not strong enough or wrong materail to clamp a fitting to, porous.
Thanks for sharing, I love watching the progression and really learning what goes into making a tank / structure the right way.
Carl
Posted: Oct 20th, '09, 08:40
by CaptPatrick
Carl,
The Divinycell I has had on hand was pre-scored, useful when doing a contoured surface, but not necessary for a flat surface. Normally the spaces are filled with a catalized resin putty. I decided that really all that I needed was to fill the spaces with virtually any inert material to avoid an excessive amount of resin to drain down into the spaces. Solution: rub in vermiculite until the spaces were adequately packed, then sealing the surface with a rolled on coating of catalized resin. Once the sealer coat tacked up, it was off to the races with the mat, biaxle, and gelcoat.
PVC pipe and fittings have a fair affinity to bonding with polyester resin, but I tend to be a little distrustful of the bond where any torque will have to be applied to the fitting. So, I try to engineer the assembly in such a way as to give me piece of mind that the fitting itself would be destroyed long before it would possibly break the bond. To create the best bond between PVC and polyester I first abrade the PVC surface well with 60 - 80 grit paper, wash the PVC with acetone, making it sticky to the touch, and immediately prime the PVC with catalized resin. The primer coat is allowed to tack up before proceeding to assembly.
The fill fitting on top also needed to be as low a profile as possible, so making up the rather elaborate recessed design as a totally separate part and then installing it as a simple unit seemed to make sense and certainly made the installation vastly easier.
Br,
Patrick
Posted: Oct 20th, '09, 17:31
by bob lico
i have a small annoying leak in my fresh water tank so i mines well dive in. i want to increase the overall lenth 6" and i feel that will suffice. should be about 23 gallons i guess from the original 18gallon. two questions ; i have 3/4" coosa board on hand but don`t know where you aquire the baffle board can i use 1/2' azek with the proper azek glue? i will use epoxy because i also have a ton on hand.
Posted: Oct 20th, '09, 18:07
by Carl
Capt Pat,
Okay, so I was close guessing a spacer for the resin, but I couldn't figure out why you would groove the material then fill it.
You had pre-scored material...makes perfect sence.
An interesting way to do the fittings...I would have done with a bulkhead fitting recessed with the top flush and thru bolted to a backing plate, kind of like the inspection plate on the fiberglass fuel tanks.
But would have taken more time, work, money and not sure if would have been any better.
Alway more then one way to skin a cat, thanks for the explaination.
Carl
Posted: Oct 20th, '09, 20:57
by Bob H.
Capt Pat. Like Ive said many times before...just wacthing you build things answers so many questions...I wouldnt be as far along on my Bertram without those pearls of wisdom (and pictures)..Keep planting those seeds.....BH[/quote]
Posted: Oct 21st, '09, 06:47
by CaptPatrick
bob lico wrote:i have a small annoying leak in my fresh water tank so i mines well dive in. i want to increase the overall lenth 6" and i feel that will suffice. should be about 23 gallons i guess from the original 18gallon. two questions ; i have 3/4" coosa board on hand but don`t know where you aquire the baffle board can i use 1/2' azek with the proper azek glue? i will use epoxy because i also have a ton on hand.
Bob,
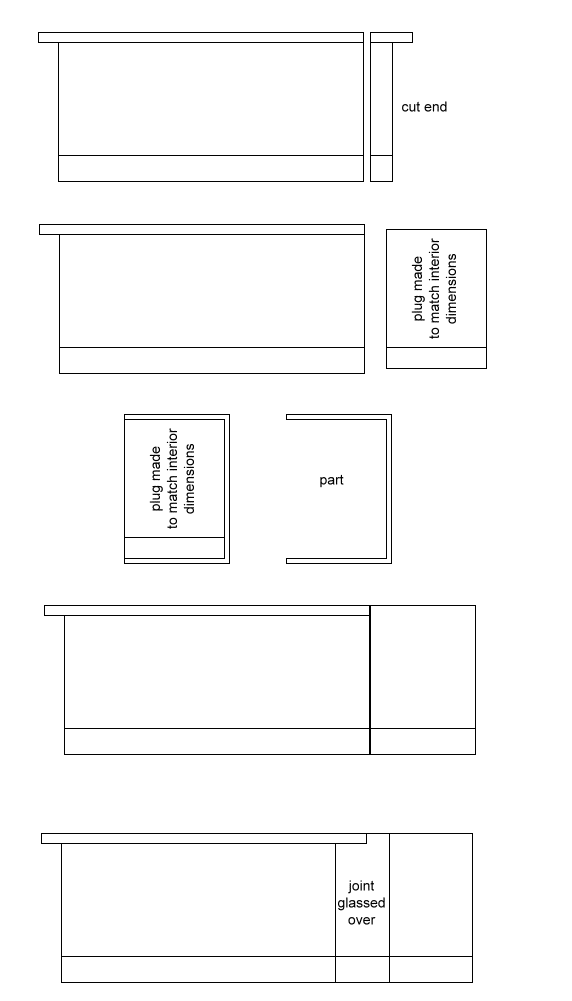
If were to expand the original Bertram tank, I'd probably cut the end off of the original, make a plug mold to match the inside dimensions, glass up a part over the gelcoated plug, and glass the part back to the tank. The part could be made in polyester, but joining the part to the tank might be best done with epoxy.
Br,
Patrick
Posted: Oct 21st, '09, 19:14
by bob lico
thank you capt. patrick you answer it .there is about 8" left in that compartment to expand the original. i guess i would have to make a baffle of some type. 23 gallons doesn`t sound like a major problem of water sloshing around.
Posted: Oct 21st, '09, 19:17
by CaptPatrick
Bob,
You won't need any baffles for that small of a tank, low and on center...
Br,
Patrick
Posted: Oct 21st, '09, 22:40
by coolair
truly beautiful work! that is art! It definitely inspires me to do more work on my boat and build new things. After seeing that i want to just go build something out of glass for the fun of it haha
my question is, about the fuel tank, would you us a core materiel for that or, just solid glass? I dont think i will try to make a fuel tank, just curious, But my dad is going to lengthen the fiberglass body on his '23 T soon, i will post some picks of that and you can tell us what we did wrong haha
Posted: Oct 22nd, '09, 07:44
by CaptPatrick
CoolAir,
A one off fuel could be done like this, but as I mentioned to Ian earlier, I would be more prone to do a solid fiberglass construction. For solid fiberglass, the start would be pretty much the same as this tank. Foam over a form and a couple of layers of glass.
Then the departure would be to finish that glassed surface, leave it on the form, gelcoat it, finish & polish the gelcoat, & treat it with mold release. This gives you a male plug mold to build the solid fiberglass tank over.
A fuel tank requires fire rated resins and would be best done in vinylester rather than polyester. The size of the tank would dictate the layup schedule and fabric choices.
Br,
Patrick
Posted: Oct 22nd, '09, 09:07
by JeremyD
:shock: I am truly humbled.
and my wife accuses me of overdoing. I take pride in what I accomplish. But Patrick - you are an artist.
Great write up
Posted: Oct 22nd, '09, 10:19
by CaptPatrick
CaptPatrick wrote:A one off fuel could be done like this, but as I mentioned to Ian earlier, I would be more prone to do a solid fiberglass construction.
After giving a bit of thought to a cored tank, the best core for a one off tank would be 3/8" - 1/2" Coosa Board...
Posted: Oct 25th, '09, 14:52
by coolair
Capt. Pat
I forgot to ask you, what is your table top made out?
Also what would the best way to do a fuel tank solid or coreded? whats the advantages/disadvantages
Posted: Oct 25th, '09, 19:13
by CaptPatrick
Matt,
The table top is 3/8" dark tint, tempered glass, that's leveled throughout on the table below. The table is on casters and can be rolled to anywhere it'll fit, including out side. Whole table weighs about 300 lbs...
Occasionally, I use the table to lay up a 44" x 90" sheet of fiberglass using SunRez polyester resin. No MEKP catalyst, fully activated only by UV light. Do the whole layup schedule, up to 1/4" thick, in one process. That layup takes about an hour. When ready, roll the table outside into the sun and the sheet is kicked hard in about 20 minutes.
As before, I'd lean towards a solid fiberglass fuel tank, but if cored, it'd be cored with Coosa Board. If you had a mold for the tank, solid fiberglass would probably be faster and more economical. If not, one off cored would be faster and more economical.
Both would be fine. The cored would be stiffer and need to be allowed to float somewhat in the boat. Solid fiberglass would have a similar flexibility as the boat and could be tabbed into place.
Br,
Patrick