Page 1 of 1
Best way to secure loose rubrail screws
Posted: Jun 7th, '09, 16:00
by nordeng
Hi - I have some loose rubrail screws and am wondering the best way to secure these. Most are tight, but some are loose and can't be tightened. I'm thinking a dab of 4200 or 5200, push them in, and then call it a day. Will this work and will I ever be able to get them out if I need to in the future? Thanks a lot.
Posted: Jun 7th, '09, 18:44
by Kevin
It may hold the screw in place but it will likely come undone after some rubbing. There is wood backing inside and it is kerfed to form to the hull. Kerfing is small cuts in the wood which allows it to conform or bend woth the hull. The cockpit is the easiest place to see how it works if you have storage doors. The holes have probably stripped out and allowed the screws get loose or even fall out. Many places are almost inaccesable unless you take a bunch of interior apart depending on the boat. I had to replace a bunch of the backing wood on my boat which is a 28.
Posted: Jun 7th, '09, 19:49
by jspiezio
Kevin wrote:It may hold the screw in place but it will likely come undone after some rubbing. There is wood backing inside and it is kerfed to form to the hull. Kerfing is small cuts in the wood which allows it to conform or bend woth the hull. The cockpit is the easiest place to see how it works if you have storage doors. The holes have probably stripped out and allowed the screws get loose or even fall out. Many places are almost inaccesable unless you take a bunch of interior apart depending on the boat. I had to replace a bunch of the backing wood on my boat which is a 28.
Kevin is right on. I have removed the screw and injected epoxy into the hole using a syringe. After the epoxy harden drill a pilot hole and reinstall the screws.
Posted: Jun 7th, '09, 19:55
by In Memory of Vicroy
Half a toothpick with some epoxy on it stuck in the hole works real good - you can snug up the screw against the toothpick and once the epoxy sets it won't back out unless you want it to.
UV
Posted: Jun 7th, '09, 20:06
by jspiezio
Vicroy wrote:Half a toothpick with some epoxy on it stuck in the hole works real good - you can snug up the screw against the toothpick and once the epoxy sets it won't back out unless you want it to.
UV
My dad's trick as well
Posted: Jun 7th, '09, 20:44
by nordeng
Thanks a lot, those are both great ideas. Two questions: 1) how do you get the epoxy into the syringe; and 2) what type of epoxy do you all use? Thanks again.
Posted: Jun 7th, '09, 21:51
by CaptPatrick
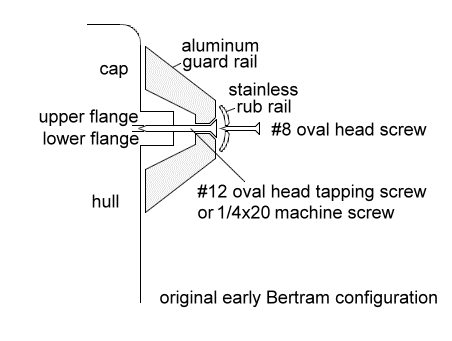
There are actually two main components to what most refer to as a "rub rail".... The heavy rail that is fitted directly to the boat is a GUARD RAIL. The, (usually), stainless steel strip that encircles the guard rail is the true RUB RAIL. The heavy guard rail spreads any impact load over a larger surface area, protecting the fiberglass structure behind it. The stainless rub rail only protects the outer face of the guard rail from abrasion and hides the larger screws holding the guard rail on.

The guard rail on most of the early Bertrams was extruded aluminum. Cross section and dimensions varied over the years depending on the model and vintage of hull. The diagram above is typical for the B31 and other models that had the flange style cap to hull joint.
Later, Bertram ditched the flange style joint in favor of the "shoe box" joint, where the cap fit onto the hull like the lid of a shoe box.
OK, so to initial question about loose screws...
If the screw is biting into wood or solid fiberglass, the time honored tooth pick solution will work for smaller screws, but the tooth pick(s) should be bonded into the hole with a strong adhesive. Wood glue for wood, epoxy or 5200 for fiberglass.
In the case of the #12 tapping screws holding the aluminum guard rail onto the flange style hulls, the hole must be filled with epoxy and a solid plug, then re-drilled with a pilot hole after the epoxy has cured.
To assure a good bond between the old hole and the plug, run a 1/4" drill bit into the hole to clean out any debris. Use a Q-Tip dipped into epoxy to prime the hole. Dip the plug, (hard wood will work, but fiberglass would be better), into the epoxy and insert it into the hole.
Posted: Jun 8th, '09, 21:38
by nordeng
Thanks Capt Pat. I think I'll go with the toothpick trick for now and use epoxy or 5200 as I believe it's into glass. Thanks a lot.
