Azek thickness recomendations
Moderators: CaptPatrick, mike ohlstein, Bruce

Azek thickness recomendations
Getting ready to pull the trigger on some Azek for the cockpit enclosure. Can't remember what the consensus was on thickness (3/8 or 1/2). (Over $400.00, so I want to ask). Bob, Randall ,Dug or anyone else....you experience is appreciated.
Giff

brother hold on what are you saying 400.00 for how many 4x8 sheets?i assume you mean 4 - times 4'x8' sheets. remember what i said azak only that has to come from a real lumber yard . to walk into a depot would be a insult to your intelligents .on long island it has completly take in over hign contruction . ALL soffits and facia is done in azak if you build victoria or queen anne then wrap around porches,lattice and decorative molding is all azak no substitution .build wright into ocean front homes up and down eastern coast has past the test of time and weather almost twice as dense as competition especially if you router quateround edge .costal contractor magazine list it as the only choice especially after gorvernment hurricane testing.
capt.bob lico
bero13010473
bero13010473


I hear ya... For some reason, a few years ago I began refering to my homestyle hurricane shutters as "clapboards" (pronounced clabboards)... not sure why.i like to call em splash boards
thinking rum had something to do with it though, and putting them up six times in a few months. Whatever, it stuck and clapboards they are.
I don't know what the world may want,
But a good stiff drink it surely dont,
Think I'll go and fix myself...a tall one.
But a good stiff drink it surely dont,
Think I'll go and fix myself...a tall one.
Bob-
Price was for 2 4X10' sheets from a "real lumber yard"(unfortunately need just over 8' continuous). $218 per sheet in Azek ("off the street price...no contractor discount"), the guy at the yard offered up "Fypon" as an alternate at about 175.00 for the same size. The Fypon materil appeared similar and supposedly is new to the market as a competitor to Azek. I have samples of both with fasteners in them floating in a bucket in my back yard for testing purposes. For curiosity sake wanted to see how the material would hold fasteners.
When I did my house over (bought from the same yard above....but as a contractor through my brother in law (real well known guy around here who somewhat recently passed on, and everyone knows it, so I can't use his account)), I used Azek for all the trim and it worked well. The stuff is easy to work with even through in stinks alittle when you rip it. That said..from my experience...house ain't boat reltive to harshness of the environment. Also never played with sheets of the stuff, just trim boards.
Giff
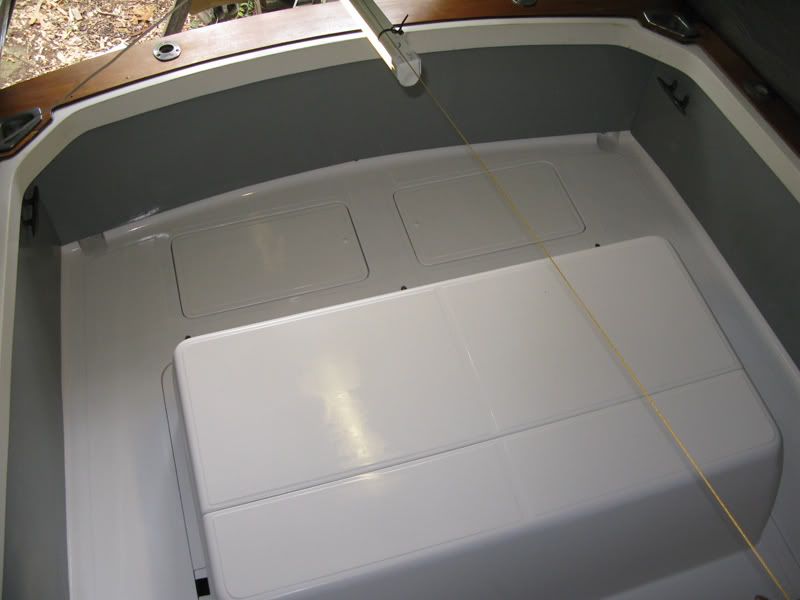
ok now i got you .you are redoing the cockpit panels there are 9' so you need a 4' by 10' cut in half and one for transum. like randall said go with 1/2" and no screws on cockpit floor.cut a piece of backer with 5/4" azek (buy cheap 5/4 x 2") and run a bead of 3m 4000 uv . also run bead beween cockpit floor and pannel. eliminate impossible to keep nice teak floor strip !the 4000 will come apart with pry bar 50 years from now and does not fade, or turn yellow. i have custom made hatches for cockpit pannels. thet are locking and same color as azek about 30" long and 14" high .when installed you could used store bought plano plastic boxes to keep tackle in (like top of the line sportfisherman).tackle or whatever stays out of weather organize and theft proof.
capt.bob lico
bero13010473
bero13010473

Giff, I would think 1/2 would work really well. Not sure if 8' is long enough though for the transom. I don't remember. I know my fiberglass panels came in 4x10 sheets. If I had a complaint, it would be that the Kallwall fiberglass is too thing. Rugged, but thin.
Sounds like you are on the right track however.
Sounds like you are on the right track however.
giff you will need a 4'x10' for the two cockpit sides and a 4x12 for the stern piece. the stern piece is a little over 11' if you plan ahead make a backer or block out of 5/4" azak and polyurathane to stern panel then side panels attach with 3m-4000 uv .no screws ,very clean look and easy to maintain ,10 years from now if you abuse the cockpit you could always paint.azak loves paint just sand lightly to break shine and paint away.
capt.bob lico
bero13010473
bero13010473
-
Tony Meola
- Senior Member
- Posts: 7036
- Joined: Jun 29th, '06, 21:24
- Location: Hillsdale, New Jersey
- Contact:
Giff
Not to steal your thread, but I have a question for those that have done this. How do you secure the bottom so it doesn't vibrate or move around?
On my old set up, there was a piece of wood that was screwed down to the deck and then the bottom of the panes crewed into that with the teak strip along the bottom. There are also a couple of plywood tabs attached to the hull that helped support the panels also.
tony as i mention above you have to do away with this teak.i love teak but that piece is impossible to maitain.take five quarter (5/4") azak purchase as a 5/4" x 2" x 12' piece very common for use as window trim out on window installation.use this along the cockpit floor attach to floor with 3m- 4000 uv . cut 5/4" azak in half lenth wise on table saw.makes a waterproof backer for cockpit panel .on top use existing wood backer blocks attach to the under gunnel.
capt.bob lico
bero13010473
bero13010473
randall the differant between the 25 bert deck and the 31 deck at the transum is a substantial crown. for somebody other then you to cut that azak exact would really be a chore. the bead of uv 4000 is going to cover all the sins . you can`t cut it will a table saw and you have to resort to a jig saw.
capt.bob lico
bero13010473
bero13010473
on the 25 deck the splash boards dont reach the deck at all. that makes it a lot easier as its somewhat arbitrary where you stop em. another thing i like about the velcro is it holds them off a bit which lets water entering through the rod holders to drain back to the deck and out the scuppers. the 25 deck is more of a unjbody design.

-
In Memory Walter K

- Senior Member
- Posts: 2912
- Joined: Jun 30th, '06, 21:25
- Location: East Hampton LI, NY
- Contact:
-
Tony Meola
- Senior Member
- Posts: 7036
- Joined: Jun 29th, '06, 21:24
- Location: Hillsdale, New Jersey
- Contact:
Guys-
All the back and froth has been very helpful for me to figure out what materials to use, especially along the for the backing. I had considered 5/4 Azek, as well as plastic material for the bottom backer. From the feedback and my "back yard" tests, I am going with the 5/4 Azek (much easier to work with and cheaper than the industrial plastic i had found.)
Thanks all....this has really helped!
Giff
tony....i use an industrial strength velcro i get at the lumber yard. i use it for all kinds of things from reuseable cardboard boxes for my art work to attaching the work to the base. what i always do is cut the two (male and female) pieces and stick them together then put them where i want them to live. they are adhesive backed and when you separate the two sides the velcro sticks to each side and is in exactly the right place. i put about six 2 inch strips on the back of the lower splash boards on the wood backer strip that the screws used to go in . screw in the top and the velcro lines up automatically.
-
Tony Meola
- Senior Member
- Posts: 7036
- Joined: Jun 29th, '06, 21:24
- Location: Hillsdale, New Jersey
- Contact:
-
Tony Meola
- Senior Member
- Posts: 7036
- Joined: Jun 29th, '06, 21:24
- Location: Hillsdale, New Jersey
- Contact:
tony there is also a 2" sealed gutter that run from engine box hatch to stern/port and starboard courner that allows the water to rush out those gemlux scuppers. tony this boat has race car steering and turns on a dime . i can run circles around the best center console this allows the boat to put bluefin/big eye along starboard side to be jerk in the boat with gin pole instead of ripping gash in meat with multible gaff trying to lift over gunnels.like i said we all fish in a differant ways. for me if it`s tuna i want it in the boat instant green or not i put towel over eyes and bleed this year i will have brewster teach me denerving.
capt.bob lico
bero13010473
bero13010473

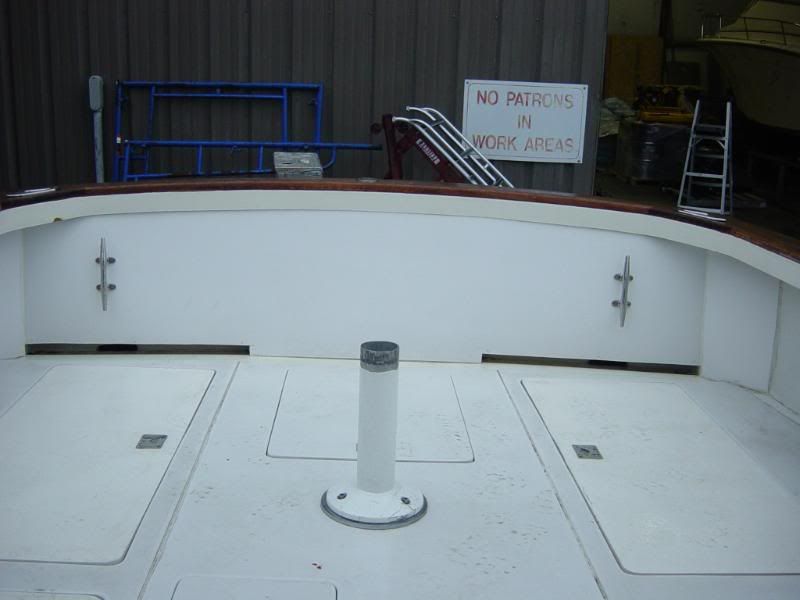
That looks good - but how did you tighten the nuts on the back of those cleats?bob lico wrote:picture taken in a terrible rainstorm.starboard side cutout not crooked just water driping making it look like a irregular cut.
1977 B31 (315 Cummins) Build thread --->https://www.thehulltruth.com/boating-ho ... model.html
2010 Key West Bay Reef | 150 Yamaha
1986 Bertram 28 260 Mercruisers [SOLD]
2010 Key West Bay Reef | 150 Yamaha
1986 Bertram 28 260 Mercruisers [SOLD]
-
Skipper Dick

- Senior Member
- Posts: 330
- Joined: Jun 29th, '06, 08:22
- Location: Cape Coral, Florida
- Contact:
skipper dick you wound not belive the effort.five eight hour days and 400.00 in material plus i used solid forged cleates. generaly speaking my life or one of the crew lifes depends on those cleats.were do you suppose the bitter end of the flygaff line goes? or better yet the bitter end of the tail rope!!! not to smart trying to hold back a bluefin giant with the line around your arms!
capt.bob lico
bero13010473
bero13010473
-
Skipper Dick
- Senior Member
- Posts: 330
- Joined: Jun 29th, '06, 08:22
- Location: Cape Coral, Florida
- Contact:
Bob, I know one thing for sure and that is you are correct about lifting the boat by those cleats. When I replaced my side and stern panels a couple of years ago, I decided to replace the cleats also. The new cleats did not have the same bolt pattern, so I had to drill that 1/4 inch plate and tap it for the bolts that hold the cleats.
Those two plates are probably the strongest part of my B28. By the way, you do good work.
Dick
Those two plates are probably the strongest part of my B28. By the way, you do good work.
Dick
1983 Bertram 28 FBC w/300 Merc Horizon
-
Tony Meola
- Senior Member
- Posts: 7036
- Joined: Jun 29th, '06, 21:24
- Location: Hillsdale, New Jersey
- Contact:
Mine were installed with screws and bolts with locking washers. No aluminum threaded locking plate. I had to contort my hand back there with a wrench to hold the nuts - that's why I asked.
I had to put the center panel in last
 [/img]
I had to put the center panel in last
[/img]1977 B31 (315 Cummins) Build thread --->https://www.thehulltruth.com/boating-ho ... model.html
2010 Key West Bay Reef | 150 Yamaha
1986 Bertram 28 260 Mercruisers [SOLD]
2010 Key West Bay Reef | 150 Yamaha
1986 Bertram 28 260 Mercruisers [SOLD]
tony thats a tuff question to answer. i started with a "belly band" around perimeter of cockpit.that is a 3" wide piece of coosa tie into outside stringers and hull side.now lay a piece of 1/2" azak with 3m4000 uv.this meets the cockpit floor but sit 3/8" lower forming a gutter next to the hull under the gunnels (no cockpit panels on port and starboard just stern)the cockpit froor is about 7/8" thick.
capt.bob lico
bero13010473
bero13010473
-
Tony Meola
- Senior Member
- Posts: 7036
- Joined: Jun 29th, '06, 21:24
- Location: Hillsdale, New Jersey
- Contact:
Who is online
Users browsing this forum: Bing [Bot], Sweetnut and 76 guests