Page 1 of 1
prop install
Posted: Dec 19th, '08, 01:31
by Rocky
Hi guys, just a quick question on prop installation. I know it is a taper fit, but is there a torque value I should be putting on these? Rocky.
Posted: Dec 19th, '08, 07:30
by tds8268
I have been told by Kastel Brothers in St. Michaels, MD "the tighter the better". They also recommend putting the small nut on first, not sure why, but I don't argue with the experts.
Dan
Posted: Dec 19th, '08, 08:17
by Harry Babb
To tight makes it very difficult to remove.
I do not know if there is a recommended torque or not.
If your taper fits properly it does not take a lot of torque to secure the prop.
Make sure that the key does not interfere with the fit between the prop taper and the shaft taper.
Look in the Boat Building Tips that Capt Pat has provided for us you will get a lot of good info.
DON'T OVER TIGHTEN.......you'll pay for it later.......
Harry
Posted: Dec 19th, '08, 09:53
by Rocky
Thank you guys. Great info here, once again! Rocky.
Posted: Dec 19th, '08, 10:09
by JP Dalik
The easiest way to check prop fit is to place the prop on the shaft without the key in place, make sure there is an even fit all the way up. Now mark with a piece of tape or a pencil where the forward end up the wheel hub stops.
Remove the wheel place the key in the keyway and slide the prop backe on. The wheel should end up in the same place. If it does not you are binding on the key and need to the key down. Once you arrive back at your mark on the shaft tighten it up. Don't go nuts but you want in tight.
Have fun. Must be nice your puttin wheels on while the frozen northeast is taking them off.
Posted: Dec 19th, '08, 10:15
by CaptPatrick
The real issue with prop installation is not just how tight the nuts are, but how well the prop mates with the shaft taper. First, both the shaft taper and the prop bore have to be absolutely clean and free of machining marks.
Secondly, the key should be a good fit in the keyway of both the prop and the shaft. Not a tight fit, but no slack. You should be able to slide the key up and down both keyways smoothly without any binding or drag.
The key is not designed to be the principle stop to keep the prop from spinning on the shaft. It's the taper and tight fit of the prop on that taper that is the principle force that keeps the prop and shaft working as a single unit.
The most important step in installing your prop is to drive the prop solidly up the taper of the shaft. If there is any foreign material, (dirt, grit, scale, etc.), or if machining grooves are present on either the bore or taper, you won't get the prop all the up the taper. The bore and taper must be matched completely.
Here's what happens if the two surfaces aren't perfectly matched: You've installed the props, the nuts are tight, really tight, and you're back in the water. When your run the boat in forward gear, the amount of torque being applied in use is far greater than what you exerted with a wrench on the nuts. As a result, the prop will climb higher onto the taper leaving a minute space between the nuts and hub. Conversely, when you back down in reverse gear, the prop is trying to move down the taper.
This back and forth movement of the prop on the taper can eventually fatigue the shaft to the point of failure.
To properly mate the prop bore to the taper, use valve lapping compound. Coat the shaft taper with the lapping compound, leave the key out of the keyway, slide the prop as far onto the taper as it will go without undue force. Install the first nut just to the point that it makes good contact with the hub and, using the second nut, lock the nuts at this position.
Now, lock the shaft, (see "Locking the Shaft" below), so it won't turn & by hand work the prop back and forth on the shaft. Take a few turns one way and a few the other. Re-tighten the nuts slightly and repeat the process. Continue the lapping process until both the shaft taper and prop bore are smooth and mated entirely.
Remove the prop, clean the lapping compound off completely with mineral spirits and wipe dry. Put a very thin film of grease or anti-seize compound on the shaft taper.
Tefgell is an excellent choice for this...
Replace the prop, with the key installed.
Don't use a stainless steel key! The key needs to be bronze...
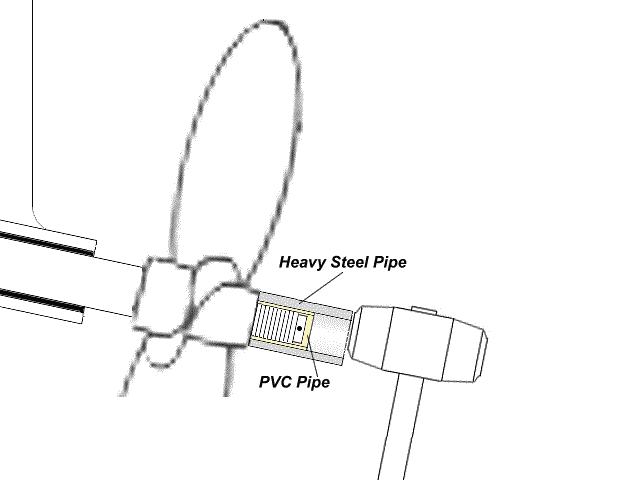
Without the nuts, use a piece of heavy wall steel pipe that will fit over threads & taper of the shaft and a heavy, (3 - 4 lb), hammer to drive the prop all the way up the taper. This is not a tap-tap, but a bang-bang force.
Now, install the first nut and wench it against the prop hub very tightly. Install the locking nut & using one wrench to prevent the first nut from turning and another wrench to tighten the locking nut hard against the first nut. The locking nut will be the wider of the two, and a couple of drops of red Loctite on it's threads should be used. Finally, install the cotter pin and your done.
Also see:
High Preformance Shafting and Installation in the
Tips Section.
 Locking the Shaft:
Installation of the prop will require you to lock your shaft, preventing it from turning during the lapping or nut tightening stage of installation.
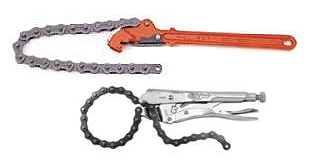
There are two ways that you can lock the shaft: One is to lock the shaft itself with a chain wrench or pliers. The other is to bock the prop against the ground with a timber. Which ever way you choose, extreme care must be used to prevent damage to either the shaft or the prop.
If using the chain wrench method, wrap a piece of heavy leather or canvass around the shaft to prevent the chain from digging into the shaft.
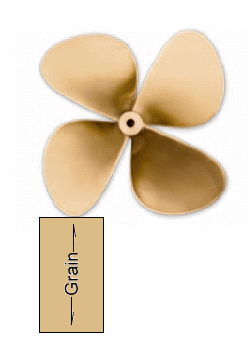
If using the prop blocking method, use a large timber set on end grain and allow the prop blade to only contact the end grain of the timber. Otherwise you risk damaging the blade of the prop.
Posted: Dec 19th, '08, 13:07
by 34Hatt
I have read many Instructions on Installing props over many years.
Capt Pat's is Dead on clear step by step and even has the nut correct, that one always starts a lot of B.S back and forth. The only suggestion I have is to make the part of lapping compound in BOLD letters to help it sink in for some !!!
Now I just have to print it and give it to some of my friends!!!
Posted: Dec 19th, '08, 14:05
by CaptPatrick
The only suggestion I have is to make the part of lapping compound in BOLD letters to help it sink in for some !!!
Hell, Dan,
Most people don't read my "de-structions" anyway, so why make it even easier? Ask Nic... ;^P
BTW, the locking chain pliers work better than the chain wrench; better bite.
props
Posted: Dec 19th, '08, 14:52
by Rocky
I will lap the two surfaces, and thanks very much for the info. I DON'T want these to come off or damage! Rocky.
Posted: Dec 19th, '08, 14:53
by Bruce
When Pat and I started doing more boat projects together, we had alot in common on installations.
Being a repower guy for many years, vibration was always a concern on the finish project and more times than not its in the drive line.
I had been using lapping compound before I met Pat and he was pretty much the only other guy that I knew that used it also.
All you have to do is look at the bore on most props and you'll see machining lands that will prevent 100% contact with the shaft.
And if while your putting on the prop, your thinking about when you next have to remove it, stop.
Put that damn thing on like you'll never have to remove it again otherwise its not tight enough.
Posted: Dec 19th, '08, 15:22
by gplume
Wish I had these "de structions" when I did mine last year...
A couple of things i learned; Use a real prop puller! Cheap ass swamp yankee (me) tried to make one out of an automotive harmonic balencer puller....with some specially ginned up collars. Looked great...did't work for crap. Even with the help of my oxy acetalene torch heating things as hot as I dared...no go.
Fortuantely our yard owner is a prettty cool guy. Saw me struggling said come here son..I got what you need and lent me his prop puller. About 5 minutes 2 pops,,,and two props right off,,presto,
On the lapping. I almost made the mistake of not doing it untill in passing had a discussion with another local "old salt" who stressed...make sure you lap the prop to the shaft. I was surprosed how manny high spots I had. Lapped away until the two surfaces were just about perfect.
It is amazing the torque that 2 perfectly mated surfaces can take. Little known fact is the pulley on the camshaft of a VW diesel(perhaps other cars also, but thats the only ine I have come across in my wrenching adventures) is not keyed, (infinate options on timing because of this) but depends on the fit between two tappered surfaces to maintain the relation between the pully and cam...and thus all valve timing depneds on it. I was skeptical of this at first, but surprisingly...it works perfect, and I have never heard of a failure due to slippage. My point....(and what our good captain was saying to some extent) is a good fit means the key does not take up the load between prop and shaft.
Enjoy that California wheather...we're getting wacked by blizzrd now.
Posted: Dec 19th, '08, 18:05
by RussP
Before you lap you should blue the taper and install the prop and remove to see how much contact you have with the taper, 85% is the minimum allowable contact. The draw should be measured this is the amount of space between the end of the prop hub and the threads. If the draw is really close be carefull when lapping, if the prop goes too far on the taper the nuts will bottem out before being completly tight.
We went around and around with the big & small nut placment at Rybovich. Our standard is slam the prop on tighten with the large nut remove the nut and make sure the key is not touching the top of the keyway on the wheel and reinstalling the small nut and locking with the large nut.This meets Lloyds and ABS standards. If you choose red locktight make sure you have a torch handy when removing. Most of the props I'm dealing with are too big to lap so if they are really bad we use flapper wheels and do it by hand. I had to install two thruster blades this week 24" diameter and it took 4 hours to fit one prop using 80 grit Clover oil based lapping compoung. I have yet to see a bronze key on any props big or small. Basicly the tighter the better when it comes to prop nuts.
Posted: Dec 19th, '08, 18:59
by Kevin
"PRINT" Swapping props here soon. Great instructions. I have never used lapping compound. Boat store or hardware store?
Posted: Dec 19th, '08, 19:07
by CaptPatrick
I have yet to see a bronze key on any props big or small
You must of not been around during Buddy Boy's prop install... The reason to use only bronze is that it will give slightly on impact, where a stainless key won't. It can make a difference between a snapped shaft or just a dinged prop. The bronze keys are available from any prop shop. When ordering shafts, or reconditioning existing shafts, specify that they be delivered with bonze keys.
You give red Loctite too much credit... Only a drop or two is all that's necessary and not cause a problem with removal. I guess if you put a couple of full squirts in, it could be a pain in the ass...
I doubt that lapping would ever remove enough material to affect the draw. You're only removing a .001 of an inch or so & linear travel increase would on be half that.
Kevin,
Auto Supply...
Posted: Dec 19th, '08, 21:03
by bob lico
russp you and jp ,capt patrick explain everything i wanted to mention my method but could not remember the spelling of the blue or red dye lets give it a try----dykum.paint this on after 1st shot of valve grinding compound lets you know when you have full mating surfaces.
Posted: Dec 19th, '08, 21:30
by CaptPatrick
Bob,
It's
Dykem and the stuff is good but very expensive. For some jobs, like valve grinding at a machine shop, it's a necessary tool.
For the job of lapping a prop to a shaft, (sorta' medium-tech precission), and from a non-professional's, (most boat owners), point of view, a new broad felt tip marker will do the same job.
16 fl ounces of Dykem, (far more than the average non-professional will use in a lifetime), costs around $12. A jumbo broad felt tip marker will set ya' back about $2.50 at Staples or Office Depot.
Posted: Dec 20th, '08, 07:15
by Bruce
You can always get a tube of prussian blue from the auto parts store along with the lapping compound.
Posted: Dec 20th, '08, 08:36
by Harry Babb
In a pinch you can use a Majic Marker to color the shaft and check the percent of contact........
Posted: Dec 21st, '08, 00:55
by Rocky
I have a very large chain wrench at work (Toyota) that I used for holding the shaft from turning while tightening prop, but also used a wide piece of serpentine belt from a Tundra, worked great, no marks and held well. Thank you all again guys. Rocky.
Posted: Dec 21st, '08, 03:11
by Sean B
I followed this advice two years ago from Tony Athens of boatdiesel.com fame, and it seems to be holding up pretty well:
Propeller installation Article
Before this, twice I had trouble with the cotter pins, then the nuts, coming loose. No longer a problem with the wire trick
Posted: Dec 21st, '08, 09:27
by CaptPatrick
Sean,
Thanks for linking Tony's article. I hadn't seen that one before & the safety wire replacement of the cotter pin seems good idea on the surface, (at least from the stand point of cotter pin's ability to catch and collect fishing line).
But in reality, if the wheel, or any component of the under water drive train, comes into contact with any type of line, the result is a better than good chance of spooling the line onto the running gear. I'm not sure that the added labor and aggrivation of drilling that hole in a stainless steel nut, on a 45º angle to the face, will reduce the possibility of picking up fishing line is enough to be worth the effort.
Tony makes some other good suggestions that I think are more important: Lots of greasey goo to help block crevice corrosion & the use of epoxy, (as opposed to my comment on Loctite), are two that will stick in my mind on my next installation.

Posted: Dec 21st, '08, 12:03
by Sean B
I used the bronze alloy nuts, which is also the type that came on my shafts when I bought the boat. Drilling them was easy using a drill press with a vice clamp, but stainless would surely be more difficult. For me, the wire was less about fishing line and more about keeping things tight.
I wish I had known about your lapping compound procedure - that goes into the bag of tricks for next time. Thanks
Maybe it was already mentioned... but whenever I have the props off I also dye test the shafts for cracks. Have never found any but I always look for them, especially after having the props get a little loose on me in the past. The dye and developer kits are pretty cheap, and can be had from a construction testing lab supply company. This is the same red dye test kits that are used to test welds for cracks in critial structures.
This is exactly why it takes me four times longer than anyone else to do these projects: all these extra steps.
Posted: Dec 21st, '08, 13:11
by CaptPatrick
For me, the wire was less about fishing line and more about keeping things tight.
Therein lies a comon misconception about the purpose of cotter keys. Except, as Tony points out, unless a
perfectly fitted castellated nut is used... The only thing a cotter pin does is keep a nut, washer, or spacer from coming completely off of a shaft.
I once had an outboard wheel spin completely off while backing down because either the cotter pin magically disapeared, I forgot to replace it, or it sheared. Never did find the prop and was only saved from a tow by proximity to the dock & a trolling motor.
OK, so let's design another gizmeaux...
(sorry, Andre, couldn't resist the temptation.)
After the prop is installed and tightened down, both nuts in place and locked, cut a piece of bronze pipe with an inside diameter that fits over the remaining end of the shaft threads past the cotter pin hole. File a slot just deep enough into the pipe that the cotter pin can be forced through, binding against the slotted pipe. Now you have a thick castellated spacer...
Posted: Dec 21st, '08, 14:14
by jspiezio
CaptPatrick wrote: Therein lies a comon misconception about the purpose of cotter keys. Except, as Tony points out, unless a
perfectly fitted castellated nut is used... The only thing a cotter pin does is keep a nut, washer, or spacer from coming completely off of a shaft.
I once had an outboard wheel spin completely off while backing down because either the cotter pin magically disapeared, I forgot to replace it, or it sheared. Never did find the prop and was only saved from a tow by proximity to the dock & a trolling motor.
OK, so let's design another gizmeaux...
(sorry, Andre, couldn't resist the temptation.)
After the prop is installed and tightened down, both nuts in place and locked, cut a piece of bronze pipe with an inside diameter that fits over the remaining end of the shaft threads past the cotter pin hole. File a slot just deep enough into the pipe that the cotter pin can be forced through, binding against the slotted pipe. Now you have a thick castellated spacer...
Capt P you always amaze me. I was going to post a similar suggestion, we do it often on aircraft assemblies, but you beet me to it.
Normally all the cotter pin does is keep details from baing lost.
Posted: Dec 21st, '08, 20:19
by bob lico
i thourgh that was my secret as applied to outboards exactly as you mention it ,oh well.here we are hoodwicking the southern boys again with the lucky to be alive crew.set world record prevous month at 112mph in s- class .don`t belive those engine covers for one moment .running at 7000 rpm in 1to 2' waves and never loss a prop.rick the thottleman seam to hit every wave as hard as he could.not even a hairline crack at end of season.oh--to be young again .
Posted: Dec 21st, '08, 20:20
by bob lico
