Page 1 of 1
Laminating mica to divincell question
Posted: Oct 27th, '08, 11:21
by Buju
Capt. Patrick & faithful,
I'm replacing rotted out flybrige panels on a customers boat... Old panels were 1/2" ply laminated with formica. Using 1/2" divinicell for the new panels, laminated on the rear with epoxy & glass mat. On the front, I'm planning to use 1/32" white formica.
Question is: Will epoxy with adhesive filler create a suitable bond between the two? I figured it would be more than adequate, but having never done any work with mica, I wanted to make sure there wasn't some factor I didn't know about before doing it.
Thanks,
Mark
Posted: Oct 27th, '08, 12:07
by CaptPatrick
Buju,
Epoxy & cabosil at the consistancy of mayonaise is the ticket for hard laminate & Divinycell. First, with a drywall knife, skim& fill the Divinycell surface to fill the pores. Use a notched trowel to apply the epoxy to the back of the laminate. Lay the divinycell onto the laminate, move it around a little to seat it in & then evenly weight it down. Clean up all squeeze out while it's wet...
Hard laminate, Divinycell, & thickened epoxy is my prefered way of making finished panels. The bulkheads & 1/4 round door for the head on Patrick Hancock's B31 are all made using this technique.
Br,
Patrick
Posted: Oct 27th, '08, 13:57
by Buju
Great, I'll proceed as planned.
That head door is slick! What's the drill on getting that radius? Score it, bend it, fill it with epoxy to retain the shape, then laminate??? Doesn't Diab offer prescored d.cell as well?
Really cool results... however they were obtained.
And thanks, as always, for the quick and informative reply....
Posted: Oct 27th, '08, 14:19
by CaptPatrick
Buiu,
I have a large form, done when I did Jim Bailey's "Buddy Boy", that I make up the blank over. Lock one piece of laminate face down, trowel on the epoxy, lay over that scored Divinycell, trowel up the second piece of laminate, lock that in place, and then vacuum bag the whole assembly.
I incorporate in lumber on edges where hinges or hardware need to be installed... Once fitted, all edges are laminated. Major pain in the ass, but the finished product is great & relatively feather weight.
Br,
Patrick
alternatives to divinycell, question
Posted: Oct 27th, '08, 15:16
by Face
A friend of mine just made new flybridge sides out of divinycell for his older, all-glass, Jersey flybridge/cruiser. He made these after having another fabricator make him some out of a honey-comb core laminate that was poorly made. The difference in weight seemed very significant to me. He said the weight came primarily from all the epoxy that the porous divinycell soaked up prior to lamination (he used fiberglass mat).
I will in the coming months be replacing my flybridge panels, cockpit panels and main bulkhead (main door and windows) in my B28. I am trying to make all of these projects as lightweight as possible. So, my question is, what could I use that would be lighter than the divinycell and is this acceptable structurally? I really want to stick to composites rather than wood.
-Joe
Posted: Oct 27th, '08, 17:11
by CaptPatrick
Joe,
You're not going to get much lighter than Divinycell. Your friend's panels are likely heavy because of the fiberglass, not the amount of resin soaked into the Divinycell. Divinycell is a closed cell PVC foam and the only pores to absorb resin is the very top surfaces where the cells have been cut open. Scored panels will use more fill to fill any voids created when the surface is curved.
In the case of the 1/4 round door above, these voids were not an issue because the door is laminated with with heavy weight Formica, so there's no print through like there would be with fiberglass.
Many people make the mistake of over glassing composite panels. Even decks don't need more than about 3/32" of fiberglass over the core. Where decks benefit from a thicker layer of glass is on the underside, not the top...
Panels and Vertical structures, (other than the hull), rarely need more than 1/8" - 5/32" of glass on either side.
Glassing too heavily and using only chopped strand mat can, unquestionably, create a weight problem. The average resin to glass content of a layup with cs mat is 3:2. If the object required 2 lbs of mat, it'll have a resin content of 3 lbs, for a net wet weight of 5 lbs.
H60 Divinycell has a volumetric weight of 6 lbs per cubic foot. Heavy enough for light structural use, but light enough to be a big weight saver. The strength of a composite panel comes more from it's thickness than how much glass is applied to each side. (See:
Basic Composite Structure and Benefits of Core Materials). One square foot of 3/4" H60 Divinycell has a weight of 0.375 lbs. It takes 2 sq ft of H60 to equal 1 lb.
A 1 sq ft of 3/4" H60, laminated on both sides with 1/8" of cs mat would weigh about 27 ounces, or about 1.7 lbs. The fiberglass accounts for over 26 oz of this weight...
So, for flat or curved panels, with a curve only on one axis, epoxied Formica & Divinycell is hard to beat. Labor time is far less than laying up glass, gelcoating, & fairing.
Br,
Patrick
Posted: Oct 27th, '08, 18:46
by randall
i would take a look at azak.......very light and made for outdoor use....i just painted it and called it a day.
Posted: Oct 27th, '08, 19:31
by bob lico
i used capt. patrick divinycell procedure on my panel doors on my bridge but had to reinforce bottom strip of doors for piano hinge and top for push buttom.very light but i would use azak next time,less work and azak has great screw holding ability.azak can also be used structual but there is a trick involve. think about a wood 2" by 4" lenth of wood if you put it across two cement blocks and step on it the wood will flex but make "strongback" out of it by placing another 2x4 on it forming a L and nail it.tremedous strenth now do this with double azek and on the flat this is my bulkhead holding the cockpit floor.trust me the cockpit floor is a rock.entire bottom bracing of azek.

Posted: Oct 27th, '08, 19:35
by randall
jeez bob...thats a nice helm
Posted: Oct 27th, '08, 19:36
by CaptPatrick
Azak = PVC Foam Board (There are several trade names, Azak is one.)
See: PVC Foam Board as an Alternative to Plywood
Posted: Oct 27th, '08, 19:43
by bob lico
randall thats was the first building project wereby i step into your world.i could have build it in half the time but decided to book match the entire pod.i went to a mill out east that had 24" bandsaw and he cut a hand picked burmise teak 3" thick in half.thus ---vertical grain from top to bottom around the front and bottom.exact match side to side.a man with to much time on his hands!
Posted: Oct 27th, '08, 19:48
by bob lico
capt patrick i should tie a string on my finger next time.azak is pvc form board but i must say this.azek is totally superior to any other brand like klear brand that has wood grain on one side.azak in very dense.
Posted: Oct 27th, '08, 20:06
by bob lico
i forgot to mention when you remove all the waterloged wood in the passage way between the engines the best support you can make is pvc board .made like i mention above strongback is perfect to hold the floor hatch.i used 316 ss square head screws recessed and azek glue.offset the boards to form a track for the engine compartment bottom pieces.(the piece that the engine hatch rest on)also made of pvc board.when working on engine just lift hatch pullout insert(no screws) and the entire engine is exposed.
Posted: Oct 27th, '08, 21:42
by Tony Meola
Bob
Do you have any pictures of that companion way including the panels the engine box's sit on? I am trying to figure out how I want to set mine up any your description sounds interesting.
Posted: Oct 27th, '08, 22:22
by IRGuy
Bob...
What glue are you using for the Azek?
Posted: Oct 28th, '08, 21:12
by bob lico
i did not want to misled anybody when i built the bridge panel i remove all of the old mica and supported the top then put a sheet of h-60 divinycell and carefully cut the three doors out .then i cut out the soft form down about 1/4" all around and fill with thicken epoxy next i did the same to the doors except i fill in 1" for the piano hinge.after filling in back and front with mayo consistacy epoxy i gel-coated front of panel and doors.the sides were done same way bridge is entirely divinycell but no mica.next year will extend top of bridge and insert two c-120 raymarine.i wanted to make it clear h-60 top off with gelcote no mica.
ir guy i will post pictures as soon as possible i just wanted to clear up my procedure in companion way.i removed everypiece and started with pvc bulkhead out. made pvc sides and left 3/4" edge on both sides of teak step for engine hatch bottom panel to rest on.then i built two strongback pvc supports from door bulkhead to step crosspiece then glue and screw everything together.now i made supports for engine hatch with rain gutters in them next a vertcal piece to hold the panel from moving in there is also a stop for the panel at the step.next i made the panel with a 45 degree edge on top to match engine hatch,next lined with sound down and insert from top down with engine hatch open.bottom of panel is held laying on strongback and held in place by walkway hatch cover.no scews,bolts on any other fasterners.just lift hatch and pull panel straight upwards.maint. free and if you don`t like matte white paint it.i use three types of glue depending on use.azak to azak sand with 80grit to break shine then glue with azak pvc glue.azak brand pvc board to fiberglass.rough up both surfaces and use PL brand poly comes in tube for cauking gun or use thicken epoxy with milled fiber and cabosil.the last glue is used when you have a outside miter or a joint like a rabbit joint when you build battey boxex out of pvc ,called PLEXUS it is indestructable with pvc ,applied with applicator gun.i hope i answer your question
Posted: Oct 28th, '08, 21:39
by Tony Meola
Bob
I am trying to follow your description of the companion way. It sounds like a lot of work but would really love to eliminate screws. Sounds like the engine box helps to hold them in place.
Posted: Oct 29th, '08, 09:11
by randall
i glued mahogany to azak with thickened epoxy....seems like a strong bond but i also built a keyway so it would be mechanical as well
Posted: Oct 31st, '08, 22:00
by bob lico
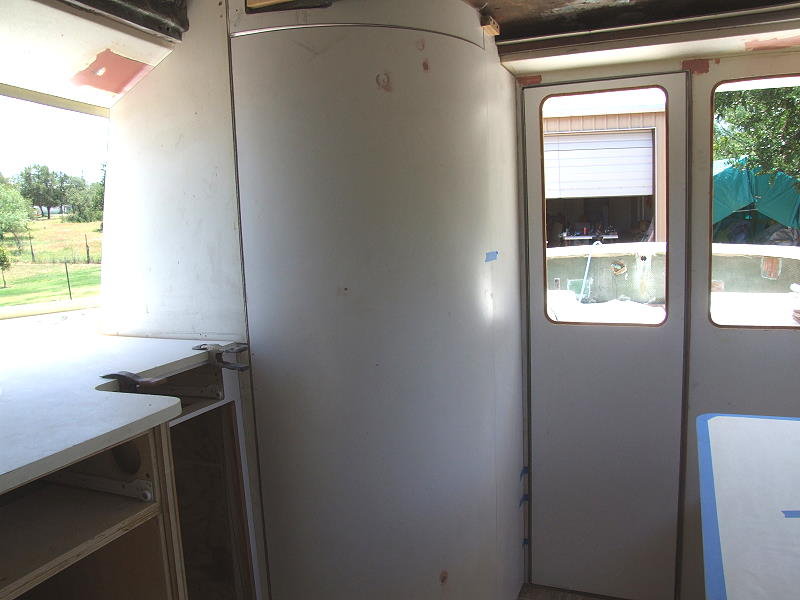
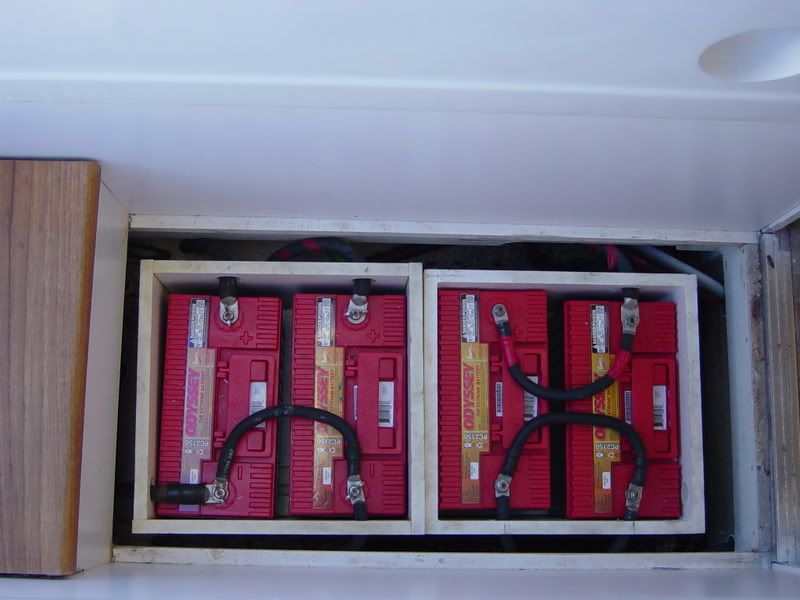
tony the screws i use is to hold the azak together while gluing.there are deck screws in 316ss a large worm or slow twist with the head recess slightly used to make strong back.here is one view of campanion way.note the large piece goes from bulhead to bulkhead resting on step bracing and strongback on both sides of battery boxes
Posted: Nov 2nd, '08, 09:04
by IRGuy
Bob....
I just realized that although I read your answer to my question above when you posted it, I never responded.. so I am offering now a belated thank you.
Several months ago I completely replaced all the heavy 12 volt switches, buss bars, wiring and other components in the engine room and built new battery boxes as well (out of 1/2" plywood with two heavy brushed on coats of Masepoxy resin, with white pigment added). Since I changed over to sealed Optima batteries I am not worried about deterioration of the epoxy coated plywood boxes. I used plywood for strength, and the epoxy as a sealing/protective layer.
BTW.. I don't see any signs that you have covers for the boxes in the pic above... My surveyor says that you have to have the batteries covered or have some other means to preclude having a dropped tool or some other conductor fall onto the terminals and cause a fire.
Posted: Nov 2nd, '08, 16:31
by Whaler1777
There are covers made out of.... You guessed it.... Azak, they're just not shown in the pictures.. Everything on Phoenix is 110% up to par...
Posted: Nov 2nd, '08, 21:46
by Tony Meola
Bob.
Thanks, I really like the set up. Gives me food for thought.
Posted: Nov 5th, '08, 20:37
by bob lico
thank you john. i guess i just don`t have the writing ability to really explain the pro`s of going with azak brand pvc.btw in it`s natural state it is a matte white,very easy on the eyes on sunny days and if you don`t like it some day you can allways paint it.i will take a picture of the companion way sides and interlock with engine hatch in a few days.