Page 1 of 1
new gauges, original panels, How?
Posted: Jan 28th, '08, 10:20
by Face
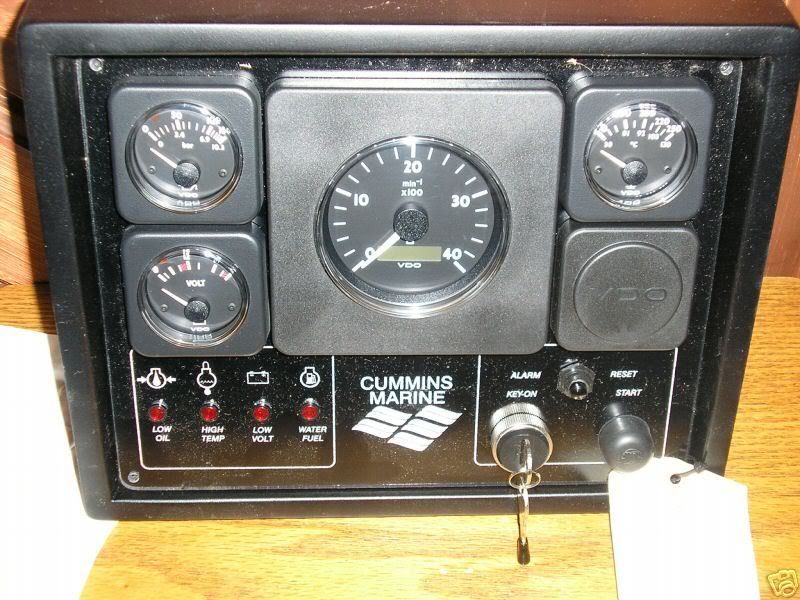
Wasn't there a post within the last year about squeezing a bunch of new gauges (yanmar/cummins) into a B28 or B31 gauge panel? I've purchased two Cummins gauge panels, new on Ebay for half-price. Trouble is I think I'll have to take apart the panels to configure the gauges on my B28 flybridge. I'll post pictures later on, but basically I have the mechanical cummins B/C series panels with square gauges. I'm sure most of you guys know which ones I mean.
Anybody else done this, with these gauges? Where should I install the key switch, starter button, and warning lights?
-Joe
About ebay, over the last year or so I didn't see the cummins panels for sale once. I couldn't find them used anywhere, online, boatyards, you name it. Cummins wants over $800 for the panel new. Over the last two weeks I've purchased two of them brand new on Ebay, 1st one about $515 after shipping, the second one $400.
Posted: Jan 28th, '08, 10:29
by JP Dalik
Take the square bezels off. You'll need new tachs cause the 4+ inchers won't fit. Order VDO Ocean Line or Ocean Pro Series bezels (can't remember its been a few year) for you Vanguard gauges in the Cummins panel. Replace the bezels and fit the gauges. Its not fun but they all fit.
Take the idiot lights out of the Cummins dash and insert the lights into the appropriate holes in the Cummins gauges (oil water temp- the water in fuel you can plug into the Tach if you want)
Its alot of work but well worth it if your looking to keep the original style of the dash.
I'm sure JJ on the "Hound" will chime in as he was one of the more recent succesful completions of this task.
Good Luck
Posted: Jan 28th, '08, 10:42
by Face
Posted: Jan 28th, '08, 12:44
by JP Dalik
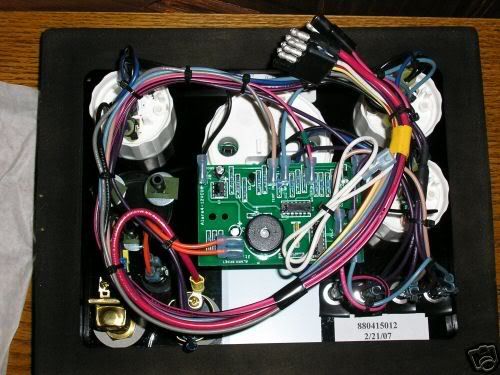
Hey what do you know new smaller tach, just buy new bezels and put the keys and buttons where you want. Its alot of work and keep the printed circuit board somewhere dry.
Posted: Jan 28th, '08, 13:00
by Face
Thanks JP, So scratch the idiot lights in the gauges idea right? You were thinking of different gauges, not these VDO gauges? Or can these lights go in these gauges? I don't have them in front of me...
I don't mind the work, I'm actually excited to do this indoor project. I plan on using the original bertram panel on my flybridge as a template to create a new one. I'm trying to minimize the use of wood on this boat, not sure what I'll make the new panel out of. Also thinking I can cut out the part of the Cummins panel with the idiot lights in order to keep them together. Thinking I'll cut out this part of the panel with a bandsaw, then sand smooth.
Anybody have any pics of what they've done? I could swear there was a thread on this within the last year or so.
Posted: Jan 28th, '08, 16:13
by Hyena Love
I just pulled the original gauge panel off the flybridge of my B28. Took a piece of plastic - starboard - whatever you call it - did a lay out, and then cut the holes. The existing gauge panel is only a thin little plastic panel.
I put the warning buzzers in a breaker box under the flybridge cowl on the port side - you know where the two little doors are on each side of the flybridge. The diesel panels I had would not fit in the dash space unless I used real small gauges.
So, I mounted just gauges, the keys, and the stop buttons on the dash panel itself.
Additional gauges can be added below the sterring wheel or mounted in the side panels in the flybridge.
Posted: Jan 28th, '08, 17:27
by JP Dalik
Face
Put the idiot lights in the gauges there are unused holes already there. If you don't you will need to find a place to mount the idiot lights and in keeping with the original dash layout there just isn't alot of room.
Its only time have fun
Posted: Jan 28th, '08, 23:28
by John Jackson
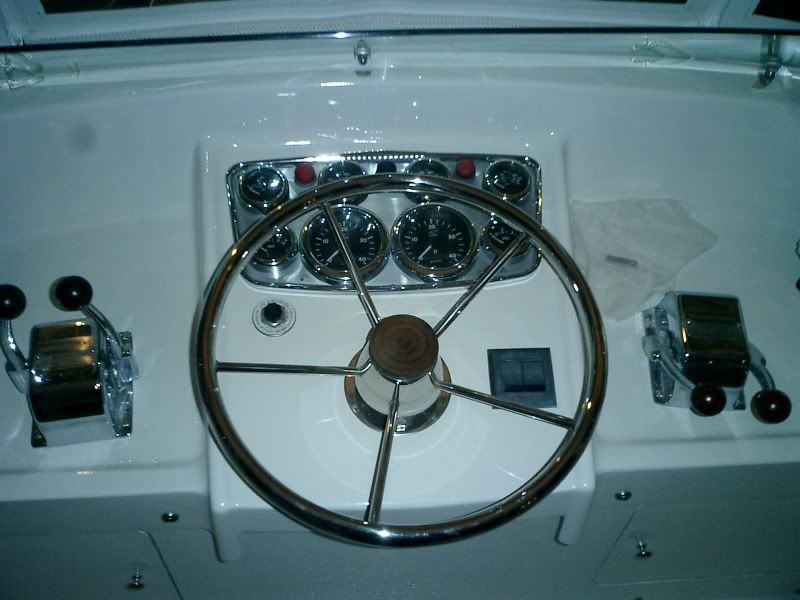
Here is the Cummins gauges in the original panel.

JP was the one who told me it could be done. You can buy the round bezels from a VDO distributor. They were about two bucks each.
Posted: Jan 28th, '08, 23:34
by John Jackson
The panel is the original rechromed. That cost about $100. I had Billy at Carver's do the switch from the Cummins panel to the original. It took him only a couple of hours. I didn't know enough about how the wiring works to feel comfortable taking it apart and it looked like the type of thing that if screwed up would take someone like Bruce to figure out which wires were in the wrong place, so I left it to the pro. I did, however, put the final coat of wax on it, all by myself.
Posted: Jan 29th, '08, 17:51
by Face
John thanks, thats what I was thinking of...couldn't find the old post. I just wanted to see examples of how others have done this. Unfortunately I just received the second panel from Ebay. I didn't look close enough at the ad and this one is the old style (larger tach). Back on Ebay it goes. I'll post pics eventually of the final product.
-Joe
Posted: Jan 29th, '08, 17:55
by Face
"I did, however, put the final coat of wax on it, all by myself."
:-D
Posted: Jan 29th, '08, 23:16
by jspiezio
Very nice bridge. All things being equal, I think it is the shine from the waxing job that makes all the difference.