Page 1 of 2
Rewiring, where to start
Posted: Oct 24th, '17, 18:41
by PeterPalmieri
So this isn’t a project I can or want to do myself but I recognize I need to plan it out in someway. I have 50 years of add ons. Original breaker panel. Fuse block on the bridge that doesn’t shut off at the breaker. Saltwater wash down tied directly two the battery. The list goes on and on. I think I basically need to have everything ripped out and start all over agin. I’m not sure if that makes sense or how much it would cost to do. But recently chasing to many ghosts, to many times I’ve killed a battery.
So I don’t know who to trust to do the work, I don’t know how I would approach them for a proper estimate and I would like to be clued in to the must do’s in this kind of project.
Or should I continue patching things as I go?
Re: Rewiring, where to start
Posted: Oct 24th, '17, 20:31
by Stephan
Pete-
There are people here who can tell you the right way- I believe they will be along shortly. I can offer what I have done thinking I started with a similar situation.
I remember clearly removing two trash bags full of old wiring from my boat when I got it. Just the act of breaking open the zip ties and bundles to un-weave the disused stuff made a little difference and that exercise had at least two benefits. Firstly, running my hands over each bit of wire gave me confidence there was not a major safety issue waiting for me. I found what I believe were original wires in what appeared to be very good condition. I also found some very recently installed bilge blower wires that were shot. Secondly, I started to have a mental picture to answer some of the questions you are considering now.
If I had the $$$ I know I would not regret pulling it all out and redoing it but I don't.
The work I have done has made me appreciate that the skill and discipline to do the job well is valuable. I also have marveled at how wildly the price and quality of the materials used varies.
Good luck-
Stephan
Re: Rewiring, where to start
Posted: Oct 24th, '17, 20:51
by Tony Meola
Peter
Well it sounds like you are feeling better if you are thinking about a project. Actually if you think it out the wiring is not that difficult. If you have the original panel and don't want to remove it, you can replace it with a Blue Seas panel. My panel was up in the forward cabinet on the starboard side just before the v berths. A Blue Sea's 10 breaker panel fit right in there. I had to make a panel to set it into but that was easy.
I used a 1/4 inch piece of birch plywood, cut out the opening for the panel and then stained it with a Mahogony stain. Looks like it belongs there .
I pulled out the engine hour gauges but they became part of the bridge system when I repowered so I did not need the original ones.
First thing I quickly figured out was if I ripped out a wire to make sure I had a string, or another very fine wire attached so I could pull through wires later. I do that on any wire I pull and I leave that wire intact when I am done, because you never know when you need another one.
The other thing I did to make it easier was to run from the main DC panel power to individual fuse blocks. So if I wanted bridge power I ran one wire from the main breaker to the a fuse block for the bridge, then I ran my bridge power off of that. That gave me a fuse for the radio, GPS, running lights etc. If you need more fuse space run a second power wire and bring it to the bridge. That helps eliminate all those in line fuses which get sloppy.
The only thing I have with an in line fuse are my bilge pumps. They are wired through 3 way switches that are fused at the battery hook up. Actually I took mine off of the hot side of the battery switches so they are always hot. 3 way switch gives my on/off and auto. Mine are on auto all the time and only move when I need to pump out water manually. Or unless some guests kid plays with them. Made a habit of always checking them if any kids I am not familiar with are on the boat.
I also put a fuse block in the engine compartment from which, I hooked up things like the wash down pump etc.
Not hard to figure out, actually the 31 is an easy boat to wire.
Think about it lay it out on paper and then go for it.
Re: Rewiring, where to start
Posted: Oct 24th, '17, 21:31
by Yannis
Pete,
Just throw everything out. Dont save anything.
I did just that (although I had just started to change one little wire here and another one there) and Im glad I did.
Put new master switches, cables, brakers everything.
My job took about 10 days (on and off) , about 110 meters of new marine cable and not much money, I really do forget how much.
Two pannels, the one up is mainly for electronics and bilge pumps.
I now have security and plenty of plugs, lights, etc where I want them.
I also wish you well, but unfortunately dont know what was the problem!
Good luck.
Re: Rewiring, where to start
Posted: Oct 24th, '17, 22:26
by Yannis
Re: Rewiring, where to start
Posted: Oct 25th, '17, 06:21
by Bruce
Peter,
You can start by sitting down and figuring out both on ac and dc what circuits you will need,
Example ac, outlets, air con, reefer, gen set or just shore.
DC, running lites, engine ignition, horn, bilge pumps, ect.
Write it down on paper, mull it over a few times and this will decide the size of your panels.
Rip out old wiring and start new and use tinned wire.
As far as batteries go, how many batteries, i.e. port batt, stb batt, house batt if that's what you want.
Once you have that info, you can approach the tech and have the system customized to your specs and most important get an estimate.
Post your thoughts here and we can revue and make suggestions to work with you to get a complete plan you can approach the repair shop with.
Some of those who live in your area can suggest a electric shop.
Re: Rewiring, where to start
Posted: Oct 25th, '17, 06:41
by CamB25
+1. Most of the work is on paper(or excel). Circuit drawings, load calcs, etc. It is possible to re-wire one circuit at a time, but if you are re-doing the whole boat it doesn't make much sense. Good Luck!
Re: Rewiring, where to start
Posted: Oct 25th, '17, 17:26
by Raybo Marine NY
one of these sized checks

and a truck load of beer
Re: Rewiring, where to start
Posted: Oct 25th, '17, 17:32
by Yannis
How many hours per day does the sun shine in NY or NJ or the area?
If it's more than 5-6 you can have a super solar reefer.
4 batteries ( 3 house,plus one for one engine with a Both connection)
a/c you cannot have solar in NY. Here, or in Florida perhaps.
2 pannels X 150€ each plus 4 batts, you're in for 1500€ for this alone.
Plus less than 1000€ for the rest, and you have a new super boat.
No shore power, no cables, no hassle.
In the winter, everything works perfect; you have low consumption and if the reefer is ON on 1, then it charges and discharges so it keeps the batts alive.
Only thing is to build a custom fridge with 10cm insulation all around, that opens from the TOP. That cost is additional, but what a permanent relief !!
Re: Rewiring, where to start
Posted: Oct 25th, '17, 17:39
by Yannis
I just read that in Paris, as well as for the whole of the Netherlands, the use of internal combustion engines for traffic, will be totally prohibited....by 2030, that's tomorrow...
Also, I was looking on City View a town in the US, I noticed that the size of american cars has been reduced considerably since I was there in the 80's...many Subarus (my beloved machine).
Re: Rewiring, where to start
Posted: Oct 25th, '17, 20:33
by Tony Meola
Yannis wrote:I just read that in Paris, as well as for the whole of the Netherlands, the use of internal combustion engines for traffic, will be totally prohibited....by 2030, that's tomorrow...
Also, I was looking on City View a town in the US, I noticed that the size of american cars has been reduced considerably since I was there in the 80's...many Subarus (my beloved machine).
I hope they are prepared to ride bicycles.
Re: Rewiring, where to start
Posted: Oct 26th, '17, 11:00
by PeterPalmieri
I already started a inventory list of what is existing, what I want to add and remove. I guess I need engage someone locally to get an estimate. I am a bit of a minimalist. Want as few things as possible that require maintenance like AC, fridge etc.
Re: Rewiring, where to start
Posted: Oct 26th, '17, 19:44
by Marlin
There is a recent thread by Stephen ,oct 2017, it's a good start
Re: Rewiring, where to start
Posted: Oct 26th, '17, 21:15
by PeterPalmieri
Thanks Marlin not sure how I missed that
Re: Rewiring, where to start
Posted: Oct 27th, '17, 17:31
by Stephan
Pete-
In considering the size of house battery bank I made the attached spreadsheet. I thought the maximum mission would be an overnight fishing trip. I also believe in keeping it simple so no refrigeration I do not have radar.
This is not a definitive calculation but just some working papers that were helpful to me.
http://www.scsloan.com/Axe%20Circuit%20Calc.xlsx

Re: Rewiring, where to start
Posted: Oct 27th, '17, 18:28
by PeterPalmieri
Thanks for that info
Re: Rewiring, where to start
Posted: Nov 15th, '17, 17:33
by PeterPalmieri
Ordered the panel. My arm was twistied into believing I can this myself.
Re: Rewiring, where to start
Posted: Nov 15th, '17, 18:59
by MarkS
Good luck Peter! Repeat after me........I love chasing sparks I love chasing sparks......
Re: Rewiring, where to start
Posted: Nov 15th, '17, 22:22
by Tony Meola
Peter
Ignore Mark the rest of us do.
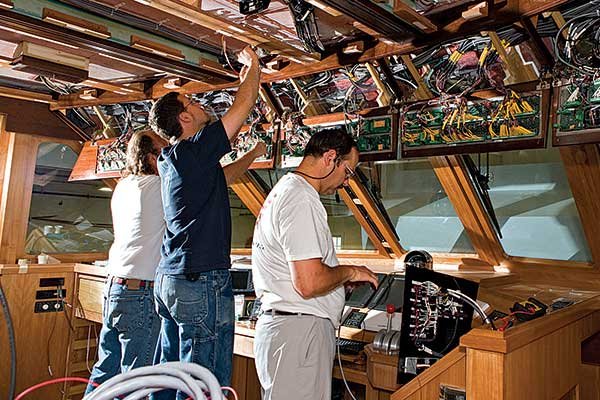
Peter it really is not a bad job. Best way to do it, is to pull down the overhead, both in the stand up head and the cabin. This give you open access to the bridge area. Then pull of the wing outboard of the engine box, this way you can make it easier on yourself to pull wires. First I figured out if there was anything I could continue to use. Believe it or not, I some wires that were in excellent shape. They were basically like new.
Then I said this is gone and got rid of it. But first I made sure that at least one was left intact so that I could use it to pull the next wire up. Then I either also attached a very thin wire or string to use as the next snake to pull the next wire up. If you get rid of the unwanted wire first and by that I mean wires that do not need to be replaced, then you can use the wires you are replacing to pull the new wire thru.
At the end of all of this, I pulled a thin wire through, lets say like 20 gauge to use for future snaking of wires. If you think it out and use what yu have to pull up the new wires, it is easy. I ran two separate power wires up to the bridge. I hooked each one of them up to a fuse block, and from those two blocks I distributed power to the bridge.
For example, run a wire from a 20 amp breaker to a fuse panel in the overhead. Then from that panel feed the bridge for electronics, running lights etc. Do the same with the next panel.
Also remember you can hook up what can potentially draw more than 20 amps off of the fuse block, since if you do it right, you would never have all of the equipment running at one time to exceed the blocs load. That is where the planning comes into play.
Have fun.
Re: Rewiring, where to start
Posted: Nov 16th, '17, 09:01
by Joseph Fikentscher
Ditto what Tony said. Of course mine is a 25 so different.
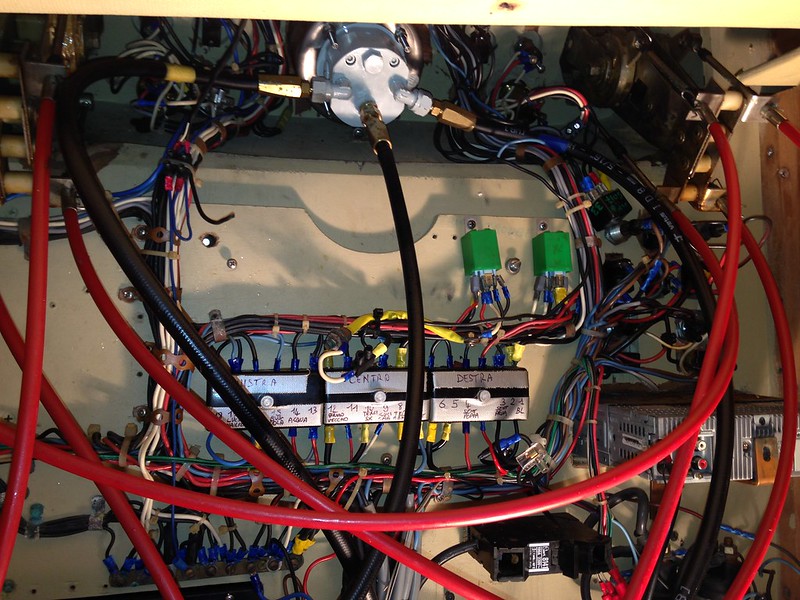
I did not have any real reusable wires so all came out except the engine harnesses. I used those to snake new (I made them) harnesses through to the bulkhead to a terminal block. One on each side so the engine wires are easy to trace.
Then from the block to the bridge to another block and to the gauges. Then with all the side panels off it was pretty easy to snake new wires for accessories to a fuse box and switch panel.
http://www.dropbox.com/home?preview=002.JPG
http://www.dropbox.com/home?preview=05-30-2016+011.JPG
http://www.dropbox.com/home?preview=05-30-2016+012.JPG
Re: Rewiring, where to start
Posted: Nov 16th, '17, 09:24
by Lars
Rewiring is on my project list as well - will get at it this spring. Everything is working and in reasonably good condition, but good luck trying to track a problem the day something acts up. A lot of stuff has been added on, overcrowding the original layout. Time to redo.
Re: Rewiring, where to start
Posted: Nov 16th, '17, 11:53
by Yannis
Italian wonders !
Re: Rewiring, where to start
Posted: Nov 16th, '17, 21:44
by Marlin
Once u have designed the system on paper,here are several things to consider, obviously use Marine grade cable/wiring, epoxy filled heat shrink connectors, ring connectors ,no fork type connectors, determine the wire size by measuring the length from the circuit protection to the anticipated loads then double that length to determine ampacidy,wire ties every 4” and secure to wire tie anchors to keep the wire loom stationary , spade type fuses vs spring loaded round buss fuses for inline protection of devices that draw less amps than supply cable circuit protection, I.e, a depth sounder display may only need 5 amps but the line supply may be protected with a 20amp breaker, remember the circuit protection is to protect the wiring as well as the device, battery cables should be protected within 7”of the battery terminal, calculate the load multiple wires coming off the battery terminals to determine the type battery connection/lug that will carry the amperage, never more than 4 cables coming off a battery terminal , buy a ratcheting type wire crimping tool and tug on all wire connections, look for a hard copy book on Marine Wiring for beginners , the guidelines are extremely important
Re: Rewiring, where to start
Posted: Nov 17th, '17, 09:35
by PeterPalmieri
Thanks Marlin. I’ve been reading and watching videos to get myself up to speed on some of this stuff.
Re: Rewiring, where to start
Posted: Nov 18th, '17, 07:25
by PeterPalmieri
I received my panel in the Mail. Have to get that mounted and started to poke around more closely at the wiring. Even with a little knowledge the current wiring is even more awful then I thought. Sure is going to keep me busy over the winter, especially considering I have no practical experience here.
Re: Rewiring, where to start
Posted: Nov 18th, '17, 12:11
by Yannis
Pete,
I ought to tell you.
Call somebody knowledgeable. These things can go well, or, they can go not well....For little euro or dollar.
Re: Rewiring, where to start
Posted: Nov 18th, '17, 18:28
by Marlin
The panel is not essential at this time,run all your wire/cables from the panel location ,leave an extra 2-3’ as a working loop on both ends, after That ,start to make the connections to the devices/ instruments and test this part out with a temporary jumper wires/continuity / multimeter testing, etc, the final panel hook up will probably be later on,that’s the easy part!
Re: Rewiring, where to start
Posted: Nov 18th, '17, 23:41
by Tony Meola
Peter
Is it a Blue Seas panel? How many breakers?
Is it going up in the forward locker or in another spot?
Re: Rewiring, where to start
Posted: Nov 19th, '17, 17:23
by PeterPalmieri
Tony,
Paneltronics. 6AC and 12DC
I’m mounting it in the vberth starboard bulkhead just around the corner from the original panel. Bob is going to walk me through a good order to do this. All the AC has to come out, a lot of things don’t run through the panel now and in some cases home use wire has to come out. I’m in the water all years round so I can’t just rip everything out, have to keep it functional
Re: Rewiring, where to start
Posted: Nov 19th, '17, 17:38
by PeterPalmieri
Marlin thanks again for the tips
Re: Rewiring, where to start
Posted: Nov 19th, '17, 19:15
by Waytooslow
I recall seeing a shipshape episode where the Pacer Group had built a wire harness for the Logan Foundation give away boat. It used waterproof snap together connectors. There were matching pigtail connectors for the accessories. A quick google search showed a few possibilities for wire harness companies. I have only had a wiring harness built in the boat by a guy who specialized in that kind of work in the past so no personal experience with any of these companies. Does seem like a good idea to me to build the harness in the shop and I would expect that most builders probably use premade harnesses.
http://www.marlanindustries.com/product ... rness.html
https://www.pacergroup.net/products/
https://www.ezacdc.com/boat-wiring-prod ... g-harness/
Re: Rewiring, where to start
Posted: Nov 19th, '17, 21:50
by Tony Meola
Peter
If Bob is walking you through it you should be good to go.
I used panelronics for my 110. Six breakers for that one. I put that panel under the dinette. I put in Blue Seas for the 12 volt, 10 Breakers and put it right back in locker same spot as the original. Both panels seem very similar in construction.
Reason I like the Blue Seas is easy to get parts for it otherwise I am neutral on the two panels. Both quality panels.
You don;t need to just rip out everything. My old 12 volt panel went bad over a summer weekend. I was able to get the Blue Seas in two days, and put that one in and was off to the races. I changed a couple of things around since the House bank feeds that panel Did not have a house bank before the repower. I keep changing and updating every year as I think of what might work better.
I keep hearing old UV saying remember the enemy of good is better.
Re: Rewiring, where to start
Posted: Nov 20th, '17, 21:33
by Marlin
Tony, your rational is wait until it breaks, cause u can get new parts in 2days, mine is replace everything know and u know what u have and that helps eliminate/ diagnose issues that may occur in the future, I think the discussion is about building a safe, predictable ,reliable A/C. And DC electrical foundation/ system with circuit protection . Since the boat is going to need in the water over the winter, obviously the bilge pumps/ high water alarrm system need to be in place as well as A/c power to keep the battery’s up, ( which can be accomplished by an inexpensive battery charger from an auto store) ,I’d cut all the wiring loose from the various bilge pumps, wire the bilge pumps / float switch into a buss bar and run temporary , circuit protected DC current to these pumps/ high water alarms to these busses. I’m a big believer in preventative maintenance and I would manually test these pump/ float switches monthly, peace of mind, because you have new wiring/ circuit protection, doesn’t preclude a bad bilge pump/ float switch. I suggest u do the same with the fresh water pump, salt water wash down, fresh water wash down, sanitation system , running lites ,trim tabs,etc. get all these components connected to nearby buss bars and they are now done and diagnosable. Design the wiring diagram on the back of a napkin, you have decided on the panel location. Decide on what u want to control / monitor and where from. All these devices have to eventually get to the CB panel so my suggestion is to run wires from every device to a maybe 12 pole buss in the locker where your panel will be. From there u can go up to the F/B with switch control wires to devices you need to manage from that location( ignition, starting, volt/amp meter,etc also) . Once everything is in the CB locker area, u make up the wiring harness sub Assy based on the back of the napkin sketch. Wire numbers are critical to connect the dots and future diagnoses
Re: Rewiring, where to start
Posted: Nov 20th, '17, 22:34
by Tony Meola
Marlin wrote:Tony, your rational is wait until it breaks, cause u can get new parts in 2days, mine is replace everything know and u know what u have and that helps eliminate/ diagnose issues that may occur in the future, I think the discussion is about building a safe, predictable ,reliable A/C. And DC electrical foundation/ system with circuit protection . Since the boat is going to need in the water over the winter, obviously the bilge pumps/ high water alarrm system need to be in place as well as A/c power to keep the battery’s up, ( which can be accomplished by an inexpensive battery charger from an auto store) ,I’d cut all the wiring loose from the various bilge pumps, wire the bilge pumps / float switch into a buss bar and run temporary , circuit protected DC current to these pumps/ high water alarms to these busses. I’m a big believer in preventative maintenance and I would manually test these pump/ float switches monthly, peace of mind, because you have new wiring/ circuit protection, doesn’t preclude a bad bilge pump/ float switch. I suggest u do the same with the fresh water pump, salt water wash down, fresh water wash down, sanitation system , running lites ,trim tabs,etc. get all these components connected to nearby buss bars and they are now done and diagnosable. Design the wiring diagram on the back of a napkin, you have decided on the panel location. Decide on what u want to control / monitor and where from. All these devices have to eventually get to the CB panel so my suggestion is to run wires from every device to a maybe 12 pole buss in the locker where your panel will be. From there u can go up to the F/B with switch control wires to devices you need to manage from that location( ignition, starting, volt/amp meter,etc also) . Once everything is in the CB locker area, u make up the wiring harness sub Assy based on the back of the napkin sketch. Wire numbers are critical to connect the dots and future diagnoses
Marlin
Actually that is not what I said. I picked up the Blue Seas Panel, because I can get breakers and what ever else I need for it right away. I had to wait two days for the panel to come in when I ordered it. No one in my area carries the Paneltronics and when I called them for a back cover for my 110 system they told me they don't make one.
So when I needed to upgrade the 12 volt system I went Blue Seas. I replaced everything in one shot, I just keep adding and changing trying to make it better. Hence my UV comment.
When I say I changed a few things around, It was the basic layout. If you read my prior post, you will see I ran power to the bridge off the new panel and that power went to a seperate fuse block so I could then tap off of that to feed the bridge and whatever else. By the time I was done I had all new wiring.
Now this spring I will possibly be adding a few more things so I will be running more wires.
I did mine while it was in the water also, and it will Peter, it took me more than one day to do it. I chose not to set up new wiring day one to run the pumps. I used the existing wiring simply because I wanted to make sure if anything happened I had pumps. Then as I worked my way through the layout that was changed also.
I did cut and paste but that was to make sure I was still operational until I could get everything done.
Re: Rewiring, where to start
Posted: Nov 21st, '17, 07:16
by Marlin
Sorry Tony, miss read the 2day thing
Re: Rewiring, where to start
Posted: Nov 21st, '17, 08:09
by CamB25
Peter,
Where are you sourcing the parts? I have collected a bunch of Blue Seas components from various sources - prices seem to vary significantly from site to site. Most of it has come from Amazon via Santa Claus.
Ancor products are like gold. Does anyone have a good source? I have many spools to order.
Suggest you invest in good tools. The Ancor ratcheting crimper is a must-have for securing terminals to light wire. They also make a good pair of strippers. If you need to crimp HEAVY lugs - up to 4/0, I have the Ancor mega-crimper...manly tool that takes three or four hands to use. I will loan it if you need it.
I had New Wire Marine make a custom switch panel for the helm. Lots of options, good quality and reasonable price.
https://newwiremarine.com/
Use a pencil to draw your electrical schematics...lots of changes as you work through everything. Red-line your semi-final build-to drawings as you complete the project, then produce an as-built set of schematics to keep as reference. You don't need to be an electrical engineer to do this project, but you should have a working knowledge of 12v systems and ohms law!
Good Luck!
Cam
Re: Rewiring, where to start
Posted: Nov 21st, '17, 08:16
by Bertramp
Pete .... two things:
1 - When on the Island, I'm gonna track you down and take a look ... I need to do mine too, but I'm a Bahia, so should be easier
2 - Listen to Marlin, nice guy, VERY knowledgeable ......one look at his boat would convince you ...... "off the charts " !!!
all the best
Re: Rewiring, where to start
Posted: Nov 21st, '17, 22:13
by Stephan
Pete-
Would you consider putting a battery direct wired with fuses for your bilge pumps? I am thinking about taking any time pressures off you so you can work at your own pace and with the right stuff? Is there anything else necessary to keep operating while you make this big improvement?
Regards,
Stephan
Re: Rewiring, where to start
Posted: Nov 21st, '17, 23:11
by Tony Meola
https://search.aol.com/aol/search?enabl ... lectronics
http://www.bestboatwire.com/
http://www.genuinedealz.com/
CAm
For wire and supplies I have used each of the above 3 vendors. You should note that Dell City used to own Ancor so when you order from them, I have found that you get Ancor wire about 25% of the time.
Others will jump in but there are other options besides Ancor, each of the above all have Marine Grade wire and supplies.
Re: Rewiring, where to start
Posted: Nov 21st, '17, 23:14
by Tony Meola
Stephan wrote:Pete-
Would you consider putting a battery direct wired with fuses for your bilge pumps? I am thinking about taking any time pressures off you so you can work at your own pace and with the right stuff? Is there anything else necessary to keep operating while you make this big improvement?
Regards,
Stephan
I would love to see everyone's thoughts on in line fuse direct wired pumps. I would think that is the best way to do it, but running it through a 12 volt panel will work also, but might be using up space you could use other places.
Re: Rewiring, where to start
Posted: Nov 22nd, '17, 07:33
by CamB25
I designed my bilge pump circuits as direct wire. I use a (+) battery lead off the house/start switch (BS 5511e) to feed a 4 slot fuse distribution block that I call the "24 hour" bus. 2 bilge pumps, one memory circuit, one spare. I also wired the float switches up to the helm switch panel to a SPST switch to have a manual way to operate each pump. I have a green led on the helm that is fed from the 24 hour bus on the load side of Bilge Pump 1 fuse. If that green LED is burning, I know I have power to the pumps.
Eventually my boat will be finished and stored in water. I don't want to think about bilge switches or power. If the green LED is on, I'm good to go.
Cam
Re: Rewiring, where to start
Posted: Nov 23rd, '17, 10:39
by Marlin
I agree with Cam, I also have an audible ( son alert ) and visual led indicator that go into the alarm mode when my float switches are activated , my 42’ came this way with a panel of 3 lites and it really proved its worth when a salt Water a/c cooling pump discharge hose came loose and I had salt water spraying on the Eskimo ice chipper and 5” of water in that water Tite compartment, I use Ultra Swithes which also have a high water alarm which is a separate hot wire, the ultra switch has 2 levels/ positions ,the lower level activates the bilge pump and the higher position activates a horn on my tower helm,both systems worked, I needed a change of underware, came off the tower to identify the problem and stopped the pump, expensive lesson as the 14000$ ice chipper got trashed even with a lot of freshwater flushing , I also went to rule 2000 pumps vs the small gpm that were installed initially. A few years later the discharge side of the salt water wash down pump burst and washed down the 12 kw generator ,alarms went off ,we found the culprit ,washed the gen set down with fresh water but ended up replacing the gen set as well,
Re: Rewiring, where to start
Posted: Nov 23rd, '17, 20:43
by Stephan
Stephan wrote:Pete-
Would you consider putting a battery direct wired with fuses for your bilge pumps? I am thinking about taking any time pressures off you so you can work at your own pace and with the right stuff? Is there anything else necessary to keep operating while you make this big improvement?
Regards,
Stephan
I was only proposing this for the time he is spending putting the new DC system in. I was reacting to Pete's comment that he needs to do the project while the boat in in the water. I agree that a proper panel with lights to indicate when the pumps are running and a high water alarm are the right way to go.
S
Re: Rewiring, where to start
Posted: Nov 24th, '17, 01:33
by Tony Meola
Stephan
Yes, but I think it gives all ideas on how to set warning systems.
Re: Rewiring, where to start
Posted: Nov 24th, '17, 16:49
by PeterPalmieri
Yes Stephan thank you. I am doing it with the boat in the water for winter. Since my bilge pumps bypass the panel now I can pretty much getting working. Hoping to get out this weekend and the. Shut her down after next.
As Tony said Bob is my mentor on the project so I’m confident even with little knowledge I will get it done correctly.
My goal on this boat is simplicity in all aspects, I’ve pretty much been removing non essential stuff since I got the boat. I have no desire for inverters or generators or refrigerators. For me it’s a simple day boat, pumps, lights and really that’s it. A simple shore power set up for the rare overnight at the beach. My main dock does not have shore power.
I’m still identifying everything I’ve got, where it’s going and if I want to keep it. Some essentials are making sure all my power sources on the bridge come through the panel. Not all of them do. Both bilge pumps run off the same battery and I I don’t have a dedicated house battery. On top of that all of the House item and the panel run to one battery. So one of my batteries is a starting battery only and the other does double duty.
So one thing ata time. Put in the panel in the v berth. And use the existing chase behind the galley to run wire into the engine box and up to the bridge. Runnew busses and have the bridge ironed out. Would be a nice step one before spring time.
Re: Rewiring, where to start
Posted: Nov 24th, '17, 23:50
by Tony Meola
Peter
See if Bob has a remote camera for looking in pipes etc. When we repowered the Diesal shop found it to be really helpful when running the wiring up to the bridge. When a wire got hung up and they could not get up the side panels they used the camera to see what was going on. One guy would look from the top side with the camera and would tell the guy trying to push the wire up how to twist or move the wire.
Just a thought because sometimes getting those wires up can be frustrating.
Re: Rewiring, where to start
Posted: Nov 27th, '17, 04:26
by Lars
Going through the wiring on the 25, I notice that much of the wiring is of an uncomfortably light gauge. Especially the battery and main distribution leads. Without having done the maths, my inclination would be to use much heavier gauge. Is this a general issue on the older Bertram installations, or just my Riva?
Re: Rewiring, where to start
Posted: Nov 28th, '17, 20:42
by Marlin
Lars, you have to do the math, safety is the more important issue, I’m sure Marine wiring standards have evolved over the last 50 years, your thought of going bigger is in the right direction, it should be a well thought out calculation and not difficult, the amps you need and the length of the run will determine the size
Re: Rewiring, where to start
Posted: Nov 28th, '17, 21:36
by Tony Meola
Lars
On my 31 which was built in 75, the wires running from the DC panel to the lights, bridge etc were all 10 gauge along with a bunch of wires not connected to anything. I feel nothing should be less than 10 gauge coming off the DC panel. That just prevents issues down the road.
If you need 8 coming off the panel than run it to what you have that requires that large of a wire.
Since we repowered to diesel all of that wiring was automatically upgraded to support the diesel engines.
Re: Rewiring, where to start
Posted: Nov 29th, '17, 08:49
by Lars
Thanks Marlin and Tony.
I am comfortable with the maths and will make certain that the sizing is ample when replacing. I was just surprised when I saw the light main leads and curious whether this is a chronic issue on old Berts - or just mine.