Page 1 of 1
Crows Nest Topsides
Posted: Aug 30th, '14, 07:50
by John F.
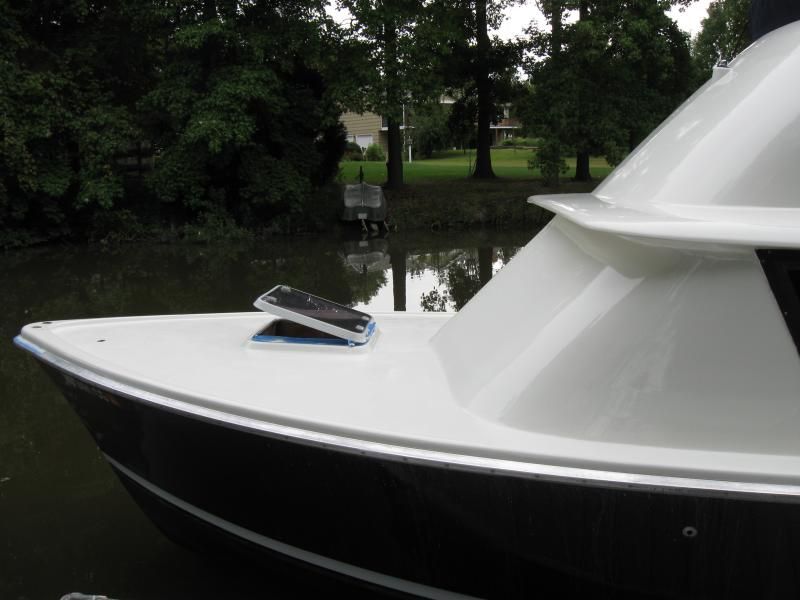
I removed the bow rail, anchor stuff from the foredeck, all the aluminum trim, boarding steps that covered up the old gasser vents, outriggers, and a bunch of screws and pad eyes. All that got f'glassed and faired, then primed, then painted. I did it at my dock and did it myself, including the painting. Its not pro-quality by any stretch, but I'm pretty pleased. Today I'll put her back together--cleats, rodholders, new solid stainless bow chock, etc.
I didn't take many before or during shots, but here's before:
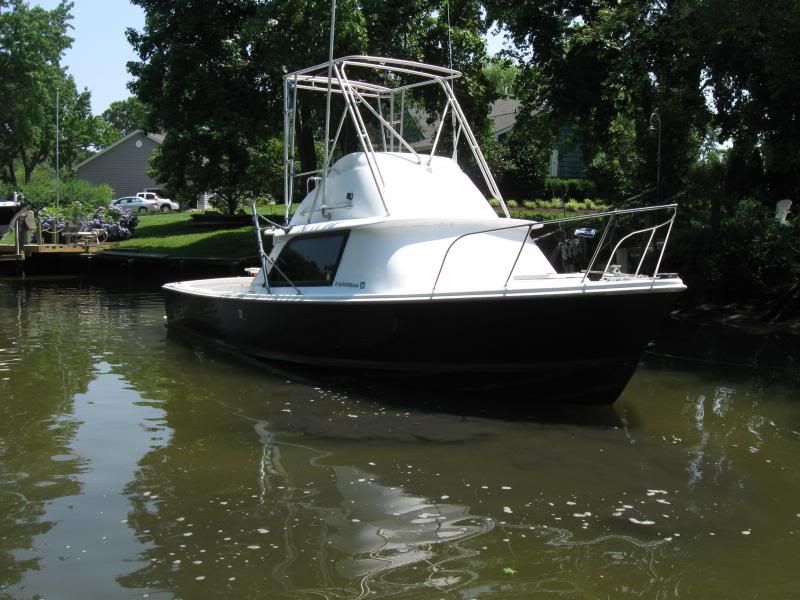

And after:
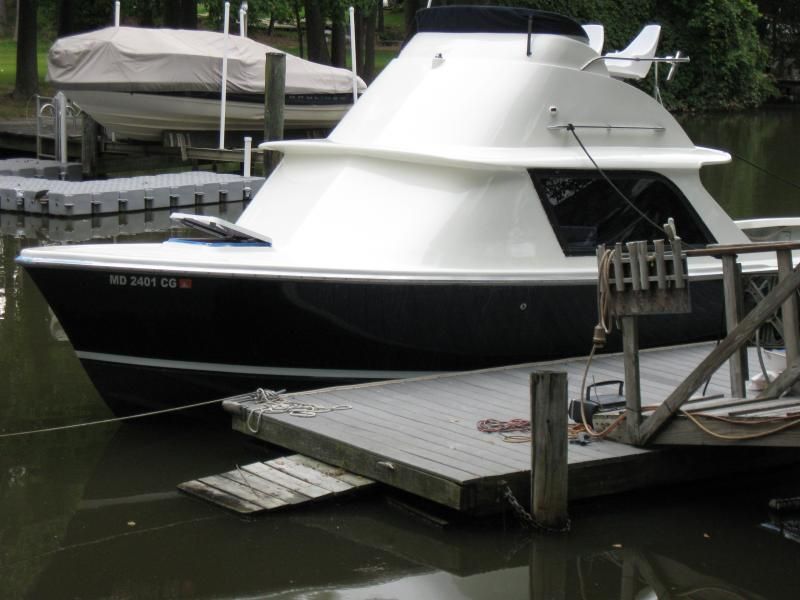
Re: Crows Nest Topsides
Posted: Aug 30th, '14, 08:54
by jackryan
John,
The paint job looks great in the pictures! What did you use to fill and fair the holes? I was also wondering about the paint and primer you used. I was thinking about painting my topsides as well, so feel free to include any of the techniques to prep and paint. I like the look of the clean foredeck. What will you do about an anchor? Will you just keep it in the cabin and carry it out when you need it?
Beautiful work,
JR
Re: Crows Nest Topsides
Posted: Aug 30th, '14, 08:55
by captbone
Looks great. Interlux Perfection?
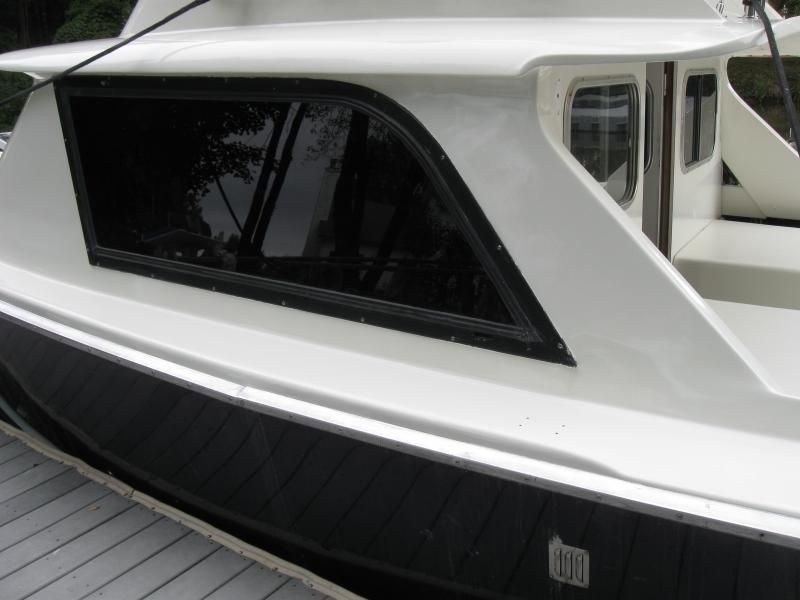
I am really impressed how the rear pillar came out. That must have been a lot of glass and time/effort.
Well done.
Cheers,
JR
Re: Crows Nest Topsides
Posted: Aug 30th, '14, 08:57
by jackryan
captbone,
Yea, I was just noticing the pillar and how clean that looks. Was that a lot of work remove the old trim and fair out?
JR
Re: Crows Nest Topsides
Posted: Aug 30th, '14, 12:29
by PeterPalmieri
Beautiful
Re: Crows Nest Topsides
Posted: Aug 30th, '14, 13:00
by Russ Pagels
John, very nice, great job ..Russ
Re: Crows Nest Topsides
Posted: Aug 30th, '14, 14:00
by CaptPatrick
Looks real nice, John. Is that color a black or deep flag blue? Pretty work.
Re: Crows Nest Topsides
Posted: Aug 30th, '14, 21:45
by John F.
Doug had the hull sides painted with awlgrip about 6 years ago. I think its flag blue--its a real dark blue. Nice color, but it shows every flaw in the hull.
I filled little screw holes after flairing them out a little with a counter sink bit. Where holes were close together, like where the bow rail or outriggers bolted down, I ground to green glass, filled, put on cloth or tape, and faired. The pilasters weren't bad. Ground the parts to green glass where they meet, epoxied together, couple of layers of glass tape, and fair.
Once I got the topsides where I thought they were OK, I sanded with 60, then 120, then 150 after I took care of the stuff that shows up when you sand. I used Intelux Primecoat and Perfection. Where a mask with filters--without it Perfection can give you an unwanted buzz. 2 coats a primer, sand, 2 coats of Perfection, sand, 1 coat with nonskid where I wanted nonskid, and a final coat of Perfection over everything. I've found that you need at least 2 coats of prime, and 3 coats of paint.
I applied the prime and paint with little foam rollers. I used about 4 rollers per coat. Once a roller gets saturated, change it out to a new one. Its about to come apart. I found that if you thin Perfection about 5%, it lays down really flat and you don't need to tip.
I'm happy with the results. I've got one kid still in college, and can't afford a professional job. I also believe that, for me, if I want a professional quality job, I'll hire a professional with a spray booth.
Thanks for the compliments. I appreciate it. It was kind of a fun project, but involved a little too much quality time with the sander.
Re: Crows Nest Topsides
Posted: Aug 31st, '14, 08:53
by Carl
Those improvements really PoP oUt at you. Nicely done!
Re: Crows Nest Topsides
Posted: Aug 31st, '14, 15:55
by Navatech
John F. wrote:but involved a little too much quality time with the sander
And it shows!... Well worth the effort IMHO!...
Re: Crows Nest Topsides
Posted: Sep 1st, '14, 16:41
by jackryan
John,
Thanks for the information on your techniques and I know you spent a lot of quality time with the sander, but by the looks of her, it was well worth it. Also, when you see what the painters are asking for a paint job, it makes quality shading time seem almost worth it. Sorry, a couple more questions:
1. Do you wet sand or dry sand? Any special kind of sand paper?
2. How do you know when you have sanded enough?
3. When you talk about thinning the paint 5%, does that mean the mixture is 95% paint and 5% thinner?
4. Is the Interlux perfection a 2 part paint?
5. How much paint and primer did it take to do the job?
6. What color paint did you use?
Thanks, and I may have a few more questions once I get started. Sorry for all of the questions.
JR
Re: Crows Nest Topsides
Posted: Sep 1st, '14, 19:32
by John F.
Jack-
1. Dry sand, and I use the crap sandpaper from Home Depot. I should plan better, but I don't.
2. I run may hand over what I've sanded. My fingers can feel what I can't see, usually.
3. Yup. 95% paint and 5% thinner, but I don't measure. I just put a pretty good splash of thinner in the mixed paint and mix.
4. Perfection is 2-part. Only downside is waste. You can't run short on a coat or you'll have terrible dry lines.
5. 1 quart did a little more than 1 coat, so I used a quart per coat and had extra that was waste. I did 2 coats prime, and basically 4 coats paint.
6. Oyster white.
Happy to answer any other questions. Interlux has a paint forum where guys like me (amateurs) ask questions and the Interlux guys post responses. I read through a bunch of stuff. It was pretty helpful. I think the site is yachtpaint.com
John
Re: Crows Nest Topsides
Posted: Sep 1st, '14, 23:16
by jackryan
John,
Wow, thanks for answering so quick. You said it took a quart per coat. Was that for the entire topside, including flybridge, cockpit and foredeck? I was wondering if you (or anyone else that wants to chime in) would consider a single component blended polyurethane paint as opposed to the 2 part epoxy paints. Petit has a single part top side paint called easypoxy. Here's a video discussing the application technique:
https://www.youtube.com/watch?v=-A9OI1WpvNo
There must be a good reason guys use the 2 part over something like the easypoxy, because it seems like you could eliminate waste and the hassle of measuring out the 2 parts by using the 1 part paint.
thanks for any input.
JR
Re: Crows Nest Topsides
Posted: Sep 2nd, '14, 02:06
by Gert van Leest
very clean !! Love it !!
Re: Crows Nest Topsides
Posted: Sep 2nd, '14, 05:57
by Carl
The Easypoxy is a nice quick application...holds up okay. I used to use on my deck and a few other items...color faded...got a dirty look to it and could not clean it out. The finish when brushed...looked like what I as a bad painter would normally get...a painted surface that looked like it was painted by me. Worked for me at the time...a quick fix.
The Perfection gives you a leg up on application...gives an okay amateur the results of a professional on a bad day. At least that was my take on it...and it is supposed to hold up better than any single part paint...but not coming close to Awlgrip or Imron.
I did my cockpit side panels and I was impressed when done...some imperfections on my last coat, all my fault for trying to retouch. Except maybe the spot where a fly landed and I tried to pull him off...but if you stand far enough away you can't see them spots. After five years...they still clean up well with a nice bright shine.
Re: Crows Nest Topsides
Posted: Sep 2nd, '14, 09:35
by acarb
Looks awesome sir!
Re: Crows Nest Topsides
Posted: Sep 2nd, '14, 10:31
by John F.
Jack-
I agree with what Carl said. The quart per coat was for the topsides from the rubrail to the brim of the flybridge. It did not include the cockpit or engine boxes (did those over the winter), or the flybridge (did that this spring). I've used the 1-part Brightsides from Interlux (I think Hatteras white matches Bertram's off white--ironic, isn't it?), and I've used Petit's Easy-poxy. The 1-part primers fill better and sand easier, and there is little to no waste. The 1-part paints dry a lot quciker, so you have to keep moving quicker or you get drylines, and teh 1-parts really need to be rolled and tipped. Perfection thinned can just be rolled. Tipping it didn't help at all. It actually came out worse, because it was slower. The 1-parts also don't smell nearly as bad as Perfection, or give you unpleasant buzz if you don't have a respirator on. Don't use Perfection in your garage unless its well-ventilated and your wife (if married) isn't going to be home for awhile. It'll stink up the whole house. The 1-parts are also easier to touch up, and just to work with generally.
The downside is supposed to be durability, and that while you can paint a 1-part over a 2-part, you can't paint a 2-part over a 1-part. I'm hoping that someday I'll get Crows Nest professionally sprayed with Awlcraft, and I wanted a primer/paint that could be painted over rather a primer/paint that may have to be sanded off.
John
Thanks again for the kind words.
Re: Crows Nest Topsides
Posted: Sep 3rd, '14, 21:41
by Tony Meola
John
Really nice job. Wish I had the nerve to take that on.
Did you fill the spider cracks? I would think they may pop up later on if you didn't.
Re: Crows Nest Topsides
Posted: Sep 26th, '14, 21:43
by JohnD
John,
Nice work, glad it turned out nice. I found humidity mattered when I did the bulkhead on my boat.
br,
john
Re: Crows Nest Topsides
Posted: Sep 27th, '14, 07:28
by John F.
Tony-
Sorry I missed your question. I sanded down the gel pretty far where it had cracks. They were mainly around the toe rail. I tried to fill them with epoxy and sand. I got some advice from Kevin, and went with it. Hopefully, they don't come back.
John -
The paint turned out good enough--that's about it. She had no where to go but up. You need to stop by. Are you going to the Annapolis show?
John
Re: Crows Nest Topsides
Posted: Sep 27th, '14, 10:06
by Bruce
John,
That's nicer work than what I saw come out of many yards and shops.
Re: Crows Nest Topsides
Posted: Sep 27th, '14, 14:48
by John F.
Thanks Bruce
Re: Crows Nest Topsides
Posted: Sep 27th, '14, 17:17
by Capt.Frank
John, How bad was it putting the tower back on? I'm afraid to take it off thinking it will not go back on that easy. I gut pain around it and need to paint again this winter or finish in spring.
Re: Crows Nest Topsides
Posted: Sep 28th, '14, 06:07
by John F.
Frank
I didn't put the half tower/hard top back on. It won't work with the helm overlay I did because of the overlays shape and height. I've been meaning to post it in the for sale section. I don't think it'd be very hard to put back on. I'd just want to get some help so I didn't scratch up the paint.
John
Re: Crows Nest Topsides
Posted: Sep 28th, '14, 07:42
by matt ciarpella
John,
what are you looking to get for the top. i have a tower I would like to replace with a standard hard top.
Im just up the road and could swing down to meet up. I sent you a PM
Matt
Re: Crows Nest Topsides
Posted: May 5th, '16, 08:48
by Joseph Fikentscher
John,
After a couple of years, how is the Perfection paint holding up?
Joe
Re: Crows Nest Topsides
Posted: May 5th, '16, 09:57
by Dug
John,
That really looks fantastic. Huge amount of work and it shows!!! Pretty, pretty, pretty!!!!! Very very nice.
Dug
Re: Crows Nest Topsides
Posted: May 5th, '16, 10:48
by John Nardi
Great job John.......I think you may have given me the confidence to tackle my boat also...I wish Awlcraft could be rolled, but apparently not...There is also a paint made in New Zealand that is specially made to be rolled; it gets high marks, but I personally can't find anyone who has used it....Again, nice job.
Re: Crows Nest Topsides
Posted: May 5th, '16, 15:03
by scot
Nice John! Beautiful boat.
Hope my back yard Perfection paint job turns out half that nice.
Re: Crows Nest Topsides
Posted: May 6th, '16, 08:14
by John F.
Thanks for the compliments. The perfection is holding up well after 2 years. I haven't done anything to it except wash it now and then. I haven't wet sanded it, or buffed it, or waxed it, or anything.
Re: Crows Nest Topsides
Posted: May 6th, '16, 08:20
by Joseph Fikentscher
John,
Good to hear. I will be starting at the top and working my way to the gunnels if the rain ever stops here. Been trying to decide on what paint to use. After hearing that yours is holding up, I think I'll use the Perfection.
Regards,
Joe
Re: Crows Nest Topsides
Posted: May 6th, '16, 22:38
by Tony Meola
John
How many coats did you use? I thought perfection rolled on pretty thin.
Re: Crows Nest Topsides
Posted: May 7th, '16, 09:53
by bob lico
looks great john i like the idea of you having the balls to tackle a top side paint job with no help or a pro. standing over you.i realize the job is ten times harder with her in the water because you cannot stand on a ladder alongside instead you have to worry about you footing as you work your self down from the front of bridge and spills,a place for the roller pan while on the top of bridge. WOW quite a bit of planning painting while the boat is in water.
Re: Crows Nest Topsides
Posted: May 7th, '16, 22:57
by Eagles 17
John
Your boat looks awsome, how did you manage to do the bow and both sides without getting a dry edge?
Results like that I couldn't begin to calculate the hours you put in filling, fairing and sanding.
Bill
Re: Crows Nest Topsides
Posted: May 8th, '16, 07:11
by John F.
Thanks again for the compliments and comments. To answer a few questions and a couple of observations.
The boat looks good in the pictures, but if you're up close and in direct sunlight, you can see the flaws in the paint job. I filled a lot of screw holes and f'glassed up a lot of stuff. I faired until it looked really good to me. Its not perfect. I just didn't want to do that extra amount of work to make it perfect. I've found that the difference between doing work that looks really good and doing works that looks perfect is a real lot more time.
I didn't put in all that time for three reasons (and these are my views only). First, its a lot of time. Second, the boat gets used to fish and cruise. I had a few friends yesterday trolling for rockfish (stripers). Although they were pretty careful, and treated the boat with respect, gear slides around, gets dropped, etc. We got a nice fish yesterday, and it got netted, and the dragged over the side, and the cannonball tandem we were using on that line bounced off the deck a few times when the fish hit the deck. And I didn't give a sh*t, because its not perfect and I don't want to concern myself with that. Its pretty liberating actually. Three, I've found from my experience that if you want a professional quality job, you need a professional and some sort of booth or other protection when you paint. The hull sides of Crows Nest were painted by a pro in a boat yard in the open. There were runs in the paint, and dust from the yard. It happens. I've seen worse jobs that people paid for, and I've seen way better--almost perfect. But the almost perfect ones were sprayed (or rolled, I don't know) by a pro that knew what they were doing, and done in a booth. I'm neither, and it came out good enough. So, if you're going to paint your own boat, its a fair amount of work, and it'll come out good or really good, maybe even great, but not perfect or almost perfect, unless you've done it a lot (I haven't) and you have a booth (I don't). And I saved a lot of $$ doing it myself.
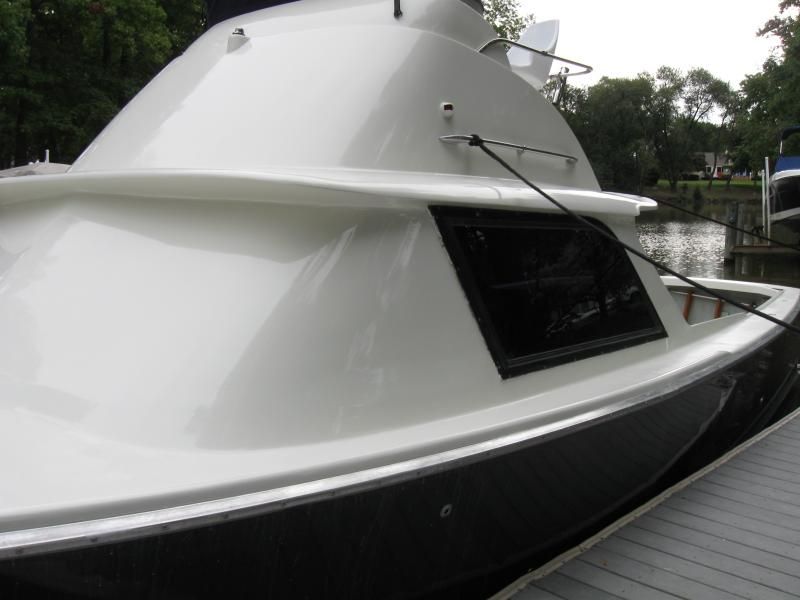
I did a bunch of prime coats. Probably 4 or so. Prime coats are the first to show the imperfections in fairing, and it takes a fair amount of primer to cover up the dark spots from f'glass work. The Perfection primer doesn't build much either. I think I did 5 or 6 coats or so of Perfection. They say three. One coat had to be redone because it got windy and the coat had a nice fine pollen/dust non-skid to it, which wasn't what I was going for. I painted from the brim of the f/b up first, and then from the brim down to the gunnel. I started/stopped at the corner of the f/b, as the dry edge was least noticeable there. I can't even find it now. I painted around the gunnels, foredeck, front windshield (brim down), starting/stopping at a gunnel where it meets the f'glassed in windshield. There's very little there that won't get non-skid (which is more forgiving than gloss). Again, I can't find that dry edge now. I painted her at my dock, and had to swing her around to get the gunnels and had to walk around her with a paint tray, roller, and brush in my hand, and a mask on my face (Perfection stinks).
Anyway, I wrote all this because of the kind words and encouragement I've gotten from this incredible group. I'm happy at any time to answer any questions from any "first-timers" who want to proceed like I did (I'd be a "second-timer" next time). My advice is limited, as I'm not a pro and have done this once. I've been to a number of rendezvous and have seen what pros can do, including the pro boat guys and pro auto body guys. Its pretty amazing. But, this worked for me.
And if any of the faithful finds there way to Kent Island (across the Bay from Annapolis), please let me know and stop by. I usually have cold beer, good bourbon, good rum, and the Bertrams.
John
Re: Crows Nest Topsides
Posted: May 8th, '16, 12:36
by Eagles 17
John
I get it I am a 10-15 footer kind of guy if it looks good from 10-15 feet it is good enough .
I to like to use my boat, cars and my house looks lived in 3 adult kids grand kids dogs and cat perfection is not an opption.
All that said your boat looks so sweet colour combination makes it look high end.
I have a few friends that are totally anal everthing has to be perfect but they are always so up tight and don't or can't relax and enjoy
What they have.
Bill


