The Lico Seating System

The Main Sand Box for bertram31.com

Moderators: CaptPatrick, mike ohlstein, Bruce

User avatar
mike ohlstein
Site Admin
Posts: 2382
Joined: Jun 29th, '06, 11:39
Location: So many things seem like no-brainers until you run into someone with no brain.
Contact:

Post by mike ohlstein »

PeterPalmieri wrote:I may dump the railing and windshield while I am working on the bridge to get that cleaner look.

Pete
I never mind when something looks pretty, as long as it works.

That railing is there to save your life. I wish that Bob would put one back on......
Mike
Mean Team Leader
PREDATOR

Burn Oil
Eat Food
1973 FBC 1286 0273-315
User avatar
bob lico
Senior Member
Posts: 5276
Joined: Jun 29th, '06, 19:22
Location: sayville,long island

Post by bob lico »

honest mike no one goes to the front of boat at sea . we throw the anchor from starboard side of cockpit with retrival ball. then hook 20' of line on ring , we retrive by driveing forward until anchor pops up in ball while driving forward the mate in cockpit wraps line in oblong basket we carry 1400' of line and 28' of chain. i have a brand new 12" high rail and ss mounts i never installed. i sure wish i put that effort into making a alluminum cradle for life raft to have auto released. 30 years ago i was in a race boat that came apart and the raft went down with what remained of the boat . paddle around for a long time before rescue ------you don`t forget!!!!
capt.bob lico
bero13010473
User avatar
PeterPalmieri
Senior Member
Posts: 2568
Joined: Nov 12th, '10, 11:26
Location: Babylon, NY

Post by PeterPalmieri »

Mike the rail I was talking about is the one on the aft of the bridge not the bow. The seats will be far enough aft that there is no reason to ever stand or walk behind the seats. Although something may be necessary when ascending and descending from the bridge. Well see. As far as my sword fish harpooning platform that's a project for another time. I'm just figuring I'll have the boat trailered over to bobs house and left out front over night. That poor pulpit will be torn off and buried in the end zone at the meadowlands before the sun comes up.

Bob back to the seats do you see any reason or advantage to add in a seat slider to either get closer to the wheel at times move it back? If you were to do it all over again would you add one or skip it?
1969 31 Bertram FBC "East Wind" hull #315939
User avatar
bob lico
Senior Member
Posts: 5276
Joined: Jun 29th, '06, 19:22
Location: sayville,long island

Post by bob lico »

yep, don`t let me on the bow with the battery powered sawsall .do you plan on growing any taller in the next year or so? i don`t think so , adjust the wheel to seat distance to be perfectly coftable and in 18 years when your son drives the boat he can redrill mounting plate.
capt.bob lico
bero13010473
User avatar
PeterPalmieri
Senior Member
Posts: 2568
Joined: Nov 12th, '10, 11:26
Location: Babylon, NY

Post by PeterPalmieri »

I figured that would be your answer but I thought I'd ask anyway.
1969 31 Bertram FBC "East Wind" hull #315939
User avatar
PeterPalmieri
Senior Member
Posts: 2568
Joined: Nov 12th, '10, 11:26
Location: Babylon, NY

Post by PeterPalmieri »

Hey guys again trying to exhaust all my options.

Before we cut a big hole in the pod and drop in my existing gauge cluster,should I consider having the analog engine data run into a unit that converts it to NMEA data and display it on a digital display?

I really don't want to spend big bucks on electronics this year but I also don't want to regret cutting a big whole in the new pod.

Advantages/disadvantages?
1969 31 Bertram FBC "East Wind" hull #315939
User avatar
gplume
Senior Member
Posts: 455
Joined: Jan 2nd, '07, 21:23
Location: North Scituate, RI

Post by gplume »

Bob-

Did you make the bench that your seats mount to? (The white fiberglass piece mounted to the aluminum legs.)

Just curious how much fab I would have to do if I go this way.
Giff
User avatar
bob lico
Senior Member
Posts: 5276
Joined: Jun 29th, '06, 19:22
Location: sayville,long island

Post by bob lico »

made that piece in about two hours . 3/4"coosa board on table saw then four 1x2" strips miter on courners and expoxy in place. i finish by skim coating with expoxy with additives then painted matching emron paint.very easy project!
capt.bob lico
bero13010473
Tony Meola
Senior Member
Posts: 6940
Joined: Jun 29th, '06, 21:24
Location: Hillsdale, New Jersey
Contact:

Post by Tony Meola »

Peter

Sorry it is a typo, its 48 inches. I am really going to have to take a good hard look once I can back in the yard and get her uncovered.
1975 FBC BERG1467-315
User avatar
PeterPalmieri
Senior Member
Posts: 2568
Joined: Nov 12th, '10, 11:26
Location: Babylon, NY

Post by PeterPalmieri »

Giff,

Bob and I had this conversation. The board looks really sleek but it is absolutely possible to mount the seats directly to a plate welded to the frame which is what I am going to do. It will also give a bit more room under the seat to throw a ditch bag or other stuff.
1969 31 Bertram FBC "East Wind" hull #315939
User avatar
PeterPalmieri
Senior Member
Posts: 2568
Joined: Nov 12th, '10, 11:26
Location: Babylon, NY

Post by PeterPalmieri »

Tony,

With that width you should be able to slide the box all the way to the port side and mount seats directly on top if it can handle the weight. Again my total seat width is 46" so the box is perfect if it's strong.

As bob and I discussed my layout and talked over the hows and why of how he did his. It seemed that it's not the most convenient place to store tackle, your out fishing and you have to either reach behind the seat or climb up on the engine box to get into it. How does that work for you?

I am thinking of putting the ditch bag under the seat and possibly a raft in a valise. While I am on the topic of safety, I have been thinking of another idea too. Keep in mind I keep a ditch bag and 4 offshore life jackets on my flats boat which very rarely sees water deep enough to drown in.

So I am thinking keeping my offshore jackets under the v berth may be to out of the way in an emergency. Optimally if the boat goes down you want them to float free. I was thinking of having back cushions made for the engine boxes, using 2" foam with a mesh back that can hold 2 or 3 type one vest upside down since the top of the jacket is thicker then the bottom the cushion would look like a wedge.

It would be a comfort feature for the guys when running and if the boat goes down the life jackets are in the water and not going down with the boat. If the backs are done in mesh when in place you see the nice white cushion and flipped over in the water you see the orange?
1969 31 Bertram FBC "East Wind" hull #315939
User avatar
Capt.Frank
Senior Member
Posts: 641
Joined: Jun 29th, '06, 21:20
Location: Kill Devil Hills,NC

Post by Capt.Frank »

Not a bad idea. Having wedge cushions made is on my list. If you go that route would love to see pictures.

Good Luck
Frank
1976 FBC
3208 NA
Tony Meola
Senior Member
Posts: 6940
Joined: Jun 29th, '06, 21:24
Location: Hillsdale, New Jersey
Contact:

Post by Tony Meola »

Peter

Actually the box always worked fine for us. The box has been on the bridge close to 30 years. I always stood on the engine box and actually the way it was set up it was right there. The draws are not on slides, they actually sit in a cubby hole type of set up and I pull the draw I want out and lay it on the bridge and get what I needed and then just pop it back in.

Actually the box sat right in the middle of the bridge so a could stand with one foot on each engine cover, it was comfortable and never had a problem in rough weather. The nice part was that when I was going through the box, people could fish without me being in the way. Off to one side might not be as convenient but might still work. The only issue would be if I have to move the set up back to gain room between the seat and the wheel. Then it might be tight with the railing back there.

The box would hold the seats. Plus it needs to be either rebuilt or I need to figure out how to fix it. After 30 years it has finally started to come apart. Not bad for a Plywood box with formica on it.

I was looking at those seats that the bolster lifts up, because that might create the room I need to stand or get in and out without setting the seat too far back. I also saw your idea about the slide adjustment, that is also a thought.

Maybe on day I have to bug Bob and drive out to look at his set up.

By the way, I like the idea about the jackets. Post the design when you figure it out.
1975 FBC BERG1467-315
User avatar
bob lico
Senior Member
Posts: 5276
Joined: Jun 29th, '06, 19:22
Location: sayville,long island

Post by bob lico »

tony you are welcome anytime .come out after april and you can put her into the wind!
capt.bob lico
bero13010473
User avatar
PeterPalmieri
Senior Member
Posts: 2568
Joined: Nov 12th, '10, 11:26
Location: Babylon, NY

Post by PeterPalmieri »

Tony,

I did get an email back from garelick and they said that the shock system will mount on the bolster seat. The seats are pretty expensive though. I paid $400 for mine I think they want $900 for the flip up bolster. The way bobs boat is set up the seats are close enough to be comfortable when driving but far enough back to make pretty easy for the passenger to slide in. If your going to rebuild the box you can just account for the railing so it's not in the way. Remember if you don't add in the pod you won't be moving the seat very far, however you now have to deal with the bulkhead which is lower the further you move the seats back. That allows the passenger arm to hang over the top of it.

When I remove the bench and before we put in the pod I'll put the seats in place, snap some photos and take measurements for you.
1969 31 Bertram FBC "East Wind" hull #315939
User avatar
bob lico
Senior Member
Posts: 5276
Joined: Jun 29th, '06, 19:22
Location: sayville,long island

Post by bob lico »

i like that; plan ahead,take every single aspect into account, measure 3 times and cut once!
capt.bob lico
bero13010473
Tony Meola
Senior Member
Posts: 6940
Joined: Jun 29th, '06, 21:24
Location: Hillsdale, New Jersey
Contact:

Post by Tony Meola »

Bob

Thanks for the offer to take a look. If I can ever sneak away from work I will have to do that.

Peter,

Would be interesting to see how your set up lays out. Once I get the cover off the boat I will be able to get a better idea of what I want to do.
1975 FBC BERG1467-315
User avatar
JP Dalik
Senior Member
Posts: 1317
Joined: Jun 30th, '06, 21:03
Location: Pt. Pleasant NJ
Contact:

Post by JP Dalik »

OK- One more time (guess this is the right thread)

Helms- Sit down stand up- hey its your boat that's your decision. If you'd like to jump into the "bling" projects before using the boat for a season and finding out what she really needs- that's cool too (engine alignment, bent shafts, strange vibrations???- whatever let's do a helm pod)

How many times do you want to play with fiberglass and repaint/gelcoat the helm area. The way you are moving right now it sounds like your going to do it twice.

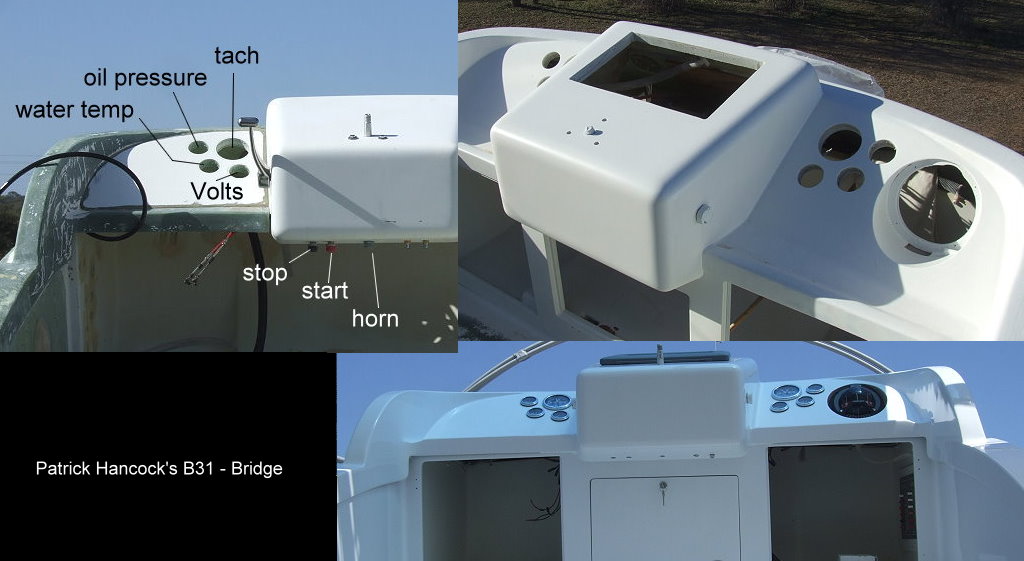
You've got the pod itself- (I'm guessing your ordering one from Capt. Pat)

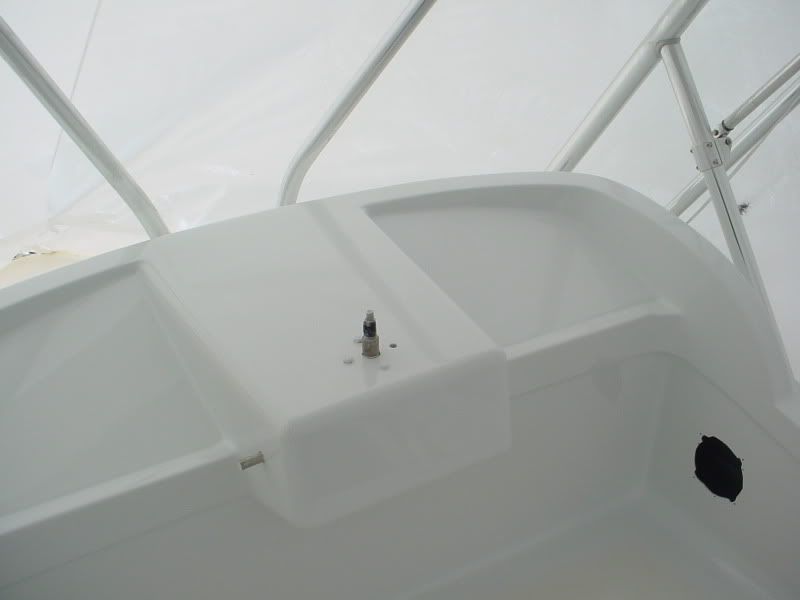
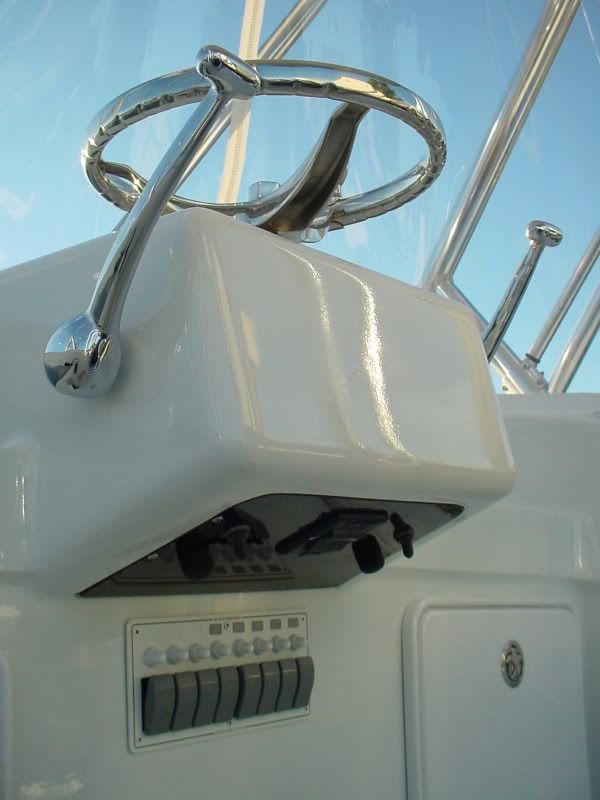
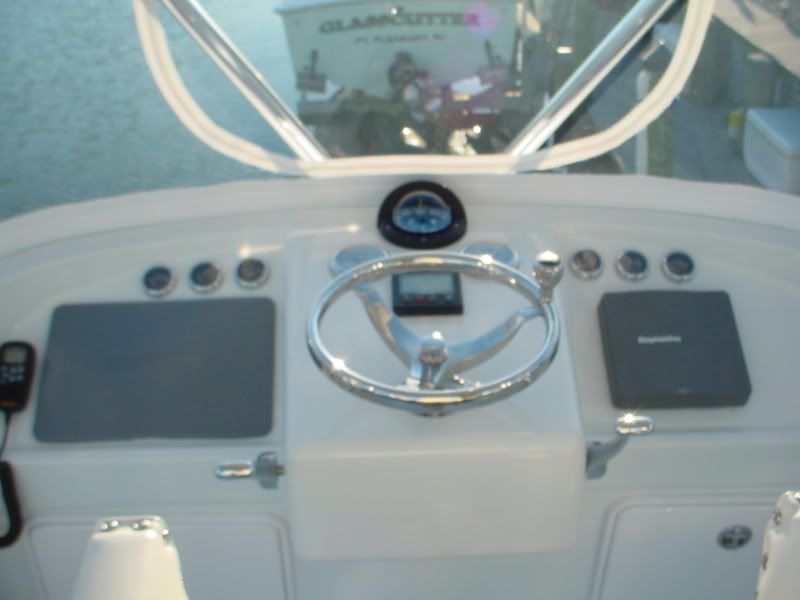
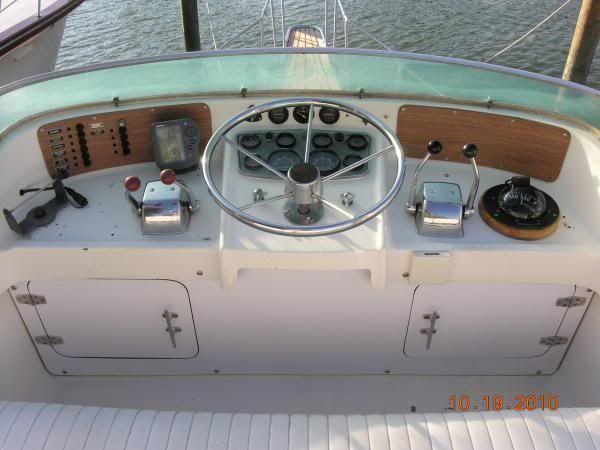
You've go the pod installation the grinding and fairing involved with that this alone is no small job, the area under the pod which will need to be addressed (formica or new glassed in panel), closing in the old clutch and throttle locations, making sure your new single levers will work with the old cables- or running new cables (I can't really understand how you might mount the single lever controls and pre fit everything with the steering and pod mounted in the boat- but that's for you to figure out), making sure there is enough play in your hydraulic lines to physically move the helm aft (are they copper or nylon lines) removing and reconnecting the bezel with your gauges in it (maybe you want to get the bezel rechromed) maybe you want new gauges in a different layout, will you move the compass to the helm pod, that hole needs to be filled and on and on.

The simple point is there is a ton of work to putting in a helm pod. Lots of planning should go into it. Once the job is finished and all the helpers are gone- you have to live with it.

Go slow, you have the rest of the time you own this boat to get things done- just try and do them once. I know I've had some do overs because something wasn't thought completely through- And Bob has as well, so take your time and ask if this is what the boat really needs right now


Image

Image

Image

Image
KR


JP
1977 RLDT "CHIMERA"
User avatar
bob lico
Senior Member
Posts: 5276
Joined: Jun 29th, '06, 19:22
Location: sayville,long island

Post by bob lico »

jp that is both beautiful and functional with the electronics on a slant .peter intends to keep thottle and gears the same for now on either side of pod and just tilt the hynatic helm into the angle of captain patrick pod .no finishing on either side of pod the new epoxy seam will show for now.
capt.bob lico
bero13010473
User avatar
PeterPalmieri
Senior Member
Posts: 2568
Joined: Nov 12th, '10, 11:26
Location: Babylon, NY

Post by PeterPalmieri »

JP,

Your opinion is very valuable and I do appreciate it. It may in fact make sense to hold off until after the season to tackle this project. Next week the boat goes over to the yard to have the new to me (reconditioned props) put on along with a new set of cutlass bearings. I had the engines realliged and I've been told the shafts are good but I am still concerned I may have running gear issues I will find this all out in a few weeks. One of the motors has already been rebuilt. The other seems to be in good working order but you never know when it's time has come. If any of these things are issues they will certainly be priorities.

I think I have a decent working plan. Let me lay it out and see if it makes sense.

The first issue is all the mechanical systems, I am hoping to flush that out immediately although it's hard to plan. I'll probably need a rebuild of the
starboard motor at some point. In the grand scheme of things I have no plans to switch over to diesels for a number of years.

The next issue is the electrical system. I am already working with someone who is an ABYC marine electrician he is fixing and upgrading the entire boat over the course of the summer. My electronics are not great but a workable fish finder and chart plotter are there until I rework the bridge and am ready to upgrade.

The cockpit is brand new as is the fuel tank. The cabin has had a face lift and is more then passable condition for the time being. The port motor has been entirely rebuilt and I should mention i am having the SW intakes replaced next week with NE ball valves, crash valves etc.

I do realize just what I've mentioned may be pretty costly and may take some time to get them in good order.

The next step is to address the bridge. If the new seats and pod sit in the garage until next winter that is ok too. When I can address it I'd like to add the pod single lever controls replace the seating and then fill in the holes and mount new electronics. I realize that I will likely have to pay someone to get the bridge to look the way I want it to. I plan on keeping the existing gauge cluster and wheel. I am not looking for the bridge to look brand new just be functional for my needs.
1969 31 Bertram FBC "East Wind" hull #315939
User avatar
PeterPalmieri
Senior Member
Posts: 2568
Joined: Nov 12th, '10, 11:26
Location: Babylon, NY

Post by PeterPalmieri »

As bob said I just want to rough in the pod. Move the gauge cluster and wheel. It won't look finished but will be functional until I am ready to do the rest. After reading a number of threads on the single lever controls it is obvious that this is beyond my capabilities. I'll have this professionally done and probably get the boat over to Raybo for fairing and paint. I can then mount new electronics and move electrical panels if I choose. These final steps should be able to be put off for the time being.
1969 31 Bertram FBC "East Wind" hull #315939
User avatar
JP Dalik
Senior Member
Posts: 1317
Joined: Jun 30th, '06, 21:03
Location: Pt. Pleasant NJ
Contact:

Post by JP Dalik »

Good Luck with her sounds like your getting ready to have some fun.
KR


JP
1977 RLDT "CHIMERA"
User avatar
Bob H.
Senior Member
Posts: 1279
Joined: Jul 10th, '06, 19:49
Location: Rehoboth, Mass.
Contact:

Post by Bob H. »

JP, What type of gauges did you use? That helm looks slick...planning a project takes alot of bucket time...you sit your ass on the bucket and think, look, plan, mock it up...then and only then build it.
The do overs Ive had are because I didnt listen to the many guys here who already built and figured out a great idea. just my 2 cents. BH
1966 31 Bahia Mar #316-512....8 years later..Resolute is now a reality..Builder to Boater..285 hours on the clocks..enjoying every minute..how many days till spring?
User avatar
JP Dalik
Senior Member
Posts: 1317
Joined: Jun 30th, '06, 21:03
Location: Pt. Pleasant NJ
Contact:

Post by JP Dalik »

Bob,

They are what came with the Cummins package except for the tach's, they are VDO Ocean Pro's and I ended running them through the alternator because at the time I didn't want to split the speed signal for the heaters.

The bezels are a VDO chrome version that I found on line.

When all else fails there is hardly anything that can't be fixed with enough time and money. Problem is I haven't found a way to reproduce either as fast as I lose it.
KR


JP
1977 RLDT "CHIMERA"
User avatar
Carl
Senior Member
Posts: 5967
Joined: Jul 5th, '06, 06:45
Location: Staten Island NY

Post by Carl »

JP Dalik wrote: When all else fails there is hardly anything that can't be fixed with enough time and money. Problem is I haven't found a way to reproduce either as fast as I lose it.

If that's not the truth...nothing is.
User avatar
bob lico
Senior Member
Posts: 5276
Joined: Jun 29th, '06, 19:22
Location: sayville,long island

Post by bob lico »

with the brilliant minds on this board namely carl,rocky, we did reengineer the sigle lever controls to work perfectly without throwing money and actual "hands on time".the shortcomings of the single lever controls were overcome and work perfect.
capt.bob lico
bero13010473
User avatar
PeterPalmieri
Senior Member
Posts: 2568
Joined: Nov 12th, '10, 11:26
Location: Babylon, NY

Post by PeterPalmieri »

Image

Looking for some additional input, as Capt Pat is finishing up the pod.

You can see my current helm layout. I am thinking of moving the hour meters and fuel gauge to the starboard faux wood panel. The switch to the right of those three gauges is not connected to anything and can be removed. The toggle on the left side of those three gauges is the trim tab control. I will likely move that to the same starboard panel (the tabs may get removed down the road so no need to drill a hole in the new pod.

The ignition sytem has a switch and a button (There is probably a more useful term for this). The button is built into the gauge cluster, The switches can be mounted to either side of the steering wheel (as they are now) or on the underside of the pod or on that same starboard panel.

Going to leave the compass as is, just moving the things that will need to be moved when the pod goes in.
I'd appreciate any input, I included a picture of the existing layout.
1969 31 Bertram FBC "East Wind" hull #315939
Tony Meola
Senior Member
Posts: 6940
Joined: Jun 29th, '06, 21:24
Location: Hillsdale, New Jersey
Contact:

Post by Tony Meola »

Peter

Not knowing how much higher over the current bench seat will be, just make sure that if you move any gauges into the Faux Wood that you can see them without having to go into contortions. Hour meter not important if you can't see it too well and the fuel guage is not too bad either since you probably only look at it every half hour or so. But watch anything else you move. I just like a clear line of site at the guages. Look down they are all rigth there. Look straight ahead at the Panel, you can see them at a qucik glance.

Just my two cents.
1975 FBC BERG1467-315
User avatar
CaptPatrick
Founder/Admin
Posts: 4161
Joined: Jun 7th, '06, 14:25
Location: 834 Scott Dr., LLANO, TX 78643 - 325.248.0809 bertram31@bertram31.com

Post by CaptPatrick »

Image
Image
User avatar
John F.
Senior Member
Posts: 2102
Joined: Jun 29th, '06, 07:58

Post by John F. »

Beautiful work again Capt. Pat. I especially like the spot for the compass--very cool.
1968 B20 Moppie - Hull # 201-937
1969 B31 FBC - Hull # 315-881 (sold)
1977 B31 FBC - Hull # BERG1652M77J
User avatar
bob lico
Senior Member
Posts: 5276
Joined: Jun 29th, '06, 19:22
Location: sayville,long island

Post by bob lico »

nice engineering and great layout and the pod is a work of art----as usual.
capt.bob lico
bero13010473
User avatar
PeterPalmieri
Senior Member
Posts: 2568
Joined: Nov 12th, '10, 11:26
Location: Babylon, NY

Post by PeterPalmieri »

Capt Pat! Beautiful work, the layout is a little different then the other console pictures I posted earlier for those that were looking at what I posted.

Of course without putting it on the bridge it is hard to tell the angle but it seems to be closest to the zero cavity teak pod which protrudes above the top of the bridge on the forward section.

It seems to have more overhang on the aft end then zero cavity but not as much as Chimera.

The wheel will be more vertical then it is now and more vertical then Chimera but not as much as Phoenix.

Maybe just like hancocks b31, Capt pat will surely set me straight

Capt Pat did a good job explaining how the layout would be and I realize I probably shouldn't even think about comparing to these other boats that are top to bottom better then the originals!

The boat is going to the yard tomorrow, new cutlass bearings, Tonys props, check on that white smoke issue, clean and paint bottom as needed it was done in September. Replace the sea cocks with ball valves. If the thru hulls need replacing I will then consider external strainers.

If all goes well and I get the boat back I can pull out the bench next weekend and try to prepare for Bob to help me. I am not going to make any plans for the pod and seat until I get the yard bill and a thumbs up from the mechanic.

Well see! I will snap a few shots of the pod over the weekend.
1969 31 Bertram FBC "East Wind" hull #315939
User avatar
CaptPatrick
Founder/Admin
Posts: 4161
Joined: Jun 7th, '06, 14:25
Location: 834 Scott Dr., LLANO, TX 78643 - 325.248.0809 bertram31@bertram31.com

Post by CaptPatrick »

Capt Pat! Beautiful work
Thanks!
closest to the zero cavity teak pod which protrudes above the top of the bridge on the forward section.
This console is patterned directly from the same jig that produced Jerry's teak pod on Zero Cavity...
It seems to have more overhang on the aft end then zero cavity but not as much as Chimera.
Same overhang, or nearly so...
The wheel will be more vertical then it is now and more vertical then Chimera
You can adjust the rake by altering the angle of the base...
Maybe just like hancocks b31
Identically the same, depending on any angle adjustment you make. And what you mount, in terms of controls, electronics, & guages...
User avatar
PeterPalmieri
Senior Member
Posts: 2568
Joined: Nov 12th, '10, 11:26
Location: Babylon, NY

Post by PeterPalmieri »

I am going to install my existing wheel and gauge cluster. With the hour meters and fuel gauge moved to the side panel. I may also need to remove the windshield to get the pod in, it will not go back on I will just fill the holes left behind. Most likely.

I will start taking measurements and considering the exact layout, I'd love to leave enough room forward of the gauge cluster for a new compass but I'm not sure it will fit without looking cramped.

Just thinking out loud is there enough room to mount an electrical panel on the front vertical section of the pod once the rigging for the wheel and single lever controls go in? Is it even worth considering doing this? Since I haven't seen anyone else do it makes me think there is a good reason not to. In any case that is phase two.
1969 31 Bertram FBC "East Wind" hull #315939
User avatar
JP Dalik
Senior Member
Posts: 1317
Joined: Jun 30th, '06, 21:03
Location: Pt. Pleasant NJ
Contact:

Post by JP Dalik »

The front vertical face of the pod isn't used because your body, legs and other more tender parts can rub against the switches and shut them off or turn them on. The underside is the safest, starts stops trim tabs horn etc.. The next safest s on a vertical panel under the helm pod.
KR


JP
1977 RLDT "CHIMERA"
User avatar
PeterPalmieri
Senior Member
Posts: 2568
Joined: Nov 12th, '10, 11:26
Location: Babylon, NY

Post by PeterPalmieri »

I'm down at the boat in the yard in islip this morning. Taking some measurements for the pod and I don't think it's going to fit without moving the throttles and the faux wood side panels. It is really close I am going to go home and get the pod so I can take more measurements.

I may have to just consider doing the seats this year and worry about the pod at a later time.

If any of you local guys are off today and want to take a look with me I can use an extra set of eyes.

Cell 5166060962

Pete
1969 31 Bertram FBC "East Wind" hull #315939
User avatar
PeterPalmieri
Senior Member
Posts: 2568
Joined: Nov 12th, '10, 11:26
Location: Babylon, NY

Post by PeterPalmieri »

Image

After taking some more detailed measurements it seems that the pod will not go in this season. The width at the most forward location protrudes onto the faux wood panels. Also the width of the pod where the throttles are located is to tight. I'll hold off and do the pod the right way with the single levers and glass work on the dash at a later date.

I'd still like to remove the bench and install my new seats which is the most important part of this project. What I am thinking is having the base made and installing it far enough back so that it will not need to be moved when I do eventually add the pod. Simply add sliders to the seats so that I can move them a bit forward in the interim.

What do you guys think? Make sense?
1969 31 Bertram FBC "East Wind" hull #315939
Tony Meola
Senior Member
Posts: 6940
Joined: Jun 29th, '06, 21:24
Location: Hillsdale, New Jersey
Contact:

Post by Tony Meola »

Peter

I had the same thoughts about the sliding seat. Actually only the center seat needs to slide. Here is the problem, If the seat slides forward, then it would have no support under it in the forward position, so the sliders would have to be pretty heavy. Even a light weight would bend the rails coming down off a big wave.

If you cut the support to protrude out so the rails have support, then you have gained nothing since the proturusion would be in your way. What I would do is take a look at John's post when he showed his set up. Not a bad set up. Only problem is for the person on the inside getting in and out if the seat does not fold down.

Hopefully someone else will have an idea. There are other options but you already have the seats so you really need to use them someway.
1975 FBC BERG1467-315
User avatar
In Memory Walter K
Senior Member
Posts: 2912
Joined: Jun 30th, '06, 21:25
Location: East Hampton LI, NY
Contact:

Post by In Memory Walter K »

One of the reasons I have recommended not doing anything until you've used the boat a while is that you will find out things about your family and friends you never expected. My family never wanted to come up on the bridge once we left the calm of the harbor. Those who came up wanted to go down once it got a bit rough...then you had to sloooow down and hold them so they didn't kill themselves getting down. A drink holder and a place to lay a sandwich suddenly plays an important part of equipment for the Captain. And if it's one of the few places left in the world he can enjoy a cigar, an accommodation for that. You discover that no one in the cockpit hears a word you are shouting when you're running at cruise and everyone is lying around or in the cabin area...a PA or second (lower radio?)...ad infinitum.
jspiezio
Senior Member
Posts: 882
Joined: Nov 25th, '07, 07:21
Location: Long Island, NY

Post by jspiezio »

walterk wrote:One of the reasons I have recommended not doing anything until you've used the boat a while is that you will find out things about your family and friends you never expected. My family never wanted to come up on the bridge once we left the calm of the harbor. Those who came up wanted to go down once it got a bit rough...then you had to sloooow down and hold them so they didn't kill themselves getting down. A drink holder and a place to lay a sandwich suddenly plays an important part of equipment for the Captain. And if it's one of the few places left in the world he can enjoy a cigar, an accommodation for that. You discover that no one in the cockpit hears a word you are shouting when you're running at cruise and everyone is lying around or in the cabin area...a PA or second (lower radio?)...ad infinitum.
Again Pete, That is really good advise. Don't do things just because you are hot to do something. Wait and do it right, or it will end up half assed
User avatar
PeterPalmieri
Senior Member
Posts: 2568
Joined: Nov 12th, '10, 11:26
Location: Babylon, NY

Post by PeterPalmieri »

I really do appreciate the advice BUT as I mentioned earlier the bench seat is shot, 3 grown men and a decent wave the bench will be in pieces. I am going to wait on moving anything on the dash though.

Tony, Garelick makes a few different slides that match up to the suspension system. the travel on the slide varies depending on the model. I can only assume that they've designed them to support an adult at full extension. I am not sure I want the slides or not.

The next thing to do is to pull down the bench and mock up the seats in place and see if it's necessary. I'm still trying to figure out how to get the right measurement for the base as the deck slopes down as you move back
1969 31 Bertram FBC "East Wind" hull #315939
User avatar
bob lico
Senior Member
Posts: 5276
Joined: Jun 29th, '06, 19:22
Location: sayville,long island

Post by bob lico »

hang in there peter i will get there. i will be at the yard all day helping john with his 31 sedan. a beehive of activity around here . we received a 35 cc unwraped it and sold it in 7 days now he wants it tested and in water this week. rigging/electronics etc. take a ride to yard i will explain back to front taper and spacing from pod. i would much rather show you then write about it. really not that complicated. now painting it thats real complicated!!!
capt.bob lico
bero13010473
User avatar
PeterPalmieri
Senior Member
Posts: 2568
Joined: Nov 12th, '10, 11:26
Location: Babylon, NY

Post by PeterPalmieri »

Thanks Bob. We haven't heard from John how is the boat coming along? Are we going to see the sedan in Greenport?

After my last post I decided I needed to take a run down to the boat before going to work and check things out a little further.

Upon further review I don't know that there is really a good option for installing the new seats without having to redo the work when the pod goes in. I will reserve judgement until Bob or someone else with a good eye can step on board and give me a more qualified opinion.

Again just thinking out loud but it may just make sense to strip the dash close up all the holes and start fresh. Install the pod, new wheel and new gauge cluster, single lever controls, switch panel, electronics etc. If I went this route I'd have to ask Raybo for an estimate on the glass work. Most likely not something I'd want to tackle mid season or try to tackle as a DIY.

I could also just do the seats and pack away the pod for a future project. There are 42 years of holes already drilled and filled all over the place sometime in the future I'd like to see the top sides repainted and a few holes more screw holes to fill will be no big deal.

Thinking out loud please tell me why I am headed in the wrong direction.
1969 31 Bertram FBC "East Wind" hull #315939
User avatar
JP Dalik
Senior Member
Posts: 1317
Joined: Jun 30th, '06, 21:03
Location: Pt. Pleasant NJ
Contact:

Post by JP Dalik »

it may just make sense to strip the dash close up all the holes and start fresh. Install the pod, new wheel and new gauge cluster, single lever controls, switch panel, electronics etc.
That sounds like something some other people said early on.

Go use your boat a little, there is plenty of time to work on it.
KR


JP
1977 RLDT "CHIMERA"
User avatar
PeterPalmieri
Senior Member
Posts: 2568
Joined: Nov 12th, '10, 11:26
Location: Babylon, NY

Post by PeterPalmieri »

JP Dalik wrote: That sounds like something some other people said early on.

Go use your boat a little, there is plenty of time to work on it.
Understood, you are a wise man. The bench is the issue, everything else is a can of worms that follows. I'm not big on doing boat projects during our short boating season unless absolutely necessary. Time is running short now, the flats boat goes in the water for the first time tomorrow. Should be fishing her by the weekend.
1969 31 Bertram FBC "East Wind" hull #315939
Tony Meola
Senior Member
Posts: 6940
Joined: Jun 29th, '06, 21:24
Location: Hillsdale, New Jersey
Contact:

Post by Tony Meola »

Peter
A suggestion if I may. Get two 1/2 inch pieces of plywood or a piece of 3/4 Coosa board. Cut a piece to fit in just like the old bench seat. Support it int the center. Clean it up, paint it, glass it whatever. Then take the two seats and bolt them to the board. This gives you one side to step over to get to the seats. Plus your son can not escape past you.

This will give you a temporary set up until you redo the bridge. May not be pretty, but will work.

Another thought, the side you would step over, make a fold down back that someone can step over and put up and lock in place. Then they can sit on a cushion next to you if you should have a third that want to join you.
1975 FBC BERG1467-315
User avatar
bob lico
Senior Member
Posts: 5276
Joined: Jun 29th, '06, 19:22
Location: sayville,long island

Post by bob lico »

peter while you have time go to the store and find empty cardboard box same size as the new pod or make one up out of poster board so we can use as template. put the new bench in now then decide on installation of pod by then you can come up with all the pieces . single lever controls is a very expensive project and not for a beginer use the boat with old controls first but i think you can install pod only keeping your steering must examine and investigate before any dashboard changes no rash decisions like i said think about raybo marine for entire dashboard like making gauge closter in center of pod or whatever you like because he can match with paint or gel-cote.
capt.bob lico
bero13010473
User avatar
CaptPatrick
Founder/Admin
Posts: 4161
Joined: Jun 7th, '06, 14:25
Location: 834 Scott Dr., LLANO, TX 78643 - 325.248.0809 bertram31@bertram31.com

Post by CaptPatrick »

while you have time go to the store and find empty cardboard box same size as the new pod or make one up out of poster board so we can use as template.
Why bother with models? Take the real deal and know for a fact what needs to be done...
User avatar
bob lico
Senior Member
Posts: 5276
Joined: Jun 29th, '06, 19:22
Location: sayville,long island

Post by bob lico »

capt. i did not want to risk scatching it ,on the other hand using the rigid pod would leave no room for error when tracing the pod on to the existing dashboard.
capt.bob lico
bero13010473
User avatar
CaptPatrick
Founder/Admin
Posts: 4161
Joined: Jun 7th, '06, 14:25
Location: 834 Scott Dr., LLANO, TX 78643 - 325.248.0809 bertram31@bertram31.com

Post by CaptPatrick »

No big deal if you do scratch it. It's fiberglass and gonna' get scratched up more during the install and fairing.
Post Reply

Who is online

Users browsing this forum: Stav and 394 guests