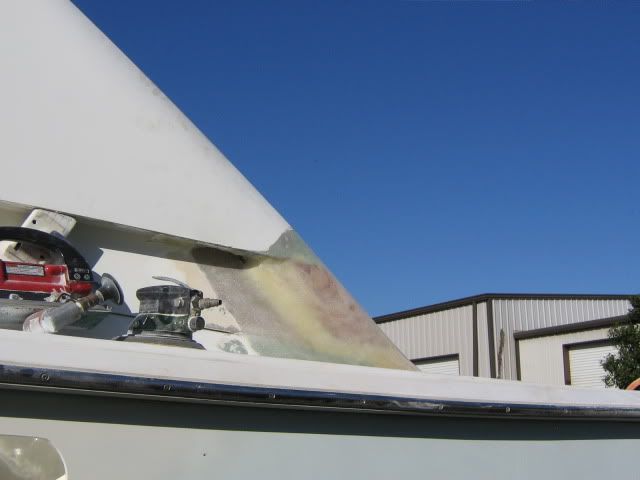
I am not sure what Bertram did originally but the tail secton of the windscreen on DeNada was some sort of piece of aluminum cut to make the transistion from the windscreen to the deck of the boat.
The aluminum provided absolutely no structural suppport and just looked nasty.
When my friend JP visited a few weeks ago we worked on stiffeners that stopped some of the movement of the windscreen.
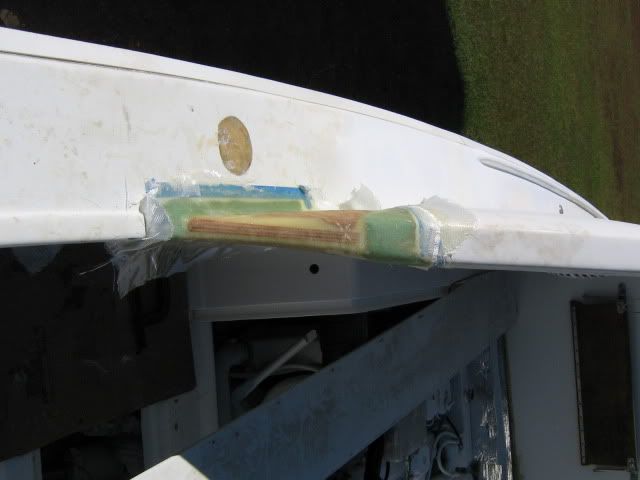
So last weekend and again this weekend I worked on making a solid transition out of marine plywood and glass. I am pretty satisfied with the results and am pretty anxious to get it faired in and painted.
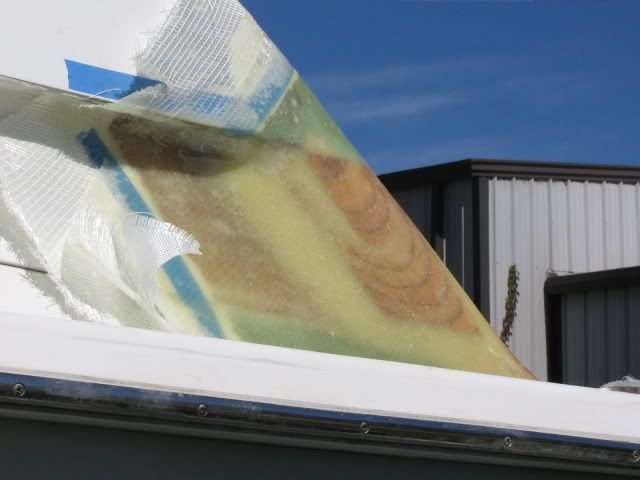
Pay close attention to the finish on the glass work in the attached these pics were taken before any sanding was done but after Peel N Ply was removed. Bob Higgins introduced me to Peel N Ply about a year ago....and from now on I won't leave home without it.....greatest stuff for an amateur like me since the invention of sliced bread and in door plumbing.
Here are a few pics of the port side from the outside.....I have not started finishing the inside yet but will post pics when I do.
I don't have pics before I started but would love to see what Bertram did from the factory......do you guys have pics of the production details of this area on the Express Cruiser???? I sort of think that my aluminum details may be original but I just don't know.
Harry,
The aluminum peices on the express cruiser wings are original from the factory, my 1961has them. When you remove them, 2 screws on the flat wide surface and 2 screws on the outside edge, they bedded them with the original Dolphinite compound with an oak triangular insert behind them. The FRP side panel above your engine boxes, screws into the oak peice at the aft end after you remove the aluminum spacer. I have taken mine off a few times to replace the side panels and add backing plates for my out rigger base stand-offs. The aluminum shines up nicely on a cloth lap wheel. I just replaced the oak with a 1" peice of Starboard and rebedded with new Dolphinite. I also replaced the backing plywood on the lower FRP panels with 1/2'' foam board epoxied them in place and made a new upper side panels out of 3/8" foam board, these are where your helm and companion chairs are fixed to and stereo speakers are cut into the upper panel. The wing is thru- bolted to the gunwale, make sure that the bolts are still good, I had a few that were snapped off and it made the entire wing area feel loose.
Harry,
I think someone aready mentioned this but if you need to add more air intake for your engines. The foward edge of the bridge wing has an area about 2" wide between the bridge wing and cabin house behind the sliding cabin window at the forward end, that can be opened up for more air, there is aready an opening there. It's up high enough so that normal sea conditions will not allow sea water to enter the engine space. I mention this because I see that you have done away with the side gunwale air intakes at deck level.
Just an added comment if you did not know that they are there. Aint boats fun to work on. Looking good. Pete Fallon
Harry,
As Pete said, the original is just a piece of extruded Alum C-Channel with a lousy contour on the bottom to fit, secured with Flathead screws.
Mine were painted when I bought the boat and I never really pay any attention to them...that is till the paint starts lifting from them. Then I slide the screw out...yeah slide as wood is gone and I just...well I'll get to that in a sec. So I slide the screw out and pull the covers off...bring to the shop where I think I'll do something. The covers sit on my desk for a few days till it gets close to the weekend and I have a feeling I just need to get them done and back on so I Bring over to Glass beading machine and remove all the paint, then a quick prep and another coat of Awlgrip then back to the boat where I figure I'll make a backing plate to securely screw in place...but my arm always seems to get "Twisted" were I have to have a beer... in a quick move I put the cover back in place and slide the screw back in with intentions of making that backing plate. Fast forward several seasons and the paint starts to lift again...been down that road several times now. Your solution seems like a fix...although I'd need to paint the boat too...not in my cards just yet.
Pete / Carl
Just as you both stated the wood behind my aluminum covers was rotted on the port side but actually in pretty good shape on the STBD side.
Since I am in the process of painting the boat I thought this would be a good time to address these parts.
When I added the Bimini Top and fastened it to the Bridge Wing I noticed that the entire thing moved when underway.
JP cut out a plywood stiffener and bonded it on the inside wall....... that tied the major portion of the Bridge wing to the short spacer that attaches to the hull. That helped a lot.
I will take a good look at the fastening bolts.....now would be a good time to replace them.
I did remove the deck air sculpers and plug the holes and last Saturday I removed 2 more sculpers that were attached to the deck 'Side Wall"......these introduced air into the Bridge Wing way down low.....they were actually located just below the aft portion of the window.
I see the air inlet that you refered to that is in the Bridge Wing.....In the forward part of the wing. These are tucked away out of harms way and if I were not looking into and all over every nook and cranney I would have never noticed them.
One day I am gonna count how many holes I have plugged. In addition to the sculper holes I am now dealing with 6 places on the deck and cabin top where an old tower was bolted on. I removed the tower and do not intend to put it back on......but one day I do intend to build a smaller tower that looks more proportionate to the boat.
And yes boats are fun to work on......When I first started this project (4 Years ago) I was gung ho! ! ! then went thru several "Burnout" periods.....but I have to say that when I sit back and look at what I have accomplished......I get a great deal of satisfaction......this ain't my first rodeo......I have been fooling with boats for more than 35 years.....but this one is more special to me that all the others combined.
I finally got my paint color just like I want it....bought the paint.....and that is what I am working on right now......getting the deck ready for paint.
I am finally seeing the light at the end of the tunnel. Saturday was a very good day because I was able to devote the ENTIRE day to DeNada.....did not have even the first intruption.....sure felt good. I thought that I would get to sand and fair some this afternoon....but as luck would have it I had to work.....Chris and I promised more than we could deliver and had to devote some overtime.
Tomorrow will be a new day.....we will see how it develops.
Ian.....thanks for the compliment on the fiberglass.....I agree that it does look good but I have to share the compliment with my good friend Bob Higgins......he sent Peel N Ply to me to try.....tried it once and fell in love with the stuff.....It makes an ameteur appear to know what he is doing.....LOL