Replacing rudder port
Moderators: CaptPatrick, mike ohlstein, Bruce
Replacing rudder port
I am replacing a rudder port on my 1977 bertram 31 Bahia Mar and was wondering if I could just use 5200 instead of making a shim or spacer made out of resin?
-
In Memory of Vicroy

- Senior Member
- Posts: 2340
- Joined: Jun 29th, '06, 09:19
- Location: Baton Rouge, LA


Joe, Alot of force centered at that rudder port, better to take your time and make a serious backing pad and install new rudder port...BH
1966 31 Bahia Mar #316-512....8 years later..Resolute is now a reality..Builder to Boater..285 hours on the clocks..enjoying every minute..how many days till spring?
-
Harry Babb

- Senior Member
- Posts: 2354
- Joined: Jun 30th, '06, 21:45
- Location: Fairhope Al
- Contact:
I agree with the group on the "Hard Shim" but it goes a little deeper than just a shim to hold the port at the correct angle.
You should make sure that the Rudder Port is held very securely around the diameter where the Casting penetrated the hull.
When you remove the rudder port from the boat and get everything cleaned up back to the hull fiberglass you will notice that the hole in the hull is larger than the diameter of the port.
If the space between the OD of the Rudder Port and the ID of the hole in the hull is not filled with something solid......the force placed on the rudder will cause the Port to shift and the entire force will be put on the bond of the 5200 and the bolts that hold the port to the hull.....and eventually that will fail......
May be Capt Pat will chime in here with a diagram.....or there may already be one in the "DIY" section that the Captian provides for us.
Hope I have explained clearly, my thoughts here.....if not I will try again.....but I believe that this is a very critical detail and should receive the utmost of attention.
hb
hb

-
Tony Meola
- Senior Member
- Posts: 7088
- Joined: Jun 29th, '06, 21:24
- Location: Hillsdale, New Jersey
- Contact:
I believe Capt. Pat says to skip the shim. I did not. Something about angled rudders that bothered me.
What I did was go to go to the container store and found a 6 inch round tin. Picked up more than two because you will ruin at least one of the them and have to do this over again. I think it took me 5 tries before I got the thin side the right thickness.
Now to move this forward, I was able to reassemble the pieces from the old port. The high side was 3/8 inches thick then the low side was probaly less than a 1/16.
I made sure I found a real level spot on the garage floor. I first assembled the old shim in the tin. I used a felt tip pen and traced the best I could around the top of the old shim. This was so I would know how much epoxy to poor. I then took the lod shim out of the tin. I took cooking oil and rubbed inside the tin and then wiped it up as best I could. This gave me a release agent.
The next step was to get the level spot on the floor, and set the thickest part of the old shim under the tin. This gave me the angle I needed. I mixed up the epoxy and poored to the line I drew in the tin.
YOu can use straight epoxy or mix in some fiberglass strands or what ever. I used straight epoxy. I used a real slow hardner.
Then just cut the tin and out comes the shim. Perfect angle. Carefully drill a hole in the center and you are all set.
I say drill slowly and carefully or you will crack the shim. Ask me how I know. Actually a spade bit works the best.
The original ports on my boat did not have any type of backing plate. We reinforced that area, increase the hull thickness back there by about an 1 1/2. I had to have a machine shop make extensions for the ports. The extensions screw onto the port. The Cummins dealer came up with that trick when we realized we were short after building up the hull.
Good luck and like the guys say, make sure the port fits snug in the whole. That part was a bear. I had to redrill the hole, it was tight then I had to hand file the hole until it fit through. Then I wrapped plastic wrap around the port and filled any gaps with epoxy. After it hardned I pulled the port back out.
Maybe someone else has an easier way of doing this.
1975 FBC BERG1467-315
-
Harry Babb
- Senior Member
- Posts: 2354
- Joined: Jun 30th, '06, 21:45
- Location: Fairhope Al
- Contact:
What I did went something like this.
After everything was clean and ground back to the original fiberglass I waxed up the port with release wax then sprayed it with parting film.
Then I installed the port into the hull with 4 carriage bolts wrapped and protected with shipping tape.
Next put a dummy shaft or your rudder into the port and secure it so that it does not fall out.
Use a combination of wood wedges (driven between the port flange and the hull) and the 4 bolts to hold the port securely in place.....while adjusting the bolts and wedges to level the dummy shaft or rudder shaft so that it hangs plumb. (assuming that the boat itself is level)
Once you have the port securely in place and the rudder shaft is hanging plumb.....then pack a little thickened epoxy (I used Cabosil and 1/4" fibers) in between the rudder port flange and the boat hull. I packed just enough thickened epoxy so as to make 4 small pads to prepare for the next step.
Once that cured I removed the bolts and removed the rudder port from the boat.
Note that what is left in place is 4 small pads of thickened epoxy that are bonded to the hull and flat.....matching the flange of the rudder port.
Now comes the fun part.
Spray parting film on the rudder port once again and when that dries "Butter Up" the flange with plenty of thickened epoxy and put enough around the OD of the casted port so that you can fill the void area between the rudder port and the hole in the hull.
Put the rudder port back into the hole.....(without the dummy shaft or rudder).....install the bolts (still wrapped with fresh shipping tape and waxed) then put nuts on the bolts and gently tighten them until the flange is pulled up snuggly against the 4 pads that resulted in the first operation.
Let that cure.....enough to maintain its shape....then put a hydraulic jack under the port and apply just enough pressure to hold the port in place while you remove the bolts....before the epoxy sets up to much and bonds them in for good.
I let the epoxy and rudder port cure over night then removed the jack and the rudder port one more time.
Then I used a Dremel tool to cut a small "O Ring" looking groove in the epoxy on a diameter just smaller than the bolt circle and then around each bolt. The purpose of this groove was to hold a ring of 5200 so that it would not all squeeze out when I installed and tightened the rudder port for the final time.
Finally I cleaned the Parting Film and wax off of the cast rudder port, applied an adequate amount of 3M 5200 the installed the rudder port for the last time.
Then the focus was shifted to the supports on the inside.
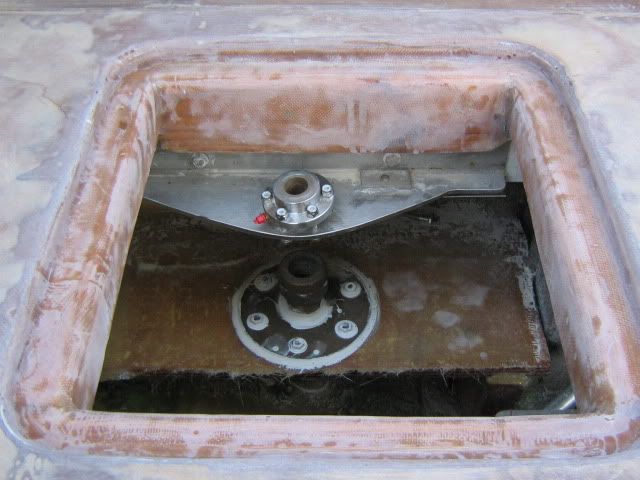
As you can see in the pic....the upper portion of the rudder port is supported in its conventional way with the large bronze plates bolted to a rudder shelf.
Above the rudder shelf is a piece of Stainless Steel angle glued and bolted to a heavy frame support. On the top of this angle is a self aligning bronze bearing that will help support the top of the rudder shaft.
The rudder stock was custom made by your truely with a 15/16" diameter round section above the 1" square section of the shaft.
Then on top of that the shaft is threaded, where a nut will screw onto the rudder shaft, and thrust on top of the self aligning bearing. The nut is split and drilled and tapped so that when its set in the proper position it can be tightened and squeezed tight onto the rudder shaft so that it will not come loose.
I'm counting on the upper bearing taking ALL of the load off of the rudder shelf and top of the rudder port. My thoughts are that by doing this, the packing will function leak free for longer periods of time.....time will tell.....so far they are working flawlessly....LOL....wonder how they will work once I launch her! ! ! !
In just 42 short years my rudder ports had worn so much that they had to be over bored by nearly 1/16" just to round them back up.
Phewwww! ! ! my little fingers are smoking form hammering on this key board
After everything was clean and ground back to the original fiberglass I waxed up the port with release wax then sprayed it with parting film.
Then I installed the port into the hull with 4 carriage bolts wrapped and protected with shipping tape.
Next put a dummy shaft or your rudder into the port and secure it so that it does not fall out.
Use a combination of wood wedges (driven between the port flange and the hull) and the 4 bolts to hold the port securely in place.....while adjusting the bolts and wedges to level the dummy shaft or rudder shaft so that it hangs plumb. (assuming that the boat itself is level)
Once you have the port securely in place and the rudder shaft is hanging plumb.....then pack a little thickened epoxy (I used Cabosil and 1/4" fibers) in between the rudder port flange and the boat hull. I packed just enough thickened epoxy so as to make 4 small pads to prepare for the next step.
Once that cured I removed the bolts and removed the rudder port from the boat.
Note that what is left in place is 4 small pads of thickened epoxy that are bonded to the hull and flat.....matching the flange of the rudder port.
Now comes the fun part.
Spray parting film on the rudder port once again and when that dries "Butter Up" the flange with plenty of thickened epoxy and put enough around the OD of the casted port so that you can fill the void area between the rudder port and the hole in the hull.
Put the rudder port back into the hole.....(without the dummy shaft or rudder).....install the bolts (still wrapped with fresh shipping tape and waxed) then put nuts on the bolts and gently tighten them until the flange is pulled up snuggly against the 4 pads that resulted in the first operation.
Let that cure.....enough to maintain its shape....then put a hydraulic jack under the port and apply just enough pressure to hold the port in place while you remove the bolts....before the epoxy sets up to much and bonds them in for good.
I let the epoxy and rudder port cure over night then removed the jack and the rudder port one more time.
Then I used a Dremel tool to cut a small "O Ring" looking groove in the epoxy on a diameter just smaller than the bolt circle and then around each bolt. The purpose of this groove was to hold a ring of 5200 so that it would not all squeeze out when I installed and tightened the rudder port for the final time.
Finally I cleaned the Parting Film and wax off of the cast rudder port, applied an adequate amount of 3M 5200 the installed the rudder port for the last time.
Then the focus was shifted to the supports on the inside.
As you can see in the pic....the upper portion of the rudder port is supported in its conventional way with the large bronze plates bolted to a rudder shelf.
Above the rudder shelf is a piece of Stainless Steel angle glued and bolted to a heavy frame support. On the top of this angle is a self aligning bronze bearing that will help support the top of the rudder shaft.
The rudder stock was custom made by your truely with a 15/16" diameter round section above the 1" square section of the shaft.
Then on top of that the shaft is threaded, where a nut will screw onto the rudder shaft, and thrust on top of the self aligning bearing. The nut is split and drilled and tapped so that when its set in the proper position it can be tightened and squeezed tight onto the rudder shaft so that it will not come loose.
I'm counting on the upper bearing taking ALL of the load off of the rudder shelf and top of the rudder port. My thoughts are that by doing this, the packing will function leak free for longer periods of time.....time will tell.....so far they are working flawlessly....LOL....wonder how they will work once I launch her! ! ! !
In just 42 short years my rudder ports had worn so much that they had to be over bored by nearly 1/16" just to round them back up.
Phewwww! ! ! my little fingers are smoking form hammering on this key board
hb
-
Tony Meola
- Senior Member
- Posts: 7088
- Joined: Jun 29th, '06, 21:24
- Location: Hillsdale, New Jersey
- Contact:
-
Capt.Frank

- Senior Member
- Posts: 641
- Joined: Jun 29th, '06, 21:20
- Location: Kill Devil Hills,NC
-
Brewster Minton

- Senior Member
- Posts: 1795
- Joined: Jun 30th, '06, 07:44
- Location: Hampton Bays NY
- Contact:

-
CaptPatrick

- Founder/Admin
- Posts: 4161
- Joined: Jun 7th, '06, 14:25
- Location: 834 Scott Dr., LLANO, TX 78643 - 325.248.0809 bertram31@bertram31.com

Rudder port
i was not content with the turning response of my boat with the captains new rudders, had the boat in summer storage, air conditioned and hurricane proof building in Stuart F , asked the mechanic to look into my concern, he measured the rudders from the centerline and found a 2" difference from the centerline,factory holes, also found the rudders were not hanging down perpendicular to the floor of the building, suggested we rotate the rudder ports or TIME then to achieve a better angle, actually the rudders were each pointing outboard when the wheel was turned, I ageededto the repair, 2dummy shafts were fixtures from floor and loaded with parting wax , he then ,after a prepared sanded opening , poured a thickened epoxy into the oversized opening the factory had drilled, rotated the ports to align to the dummy shafts ,allowed the epoxy to kick, Redrilled the holes to refasten the rudder ports , 5200 them Back into place, the rudder shelf had to be modified because of the new alignment , made a ss plate to mount the high tide upper bearing onto the composite rudder shelf per the capts instructions,ran the boat south today with much better response,FYI, may have been a factory anomaly initially with the location of the rotation of the ports timing
L
L
Who is online
Users browsing this forum: No registered users and 275 guests