Propeller Shaft Nut Question
Moderators: CaptPatrick, mike ohlstein, Bruce
-
White Bear

- Senior Member
- Posts: 157
- Joined: Jun 30th, '06, 08:16
- Location: Southold, NY
Propeller Shaft Nut Question
Having just replaced a propeller, I was faced with the eternal question of which nut lies next to the propeller and which is used as the locking nut. Before my installation I did considerble research (although I could not access the Bertram 31 archives) and found different manufacturer's drawings showing "thick" and "thin" nuts used in both positions, but with no real explanations to support their choices. I'm not obsessing about this as my job is complete and the boat is running fine, but I am curious if anyone can supply a definitive answer as why the nuts are oriented one way or the other. Failing that, is their any anecdotal information about a bad result attributable to orientation?

-
mike ohlstein

- Site Admin
- Posts: 2383
- Joined: Jun 29th, '06, 11:39
- Location: So many things seem like no-brainers until you run into someone with no brain.
- Contact:
Mike,
If those nuts are installed properly, no need to cotter pin thru the nut.
Most shafts have the very end non threaded and a hole for a cotter pin.
The shaft, key and prop must not bind. The first nut gets tightened like its never gonna come off.
The lock nut is put on, a wrench holds the first nut while the lock is tightened against it. Most don't hold the first nut and thus the locking feature really doesn't work well.
-
White Bear
- Senior Member
- Posts: 157
- Joined: Jun 30th, '06, 08:16
- Location: Southold, NY
From my mechanical experience and for what it's worth, I concluded that a locknut is a locknut, underwater or anywhere else. Hence, the thicker nut was placed against the propeller, then the thinner nut used as a lock and a cotter pin installed as final insurance. I'm still interested in any information that supports placing the thinner nut next to the propeller since that orientation seems to defy common sense.

Okay...but remember you asked for it. I went over this a few years ago when the Boat yard manager told me I had my nuts on wrong. On one hand I really didn't care on the other hand he peeked my curiosity and I did a good amount of research.
According to most literature you will find the larger nut goes on followed by the smaller jam nut. This is what looks right and seems right.
Now for the flip side...
I have also read and spoke with engineers who state when driving a taper home (like prop on a shaft) or looking for the highest locking pressure you want to install using The Thinner Jam Nut first. Reason being the thinner nut has less friction and more of your effort is being translated into driving the prop onto the taper or just locking the assemble together.
In all honesty, I don't think it makes that much of a difference provided you fit the prop to the shaft the right way and make sure your key does not ride up the back of the keyway, that is where I see the most problems.
Here is another little tidbit...the hardware on prop shafts are supposed to be snug, that is you should nut be able to just spin them on easily with your hand. However, whether I sell to the average boater or the Coast Guard they all want the hardware to spin up freely...so that is what we do and just about every other manufacturer seems to do as well.
For the record, my hardware spins up free and I usually put the big nut on first.

Capt Pat has a web page on shafts and props pretty much everything you need to know.
http://bertram31.com/proj/tips/shafts.htm
http://bertram31.com/proj/tips/shafts.htm

-
AndreF

- Senior Member
- Posts: 711
- Joined: Jun 29th, '06, 09:53
- Location: Baton Rouge, Louisiana
- Contact:
For instance on one point, when an old company like that shops health insurance, the first question a health insurance company asks is "are retirees covered?" and when they are, rates are adjusted accordingly, upward, due to loss ratios (claims experience).
In some instances, Chapter 11 lets them carve out these retirees and also clean the slate of pending law suits. Like Kodak just settled a race discrimination law suit for some $25 mill for 2003-2005 "infractions", the kind of suit that is impossible to defend.
Look what United Airlines did, whacked off peoples' retirement accts but what was better, lose it all or a portion?
Bad thing is, its going to get worse.
My 2 cents.
I'm not sure but indecision may or may not be my problem.
"People sleep peaceably in their beds at night only because rough men stand ready to do violence on their behalf." - George Orwell
1981 FBC BERG1883M81E
"People sleep peaceably in their beds at night only because rough men stand ready to do violence on their behalf." - George Orwell
1981 FBC BERG1883M81E
-
Harry Babb

- Senior Member
- Posts: 2354
- Joined: Jun 30th, '06, 21:45
- Location: Fairhope Al
- Contact:
Jam nut first...Big nut first....we all know it will work either way because we all have seen installations that fit both configurations.
I thought I would take this opportunity to share an experience that once happened concerning the assembly of a tapered bore coupling on a 2-1/2" prop shaft.
The shaft and couplings came to us to be straightened....the customer complained about a vibration that had plagued him for quite some time. We straightened the shafts, fitted the couplings then checked the assembly for runout. As I remember the situation we had to slightly bend the shaft to make the "Register" diameter run true then we had to chuck the Shaft/Coupling assembly and machine the coupling face to make it run true.
Long story short the customer installed the shafts and the vibration still existed. He brought the Port shaft back to us (it was the only one shaking) We checked the face and guess what it was running out.
Once again we face the coupling. Then we removed the coupling and then put it back on the shaft and guess what it was running out again.
At that point we turned a tapered mandrell in the lathe and slid the coupling onto the mandrell hard enough to lock it on the taper. We checked the runout of the face of the coupling where the nut contacted the coupling and discovered that it was not perpinducular to the centerline of the shaft...we showed a Total Indicator Reading (TIR) of .009". We took a face cut on that surface of the coupling. Now the face that makes up to the nut is absolutely square with the centerline of the shaft.
We then threaded a short piece of stock so that it would thread snuggly into the nut.....we found that the faces of the nut were not square with the pitch diamter if the nut.....we corrected that situation also.
Now the final test.....we assembled the coupling onto the shaft checked the squareness of the face.....removed the coupling from the shaft and reasembled it once again....it repeated every time.......
After chucking and facing the coupling one last time the the problem was solved.....
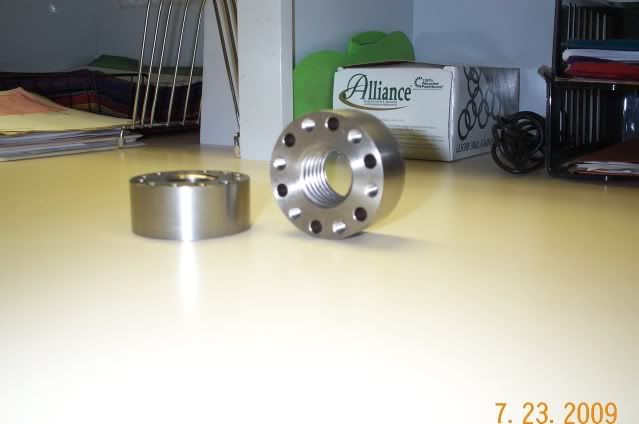
Now I will show how I am going to mount my coupling to the shaft on DeNada. The pic below shows a special nut that I made for assembly and disassembly of the coupling/shaft and the propeller/shaft.
The idea is that you first slide the coupling or propeller onto the taper making sure that it is not "Key Bound" and that the tapers match and fit properly (Lap if needed). Then screw the pictured nut onto the shaft threads. Notice that half of the holes in the nut have been tapped 5/16-18. At this point you screw bolts into the threaded holes until they contact the face of the coupling or propeller.
Now continue to tigten the bolts evenly in a cris cross pattern until all of the bolts reach 15 foot pounds of torque. This process pushes the coupling/propeller straight onto the shaft.
Now remove the installation nut and put the full nut and the jam nut in place and go boat riding.
Now for removal.......notice that half of the holes in the nut are tapped and the other half are drilled clear thru. When the coupling was manufactured we drilled and tapped a bolt pattern in the counter bore that matches the bolt pattern in the nut. Simply screw nut onto the threads....insert 6 bolts thru the clear holes and thread them into the coupling....continue to tighten them until the taper breaks loose.
To do this on the prop you will need to drill and tap the bolt pattern in the aft face of the prop hub before it is installed.
I thought I would take this opportunity to share an experience that once happened concerning the assembly of a tapered bore coupling on a 2-1/2" prop shaft.
The shaft and couplings came to us to be straightened....the customer complained about a vibration that had plagued him for quite some time. We straightened the shafts, fitted the couplings then checked the assembly for runout. As I remember the situation we had to slightly bend the shaft to make the "Register" diameter run true then we had to chuck the Shaft/Coupling assembly and machine the coupling face to make it run true.
Long story short the customer installed the shafts and the vibration still existed. He brought the Port shaft back to us (it was the only one shaking) We checked the face and guess what it was running out.
Once again we face the coupling. Then we removed the coupling and then put it back on the shaft and guess what it was running out again.
At that point we turned a tapered mandrell in the lathe and slid the coupling onto the mandrell hard enough to lock it on the taper. We checked the runout of the face of the coupling where the nut contacted the coupling and discovered that it was not perpinducular to the centerline of the shaft...we showed a Total Indicator Reading (TIR) of .009". We took a face cut on that surface of the coupling. Now the face that makes up to the nut is absolutely square with the centerline of the shaft.
We then threaded a short piece of stock so that it would thread snuggly into the nut.....we found that the faces of the nut were not square with the pitch diamter if the nut.....we corrected that situation also.
Now the final test.....we assembled the coupling onto the shaft checked the squareness of the face.....removed the coupling from the shaft and reasembled it once again....it repeated every time.......
After chucking and facing the coupling one last time the the problem was solved.....
Now I will show how I am going to mount my coupling to the shaft on DeNada. The pic below shows a special nut that I made for assembly and disassembly of the coupling/shaft and the propeller/shaft.
The idea is that you first slide the coupling or propeller onto the taper making sure that it is not "Key Bound" and that the tapers match and fit properly (Lap if needed). Then screw the pictured nut onto the shaft threads. Notice that half of the holes in the nut have been tapped 5/16-18. At this point you screw bolts into the threaded holes until they contact the face of the coupling or propeller.
Now continue to tigten the bolts evenly in a cris cross pattern until all of the bolts reach 15 foot pounds of torque. This process pushes the coupling/propeller straight onto the shaft.
Now remove the installation nut and put the full nut and the jam nut in place and go boat riding.
Now for removal.......notice that half of the holes in the nut are tapped and the other half are drilled clear thru. When the coupling was manufactured we drilled and tapped a bolt pattern in the counter bore that matches the bolt pattern in the nut. Simply screw nut onto the threads....insert 6 bolts thru the clear holes and thread them into the coupling....continue to tighten them until the taper breaks loose.
To do this on the prop you will need to drill and tap the bolt pattern in the aft face of the prop hub before it is installed.
hb

Harry you do some cool stuff. I like this for the coupling.
Not sure about the prop removal. Most of the time we just throw up a piece of threaded brass and beat it with a hammer till the prop pops loose. Nothing more satisfying than hitting something with a hammer till it falls off.
Not sure about the prop removal. Most of the time we just throw up a piece of threaded brass and beat it with a hammer till the prop pops loose. Nothing more satisfying than hitting something with a hammer till it falls off.
KR
JP
1977 RLDT "CHIMERA"
JP
1977 RLDT "CHIMERA"
-
Harry Babb
- Senior Member
- Posts: 2354
- Joined: Jun 30th, '06, 21:45
- Location: Fairhope Al
- Contact:
JP, There is something about hammers when used on nice things that just goes aganist my grain.....
$1000.00 prop and a sledge hammer! ! !
I'm feeling sick! ! !
But on the other hand...boat yard mechanics and hammers actually generate a pretty good income stream for us...
As far as the nut shown in the pic....its was not my idea.....I made some of these for a Hatteras engineer several years ago
$1000.00 prop and a sledge hammer! ! !
I'm feeling sick! ! !
But on the other hand...boat yard mechanics and hammers actually generate a pretty good income stream for us...
As far as the nut shown in the pic....its was not my idea.....I made some of these for a Hatteras engineer several years ago
Last edited by Harry Babb on Jul 23rd, '09, 22:33, edited 1 time in total.
hb
-
MikeD@Lightningshack

- Senior Member
- Posts: 127
- Joined: Jul 4th, '06, 16:52
- Location: Manasquan, NJ
- Contact:
Being the Director of Engineering at a bolting / fastener and hydraulic tool company I must weigh in:
www.jetyd.com if you are interested in industrial fasteners...
As far as function I see no difference in the order of installation:
With regards to installation, if you put the Jam nut on first you might have trouble finding a thin enough wrench in your box to react properly when installing second nut. If you do it the opposite way, a pair of adjustables will do the job.
With regards to friction... The thinner nut will not give you more load. Friction losses are based on the load/force and the respective coefficient of friction betweem surfaces. Thread surface area is irrelevant.
Disregarding the nut weight, which is insignificant compared to load generated, a very long nut is no more efficient than a short nut. Counter intuitive, I know... but study it a while and you will probably understand.
Good lubrication will double nut efficiency. Lubricate threads and face of nut that engage the prop and you will generate much higher thrust loads. Moly-Disulfide is best.
lubricant on the Jam nut... I wouldn't bother. This way the jam nut has a higher coefficient of friction, but still enough load to perform it's jamming function without vibrating loose.
Mike Dolan
www.lightningshack.com

Very cool, we beat the crap out of that question and the concensus of "it really doesn't matter" seemed to prevail.
Nice coupling Harry, looks similar to what we use on the tugs and other workboats up here.
Anyone use split rings in their couplings to prevent the shafts from slipping out of the couplings when reversing hard?
Nice coupling Harry, looks similar to what we use on the tugs and other workboats up here.
Anyone use split rings in their couplings to prevent the shafts from slipping out of the couplings when reversing hard?
-
Harry Babb
- Senior Member
- Posts: 2354
- Joined: Jun 30th, '06, 21:45
- Location: Fairhope Al
- Contact:

Who is online
Users browsing this forum: Google [Bot] and 427 guests