Soft Engine Mounts - Fixes?
Moderators: CaptPatrick, mike ohlstein, Bruce
Soft Engine Mounts - Fixes?
Have a small '70 Bert. I/O. Noticed when I winterized it that the 2 front engine mounting lag bolts were coming up, and no longer got good traction in the wooden engine stringers when attempts where made to re-tighten them.
Engine has been up and out a few times in recent years. Probably got some water in there along the way and some rot. Not sure how localized or extensive it is.
Any one have experience or thoughts on this? Any inexpensive, practical fixes - eg. not replacing the engine bed stringers?
Engine has been up and out a few times in recent years. Probably got some water in there along the way and some rot. Not sure how localized or extensive it is.
Any one have experience or thoughts on this? Any inexpensive, practical fixes - eg. not replacing the engine bed stringers?
Redcat20
If the surrounding wood is in good shape and its just a stripped out lag then I'd try the following.
Keep drilling out the hole with larger and larger size bits until you have good clean wood chips coming out. At that point get yourself an oak or mahogany dowel wipe everything down with denatured and let it dry, then shmutz (this is a technical term) it with west epoxy and coat the inside of the hole as best you can then add a little bit of 403 and west to the inside of the hole, this will fill the bottom where the dowel won't fit.
Get a hammer play a little whack a mole with the dowel in the hole set it home trim and sand it even, seal the repair with epoxy and replace the lag it should be good.
In the event that you never get to good clean wood then I would suggest replacement of the whole thing.
KR
JP
1977 RLDT "CHIMERA"
JP
1977 RLDT "CHIMERA"
- CaptPatrick
- Founder/Admin
- Posts: 4161
- Joined: Jun 7th, '06, 14:25
- Location: 834 Scott Dr., LLANO, TX 78643 - 325.248.0809 bertram31@bertram31.com
Red,
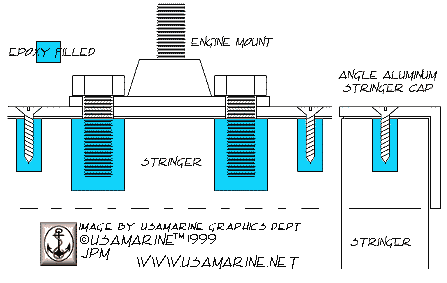
The simplest fix will be to pull your engine, remove the motor mounts, over bore the holes, fill with thickened epoxy. Once done, re-drill pilot holes for the lags & re-set the mounts & engine. See: http://bertram31.com/proj/tips/sleeving.htm

Br,
Patrick
The simplest fix will be to pull your engine, remove the motor mounts, over bore the holes, fill with thickened epoxy. Once done, re-drill pilot holes for the lags & re-set the mounts & engine. See: http://bertram31.com/proj/tips/sleeving.htm

Br,
Patrick
- In Memory of Vicroy
- Senior Member
- Posts: 2340
- Joined: Jun 29th, '06, 09:19
- Location: Baton Rouge, LA
Jack up the front of the motor with some hyd. jacks (put some 2x6 on the hull to jack from) to take the load off the mounts, remove the mounts and dig into the stringers. The stringers on the B20 were enceased in heavy glass, and the wood was mostly a filler to mold the glass around. Dig deep, get all the rotten wet wood out and in the process open up the top of the stringer enough to dry it out, then fill with a mix of epoxy resin and chopped glass fiber, tamp it in, let it cure then drill a pilot hole and re-attach your motor mounts with the lag bolts. Getting it dry is the ticket before you put the glass/epoxy in to make your new bed for the lag bolts.....think about using some "U" aluminum to cap the stringers and thru bolt them into the stringers and drill and tap the alum. tops for your motor mounts...use Tef Gel on the cap screws into the aluminum.
UV
UV
Can you get to the sides of the stringer? If so you can cross drill it for a 2" or larger dowel thru the center of the stringer. Make sure that the dowel stands slightly proud of the fiberglass on each side of the stringer. Coat the dowel with epoxy and insert in stringer. Get lag bolts that are long enough to reach down through the dowel. Drill down through the dowel the proper size for the lag. Coat lag with epoxy and screw in. Paint the ends of the dowels with Epoxy. You could do the same thing with a piece of shafting cross drilled and threaded so that you could use a conventional bolt instead of a lag bolt.
Rawleigh
1966 FBC 31
1966 FBC 31
- CaptPatrick
- Founder/Admin
- Posts: 4161
- Joined: Jun 7th, '06, 14:25
- Location: 834 Scott Dr., LLANO, TX 78643 - 325.248.0809 bertram31@bertram31.com
Engine Mounts
Thanks for all the input.
Will look at the mounting places over the next few days and share what I end up doing.
Will look at the mounting places over the next few days and share what I end up doing.
Redcat20
Who is online
Users browsing this forum: Google [Bot] and 49 guests