Guys...a somewhat off the "b31" subject here...but...
...I recently moved to a new house in the suburbs of Philadelphia. A classic colonial house, just a wiffleball shot from valleyforge park. The house had one room in the 1st floor that was for "formal living room". When my wife and I moved in, she started talkin about tea parties and enterrtaining...huh?...she hates tea (really) and we never "entertain" ...so i talked her into making it an office.
...problem... the only desk i own is a small white particleboard desk i got from Ikea whien i was in college. ...i didn;t have a nice desk. So after allowing her to drag me all over creation looking for the right desk, i decided to make my own...
I set out to make a desk the looked like i had sawed off the back 3 feet of an old Rybovich. No plan, no idea how, but i had a photograph of a nice Rybo sportfish. I framed it out and "cold-molded" the slight tumblehome sides with plywood, light glass over the plywood, faired it out, added the lower rubrail, veneered the "transom" with teak...looks great. Two cabinets under each side with drawers. Will be awlgripping the sides and back white or fighting lady yellow (since this thing will inside my house, i have to negotiate the color with my bride)
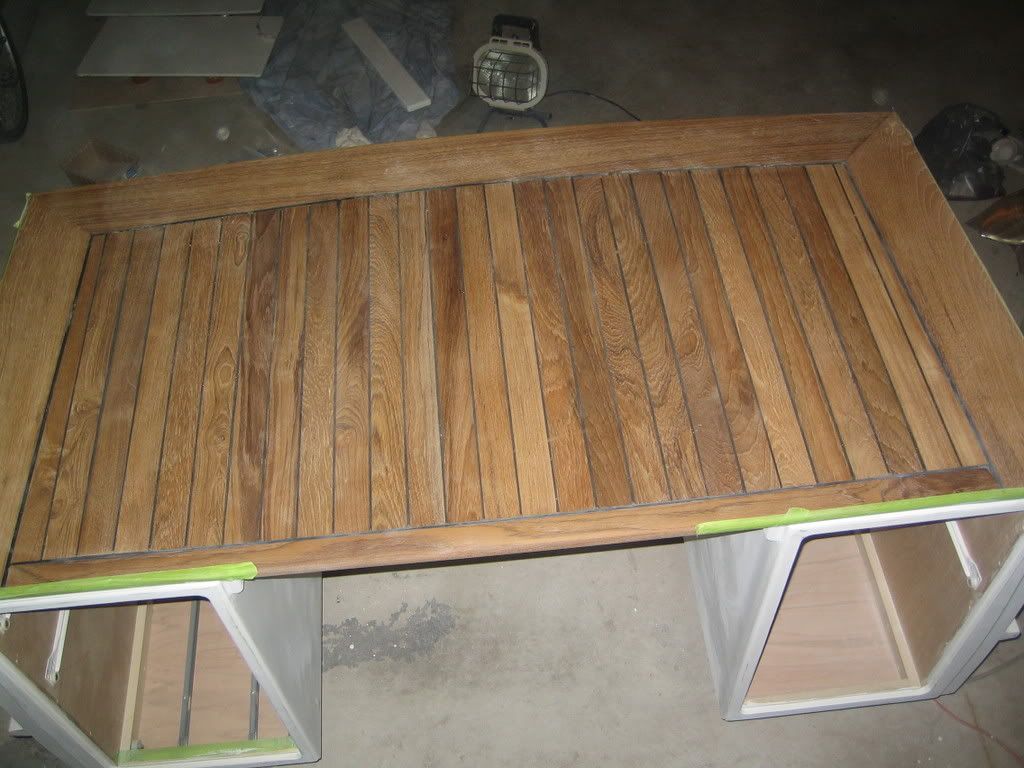
Now, i need to make the desktop. I want to make the top look like the cockpit with 6"wide coverboards around the edges and then 1 7/8" teak strips accross the middle to mimic the look of a teak deck.
Here's my question....since i will be using this "deck" as a desktop, i would prefer not to use the standard black caulk in the seams because it is somewhat soft...and since i will be writing on this thing, i'd rather use epoxy (west system or??) with graphite powder to fill the seams. Theoretically, this will make a nice hard, smooth surface that can be finished with some low gloss tung oil and polyurethane. However...i'm somwhat concerned that teak might expand and contract causing the hard epoxy seams to crack. Not that this desk will really be subjected to the outdoor elements, but in the summer, the sun coming through an open window could cause it to warm and expand slightly and i'd hate to see my desktop crack apart.
...am i worried about nothing here? If i were to use 1/16 teak laminate on top of 3/4 plywood for the 1/16 "decking" would that reduce or increase the expansion/contraction issues?
...like i said, nothin to do with Bertrams, but if anyone will have some insight into this problem, it will be one of you guys!
Thanks
Joe Fanelli
484-254-0293
Expansion/contraction of teak or mohagany
Moderators: CaptPatrick, mike ohlstein, Bruce

-
John Jackson

- Senior Member
- Posts: 161
- Joined: Jul 19th, '06, 22:39
- Location: Point Pleasant Beach, NJ
Joe, I have no idea how much teak expands or does not. My guess is that it does not because my boat’s teak hatches don’t seem to change their fit whether dry or soaked. I think that the wood has a very high oil content that makes it pretty impervious, which is why I think it lasts so long in the marine environment. When I took apart my 45 year old boat none of the teak parts had any rot at all and I was able to “recycle†a lot of it. But if the truth be told, I know very little of such matters.
By the way, your idea sounds ridiculous and absurdly overambitious. You will fit in very well here.
Seriously, it sounds like a really cool idea and I look forward to seeing the post of the finished product. Please post pictures of your progress. JJJ
By the way, your idea sounds ridiculous and absurdly overambitious. You will fit in very well here.
Seriously, it sounds like a really cool idea and I look forward to seeing the post of the finished product. Please post pictures of your progress. JJJ
-
John Jackson
- Senior Member
- Posts: 161
- Joined: Jul 19th, '06, 22:39
- Location: Point Pleasant Beach, NJ
And another thing-
I have both types of seams on my boat. In the cabin I used ¼ inch teak strips and filled the seams with epoxy with graphite to make it black. I followed the instructions on Capt. Patrick’s "how to" page for building a teak deck. If I recall, the West System manual gives similar instructions. This teak is laminated over ½ marine plywood with epoxy with adhesive filler and then clear epoxy on the underside to seal it. Never had an expansion issue. The outside deck was made by the boat yard and is ¾ marine plywood with ½ teak laminated to it with epoxy, back side sealed with epoxy. The seams are two part black rubber caulk. This part of the deck also never had an expansion problem.
From watching about five such decks made with the rubber caulk, it is almost impossible to not have air bubbles that leave voids in the seams, some very small, some not so small. I have yet to see a deck without these imperfections in the seams on any brand of boat. Having struggled with getting the bubbles out I make it a point to look closely at them when I go on another boat. You don’t notice them while standing on the deck unless you really look, but a desk surface is only about a foot and a half from your nose.With the epoxy “caulk†lines I also got bubbles and voids, but they are easy to go back over and fill in with new epoxy. When you sand it out, the epoxy can be sanded to the exact height of the wood; not so easy with the rubber. You could also paint the epoxy seams if you couldn’t match the filled areas exactly. Good luck
i would suggest you do what you want and put a sheet of glass over it..
I would suggest one of the following methods:You could also paint the epoxy seams
1) Combine those two suggestions. Use a sheet of teak or mahogany veneer over plywood for the desk top. Then, mask off and paint the "caulk" lines on the veneer. Actually having teak boards with caulking will not add any functionality. As you point out it may in fact reduce the desk's life cycle through expansion/contraction/drying et cetera.
2) If you really want to save some time and effort use the faux "teak and holly sole" material that is glued directly on the deck. Glue this directly to the plywood sheet. Take a look at this product as an example- http://www.flexiteek.no/. It seems this is the simplest way forward. If it were me, I would use this stuff.
Since you will have the glass over the "teak", no one will ever know either way.
ah...thanks guys..
thanks all...
i had a chat with an old dude over at the local woodcraft shop. Like Randall, he suggested using dark wood to mimic the seams.
And like John, he thought the idea of using thin teak veneers epoxied to plywood would do the trick. Plywood appaently does not have the expansion issues of solid hardwoods. ...and even though this desk is cold-molded, fiberglassed, painted with awlgrip, "protected" with stainless steel rubrails, has the rot-proof capt pat PVC panels as doors on the cabinets and has solid teak deck/top...it will NOT actually be subjected to salt-water (the old dude had to keep reminding me of this as we chatted).
So for now, considering everyones much appreciated input, i will take the following approach...i will use marine plywood base, then laminate the 1 7/8" teak strips to it with blackened epoxy (per west system's instructions). The teak venners will be 1/16" thick and if i can find ebony or other near-black wood to mimic the 3/16 caulk line, i will torture myself and laminate them in...if not, i will use west system black epoxy. The "coverboards" will be solid teak, planed to the same thickness of the "deck"...and all along the inside edge (where the coverboards, meet the deck) will use the rubber caulk, as this will allow for the small amount (if any really) of expansion that may or may not occur.
I'll take a few photos to share with you guys.
thanks
Joe

Very cool idea Joe... I've been wanting to do something like that for a while now. Aftco makes a product called the "transom desk". Same idea, but I think there is no cockpit area, the whole desktop seems to be varnished teak coverboards ( http://www.marlinmag.com/article.jsp?ID=16267 )

jspiezio, I like your idea of using a single sheet of teak veneer & masking out the 'caulk lines' and painting them on. Much less labor intensive & same end results.
Either way, it's gonna be sweet. Any rodholders or stainless/chrome 'jewelry'
going on the coverboards??
jspiezio, I like your idea of using a single sheet of teak veneer & masking out the 'caulk lines' and painting them on. Much less labor intensive & same end results.
Either way, it's gonna be sweet. Any rodholders or stainless/chrome 'jewelry'
going on the coverboards??
ahhhhhh
Buju...where the hell were you with this post back in October when i started this whole project! Didn't know i could just buy one!
...well, i got a look at that one from aftco on their website...same basic idea, but it doesn't look exactly right.
I'll take some pictures of it as soon as the top is completed. Maybe i can get some opinions on paint color for the sides. I got the awlgrip color card the other day...that doesn't really help because there are so many choices, its hard to pick...i wish they made awgrip in 3 colors...white, offwhite and cream white...that would make my choice easier...and my wife wouldn't be so nervous about a "seafoam" green desk in her house...(Jimmy G...no offense...i love the seafoam green)
Joe
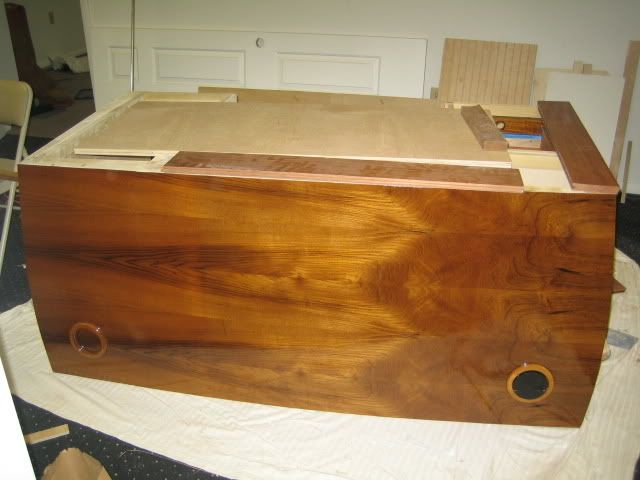
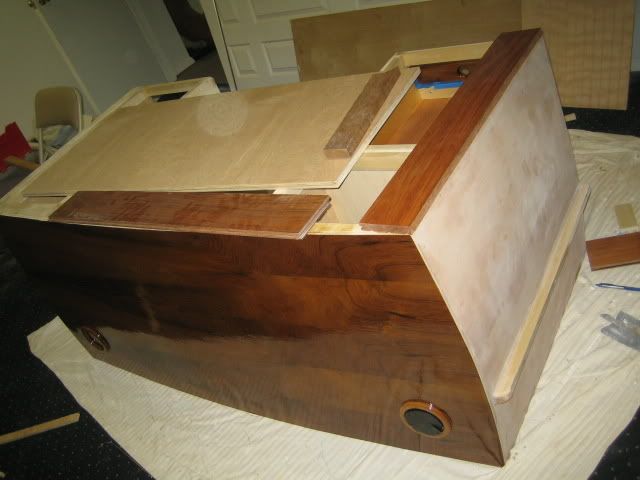
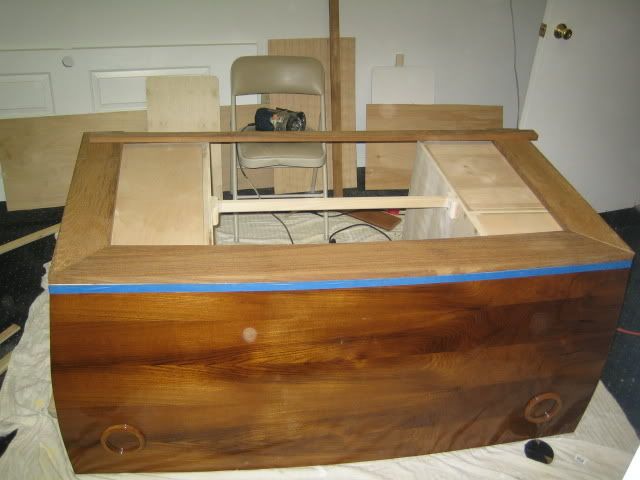
progress so far
well, since you've all been helpful, i'd like to add you all to the board of directors for this project.
Invested some time (wife calls it "wasting" time) on the desk tonight. The problem with teak is that its so darn expensive that i'm actually afraid to cut it. So, i'm "strategizing" right now on the layout of the teak coverboards.
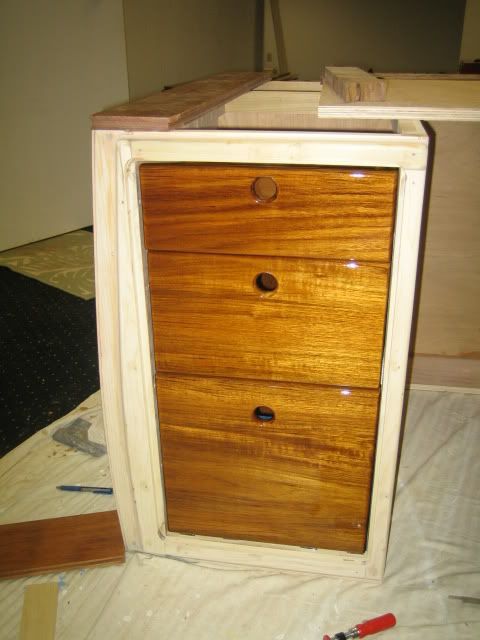
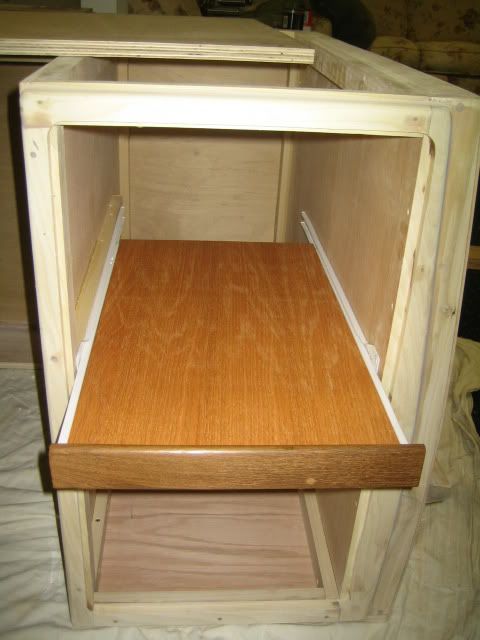
I took a few photos of progress so far. As you can see its framed out, glassed and faired. I've got the teak veneers on the transom and have completed the drawers. i've got a few initial coats of varnish on the teak parts. Will work on the top this weekend. Then off to get some paint on this thing. Paint will be the main battle ground with Mrs Fanelli. Ice blue, seafoam green, fighting lady yellow. My wife says WHITE...which would be nice too. I'm gonna need a whole fleet of desks, each with a diffrent color i think.
Will be adding some stainless Hawse pipes to the aft corners on the top. Will add some bling as well as make a nice place to run the wire for my computer monitor. Will also add some LED "underwater" lights to the bottom of the transom (below the water line which will be painted on ) Besides adding additional effort, expense and bling, they will serve a practicle purpose as a nite-light for the office when wired into a photosensitive switch. Struggling what to do with the exhuast ports. I hve some old 3" stainless steel tubes which i could mount in the transom...but i'm really afraid that starts to get rediculous. As you can see i put ablack plug (scrap wood with electircal tape) in one exhuast port and i don[t think it looks bad - someone suggested putting small round black speakers in there - i dont know about that - although it would be fun to record the startup sound of my boat, then make that the startup sound on my computer.
Still lots to do - but will keep yu all posted ...if you want
Joe
Invested some time (wife calls it "wasting" time) on the desk tonight. The problem with teak is that its so darn expensive that i'm actually afraid to cut it. So, i'm "strategizing" right now on the layout of the teak coverboards.
I took a few photos of progress so far. As you can see its framed out, glassed and faired. I've got the teak veneers on the transom and have completed the drawers. i've got a few initial coats of varnish on the teak parts. Will work on the top this weekend. Then off to get some paint on this thing. Paint will be the main battle ground with Mrs Fanelli. Ice blue, seafoam green, fighting lady yellow. My wife says WHITE...which would be nice too. I'm gonna need a whole fleet of desks, each with a diffrent color i think.
Will be adding some stainless Hawse pipes to the aft corners on the top. Will add some bling as well as make a nice place to run the wire for my computer monitor. Will also add some LED "underwater" lights to the bottom of the transom (below the water line which will be painted on ) Besides adding additional effort, expense and bling, they will serve a practicle purpose as a nite-light for the office when wired into a photosensitive switch. Struggling what to do with the exhuast ports. I hve some old 3" stainless steel tubes which i could mount in the transom...but i'm really afraid that starts to get rediculous. As you can see i put ablack plug (scrap wood with electircal tape) in one exhuast port and i don[t think it looks bad - someone suggested putting small round black speakers in there - i dont know about that - although it would be fun to record the startup sound of my boat, then make that the startup sound on my computer.
Still lots to do - but will keep yu all posted ...if you want
Joe

That is fantastic - you are certifiable, which I like. Thanks for sharing your project.
There is no question that speakers in the exhaust pipe are a requirement. Just think how easy it would be to swap motors. One day Cummins, another Yannies, another a good ol' big block gasser.
Keep the pics coming as you progress, you also require a "bait prep station" for ice and whiskey - it is a home office, right?

cover boards on -
Just quick update...cover boards have been roughed into place - and i've found a source for the 1 7/8" wide "deck" boards.
Question about paint. ...the battle with Mrs fanelli is nearly over. We've eliminated all color options except White and Fighting lady yellow (FLY) and ice blue (IB) . ...however, FLY & IB is only still an option because i promised i wouldn't paint the desk either of those colors.
...so - i am going to prime the paintable surfaces with 2 part epoxy primer. Then sand/ fair as recommended by the Mfg. When it comes to the paint...well - this is my weak spot. I used to live in CT and had a "guy" who would spray my projects in-bewteen his regular jobs. By, here in PA - i don[t have "a guy". I've been reading the instructions for Interlux Perfection which claims that you can get really good results
with roller and tip/brush. I'm wondering now, if i could try this myself. I don't have spray equipment - and the associated safety gear - from reading the safety sheet on this stuff, its a little scary to do this without serious precautions.
I'd love to save the $$ and do this myself - but after all the effort hat will have gone into this project - i don't want to screw it up right at the end with a crappy paint job. Any of you guys roll and tip any of the 2 part LP paints? Does awlgrip come out OK with the roller if you use the proper reducer?
Joe
-
John Jackson
- Senior Member
- Posts: 161
- Joined: Jul 19th, '06, 22:39
- Location: Point Pleasant Beach, NJ
Interlux Perfection and Awlgrip both roll and tip very well. I have used both products and have been very happy with the results of each. The biggest challenge with the Awlgrip is that it runs. The Interlux will run too. Just use multiple light coats and you will get great results. Also, spend a lot of time sanding the primer.

Awesome job on the desk!!!
Considering your desk probably won't be seeing much salt water, I'd give a 1-part paint a shot. You can always sand it off or test it on the interior parts.
I had good luck painting my rudder shelf areas of my bilge with Interlux Brightsides, it's a 1-part paint and with primer/paint it was and easy roll and tip application. I used ice blue, which is white with a hint of blue and am happy with the results. One tip is to stir well and slowly to keep bubbles down.
Good Luck,
JohnD
Should be fine, linear polyurethanes flow quite nice. The only places it gets "iffy" are large surface areas in the direct sunlight, which is not what you're dealing with by any means. I don't think you'd need a roller either, cut in the edges first with a small (2"angled sash) black china bristle brush and then paint the whole "hull" with a large (3" or 4") black china bristle brush... be sure to work the poly over your substrate a few times to ensure uniformity in the coverage, and to eradicate any possible runs which could happen once you move to the other side.
You could do this with both the prime and topcoat, might want to use two coats of primer, sand it with fine paper and wipe clean with denatured alchol, or acetone before topcoat also... Just be sure the wood grain is sealed, and not absorbing the primer before applying the topcoat. And be SURE to use the brush & roller reducer if Interlux has one for their Perfection... I'm sure they do. The reducer allows the paint to flow and level a bit longer before it begins to cure, meaning- no brush marks.
Also put a box fan in the nearest window blowing outward to avoid the wrath of the bride, even beter if you have a window on either side one fan blowing in fresh air, the other sucking all the v.o.c. laden air out. It's NOT a good buzz.
-
MarkS

- Senior Member
- Posts: 1160
- Joined: Jun 29th, '06, 08:40
- Location: The Frozen Tundra/EX-democratic stronghold Wisconsin
Joef,
I wish I would have seen this when you first posted it. Alloc, which is a laminate flooring, has a click together product called shipsdeck oiled teak. (I think, I sell the stuff, but to much liqour has passed the lips) anyway it looks very authentic. About 20 sq. ft. in a box and you could glue it onto a sheet of plywood for a very ridged, dimensioanlly stable writting surface. I would pour two part epoxy over the top which gives it a smooth, glass clear and very durable finish that is impervious to most liquids, ( I did it to my bar and spill with a vengance) and nothing sticks. Dice games, bottles dropped, forheads banged, reels rebuilt, chrome polished, lots of stuff on that multi use surface, looks like new. You might be able to see it at
www.alloc.com
if not it is on the verge of discontinuation but still availble in limited supply, I just got a couple of boxes for an old job that did an addition.
Food for thought, good luck whatever you decide, looks great so far,
Mark
72 Bertram 25 FBC "Razorsharp" Hull #254-1849
Things of quality have no fear of time.
Bondage to spiritual faith faith to great courage courage to liberty liberty to abundance abundance to complacency to apathy to dependence to bondage
Things of quality have no fear of time.
Bondage to spiritual faith faith to great courage courage to liberty liberty to abundance abundance to complacency to apathy to dependence to bondage
-
CaptPatrick

- Founder/Admin
- Posts: 4161
- Joined: Jun 7th, '06, 14:25
- Location: 834 Scott Dr., LLANO, TX 78643 - 325.248.0809 bertram31@bertram31.com
As in the past, I caution all of you NOT to use acetone as a cleaner in preperation for paint. Denatured alcohol or a proprietary wash solution are the only surface cleaners that should be used....clean with denatured alchol, or acetone...
Acetone has untold impurities in it and can cause several problems, including reduced adhesion & "fish eyes" to name a couple. Acetone is fine for cleaning up equipment, tools, & hands. When using epoxies, (not epoxy primer), use denatured alcohol for the general clean up.
I rarely use a proprietary wash solution because denatured alcohol works beautifully.
Br,
Patrick
Br,
Patrick
Molon labe
Patrick
Molon labe
Funny that I typed that, 'cause I know better...from experience too. Minor fish eye's on a flats skiff which I sprayed with awlgrip. The owner was helping me with it, and after sanding the high build primer I was wiping down the transom area with denatured alcohol, and he was wiping the bow and casting deck...he used acetone, I didn't think too much of it. Sprayed the topcoat, it looked great, came back in the A.M... little fish eyes all over the radius' on the toe rails/fly line rails and right above the rub rail area. Had to sand it back to the primer and respray the topcoat.
Thanks for reminding me of a lesson I should've learned the first time Capt. Pat... I may be spending too much time around v.o.c.'s...need to get out on the bluewater and beat up a couple of sails...
Thanks for reminding me of a lesson I should've learned the first time Capt. Pat... I may be spending too much time around v.o.c.'s...need to get out on the bluewater and beat up a couple of sails...

I've used these paints on quite a few projects they paint up really nice. It might be so much easier to use tham that it would be worth it.JohnD wrote:Awesome job on the desk!!!
Considering your desk probably won't be seeing much salt water, I'd give a 1-part paint a shot. You can always sand it off or test it on the interior parts.
I had good luck painting my rudder shelf areas of my bilge with Interlux Brightsides, it's a 1-part paint and with primer/paint it was and easy roll and tip application. I used ice blue, which is white with a hint of blue and am happy with the results. One tip is to stir well and slowly to keep bubbles down.
Good Luck,
JohnD
Capt Pat- thanks for the tip on acetone. I use to clean everything and I had no idea about that.

Joef,
We used Interlux Perfection on the deck and coaming because we couldn't spray out-doors here and were thrown out of the shed we were promised because a Riva cracked its hull, (not that I'm still upset but I promised I would tell the whole world forever), anyhoo...It looks great from a distance but you will have to be real careful as people will be close by your desk when they see it. Personally, I'd spray.
You've done a great job so far so why stop, why not continue through the mid-section and bow and then do a superstructure, you'd have one helluva good looking boat and you're part way there. In any event, you've got to get yourself a better chair than the one pictured.
Nic
Hull No. 330 1963 SF "Tennessee"
JoeF,
I'm new to the site and hope to make a useable contribution to a beautiful project. It's something that I have, like many others, thought about and wanted to do....but the difference is you are actually near completing....I'm jealous!
How about a teak fighting chair for a seat? Either a purchased chair or one that you create with a "spider" style bottom with 4 or 6 rollers attached to the seat post? Most of the chairs sold have large diameter posts for strength and durability, the post you may want to have on your chair doesn't need to be that massive.....the only fighting may be with the bride!
Good luck with the project and looking forward to seeing the progress.
DoubleJ
Type of sprayer?
Thanks for all the notes. I've made some progress last evening and have the teak decking layed out and rough planed down to thickness...will post a few pictures tonight.
...I always wished i could spray this stuff...there seems to be dozens of types of sprayer....HVLP, airless, etc, etc...and then the spray guns all have different designs and then the whole issue of nozzles... i've alwys been scared off the idea. What is the proper type of equipment used for spraying this stuff?
...and yes - i will get a better chair. A few years ago, i made a teak rocket launcher for my Scopinich fighting chair...so i have the old teak ladder back that originally came with it...will try to find an old fighting chair to re-hab, or make a cool one using the old ladder back.
...anyway - teak work on the top/deck should be done this weekend, and ready to head to the "paint booth" (the tool shed in the back yard) next week. Will post some photos tonight
J
By far, the most efficient ( a concern when spraying pricey products such as linear poly ) and finest finish is going to be acheived by a dedicated, real HVLP system... I regularly use a Capspray 9100 ( 4 stage turbine ), and am amazed at it's efficiency. The published rate of transfer eff. is at 80 to 85%... meaning that 80 to 85% of the material you are applying actually ends up on your substrate. The overspray, and bounceback are so minimal, that it also greatly reduces time spent masking, and covering adjacent areas as well. BUT, if your looking for something just for this project, forget it... they're expensive, you'd have to spray a helluva lot of stuff around the house to justify it. You can also pick up less powerful, and less expensive ( 2 or 3 stage turbine units ) which would work in your scenario, and great for varnishes, lacquers, etc. The thicker the viscosity of the material being sprayed, the more powerful unit you'll need.
Now, there are the HVLP conversion guns for conventional spray eqipment. If you've already got a compressor, I'd think that'd be the route to go. There was discussion, here on the board, about these guns a few months back.
Forget about airless sprayers alltogether. They operate by sucking your material straight into a piston, pressurizing, and feeding it through a high pressure hose. You'll regularly burn through a quart of material just to get the system ready to spray. I believe your looking at 40 to 50% transfer efficiency with a common airless sprayer. They are only for high volume, high production ( int & ext residential & commercial structual painting...).
Joe, your best bet, in all honesty would be to either apply the product via brush ( dont forget the brush/roller reducer/retarder ). Or, just look in the yellow pages, or go to your local Sherwin Williams, or independant Benjamin Moore dealer, and ask them to recommend a painting contractor who is skilled with fine finishing on a HVLP system. It really shouldn't cost you that much. What do you have, maybe 20 square feet?
slow but sure progress
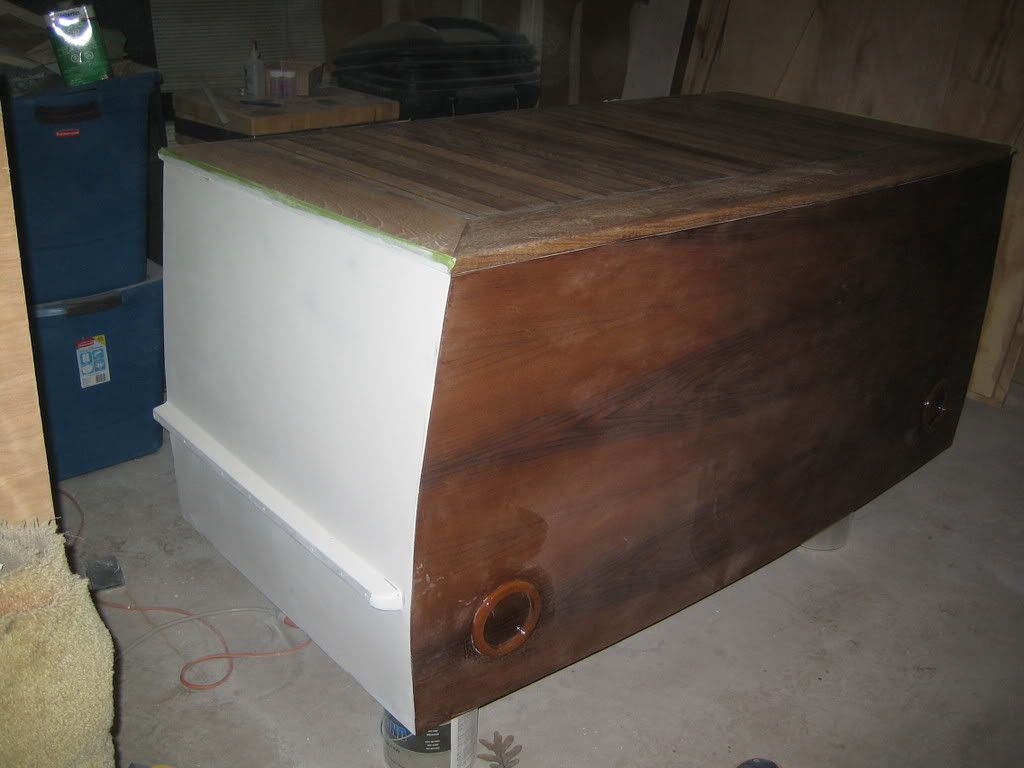
Men - progress is slow...since all of this work had been getting done in my basement after work, my wife has been a little "sensitive" about running sanders and routers while the baby is sleeping...which is all the time after 8pm. I have now moved the basecamp to my shed - and have made some good progress...the top is done. I used the west system marine epoxy betweeen the deck boards and regular rubber teak deck caulk all around the coverboards. I actually bought some rough teak decking...and then had to buy a planer to get the rough boards uniform...my wife especially liked when i ran the planer. I did all of the belt sanding, the randon sanding down to 150grit on the "deck" ...and it looks awesome.
As you can also see - i've got 2 coats of interlux 2-part primer and its all sanded down to 220grit, ready for paint. I have decided to spray this desk, as there would be a LOT of brush work around the doors and especially under the desk. I purchased an HVLP sprayer and a good respirator (almost cost as much as the sprayer ...and have been reading the instructions and safety warnings...i have a plan - and hope i can shoot the desk in the next few days. Some good news on paint color...i offically got the greenlight from Mrs. Fanelli to go with Fighting Lady Yellow...so that is the paint sitting in my garage right now - awaiting its trip from the can to the surface of my desk. For anyone thinking of using these 2 part paints...the fumes really are serious stuff...i imagine you could easioy kill yourself with a few deep breathes of the stuff.
The stainless steel rubrail caps are cut to size and can be installed as soon as the paint dries. I need to order the rubrail for along the top...want to use small white vynl with Stainless cap. I purchased the LED "underwater" lights (will act as a nightlight in the office)...went with warm white ...i made my best argument to my wife for blue or green...she really doesn't care if the colored lights draw more bait...it was white or nothing. I will order the rest of the bling when the paint is on.
I was really hoping to be done by now...but between the baby, the noise, trying to get my actual boat ready for the water and my day job, this is taking much longer than it thought ...lots of dust from the sanding - which is just finished tonight...gonna get it all cleaned, de-dusted, shed swept and sprayed down and will get that paint on asap
Love the desktop... Very, very cool. Uneven writing surface though??
You must have went with a inexpensive HVLP sprayer if your respirator cost nearly as much, unless you bought a $1500 respirator :shock: ... Are you sure it'll spray your Awlgrip, or Perfection??? What unit did you get?
A honest word of caution Joe, it is much, much easier to screw up a paint job with a sprayer than with a brush. My advice is to practice and practice with the HVLP until your really comfortable with it. Most imprtant thing is to keep your hand moving. Begin to pan your hand/spray gun before you depress that trigger...most common mistake I've seen is people depress the trigger, then begin to move their hand, which leads to uneven coverage, sags, runs, drips, etc. If you've already sprayed the primer, then you have an good idea, but the topcoat will behave differently.
Not trying to be negative by any means, just hoping to help you prevent any potential mistakes... I like what you're doing, and am lookin forward to see it done in it's full glory.
desk..
thanks for the thoughts.
About the writing surface...it is actually very smooth. I used the expoxy instead of the rubber seam compund fo this very reason. The rubber seam compound goes around the edges to allow for some expansion and contraction. I had to do a fair amount of touchup on lowspots and airbubbles that formed in the expoxy, but i actually tested it out with some plain white paper and a ball point pen...the texture of the wood shows up more than the seams. Once the painting is done, i'll do a final sanding with 220 grit and finish with a few coats of wipe-on satin poly for protection. I will also be paiting on a dark blue glossy boot stripe and then a flatted enamel of a slightly lighter shade of blue to mimic bottom paint.
Yes - there will be a name on the desk...named after my boat STONDOOF. ...i am borrowing that name from my great uncle who built the original stondoof out of steam bent lumber...did it with some friends on the beach in Coney Island in 1938...just in time for the big hurricane to come in and destroy it. My uncle was killed a few days after D-day in 1944 on his way to liberate Paris... was buried in France...which prevented him from rebuilding the boat. But his brother (my grandfather) hung on to the orginal name plate for all these years. ...so from now on, all my boats will be named after that one...including this desk.
...yeah - i know i need some practice with the sprayer...i actually rolled the primer on - which is what inspired me to want to spray it. doing the sides was actually quite easy and very fast...roll, then tip - perfect. But brushing around the doors and then under the desk, which has some tricky spots was tough...i always got drips and runs and had hours of sanding to correct...and plenty of that work is done while laying on my back while the dust landed on my face. I have an old peice of fiberglass panel that i will use in a full 'dress rehersal" before i turn the gun on my desk. Thanks for the advise on keeping my hand moving... if the dress rehersal goes badly, i may go back to plan A.
Looking foreward to finishing at this point. I started this project last september...told my wife i'd be done in 4 months. ..i'm up to about 9 months now...which i guess is about right.
Will kepp you posted.
Joe
Joe, The guys who painted my boat do alot of spraring and are really good. We had a hard time getting the final deck coat done because of the dust in the shop. After the third time of sanding it off and trying again, I sent it to a bodyshop and picked it up the next day, looking perfect. That desk would fit on a trailer...Unless, the do-it-yourself part of the project is as important as the outcome - which is totally justifiable if it is.
THE DUST!
Interesting you mentioned the dust. I was in the shed tonight wiping down all of th parts with the proper solvents...at first i used paper towels, then cotton t-shirts that were dark grey...the grey helped me see where there was still white dust from the primer...and i just can't seem to get it all. I'm half tempted to take it out on the driveway and gently take a hose to it...then hose out my shed before i start painting.
...or - call Dominic...my local body shop guy...take my paint over to him, put the desk on my dad's pickup truck and 'get er done"
...now that you mention it...thats a pretty good idea. i'm gonna call Dominic tomorrow -just see what he says.
...or - call Dominic...my local body shop guy...take my paint over to him, put the desk on my dad's pickup truck and 'get er done"
...now that you mention it...thats a pretty good idea. i'm gonna call Dominic tomorrow -just see what he says.
Joe,
Sorry, I missed that you had done the "deck" with epoxy, just saw the rubber caulk mentioned...
By all means, feel free to put a quart of water into your HVLP cup and spray the whole shed floor with a mist, then take a damp rag to the desk sides... it'll get the dust off. Just be sure to follow that with a denatured alcohol dampened rag to get rid of that water on the desk.
Better to just spray the shed floor with water, and wipe the desk with alcohol.
Also not a bad idea to put a box fan blowing outward in the shed door...
also, if you're wiping the freshly sanded primer with their recommended reducer/thinner/cleaner ( probably Interlux 2333N ?? ) ... just because you're getting white on your grey rags doesn't neccessarily mean it's dust. The solvent will soften the porous surface of the sanded epoxy primer... could be removing the very top of the non-fully-cured primer film.
Who is online
Users browsing this forum: Bing [Bot], Google [Bot] and 355 guests