Hey Guys
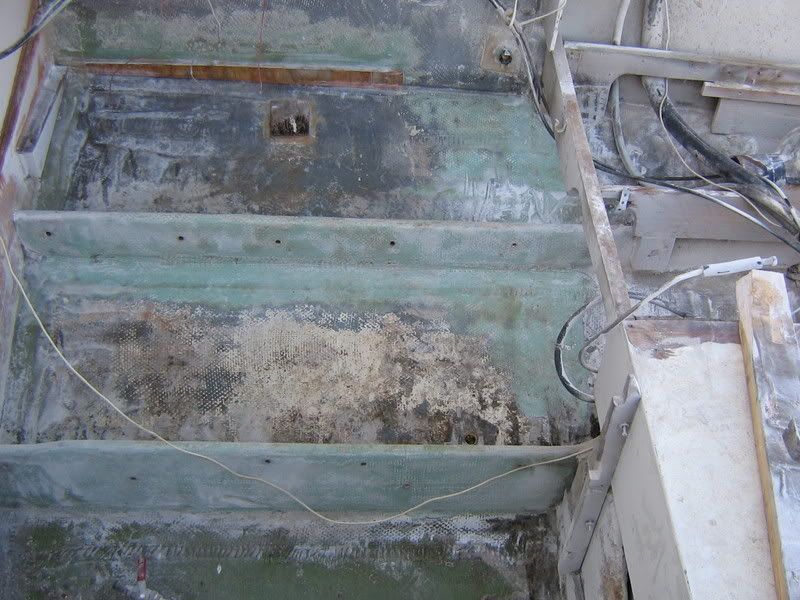
If you don't mind take a look at the attached photo.......its a shot of the Starboard engine compartment. If you notice in the center of the pic near the chine there is a piece of plywood glued to the hull. There were 2 of them. The second one was aft about 18 inches and a 4 or 6" toward the keel. If you look close you can see where I ground it off flush with the hull.
I first thought that it a patch but the fiberglass hull does not show any evidence at all that a hole had been drilled and then repaired.
What is it or what was it??? I am pretty sure that it is original. It smelled like the Bertram Fir Plywood. The piece of plywood did not have any holes drilled.
Harry
[img][img]http://i147.photobucket.com/albums/r289 ... G_1881.jpg[/img][/img]
Whats this????????????
Moderators: CaptPatrick, mike ohlstein, Bruce
-
Harry Babb

- Senior Member
- Posts: 2354
- Joined: Jun 30th, '06, 21:45
- Location: Fairhope Al
- Contact:

Something to do with a piece of equipment on a shelf above maybe? If it were a repair there would be no point sticking plywood over it. A base for something...glued? Ready to fit thru hull fittings, sea-cocks that never happened? Interesting to speculate....but just get rid of it all.
You've got the lovely milky green colour early fibreglass. Go Harry, Go!
Nic
You've got the lovely milky green colour early fibreglass. Go Harry, Go!
Nic
Hull No. 330 1963 SF "Tennessee"


-
CaptPatrick

- Founder/Admin
- Posts: 4161
- Joined: Jun 7th, '06, 14:25
- Location: 834 Scott Dr., LLANO, TX 78643 - 325.248.0809 bertram31@bertram31.com
Harry,
They're just dead wood blocks & you'll find them scattered throughout the boat wherever Bertram thought they might need a place to screw something down...
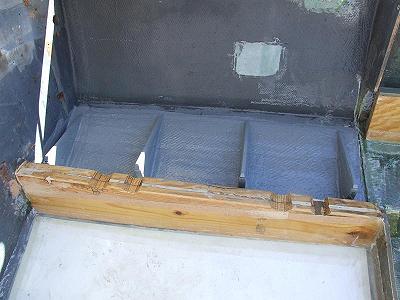
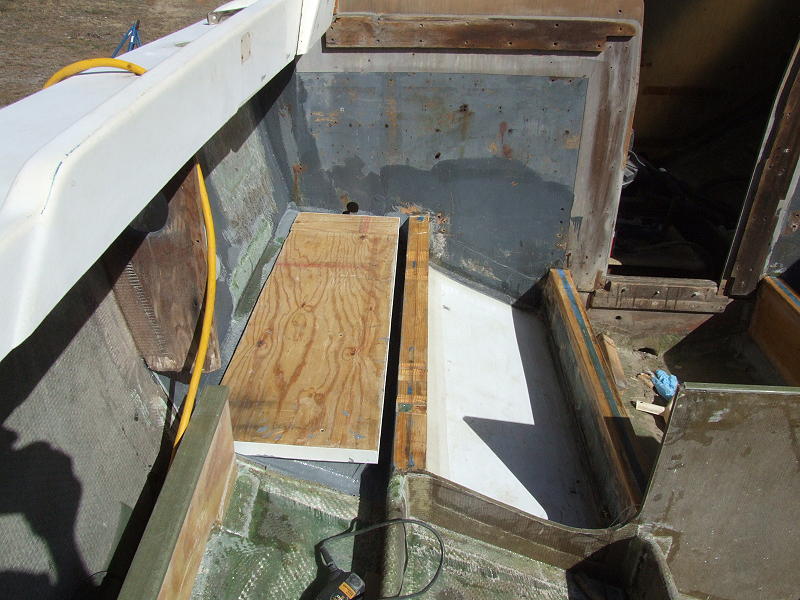
On another topic, be sure you build your outboard shelves so that the finished top surface is no higher than the indentation of the chine. This will maximize the height space below your air box installation. Below is the configuration of the shelves on Patrick Hancock's boat. Click on the images for larger image.
Both the shelves & hull surface below the engines have been laminated with the FRP sheeting that is sold at home improvement centers for showers. (I call it "instant fairing".) The lamination is done with thickened epoxy & the sections under the engines are also tabbed. The plywood shelves are fully epoxy coated & edges are trimmed with the FRP. Supports are epoxyed & tabbed to the hull, shelves are epoxied & screwed to the supports. Shelves are tabbed to the hull before laminating the FRP top.
When using the FRP as a facing, sand down the pebbled surface by about 50% with 80 grit & laminate that face down.
The notches in the engine beds correspond with the engine ramps and filled with thickened epoxy, prior to adding the channel caps, for added holding power of the lag bolts.
The limber holes in the space below the engines were closed off to contain any oil spill & prevent entry in the common bilge space. (USCG requirement.)
Br,
Patrick


They're just dead wood blocks & you'll find them scattered throughout the boat wherever Bertram thought they might need a place to screw something down...
On another topic, be sure you build your outboard shelves so that the finished top surface is no higher than the indentation of the chine. This will maximize the height space below your air box installation. Below is the configuration of the shelves on Patrick Hancock's boat. Click on the images for larger image.
Both the shelves & hull surface below the engines have been laminated with the FRP sheeting that is sold at home improvement centers for showers. (I call it "instant fairing".) The lamination is done with thickened epoxy & the sections under the engines are also tabbed. The plywood shelves are fully epoxy coated & edges are trimmed with the FRP. Supports are epoxyed & tabbed to the hull, shelves are epoxied & screwed to the supports. Shelves are tabbed to the hull before laminating the FRP top.
When using the FRP as a facing, sand down the pebbled surface by about 50% with 80 grit & laminate that face down.
The notches in the engine beds correspond with the engine ramps and filled with thickened epoxy, prior to adding the channel caps, for added holding power of the lag bolts.
The limber holes in the space below the engines were closed off to contain any oil spill & prevent entry in the common bilge space. (USCG requirement.)
Br,
Patrick


Br,
Patrick
Molon labe
Patrick
Molon labe

-
Harry Babb
- Senior Member
- Posts: 2354
- Joined: Jun 30th, '06, 21:45
- Location: Fairhope Al
- Contact:
Well its like this.....DeNada is outside and it rained like crazy here this afternoon.......
THEN
My daughter and I went on our 27th annual Father/Daughter Christmas shopping trip......tomorrow afternoon will be spent with my lovely wife
THEN
I may be able to sneak in some grinding time on Saturday before a Saturday evening Christmas Party......Sunday and Monday and Tuesday are out...........BUT come December 26th I will be getting back on the grinder and the mistery blocks will be completely ground away as well as the puddy on the Port Engine Stringers
UNLESS
Someone sneaks in grabs my grinder and does all of the grinding before I I get a chance to finish
Then I woke up and reality set in..............I have no friends at least until DeNada splashes again Ha Ha LOL
Harry
THEN
My daughter and I went on our 27th annual Father/Daughter Christmas shopping trip......tomorrow afternoon will be spent with my lovely wife
THEN
I may be able to sneak in some grinding time on Saturday before a Saturday evening Christmas Party......Sunday and Monday and Tuesday are out...........BUT come December 26th I will be getting back on the grinder and the mistery blocks will be completely ground away as well as the puddy on the Port Engine Stringers
UNLESS
Someone sneaks in grabs my grinder and does all of the grinding before I I get a chance to finish
Then I woke up and reality set in..............I have no friends at least until DeNada splashes again Ha Ha LOL
Harry
hb

Harry,
Just like I tell Timmy if I'm in the area put me to work. Having been there and scratched like a mad man because of it I can only help that the elves show up during the holiday and deliver to you the most magical of presents. The dust free 40 grit grinder. If said elves should choose to desert you then the best I can wish is many more Tyvek suites.
Just like I tell Timmy if I'm in the area put me to work. Having been there and scratched like a mad man because of it I can only help that the elves show up during the holiday and deliver to you the most magical of presents. The dust free 40 grit grinder. If said elves should choose to desert you then the best I can wish is many more Tyvek suites.
KR
JP
1977 RLDT "CHIMERA"
JP
1977 RLDT "CHIMERA"
-
Harry Babb
- Senior Member
- Posts: 2354
- Joined: Jun 30th, '06, 21:45
- Location: Fairhope Al
- Contact:
JP
I have the grinding itch pretty much under control. I put on a Tyvek suit, 2 head socks, goggles, respirator, kitchen long cuff gloves then I put rubberbands around my wrist and ankles.
I did get dust down my collar...........Do they make a Tyvek suit with a hood????
Other than the back of my neck I did not itch at all........believe me the dust was very thick when I finished the Starboard side.
Truth is that I do not want anyone else grinding.............I am afraid that they may do a lot of damage if they don't know when to quit.
Looking forward to Dec 26th
Harry
hb

-
Harry Babb
- Senior Member
- Posts: 2354
- Joined: Jun 30th, '06, 21:45
- Location: Fairhope Al
- Contact:
YIKEEEEEES
Russ I'm to much of a wuss...........don't think I'll ever get to the immune stage.
I have a good friend that has built boats for most of his life. He too dresses in shorts, tee shirt and flip flops.
My friend built me a skiff 20+ years ago and the deal was that I had to wax the mold and do all of the grinding.......following his lead I did not dress for the occasion............he nearly laughed me out of town.....I itched for days afterwards.
Harry
hb


Harry
Masking tape around the collar works. Don't try to pull it off, it will just screw the Tyvek. Cut it at the neck and open. Careful, after several hours of grinding I often thought of cutting my jugular.
Masking tape around the collar works. Don't try to pull it off, it will just screw the Tyvek. Cut it at the neck and open. Careful, after several hours of grinding I often thought of cutting my jugular.
Mikey
3/18/1963 - -31-327 factory hardtop express, the only one left.
The difference between genius and stupidity is that genius has its limits.
-Albert Einstein
3/18/1963 - -31-327 factory hardtop express, the only one left.
The difference between genius and stupidity is that genius has its limits.
-Albert Einstein
Who is online
Users browsing this forum: Google [Bot] and 327 guests