Hey Guys,
Deck is coming out this week. Silly question, but where do I start when removing an original Bertram plywood deck.
Thanks in advance.
JohnV8r
Cockpit Deck Removal - Order of Work
Moderators: CaptPatrick, mike ohlstein, Bruce
-
JohnV8r

- Senior Member
- Posts: 625
- Joined: Jun 29th, '06, 21:59
- Location: Northern California Bay Area
- Contact:
Cockpit Deck Removal - Order of Work
Bertram 31 - The Best Boat Ever Built
-
Tony Meola
- Senior Member
- Posts: 6940
- Joined: Jun 29th, '06, 21:24
- Location: Hillsdale, New Jersey
- Contact:
Re: Cockpit Deck Removal - Order of Work
John
When I did mine years ago, I had to first remove the engine box hinges and side panels. Mine had a small piece of teak screwed in right behind the forward part of the panel. This piece looked like it was there to help hold the deck down. After that just start removing the deck screws. I was able to get mine out without removing the engine box's.
You will need help getting those decisions out. They are not light.
1975 FBC BERG1467-315

Re: Cockpit Deck Removal - Order of Work
I used to have two SS trim pieces going down the center of the two joints. Unscrewed those strips.
Side panels where screwed into...well the sides, through the Teaks trim. Those came up, panels came out and I could reach outer edge of deck.
Pulled the hatches out.
I had a piece of SS trim where motor box hit deck, so had to lift back of boxs up to remove, I'd wedge something under sides to keep back of box raised.
Along the stern edge I had a piece of SS trim that needed to be removed.
At this point all that held deck down was out and I found lifting from hatch area gave enough leverage to break silicone bond to which point it was just put floor where I needed it to be.
Its not light, but it is awkward...I was still able to jockey them around, on the boat, stand on edge to work in an area or put on the dock...if boat on land a little slide over the side. Second set of hands can make it much easier.
Its real simple...remove whatever you think is holding it down and when you can't find anything else, try pulling it our...if still down solid...look again.

Re: Cockpit Deck Removal - Order of Work
John-
Everything Carl and Tony said. In my case, I found it to be much easier with the boxes out of the way. I took the boxes and wing panels next to the boxes out of the boat. It made it way easier. My port side wing panel has my shore power inlet. That had to be disconnected. The starboard side had my raw water washdown--that had to be disconnected to. If your wood deck is like mine was, don't underestimate its weight. Mine was water logged, and a lot heavier than it looked. Good luck.
John
1968 B20 Moppie - Hull # 201-937
1969 B31 FBC - Hull # 315-881 (sold)
1977 B31 FBC - Hull # BERG1652M77J
1969 B31 FBC - Hull # 315-881 (sold)
1977 B31 FBC - Hull # BERG1652M77J
-
JohnV8r
- Senior Member
- Posts: 625
- Joined: Jun 29th, '06, 21:59
- Location: Northern California Bay Area
- Contact:
Re: Cockpit Deck Removal - Order of Work
Funny you should mention the possibility that my deck could be water logged. I already took the teak trim and side panels off. I have always had to contend with water that would pool up on the starboard side of the deck against the teak trim. It was more of an annoyance than anything. I had done several layers of epoxy undercoating with six coats of Epiphanes on the teak trim. I was very surprised to see that the back bottom side of the teak was spongy and rotting. I remember thinking there was ZERO chance water would ever penetrate that trim piece because of the amount of epoxy that was in it. Ironically, the trim piece that helps mount the side panel to the deck is not rotten. It is untreated mahogany. The trim piece may have begun rotting from the inside from moisture trapped in the wood when I did the epoxy undercoat.
I will be interested to see where I have rot on the deck (only know of the areas by the bulkhead at this point).
I will be interested to see where I have rot on the deck (only know of the areas by the bulkhead at this point).
Bertram 31 - The Best Boat Ever Built
-
Tony Meola
- Senior Member
- Posts: 6940
- Joined: Jun 29th, '06, 21:24
- Location: Hillsdale, New Jersey
- Contact:
Re: Cockpit Deck Removal - Order of Work
John
Odds are that the piece under the teak that is attached to the transom is probably soft in spots also. That piece has been replaced twice on my boat. Once in 96 when we put in the new deck and then again in 2008 when she underwent the re-power.
The second time she was coated in glass so hoping it holds up.
1975 FBC BERG1467-315
-
Pete Fallon

- Senior Member
- Posts: 1313
- Joined: Jun 29th, '06, 23:10
- Location: Stuart Fl. and Salem, Ma.
Re: Cockpit Deck Removal - Order of Work
John,
The original factory Bertram deck made of Marine plywood had 2 metal strips running fore and aft and one across the transom. After removing the metal strips there are 4 to 5 slotted bronze wood screws holding the plywood sole in place, also the hinges for the engine boxes should be removed. You have to remove the side panels and stern cleats and the upright teak trim in the aft sections of the side panels at transom. There is a piece of 1"x4" mahogany that runs the length of the cockpit at floor level this holds the side panels to the cockpit sole, they are secured with counter sunk screws to the sole. If the boat has a fighting chair the base plate might have to be removed if it has a backing frame work securing it to the cockpit supports. There is a teak board that has a plywood lip under it at the transom, if the deck is bad chances are the plywood ledger board under the teak is also rotten. To remove the curved transom panel you have to pry it upward at the bottom with a wide chisel with and a piece of wood to keep the teak upright trim from splitting or denting. The panel sits into L brackets that are fastened to the teak trim upright running the width of the cockpit, gently lift the transom panel upward about an 1" then pull it towards you. It has a U shaped board glassed into the underside of the deck at the sides and transom areas, so when you lift up the transom panel it only goes so far, I have found that over time the glassed in U has been broken in spots. There is also a upright board at the forward end of the cockpit panels that the side panels are screwed into and usually a cockpit wash down spigot and the inlet for the 110 volt inlet have to be removed to get the side panels out.
I made my cockpit pieces out of 1" PVC foam core board with battens on the underside to add stiffness, the new side and transom panel supports are made of fiberglass channels from McMaster Carr, make sure you order the transom section longer than the side panels, I think it's 104" long across the transom and it has a slight curve to it. I put 3 layers of 1708 on the bottom of each cockpit panel and I had access to a chop gun for extra stiffness along with the battens. The top of the sole and hatches had 3 layers of 1808 on the top along with some chop glass. I laid the panels up on a flat 5'x 10' table with a glass top, you can also use Formica topped table just make sure it is waxed or use mold release on table top. The lip around each hatch was 1" of laid up glass for the hatches to sit on it came out to be about 3/8" thick, you can add half round PVC pipe for gutters glassed into the lip if you want.
I used white gel coat with a medium sand for non skid on all top surfaces except hatch lip surfaces (just mask off with blue tape). The panels were in the boat for 10 years before I sold her in 2014 with no signs of any problems. The new curved teak piece at the cockpit sole at transom was the biggest hassle of the entire job. You might want to replace the stern cleat backing plates if they are showing any signs of rot or the screw holes are getting worn out while the side panels are off.
The entire job took me about 6 weeks and cost around $2,000.00 not counting my time, that included replacing the rudder tables, cockpit sole supports and running new fuel lines, fill hoses and 2 bilge pumps and hoses along with a new wash down/ live well system and new mufflers and exhaust hoses and tail pieces, plus cleaning and painting all areas under the cockpit. Take your time and do it right and you won't have to do it ever again. Good luck.
Pete Fallon
1961 Express Vizcaya Hull 186 12-13-61
Re: Cockpit Deck Removal - Order of Work
Pete,
What you describe sounds and looks like the checklist before the Columbia lift-off !!
I even wonder how you remember all those details!!
Why is my 28 deck so much easier to take out? Just unscrew the hold down screws and pull it out. For those who don't even have it screwed down, even easier.
What you describe sounds and looks like the checklist before the Columbia lift-off !!
I even wonder how you remember all those details!!
Why is my 28 deck so much easier to take out? Just unscrew the hold down screws and pull it out. For those who don't even have it screwed down, even easier.
1973 B28 FBC/2007 4LHA STP's - "Phantom Duck" - Hull "BER 00794 1172"
-
JohnV8r
- Senior Member
- Posts: 625
- Joined: Jun 29th, '06, 21:59
- Location: Northern California Bay Area
- Contact:
Re: Cockpit Deck Removal - Order of Work
Pete,
Thanks for the detailed response. I appreciate it.
I do have a question about the hatches on the deck. This may sound silly, but did you cut the hatches into the foam prior to laying the first layers of 1708/1808 or did you put some glass down to stiffen it and then cut it? If you cut it prior, did you use a jigsaw to cut the foam? Also, I am going to move the exhaust to create fish boxes/storage. I want to recess the hinges. Should I rout the depth for the hinges into the foam prior to glassing that area of the foam core or rout it after into the glass and reseal?
I was planning on using 1708 on both sides of the deck prior to installing it, then adding a layer of 1.5 oz chopped strand mat after install to cover seams, add thickness, and ease the fairing process. I don't have access to a gun. How did you finish your deck after install prior to gelcoating it? Did you glass over it once it was in? Use a fairing compound in the seams?
Thanks for your help!
JohnV8r
Bertram 31 - The Best Boat Ever Built
-
Pete Fallon
- Senior Member
- Posts: 1313
- Joined: Jun 29th, '06, 23:10
- Location: Stuart Fl. and Salem, Ma.
Re: Cockpit Deck Removal - Order of Work
John,
You can cut the hatches out with a router with a round over bit before any glass work, or a jig saw, I used a router with the round over bit so I didn't have any sharp edges to contend with and it saved a step of rounding the foam over. Just remember to do the hatches last after you have done the big sections of sole with the hatch lips in place, that way you can adjust the hatch sizes with a grinder. As for the recessed hinges your going to have to add a backing plate glassed into the foam, a piece of solid glass scrap or aluminum plate so you can drill and tap them or thru bolt them. The center section of the sole should rest on the cockpit supports that way when you add the bead of silicon it has a place to drop onto, you might have to add a sister piece to make it wide enough to rest on or if your using the fiberglass channel it should be wide enough so the silicon doesn't drop on top of your fuel tank.
The finished sections should have no more than 1/4" gap between the center section and the outside sections, with the edges rounded over, you can build in a lip on the bottom of the center section so the outside pieces rest on that lip, then just run a bead of white silicon into the gaps. You could also get a piece of T shaped aluminum trim to drop into the gap between the sections then silicon them in place, don't use 5200 between sooner or later your going to take the deck up for some kind of project. I did the T shaped trim the first time I put the original wooden sole back in place, I found that the bead of white silicon was easiest and did not get scratched up over time.
You can use all 1708, I just happened to have more 1808 than 1708 on hand.
Yannis,
I have a semi photographic memory plus the 28 cockpit sole is a one piece sole if I remember correctly and it is smaller than a 31. The 28 was designed by Dave Napier in the 70's not Ray Hunt and they were not using Balsa core when the 31's were first built.
Pete Fallon
1961 Express Vizcaya Hull 186 12-13-61
Re: Cockpit Deck Removal - Order of Work
I have a semi photographic memory too!!
...however I have two issues with mine:
-first its Polaroid, so it may not catch all the details and fades.
-second, my filing system lacks so I forget where I stored the photo.
What was the question again?
...however I have two issues with mine:
-first its Polaroid, so it may not catch all the details and fades.
-second, my filing system lacks so I forget where I stored the photo.
What was the question again?
-
Tony Meola
- Senior Member
- Posts: 6940
- Joined: Jun 29th, '06, 21:24
- Location: Hillsdale, New Jersey
- Contact:
Re: Cockpit Deck Removal - Order of Work
Carl wrote:I have a semi photographic memory too!!
...however I have two issues with mine:
-first its Polaroid, so it may not catch all the details and fades.
-second, my filing system lacks so I forget where I stored the photo.
What was the question again?
You just need to purge some files. LOL
1975 FBC BERG1467-315
Re: Cockpit Deck Removal - Order of Work
Tony Meola wrote: You just need to purge some files. LOL
I'll have to give that a try.

Re: Cockpit Deck Removal - Order of Work
Pete,
That's great stuff, thanks!! Has anyone here used Coosa board to fabricate their deck, and if so, what thickness would your recommend? Pete, do you have any pictures of your project?
JR
That's great stuff, thanks!! Has anyone here used Coosa board to fabricate their deck, and if so, what thickness would your recommend? Pete, do you have any pictures of your project?
JR
-
Tony Meola
- Senior Member
- Posts: 6940
- Joined: Jun 29th, '06, 21:24
- Location: Hillsdale, New Jersey
- Contact:
Re: Cockpit Deck Removal - Order of Work
Jack
You need to use 3/4 Coosa. I think Lilco used Coosa.
You need to use 3/4 Coosa. I think Lilco used Coosa.
1975 FBC BERG1467-315
-
JohnV8r
- Senior Member
- Posts: 625
- Joined: Jun 29th, '06, 21:59
- Location: Northern California Bay Area
- Contact:
Re: Cockpit Deck Removal - Order of Work
Guys,
Does this look like the factory deck configuration? This is a shot of the underside of the deck from the port transom hatch looking forward.

I'm having a bitch of time getting the deck up. I have removed all the screws from the deck, and used a Fein multimaster to cut the caulking between the deck pieces. My goal was to remove them semi-intact to use them as a template for the new deck pieces. However, they are not coming up with a pry bar.
You can see from the picture above there is a cut that has been made with a jigsaw inside of the seam, and that did not help release the deck either. I gave it everything I had today in terms of leverage and force and didn't even get a hint of release from the deck.
I tried removing the center piece rather than the port side to see if that might make a difference, but that did not budge either. It's almost like there is 5200 on the cross members holding the deck down.
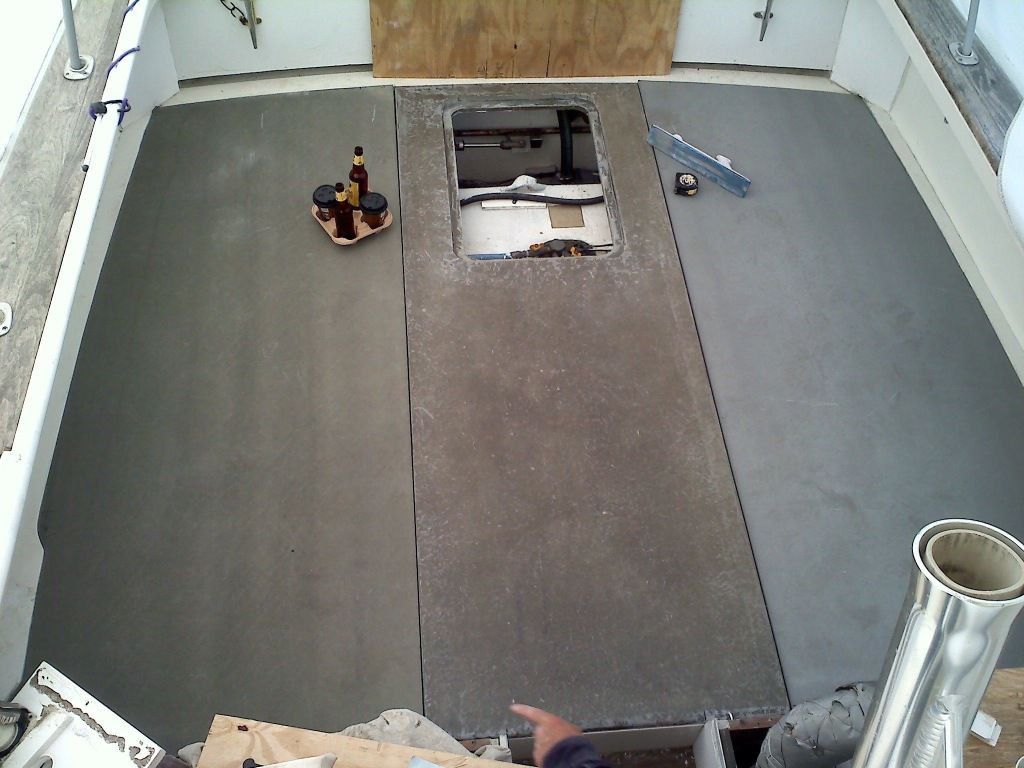
I'm just trying to get some feedback before I revert to more drastic cutting measures. Here's a picture of the deck prepped for removal. The last SS batten was removed just after the photo and that seam was cut too.

Any feedback would be greatly appreciated.
Thanks in advance.
Does this look like the factory deck configuration? This is a shot of the underside of the deck from the port transom hatch looking forward.
I'm having a bitch of time getting the deck up. I have removed all the screws from the deck, and used a Fein multimaster to cut the caulking between the deck pieces. My goal was to remove them semi-intact to use them as a template for the new deck pieces. However, they are not coming up with a pry bar.
You can see from the picture above there is a cut that has been made with a jigsaw inside of the seam, and that did not help release the deck either. I gave it everything I had today in terms of leverage and force and didn't even get a hint of release from the deck.
I tried removing the center piece rather than the port side to see if that might make a difference, but that did not budge either. It's almost like there is 5200 on the cross members holding the deck down.
I'm just trying to get some feedback before I revert to more drastic cutting measures. Here's a picture of the deck prepped for removal. The last SS batten was removed just after the photo and that seam was cut too.
Any feedback would be greatly appreciated.
Thanks in advance.
Bertram 31 - The Best Boat Ever Built
-
Tony Meola
- Senior Member
- Posts: 6940
- Joined: Jun 29th, '06, 21:24
- Location: Hillsdale, New Jersey
- Contact:
Re: Cockpit Deck Removal - Order of Work
Sure looks like it. Does not mean they did not use some type of adhesive. Usually the original deck has to be repaired at done point. I am sure it has been out before. Probably thought if they sealed them it would help prevent rot.
You have an inspection port in yours over the fuel fill port. That is not factory.
Here is a thought, just try cut out a small section are the forward hatch edge. Cut from the hatch to the support running along the fuel tank. If you can't lift that small section out after you cut it then it has been cemented down.
1975 FBC BERG1467-315
Re: Cockpit Deck Removal - Order of Work
John,
I am not at all familiar with the 31, but why don't you try to remove this plastic covering; there may be screws under it that secure the deck to the beams underneath.
I am not at all familiar with the 31, but why don't you try to remove this plastic covering; there may be screws under it that secure the deck to the beams underneath.
1973 B28 FBC/2007 4LHA STP's - "Phantom Duck" - Hull "BER 00794 1172"
Re: Cockpit Deck Removal - Order of Work
Deck layout looks alot like mine did before I changed it.
The deck sits on the mahogany strips to the side of fuel tank, on the ply at the front and along the teak stern piece. If not coming up...I'd think they decided to bed the deck in place instead of just dropping in place and chalking the just the seams.
As you can easily get to front of deck...can you slide a putty knife, or wrecking bar in that seam between deck and top of bulkhead. Work it open all the way across...then the sides moving stern as far as you can go. From there lift front edge or use wedges. My experience has been a long running silicone type bond is almost impossible to just "pull apart" from center lifting directly...but by prying from one side its like tearing the seam open...the further you get the easier it becomes as the angle works to your favor.
Also as you break the front seam...you should determine there are no additional screws holding in place. I doubt that as Nautilex decking material is usually glued then stapled to the underside.
Edit- a second look it appears the material may not be wrapped...so maybe they did screw deck in then lay material over....lift back Nautilex and take a peak, or work that front edge with putty knife...you'll quickly know if your slicing goop or hit a screw.
Re: Cockpit Deck Removal - Order of Work

Working on the same project. I was able to clear all my lines and run a circular saw along the seam between the center third and outside sections. With all the outside screws removed those two pieces just lifted out. I ran the blade horizontal between the deck support and the plywood to cut the screws hidden under the teak. Not sure if this is correct, but the deck is out.
-
JohnV8r
- Senior Member
- Posts: 625
- Joined: Jun 29th, '06, 21:59
- Location: Northern California Bay Area
- Contact:
Re: Cockpit Deck Removal - Order of Work
Thanks Guys! Those are all great suggestions.
Bertram 31 - The Best Boat Ever Built
-
JohnV8r
- Senior Member
- Posts: 625
- Joined: Jun 29th, '06, 21:59
- Location: Northern California Bay Area
- Contact:
Re: Cockpit Deck Removal - Order of Work
Hey Guys,
I just want to thank everyone for the help with this. The deck is finally out. Peeling back ALL the deck vinyl material revealed the screws I didn't expect to find. The other piece that made a HUGE difference was the suggestion to use wedges to create more pressure once I got a section started.
There were a couple of things that surprised me:
1. The silicone used had an incredible amount of strength of bond. More so than I would have expected. I'm not sure mine wasn't 4200 or some other adhesive. I had to cut a hole in the middle of the outboard deck pieces to get a pry bar in to get those sections up.
2. They clearly used two different batches of epoxy and filler to fill the screw holes. 2/3 of the plugs popped right out with a chisel and revealed clean screw heads. The other 1/3 were filled with a thinner mix of epoxy that filled the screw heads. I had to use my Fein Multimaster to cut squares around those screws since I could not back them out.
3. Speaking of screws, they don't make them like they used to. Those cheap SS screws I get at West Marine start to strip with one in & out. I toss them after one trip to avoid problems down the road. Some of the screws I removed looked brand new with no burrs on the head thread after they came out nearly 40 years later.
4. I knew I had some rot, but I was surprised how solid my deck felt given the amount of rot I found in the layers of plys in the wood.
Thanks again for all the help!
JohnV8r
Bertram 31 - The Best Boat Ever Built
-
Tony Meola
- Senior Member
- Posts: 6940
- Joined: Jun 29th, '06, 21:24
- Location: Hillsdale, New Jersey
- Contact:
Re: Cockpit Deck Removal - Order of Work
John
Glad to hear. Sounds like it was sort of easy peasy.
Glad to hear. Sounds like it was sort of easy peasy.
1975 FBC BERG1467-315

Re: Cockpit Deck Removal - Order of Work
i built a entire cockpit out of Coosa 26 in 3/4". good for a 1000 years.

capt.bob lico
bero13010473
bero13010473
Re: Cockpit Deck Removal - Order of Work
this was the inertial fitting then i remove and cut out hatches etc.
capt.bob lico
bero13010473
bero13010473
Who is online
Users browsing this forum: No registered users and 288 guests