
matt aeroquip gives you two choices steel or brass. the brass gets a little green oxide on the outside but they are perfect unless you are one of those anal ones who polish all the brass fittings i would not lose any sleep over them.in my humble opinon even if you never intend to use your boat "for hire" i would do exactlly what bruce did on this installation;
A) the coast guard has quite a bit of experiance in ships that sank aqnd what the malfuntion was. and B) to be honest in my opinon ,if you skimp on your installation it nomally comes back to bite you in the ass at the worst possible time!!!
matt i do not have the packet # for the coast guard regulation but it is on line sombody will give you a link.
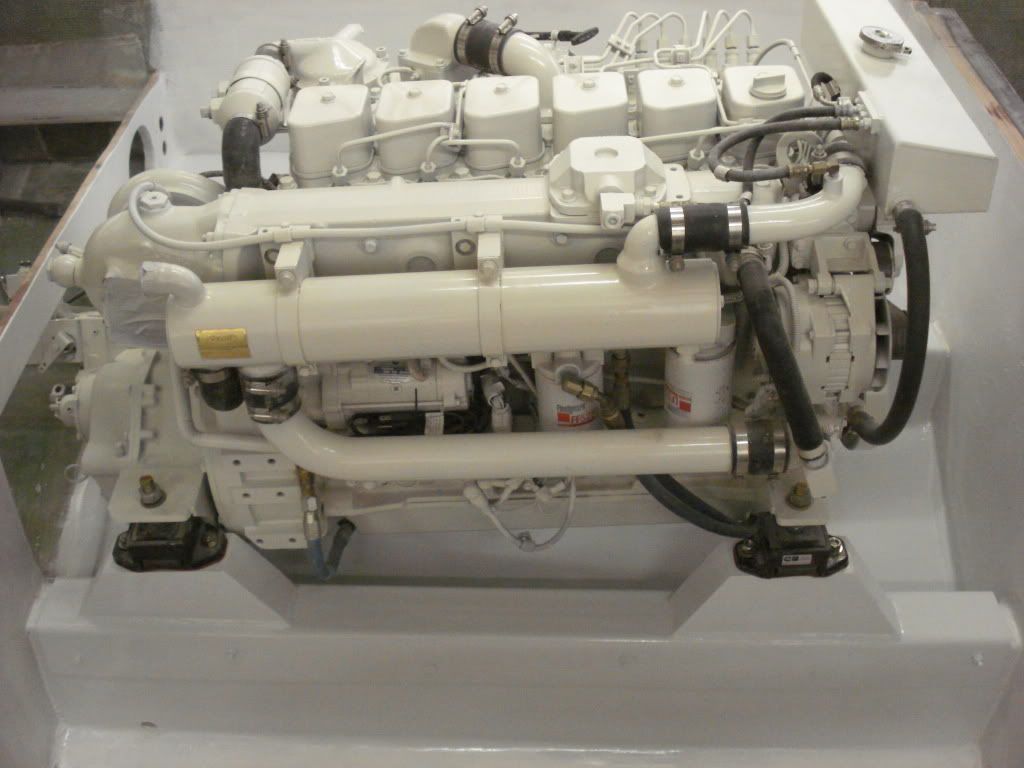
cummins installation
Moderators: CaptPatrick, mike ohlstein, Bruce

Wayne,
Good eye on the cap bolts.
When the caps were installed over the built up stringers they were also epoxied down with a thickened mixture. The front and rear bolts were put in to hold in place till the epoxy set and then 2 more were to be added in between.
This boat was done at an opened boat yard during our rainy season and it rained for a few days. When I returned, the painter had already painted the risers, caps and engine room area and it slipped my mind and I continued with the engine install untill I checked my checklist before the sea trial and noticed they were not there.
Installed then but in reality since the cap and risers were 1/2 material I doubt anything would have moved.

Marlin, I also installed a pair of Cummins 5.9s, could not use any of the factory mounts, I had custom ones fabbed up after hanging the motor in the boat. Build the mounts to meet the ramps/ beds. Have you guys seen the Parker marine fuel line? seems pretty rugged and they have push in fittings good to 250 psi..Once they are pushed in only way to get them out is to cut them...next question how do you change direction of the raw water discharge? Copper heat exchangers right?
1966 31 Bahia Mar #316-512....8 years later..Resolute is now a reality..Builder to Boater..285 hours on the clocks..enjoying every minute..how many days till spring?
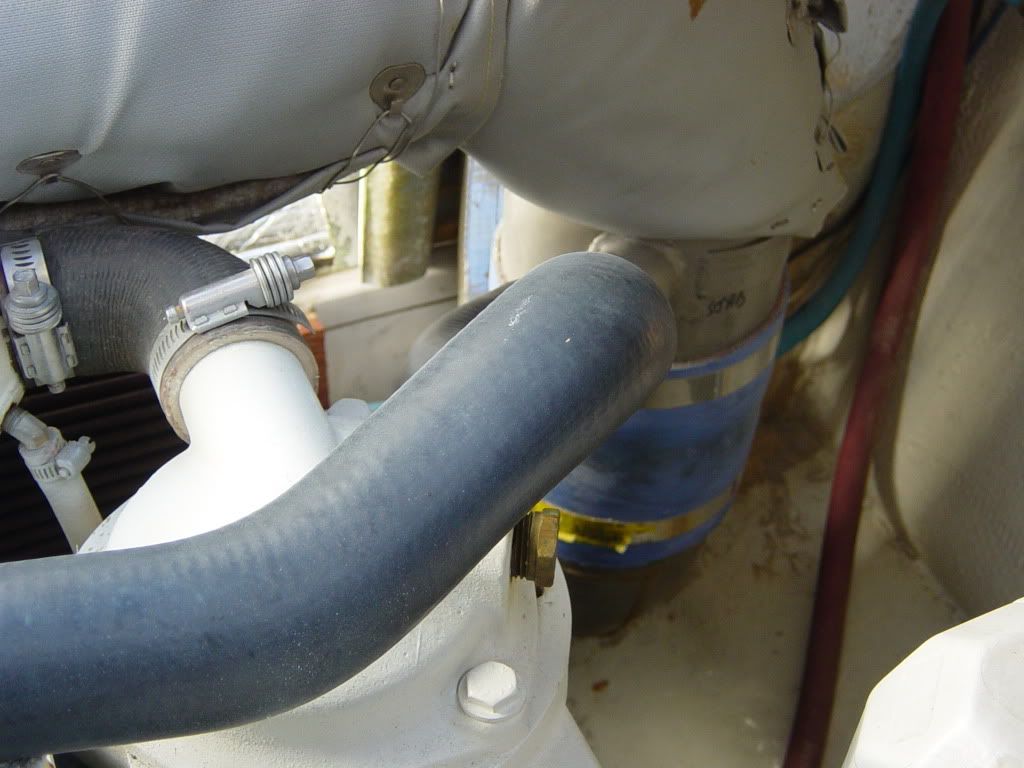
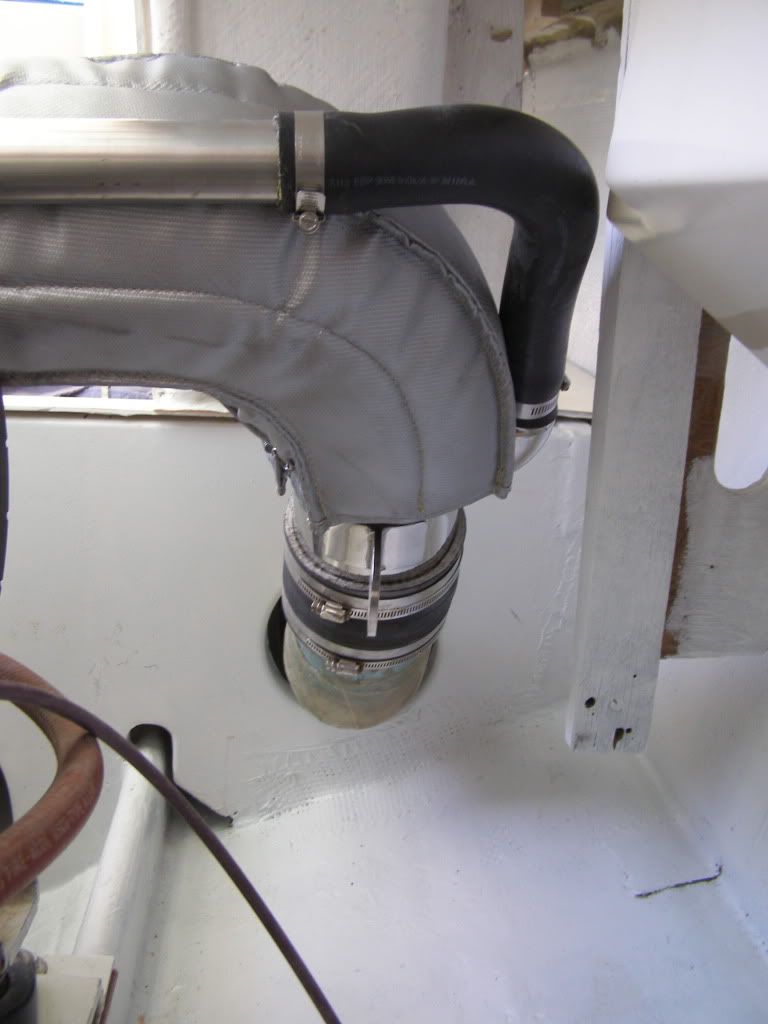
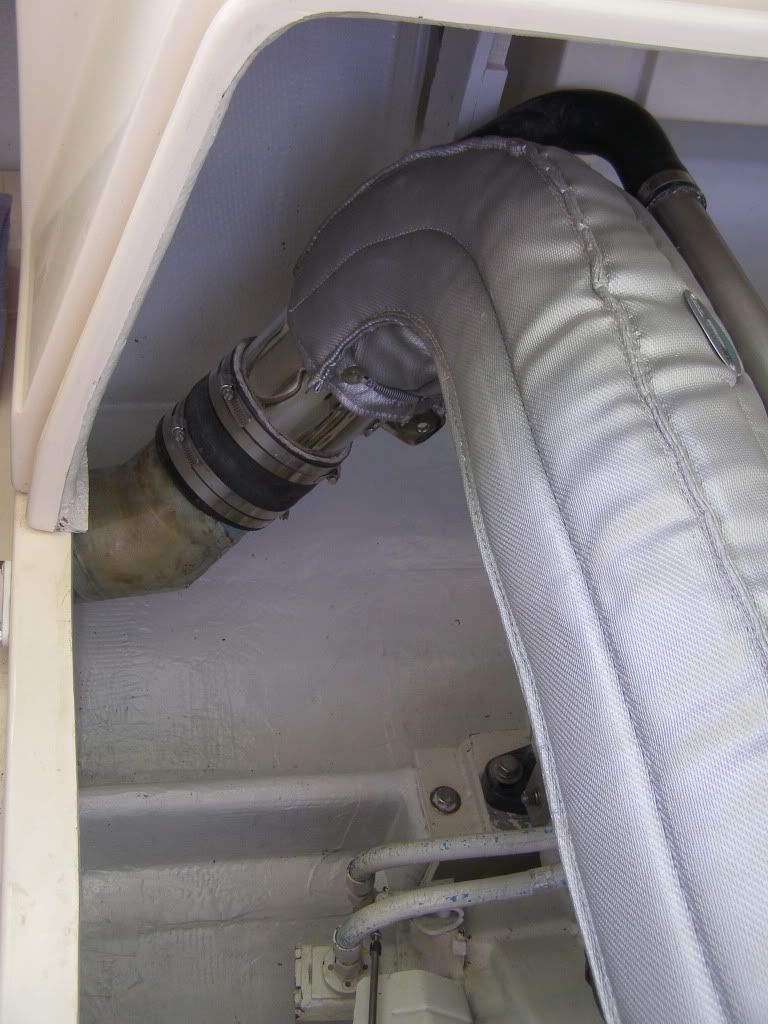
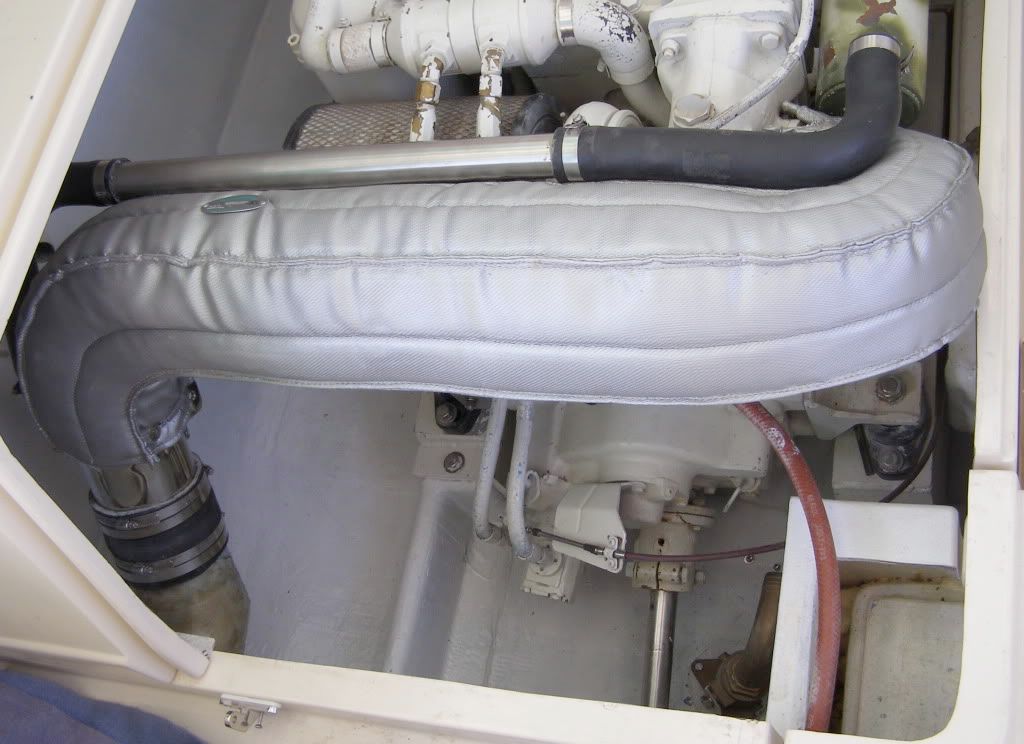
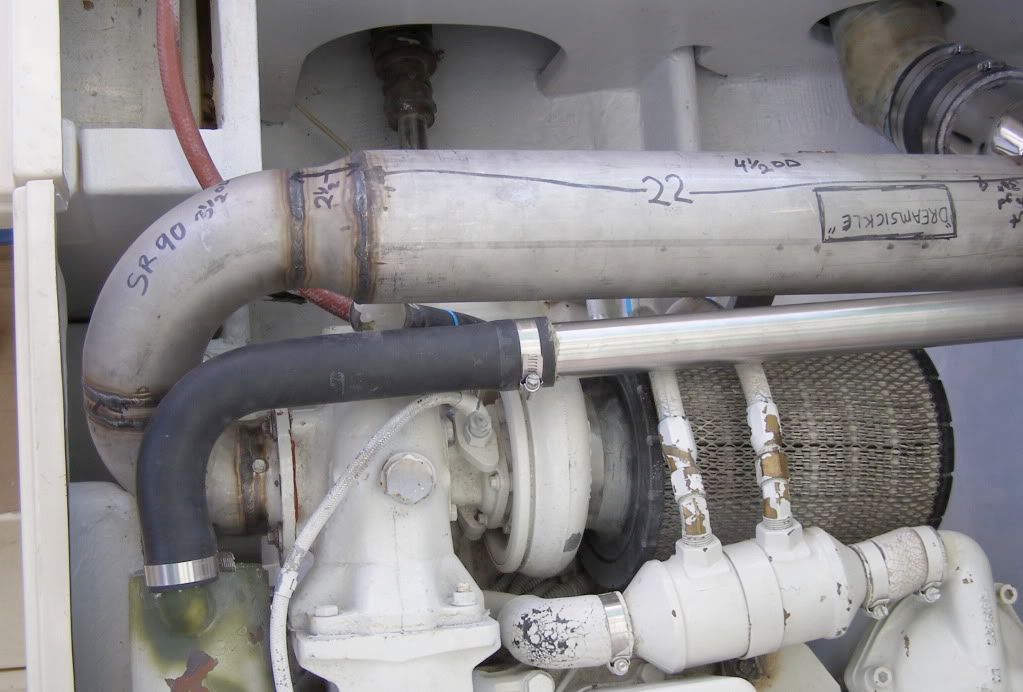
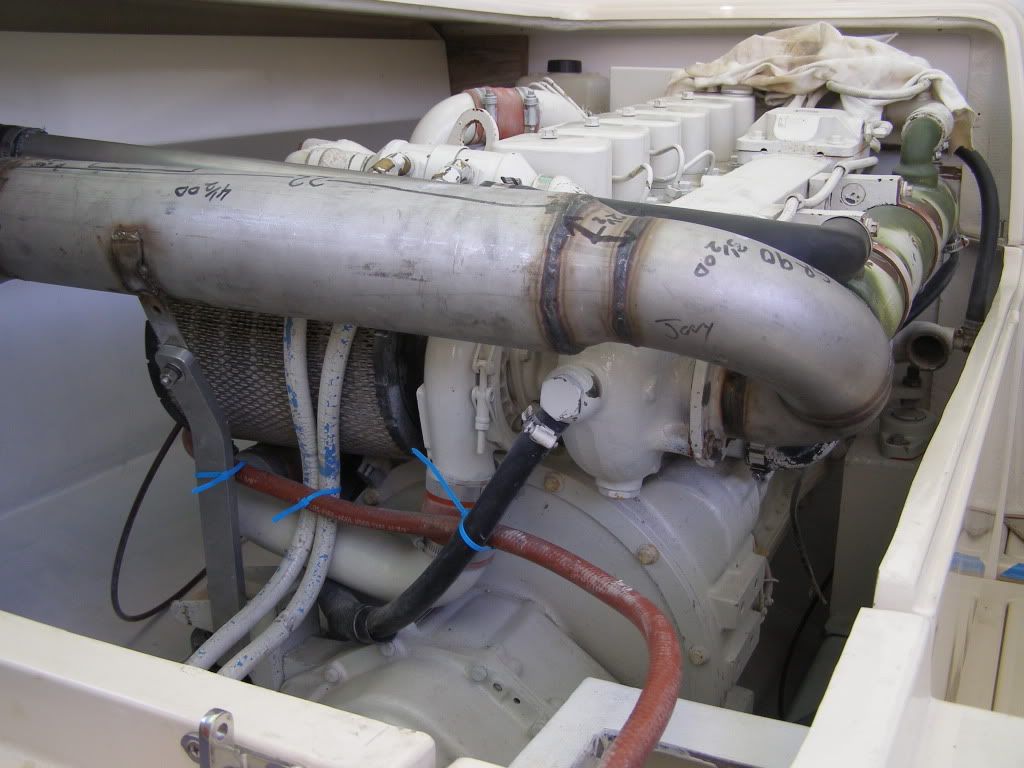
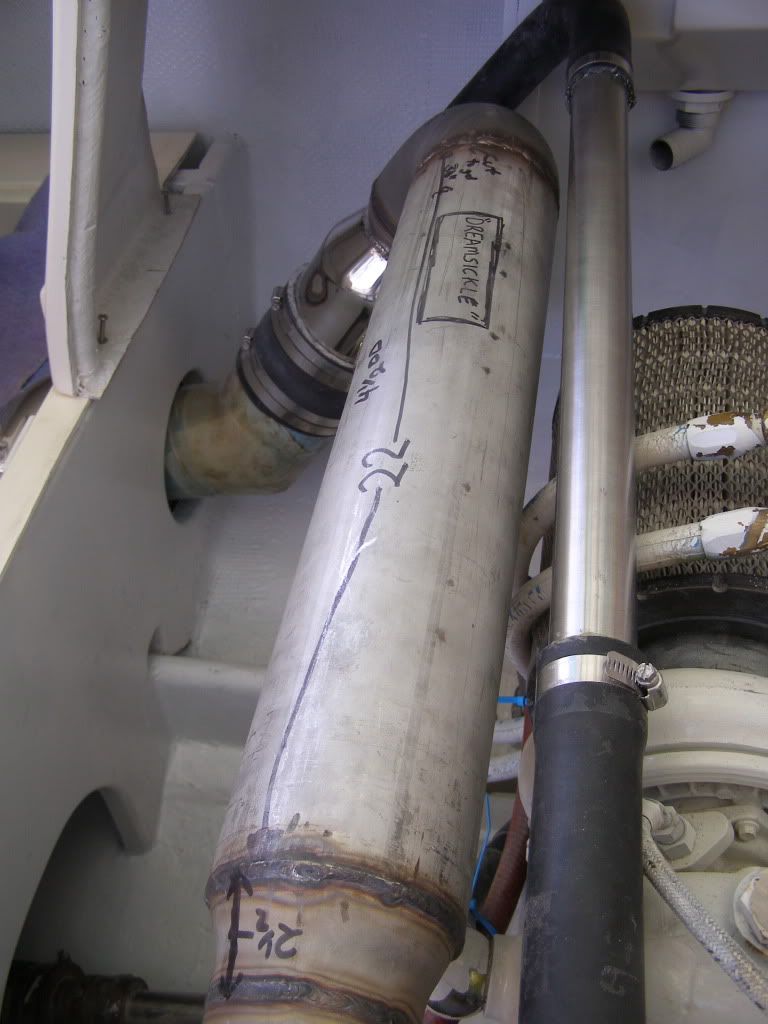
bob h look at the photo of my engine installation . look at the rear of the heat exchanger and you can see i reverse it.i cut it out and reverse it by brazing it . be careful with the heat the cooling bundle is not to far away. i used a short section of fiberglass pipe between pre shaped hose to check water flow and a aid to troubleshooting.
capt.bob lico
bero13010473
bero13010473

cummins install
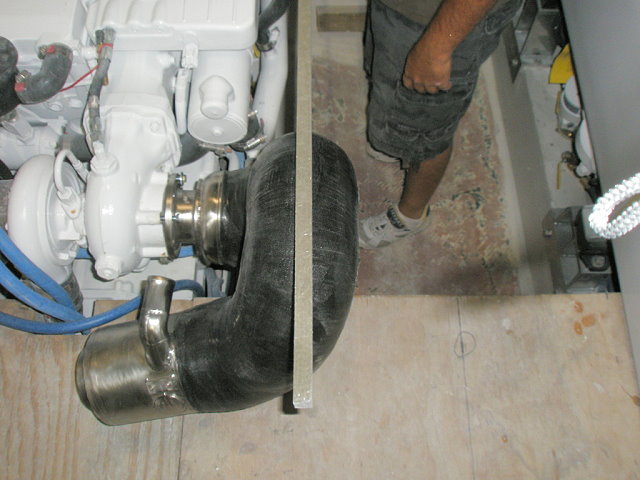
nice install, tkx for the images.Many questions,1 why change the water discharge direction? 2. Are the"engine ramps" drilled and tapped to accept the Barrys'? 3 I dont see any exhaust stuffyet,Bruce shows asupper system with risers, yet I se other installs with just elbows. Bruces' install shows the aft engine bulkhead moved futheraft to accomadate the ehaust transition outboard, will you do that? 4 My dry fit tells me I need a widened and lengthed motor box assy, same with you? tks for your patience!
marlin if you did not change to heat exchanger output 180 degrees the pipe would run smack into the exhaust pipe from the output of the turbo!!!
bob h incidently i went with 41/2" id 316 ss all the way to sprinkler head.dyno shows 6hp increase, you know those crazy guys who are hp consious at all times .---gotta get that exhaust out!!!!
bob h incidently i went with 41/2" id 316 ss all the way to sprinkler head.dyno shows 6hp increase, you know those crazy guys who are hp consious at all times .---gotta get that exhaust out!!!!
capt.bob lico
bero13010473
bero13010473
cummins install
Bob tkx, I have gained so much knowledge from the considerate responses, and of course capt patrick!
Marlin, my engine ramps are hollow from the back, on the outboard side of the engines only wedges were used and I drilled out the stringers slighty larger than the holes in the engine beds, then I used epoxy unthickend first then mixed up cabosil, microfiber, high denstity mix, found a high grade stainless bolt cut off the head, then epoxied the rods into the stringers...Bob Lico, 4.5" ss exhaust, will do, Bama brother (harry b) is helping me with the shower heads..thanks for the heat exchanger tip..my dad taught me to weld by teaching me to braze first..BH
1966 31 Bahia Mar #316-512....8 years later..Resolute is now a reality..Builder to Boater..285 hours on the clocks..enjoying every minute..how many days till spring?
bob h i will try to take a very important photo for you. first try and follow my terrible spelling. ok here we go; port engine out of tubo LARGE radius 180 degree turn (my engines have quite a bit of top space due to engines sitting very close to bilge )then go across top of engine allowing just enough for blanket . now you line up with the muffler input down below.cock the 90 degree ss fitting about 60 degees towards muffler .now your 6" sprinkler head, then a short section of trident silicon hose and a 316 ss 6" by 60 degree fitting with another trident hose straight into muffler. this will give you the best exhaust flow and have the insurance of a surge protection along with one way baffle in the front of muffler.i back down so hard on a big eye tuna this year i put a wave over the transom never a problem with putting water into the engine(god forbid).
capt.bob lico
bero13010473
bero13010473

I rolled my heat ex a little to clear the blanket.. I like Bobs redirect idea..
The engine box on Cowboys boat was raised by adding a fixed lip to the deck & attaching the hinges upright..dont notice it at all.
It also keeps water from draining into the engine area from the deck..
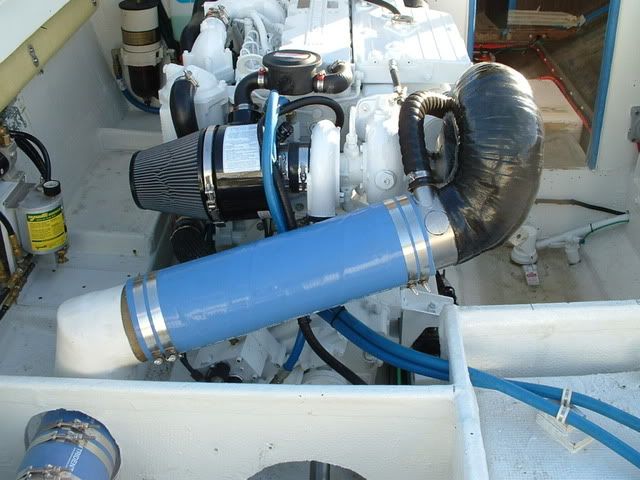
Im putting the parker hoses on ,Got em cut & layed out.
..
Wayne
The engine box on Cowboys boat was raised by adding a fixed lip to the deck & attaching the hinges upright..dont notice it at all.
It also keeps water from draining into the engine area from the deck..
Im putting the parker hoses on ,Got em cut & layed out.
..
Wayne
-
Harry Babb

- Senior Member
- Posts: 2354
- Joined: Jun 30th, '06, 21:45
- Location: Fairhope Al
- Contact:
Bob Lico wrote:i cut it out and reverse it by brazing it . be careful with the heat the cooling bundle is not to far away.
I found out the you can TIG weld the elbow back onto the heat exchanger using Silver Solder as a filler and Argon as a shield......total heat input is much less than using a torch to solder the fitting back onto the exchanger.
Using the TIG process you can stop and cool the joint then proceed if you think that you are getting close to damaging the "Bundle"
H
hb
harry i was able to slid a heat sink in between cooling bundle and heat exchanger tank. bob here is a photo of 6" sprinkler head on down pipe. hard to photo but you get the idea notice the 60 degree 6" ss fitting at the bottom on a slight angle to the 6" muffler opening on opposite site of bulkhead.
capt.bob lico
bero13010473
bero13010473

All i can say for brazing, use the good silver solider, 15% not the cheap shit and if heat is an issue, make sure you sand and clean the joint really good, and the solider should flow! put a wet rag around maybe? when we have to braze expansion valves and other valves that have seals in them, we ususaly just wrap them with a wet rag and they are good to go.
But as harry said, you could always tig it... hell, if its copper and not under pressure, you could probably use a butane torch and led past stuff plumbers use. idk
i was reading, there is some braided SS hose approved by CG, That would look sweet, with AN fittings, kind of hotrodish. probably expensive as hell
Matt
cummins install
Bruce, did you have to alter or "bubble" the port motor box to accomadate the exhaust riser, I have a new set of Capt Alex motor box assys and had the exhaust fabed by Diangelo , port side cover still needs to move another 4" inboard to clear the exhaust, I forwarded your images to them to help design the risers, any help is much appreciated, the boat is now at Palmbeach Towers in Riveria Beach for the 1/2tower work thx Marlin
-
CaptPatrick

- Founder/Admin
- Posts: 4161
- Joined: Jun 7th, '06, 14:25
- Location: 834 Scott Dr., LLANO, TX 78643 - 325.248.0809 bertram31@bertram31.com
This is where purpose design comes into play.
The person either submitting the design to a builder, or if the builder is designing the piece themselves, have to understand and acknowledge the size constraints and work with them.
D'Angelo in Ft Lauderdale built mine because they had the capability to build what I wanted.
The design and build of the risers was done before the engines even went in to make sure nothing had to be changed on the install to get everything to fit within the confines of the boxes.
cummins install
Bruce thx for the response, I handed your images to their cad designer when he visited the boat whick cost an extra 250$, I didnt want any surprises or changes, obviously yours worked and the "1st" cad dude knew they had built your set. The second cad person that drove back up also took more measurements and I waited for the final product. I guess I should have requested the drawings to be sure we were on the same page,bad assumption.. They say they can gain a couple of inches for me , thats why I ask if yours fit, they told me {Dave} that sometimes a" bubble" needs to be added to make thinks work. They did my rybo and those are great and they want me to be satisfied
-
CaptPatrick
- Founder/Admin
- Posts: 4161
- Joined: Jun 7th, '06, 14:25
- Location: 834 Scott Dr., LLANO, TX 78643 - 325.248.0809 bertram31@bertram31.com
Dave's trying to blow smoke up your ass......... I've seen hull bottoms with "bubbles" to make room for oil pan or transmission clearance, but never on an engine box. Total BS.they told me {Dave} that sometimes a" bubble" needs to be added to make things work.
A bubble anywhere would be only a band-aid for poor engineering.
If you sent them pics and they knew of the build and what I see in your pics is the result, I don't know what to say other than their ability to do a job correctly has seriously degraded.
No excuse for something like that especially after visiting the boat and taking measurements.
Welcome to Florida, where "It'll get by with a little tweaking" is our motto.
Glad I'm out.
No excuse for something like that especially after visiting the boat and taking measurements.
Welcome to Florida, where "It'll get by with a little tweaking" is our motto.
Glad I'm out.

Re: cummins install
Marlin wrote:Bruce thx for the response, I handed your images to their cad designer when he visited the boat whick cost an extra 250$, I didnt want any surprises or changes, obviously yours worked and the "1st" cad dude knew they had built your set. The second cad person that drove back up also took more measurements and I waited for the final product. I guess I should have requested the drawings to be sure we were on the same page,bad assumption.. They say they can gain a couple of inches for me , thats why I ask if yours fit, they told me {Dave} that sometimes a" bubble" needs to be added to make thinks work. They did my rybo and those are great and they want me to be satisfied
I wouldn't be satisfied with a bubble.
They where told / given the motor box constraints when they where taking measurements? If so...they did a blunder.
Unless the CAD files where Bruce's...wonder why they didn't use those...at least to compare or modify from.
cummins install
We picked up the port riser this week and D'angelo was able to reduce the excess width miraculously by 4". Unfortunately I will not be working on the project till next October so I dont know the final fitment, but I was pleased with there efforts and follow thru without any hassle

Our West coast connection, Tony, did this exhaust for my 300 Cummins. All five inch and with mufflers. Fits snugly, no change to the Cabrera engine boxes. Engines run well and Tony made the whole process seamless. This is the way to go.
Mikey
3/18/1963 - -31-327 factory hardtop express, the only one left.
The difference between genius and stupidity is that genius has its limits.
-Albert Einstein
3/18/1963 - -31-327 factory hardtop express, the only one left.
The difference between genius and stupidity is that genius has its limits.
-Albert Einstein
Who is online
Users browsing this forum: Google [Bot] and 20 guests