I am beginning the installation of teak veneer where I have removed the original Bertram Formica.
This is the first time I have dealt with teak veneer instead of teak veneered plywood. I plan on installing the veneer on the plywood with DAP Weldwood Contact Cement. What is the best way for me to seal the teak once it is installed on the plywood to prevent staining from any water leakage down the road? Should I apply a 50/50 epoxy resin/Acetone coat to the teak prior to applying varnish and will one coat be enough to prevent staining?
Thanks in advance.
Teak Veneer Installation Question
Moderators: CaptPatrick, mike ohlstein, Bruce
-
JohnV8r

- Senior Member
- Posts: 625
- Joined: Jun 29th, '06, 21:59
- Location: Northern California Bay Area
- Contact:
Teak Veneer Installation Question
Bertram 31 - The Best Boat Ever Built
-
CaptPatrick

- Founder/Admin
- Posts: 4161
- Joined: Jun 7th, '06, 14:25
- Location: 834 Scott Dr., LLANO, TX 78643 - 325.248.0809 bertram31@bertram31.com
Re: Teak Veneer Installation Question
John,
I'd use Epifanes RE500 Rubbed Effect Interior Varnish with no epoxy sealer coat. Use 4 coats of the Epifanes as per directions...
I'd use Epifanes RE500 Rubbed Effect Interior Varnish with no epoxy sealer coat. Use 4 coats of the Epifanes as per directions...
Br,
Patrick
Molon labe
Patrick
Molon labe
Re: Teak Veneer Installation Question
NO.. NO.. NO!
Don't use contact cement. I tried that and rejected it as a royal PITA to do well. If you get it even a little bit out of alignment you are screwed because once the two pieces touch they are permanently bonded!
I have an easy to use non-contact cement method to use that results in a perfect fit. I have done my cabin interior with it as well as some furniture and it works great.
Try this on a sample and see what you think. I use only paper backed veneer, which I get in person at a veneer mill in Beaufort, NC.
1 - Get the surface you want to cover clean and smooth.
2 - Cut the piece of paper backed teak veneer to the exact shape you need.
3 - Get some regular old woodworkers water based glue (it is usually yellow or tan color).. I use Titebond III Ultimate Wood Glue, which is available in hardware and building supply stores. Brush a liberal coating of this glue on the surface you want to cover and the back of pre cut piece of veneer. If the glue soaks into the base surface or the veneer too much you can apply a second coat of glue after the first is dry.
4 - Let both surfaces get completely dry. Once coated and dry you can take as much time as you want before you apply it.
5 - Put the veneer piece wherever you want it to be applied. If necessary you can tape it in place. Since the glue is dry you can slide the veneer around until you have it exactly where you want it without it sticking.
6 - Take a regular clothes iron and set it to cotton (hot). Once it is at that temp you are ready to start applying the veneer.
7 - Cover the iron surface with a piece of cloth. I use an old tee shirt.
8 - Press the hot iron with the cloth covering it onto the veneer surface. You can start anywhere.. I usually start in the middle somewhere. Move the iron around so you heat the veneer beneath it and liquify both coats of glue, but don't let it rest so long that you char the veneer.
9 - Remove the iron and let the veneer surface cool. The area that you ironed is now stuck to the surface you are covering.
10 - Do the complete surface of the veneer until it is all adhered to the base surface.
If you make a mistake you can reheat the surface and reliquify the glue and move the veneer around. Once the glue cools the veneer is permanently adhered to the base surface, unless you reheat it. If you get an air bubble beneath the veneer cut a small slit in it with a razor blade (follow the grain).. then reheat it to get a good bond with no trapped air.
I came up with this technique after reading a book on veneering and calling the manufacturer of the glue. It removes all the issues with contact cement. No flammable vapors, easy to use. You can slide the veneer around until it is exacxtly where you want it.
Play with a couple of test pieces until you are comfortable with your technique. I don't know of anyone else who uses this technique.. I have told a couple of pros about this and they were skeptical until they tried it.
Let me know how things turn out.
Frank B
1983 Bertram 33 FBC "Phoenix"
--------------
Trump lied! Washington DC isn't a swamp.. it is a cesspool!
1983 Bertram 33 FBC "Phoenix"
--------------
Trump lied! Washington DC isn't a swamp.. it is a cesspool!
-
PeterPalmieri

- Senior Member
- Posts: 2568
- Joined: Nov 12th, '10, 11:26
- Location: Babylon, NY
Re: Teak Veneer Installation Question
Frank,
That sounds like a set of directions even I can follow. Did you go right over the old laminate or remove it. In either case did you do any prep work to the old surface?
Pete
That sounds like a set of directions even I can follow. Did you go right over the old laminate or remove it. In either case did you do any prep work to the old surface?
Pete
1969 31 Bertram FBC "East Wind" hull #315939
Re: Teak Veneer Installation Question
Peter...
It really is simple, and much easier than contact cement.
I removed all the original formica and rough sanded the wood it was glued to before I applied the veneer. I don't think there are many glues I would trust on top of formica, especially water based ones.
Removing the formica is another PITA.. I used a Fein Multitool (several other mfgrs sell similar tools now) and a flat straight blade with a sharpened edge to lift the formica. On areas that were well adhered I set a Skil saw blade to score the formica in parallel strips as wide as the blade and as deep as the formica is thick.
Worked very well.
I have removed all the formica in my cabin... the bulkheads and new cabinets are all teak veneer covered, and the counter tops are solid surface material.
I realize formica has it's place in the world.. just not my boat world.
Frank B
1983 Bertram 33 FBC "Phoenix"
--------------
Trump lied! Washington DC isn't a swamp.. it is a cesspool!
1983 Bertram 33 FBC "Phoenix"
--------------
Trump lied! Washington DC isn't a swamp.. it is a cesspool!
-
PeterPalmieri
- Senior Member
- Posts: 2568
- Joined: Nov 12th, '10, 11:26
- Location: Babylon, NY
Re: Teak Veneer Installation Question
I'd love to see some picture of the finished product if you've got them
1969 31 Bertram FBC "East Wind" hull #315939
Re: Teak Veneer Installation Question
I will take some and post them soon.
Frank B
1983 Bertram 33 FBC "Phoenix"
--------------
Trump lied! Washington DC isn't a swamp.. it is a cesspool!
1983 Bertram 33 FBC "Phoenix"
--------------
Trump lied! Washington DC isn't a swamp.. it is a cesspool!
Re: Teak Veneer Installation Question
RE: the Fien Multitool:
I had a small job that called for a multi tool. Not wanting to spend the big bucks for a small job I thought I'd try the Harbor Freight version
http://www.harborfreight.com/variable-s ... 67537.html
I'm not a tool cheapskate, but I'm not a tool snob either. If a tool works for the purpose I intended at the duty level I use it, I'm happy. In this case I just wanted the tool for one quick job, not an investment, so I didn't spend a lot.
It turns out that the Harbor Freight version is now one of my favorite tools. I have found a lot of uses for it, not the least of which is putting a flat blade on it and power-scraping stuff up. I can easily see how it would be a great tool for removing the old laminate.
I also bought a Bosch triangle sander head and by sanding off a little ridge on that head adapted it to the HF tool. Now it takes Bosch triangle hook and loop pads which I can source more easily then the HF version. It is super handy as a detail sander. And I use it on occasion to make precision cuts in tight spots. So far I give it 5 stars.
NEXT:
I have a veneer repair project that is sitting in my basement right now and I am pretty cluless how to proceed. I started buying books, but so far they are not much help on the repair and restore side.
If y ou don't mind my asking, What book did you read that sugested this iron-on technique?
I'd like to give it a look.
(another) Peter
-
JohnV8r
- Senior Member
- Posts: 625
- Joined: Jun 29th, '06, 21:59
- Location: Northern California Bay Area
- Contact:
Re: Teak Veneer Installation Question
Frank,
Wow! Thanks for that!!! You have no idea how much I was NOT looking forward to using contact cement. I will try a test strip of this first and report back, but as it sits right now I LOVE THIS!!!
Wow! Thanks for that!!! You have no idea how much I was NOT looking forward to using contact cement. I will try a test strip of this first and report back, but as it sits right now I LOVE THIS!!!
Bertram 31 - The Best Boat Ever Built
-
Raybo Marine NY
- Senior Member
- Posts: 895
- Joined: Jan 3rd, '07, 00:28
- Location: Lindenhurst, NY
- Contact:
Re: Teak Veneer Installation Question
Pretty sure i used Formica brand glue for formica-on formica, but you may want to check that first. if it doesnt work you haven't lost anything.
Also used 3m PSA veneers and that bonds like iron to pretty much anything and you can get matching edge trim
In a pinch i used that really thin double sided carpet tape, thats another product that has incredible bonding strength and is so easy a caveman can do it
Also used 3m PSA veneers and that bonds like iron to pretty much anything and you can get matching edge trim
In a pinch i used that really thin double sided carpet tape, thats another product that has incredible bonding strength and is so easy a caveman can do it

Re: Teak Veneer Installation Question
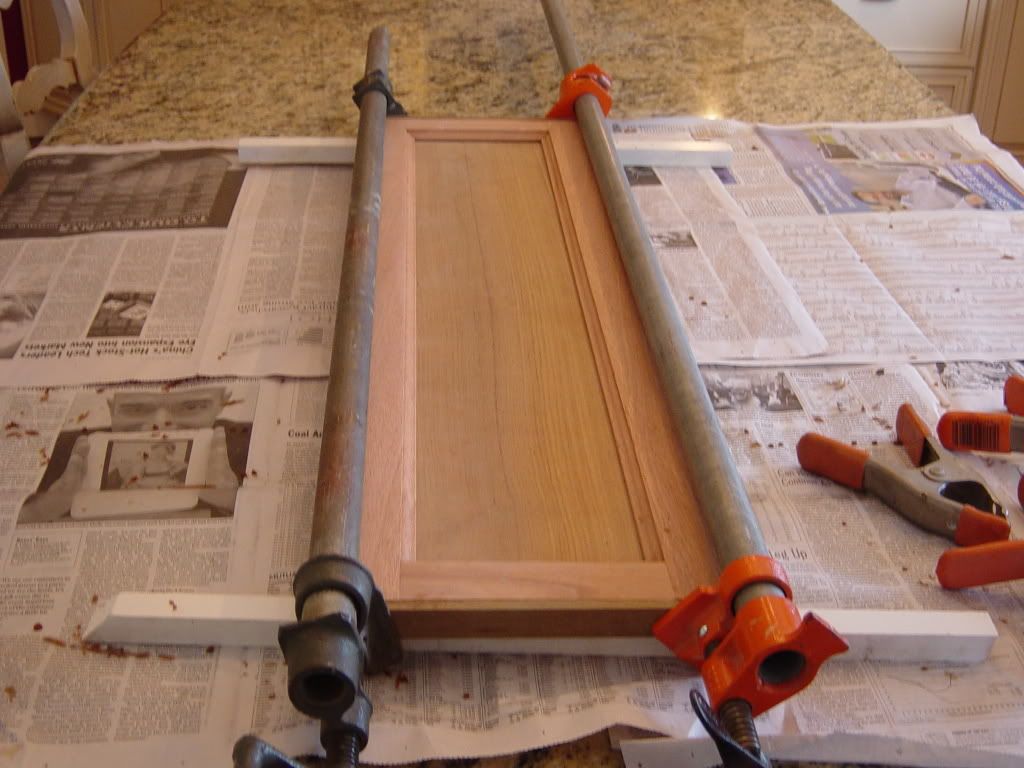
I. Did my cabin by first removing Formica with Fein tool then I used epoxy with a touch of high density filler and spread it out with a bunch of clamps.the epoxy gives you time to move the teak veneer around for alignment .
I used same finish as the captain ( rapid cote).

I used same finish as the captain ( rapid cote).
capt.bob lico
bero13010473
bero13010473
Re: Teak Veneer Installation Question
Same method with 1/4" teak veneer on cabin floor over Coosa board .each board has a 5/16" border of epay miter as a protective perimeter .
capt.bob lico
bero13010473
bero13010473
-
JohnV8r
- Senior Member
- Posts: 625
- Joined: Jun 29th, '06, 21:59
- Location: Northern California Bay Area
- Contact:
Re: Teak Veneer Installation Question
I have a Fein tool. Did you use the linoleum scraper or the saw blade?
Bertram 31 - The Best Boat Ever Built

Re: Teak Veneer Installation Question
Use to use a spray bottle of acetone for misaligned laminates detaches instantly and let it dry and re glue.
Sportsmen Conservation Sustainable Harvest Accountability Integrity with the spirit of a Warrior.
-
RAWicklund
- Senior Member
- Posts: 159
- Joined: Oct 5th, '10, 07:58
- Location: Houma, La
Re: Teak Veneer Installation Question
I've got a question along the same lines.
I'm gluing plastic laminate to coosa board for cabin door and bulkhead. I like the instant stick quality of contact cement but uncertain of its longevity in a wet enviroment.
Since it's just formica I'm not concerned about alignment, but more concerned about using epoxy and leaving air bubbles behind if I don't clamp properly during cure.
I've never done large sections with exoxy..... whats my best route??
Ray
1971 Sportfish 314 49 1103
1994 B28 BERF2720L394
1994 B28 BERF2720L394
-
JohnV8r
- Senior Member
- Posts: 625
- Joined: Jun 29th, '06, 21:59
- Location: Northern California Bay Area
- Contact:
Re: Teak Veneer Installation Question
As an FYI on the longevity of contact cement, I believe the original factory installed Formica was attached using contact cement.
Bertram 31 - The Best Boat Ever Built
-
JohnV8r
- Senior Member
- Posts: 625
- Joined: Jun 29th, '06, 21:59
- Location: Northern California Bay Area
- Contact:
Re: Teak Veneer Installation Question
Capt. Patrick,
I somehow missed your post the first time around reading this from my iPhone. Thank you for that. That is perfect...Epiphanes rubbed effect is what I have on the teak in my interior that I have varnished to date. Will do the same with the veneer.
Thanks,
John Vietor
I somehow missed your post the first time around reading this from my iPhone. Thank you for that. That is perfect...Epiphanes rubbed effect is what I have on the teak in my interior that I have varnished to date. Will do the same with the veneer.
Thanks,
John Vietor
Bertram 31 - The Best Boat Ever Built
Re: Teak Veneer Installation Question
I'll try to answer everybody's comments/questions here...
The other Peter I can't find the book on veneering I used.. but the technique wasn't actually described in it.. the author only mentioned that the water based yellow and white woodworking glues were "thermoplastic", meaning they melted with heat and resolidified when cool, and I sort of took it from there.. I spoke with a couple of veneer supply companies and a couple of glue manufacturers, got some general info, and pretty much by trial and error I developed the technique. I spoke with some technical and marketing people at Franklin International, the makers of the Titebond line and asked them if they thought my technique would work with their products and they said yes, but they did not want to advertise that their products could be used in a different way from the regular gluing markets they already served.
As far as the Fein tool.. I bought it about 8 years ago when I was installing the interior trim in my new house.. before their patent ran out a couple of years ago. I paid about $350 for the kit of the basic machine and an assortment of blades in a case. Today several other companies make similar tools for a lot less. I buy all my blades at Harbor Freight.. lots cheaper, but even for wood buy the metal cutting blades, they last a lot longer, and if you hit a nail or screw they don't dull immediately. I buy rolls of velcro backed sandpaper and cut my own paper for the original Fein sandpaper holders. Before I started buying rolls of paper I bought the same velcro backed material used for holding sandpaper to random orbital sanders, and cut pieces out of that. Buying rolls (from Klingspor) is a lot cheaper.
Raybo I was always afraid to use PSA backed veneer because I thought the humid environment might not allow the adhesive to hold up. Glad to hear you say it is OK for boats. The same for the carpet tape.
Bob Lico As usual, your works looks great! So does your car.
Keith Good tip about acetone in the spray bottle. Like so many other ideas.. I wonder why I never thought of that myself!
JohnV8r I used a standard linoleum blade, which I sharpened several times. I think the Multitool is one of my most versatile tools. I am not sure nwhat I would do without it.
OK guys.. I hope I have answered everybody's questions. This is one of the great things about this forum.. everyone has their own tricks and techniques, and everyone is willing to share them. There is no spamming, no BS, no flamers, and no Sea Ray owners! Thank you (again) Captain Patrick!!!
Frank B
1983 Bertram 33 FBC "Phoenix"
--------------
Trump lied! Washington DC isn't a swamp.. it is a cesspool!
1983 Bertram 33 FBC "Phoenix"
--------------
Trump lied! Washington DC isn't a swamp.. it is a cesspool!
-
Raybo Marine NY
- Senior Member
- Posts: 895
- Joined: Jan 3rd, '07, 00:28
- Location: Lindenhurst, NY
- Contact:
Re: Teak Veneer Installation Question
PSA is what they glue the jet ski pads down with, always submerged in water and if you ever had to take Kawasaki pads off you would know the padding shreds before the glue lets go
Inside your boat its fine
Inside your boat its fine
-
bertram 20
- Posts: 108
- Joined: Feb 22nd, '08, 09:05
- Location: Scituate Ma
Re: Teak Veneer Installation Question
hey john were did you get the teak veneer? i was thinking of doing same thing

-
JohnV8r
- Senior Member
- Posts: 625
- Joined: Jun 29th, '06, 21:59
- Location: Northern California Bay Area
- Contact:
Re: Teak Veneer Installation Question
I got the teak veneer from Maritime Wood Products:
http://www.maritimewoodproducts.com/
Great people, great products in my experience.
http://www.maritimewoodproducts.com/
Great people, great products in my experience.
Bertram 31 - The Best Boat Ever Built
-
bertram 20
- Posts: 108
- Joined: Feb 22nd, '08, 09:05
- Location: Scituate Ma
-
JohnV8r
- Senior Member
- Posts: 625
- Joined: Jun 29th, '06, 21:59
- Location: Northern California Bay Area
- Contact:
Re: Teak Veneer Installation Question
Yes, teak. They have veneer from "recycled" teak from time to time, which is what I got. I like it because it is more of the old golden/honey teak style than the darker variety I see more of today. However, it varies from batch to batch. Because of that, you're better off ordering what you think you will need so all the veneer matches.
Bertram 31 - The Best Boat Ever Built
Re: Teak Veneer Installation Question
I should add the original cabinet doors were discarded and I build doors from scratch because I like the raised panel look with routers finger joints.
capt.bob lico
bero13010473
bero13010473
Re: Teak Veneer Installation Question
Sliding draws on salon benches .teak veneer .epoxy holds up well
capt.bob lico
bero13010473
bero13010473

Re: Teak Veneer Installation Question
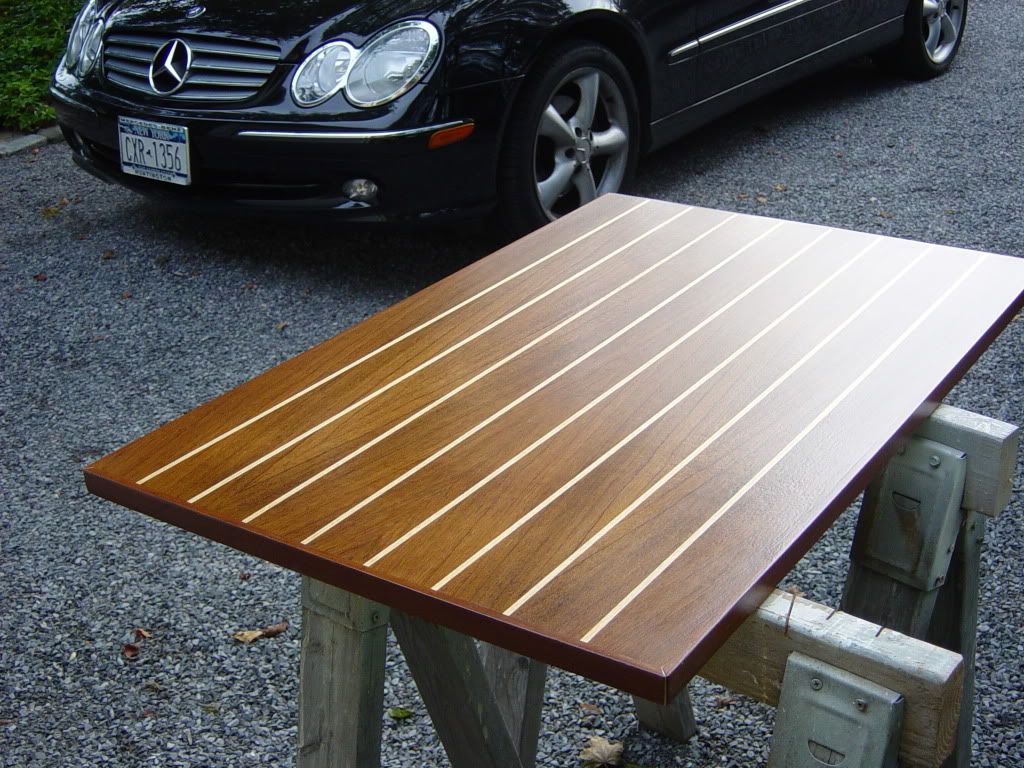
Bob, I like that your work bench is in fact a polished granite countertop... raising the bar there sir.
IRGuy, your veneer method is the exact method my Mom used to do on antique furniture restorations. She was a furniture refinisher for 30 some years, and was taught that method by another old school refinisher. I have done it a few times years ago, works very well.
The few times I've done veneer applications in a marine environment though, I used very slightly thickened epoxy, after a reduced epoxy prime coat. Then rolled the beejeezus out of it with a wallpaper roller. Overkill I'm sure.
I don't know what the world may want,
But a good stiff drink it surely dont,
Think I'll go and fix myself...a tall one.
But a good stiff drink it surely dont,
Think I'll go and fix myself...a tall one.
Re: Teak Veneer Installation Question
Your right the granite center island is overkill but it is huge and perfectly flat with good lighting above.needless to say wife is on pins and needles while I leave dry overnight.sort of a trade off she knows it took me a year of very long hours to build her kitchen so she "puts up with me".buju it is very easy to screw up a good woodworking job with the glueing .here is kitchen detail (talk about labor )
capt.bob lico
bero13010473
bero13010473
-
JohnV8r
- Senior Member
- Posts: 625
- Joined: Jun 29th, '06, 21:59
- Location: Northern California Bay Area
- Contact:
Re: Teak Veneer Installation Question
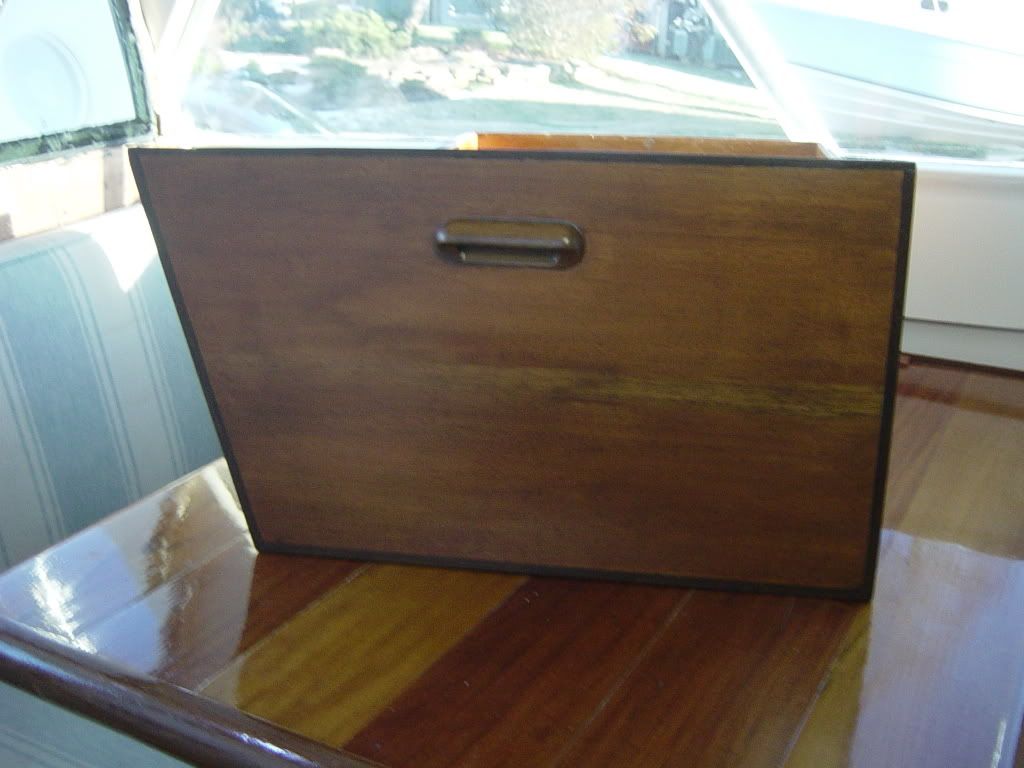
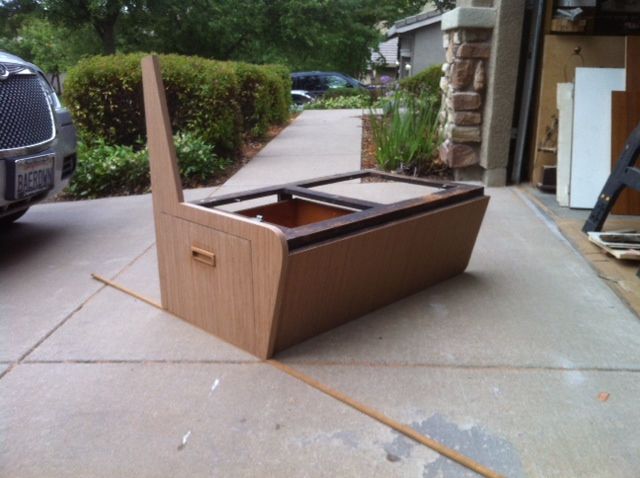
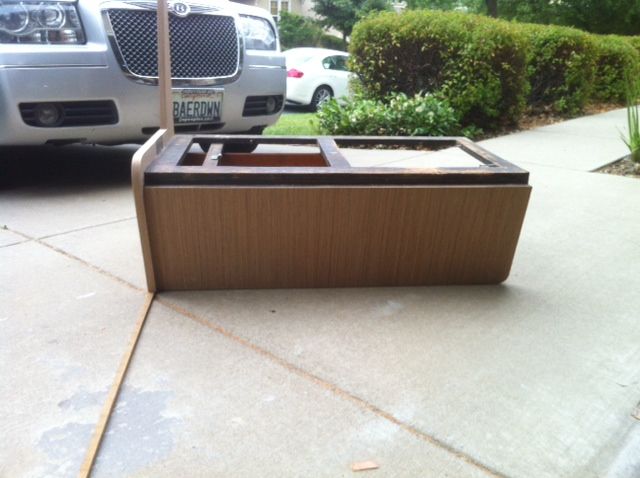
OK, here we go... This will be the kick panel between the settee floor and the main cabin floor. One thing that caught me a little off guard was that the teak veneer wanted to curl up when the glue was applied. I quickly put a couple of foam pins in the corners to keep it as flat as possible. I'm guessing it will be fine when the iron is put to the veneer.


Bertram 31 - The Best Boat Ever Built
-
JohnV8r
- Senior Member
- Posts: 625
- Joined: Jun 29th, '06, 21:59
- Location: Northern California Bay Area
- Contact:
Re: Teak Veneer Installation Question
Kick panel veneer completed! No bubbles, no troubles, nothing but simple. I just need to hit the edges with my laminate trimmer for the final trim and then it will be ready to varnish.
Frank B (IRGuy)...I LOVE YOU MAN!!! This was TOO EASY!!!

Frank B (IRGuy)...I LOVE YOU MAN!!! This was TOO EASY!!!

Bertram 31 - The Best Boat Ever Built
Re: Teak Veneer Installation Question
If it curls just let it dry and when you are ready to apply it just flatten it by hand and tape it temporarily in place.
I never tried keeping it flat with pins, but that should do just fine.
Yeah.. but will you still love me when your project is done?
I never tried keeping it flat with pins, but that should do just fine.
Yeah.. but will you still love me when your project is done?
Frank B
1983 Bertram 33 FBC "Phoenix"
--------------
Trump lied! Washington DC isn't a swamp.. it is a cesspool!
1983 Bertram 33 FBC "Phoenix"
--------------
Trump lied! Washington DC isn't a swamp.. it is a cesspool!
-
JohnV8r
- Senior Member
- Posts: 625
- Joined: Jun 29th, '06, 21:59
- Location: Northern California Bay Area
- Contact:
Re: Teak Veneer Installation Question
I'm knee deep into the veneer process now. Here are a couple of quick updates on how Frank B's Titebond III veneer adhesion process is working for me:
Overall, it's gone so well, I wish I had talked to Frank B before I got married. The only thing to me more annoying than working with contact cement is working with my ex-wife. Frank might have been able to save me from that misery too. LOL!
Here are my observations so far:
First, the Titebond method works well adhering veneer to areas of delaminated plywood that have been filled with Bondo. Absolutely no problem whatsoever.
Second, one of the coolest things about this process is that if you have an edge or corner of the veneer that isn't completely adhered to the substrate, you simply heat it up again, press and hold, and it's solidly adhered. That happened a couple of times for me when I adhered the veneer, trimmed it with my laminate trimmer, and then realized there were a couple of small areas maybe .5-.75" where the edges were not fully adhered. I simply put the iron directly on the area for maybe 5 seconds and used a piece of scrap veneer to press and hold for another 5 seconds.
Third, to position the veneer for an initial alignment check and make sure I have everything the way I want it, I simply set the iron on one end for a few seconds and that's enough to hold it in place, but still allow me to heat it and remove it in the event I need to adjust it. That is a REALLY cool feature with this that just wasn't possible with contact cement or my ex-wife.
Fourth, I have been able to use the iron directly on the veneer if I needed to. However, I have used a t-shirt per Frank B's instructions and have gone very slowly from one end to the other. Using a t-shirt not only protects the surface of the teak veneer from scratching, but because using the t-shirt means the surface of the veneer and glue doesn't heat as fast, I find myself working very slowly and methodically. I have not had one single bubble or blistered area where it appears that I missed a spot.
Fifth, the best method for spreading the glue that I have found is actually the yellow flexible rubber epoxy spreaders from West Marine. I can spread the initial 90% out quickly. The epoxy spreader allows more glue under it than say a 3" flexible putty knife or flexible scraper. That keeps me from feeling like I need to apply a second coat of glue. I then place paper towels under the edges of the veneer and spread glue out onto the edges. The paper towels keep the glue from getting onto the surface of the veneer. You have to do one edge at a time with the paper towels as the veneers bows just a little from the glue.
Finally, from the "for what it's worth" column: Since Shambala is 1:45 from my house and I occasionally forget a tool, I have gotten to know a marine carpenter down by the marina. He's been great when I forget my router or circular saw and need something cut. I was in his shop last weekend extolling the benefits of the Titebond III method, when he smirked and said, "I haven't used contact cement on veneer in 20 years." I started questioning him about his experiences while he made a slight adjustment to one of the mahogany flooring support pieces for me when he told me this: In his experience, Titebond II has better melt properties during the adhesion process with the iron. In his opinion, this is important when applying veneer to curved areas. He went on to say that in his opinion Titebond II is superior to any "regular wood glue" on the market and can be used with confidence in any application on a boat where wood glue is appropriate.
I said "Titebond III says it's Waterproof; II says it's Water Resistant." He said, "Call me when you have a piece with II fall off."
As a result of his comment, I did use Titebond II on the round pieces of the seat frame and on a seat frame kick panel. Two things I noticed:
1) There was a difference in the sound of the glue adhering. With III there is a crackling sound as the iron is advanced over the glue. It's almost like the III adheres and then pops off until it gets hot enough to permanently adhere. With the II, it stuck from the get go and made no crackling sound.
2) I had no edges with the II that needed to be reheated and pressed like I did with the III.
Draw your own conclusions and proceed accordingly.
...and Frank B, I still love you man!!! I usually look like a Polynesian warrior doing a Haka dance over veneer with contact cement as I start to pull the sticks out. I haven't even broken a sweat with your Titebond method yet. This has been the easiest veneer project I've ever done!!!
Bertram 31 - The Best Boat Ever Built
Re: Teak Veneer Installation Question
Thanks for the update.. and I am glad the project came out as you wanted!
I will try Titebond II next time.. When I was doing 3 piece crown moulding and other finish work after the builder finished the rough work and left my new house for me to complete I used a lot of glue and standardized on Titebond III soon after it came out. As soon as the boat is finished I plan on getting back into woodworking and will be in the gluing business again.
As far as me giving you any advice on choosing a wife.. I am not the one.. I have been married for 44 years to the same woman.. I think we are finally getting to know each other!
How about some pics? You know everybody here wants pictures! Of boats.. not ex-wives!
Frank B
1983 Bertram 33 FBC "Phoenix"
--------------
Trump lied! Washington DC isn't a swamp.. it is a cesspool!
1983 Bertram 33 FBC "Phoenix"
--------------
Trump lied! Washington DC isn't a swamp.. it is a cesspool!
-
JohnV8r
- Senior Member
- Posts: 625
- Joined: Jun 29th, '06, 21:59
- Location: Northern California Bay Area
- Contact:
Re: Teak Veneer Installation Question
I'll try to get picks of the seat frames up this weekend. Still have a ways to go on the completing the entire interior, but the pieces I brought home will be finished and varnished this weekend.
Bertram 31 - The Best Boat Ever Built
-
Todd Pearce
- Senior Member
- Posts: 285
- Joined: Jul 19th, '06, 08:46
- Location: New Zealand
Re: Teak Veneer Installation Question
HI,might be a dumb question,but ,is there any reason why you cant use just one good layer of glue and iron the vineer straight to it?has it been tried ? I ask as on the strength of what i`ve read here iam keen to try a repair that I`ve been to scared to attempt
-
CaptPatrick
- Founder/Admin
- Posts: 4161
- Joined: Jun 7th, '06, 14:25
- Location: 834 Scott Dr., LLANO, TX 78643 - 325.248.0809 bertram31@bertram31.com
Re: Teak Veneer Installation Question
Todd,
Any time two items are to be bonded together, through the use of an adhesive, coating both pieces assures that the maximum bond strength is achieved.
Most adhesives are applied as a liquid or semi-liquid to a substrate which allows the adhesive to penetrate as deeply as possible into the surface of the substrate. In the case of the Titebond/iron technique, coating both surfaces insures that the bond strength to each part is uniform. When heated with the iron, the two pieces are bonded together by adhesive melting into adhesive.
If only one surface were coated, it's doubtful that the uncoated piece would uniformly receive anywhere near the same penetration of adhesive as it would had it of been coated with the adhesive in it's liquid state. The heating does not return the adhesive to a liquid state, it only softens it and allows it to cross link with itself between the two substrates.
Br,
Patrick
Molon labe
Patrick
Molon labe
-
JohnV8r
- Senior Member
- Posts: 625
- Joined: Jun 29th, '06, 21:59
- Location: Northern California Bay Area
- Contact:
Re: Teak Veneer Installation Question
Todd,
I would say you will be shocked at how simple this process works. For reference, I have owned Shambala for 10 years now. I have changed the cockpit side and transom panels three times now. I used white Formica on PVC board all three times and attached it with contact cement. While it is not a difficult project per se, contact cement takes the "pain in the ass" factor to a 9 out of 10 for me because I always seem to find a way to get one piece slightly misaligned so there is a bubble or something wrong. I'm sure I have averaged making four panels to get three good ones on that project.
This Titebond process by comparison easily takes the "pain in the ass" factor down on adhering veneer down to a 1 out of 10. No exaggeration there. This has to be one of the greatest tips I have gotten from this website...and I would say 85% of my knowledge base on how to address an issue has come from Bertram31.com.
Whatever your project is, just do it.
I will also preface these pictures by saying two things: 1) I am a weekend & evening warrior when it comes to woodworking. I work in an office, so I don't have anywhere near the skill set of some of the people here. My jaw dropped when I saw Buddy Boy and Bob H's Bahia Mar modification and I marvel at the technical knowledge guys like Bruce and Bob Lico have. 2) I often tell people that I own the nautical equivalent of a Shelby Cobra to drive the point home that I am the steward to a living piece of history. I love history and while I like to upgrade things on Shambala, I want to keep her as true to original as possible. I tend to get all geeked up when I find Shambala's hull number hand written by the workers at Bertram somewhere like the bottom of the drawers.
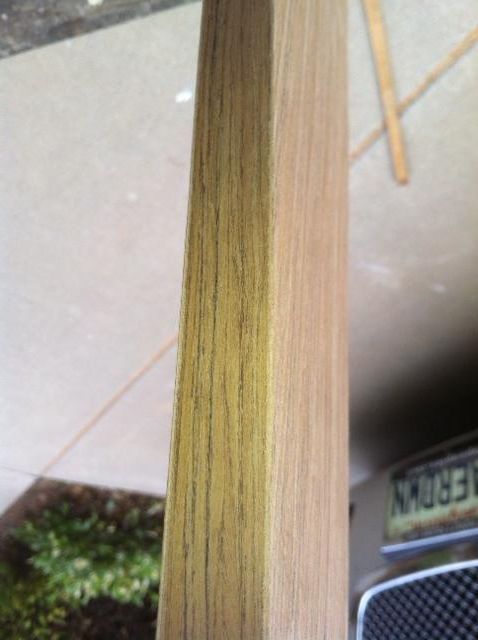
So with that said here are the pictures that should not overwhelm you with anything but the simplicity of the work. I have not gotten one ounce of varnish on yet which is why the teak veneer doesn't look very amber yet.
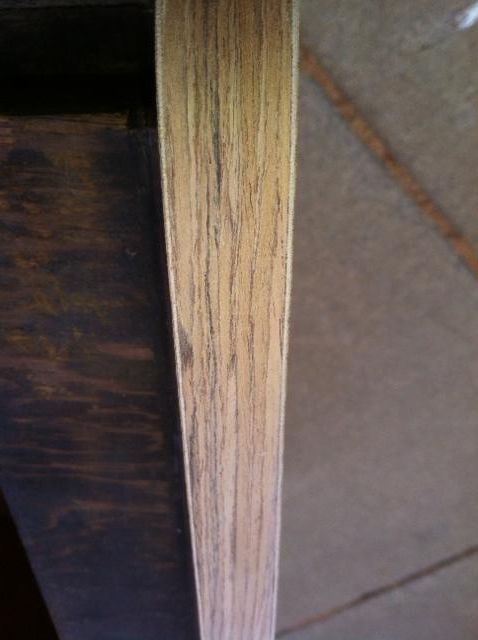
The only disappointment here was that I could not get a cutout of the veneer after applying one solid piece to put on the drawer fronts. I was off by about 1/16". That's why the grain patter on the drawers doesn't match the frame perfectly.
This is the top of the radiused corner on the settee frame. I put this photo in because I accidentally nicked the veneer with the laminate trimmer and had to pull off the inside veneer (by heating it and removing it) and the edge piece shown so I could replace the piece shown. I think this is remarkable because I used the same interior piece of veneer. After re-prepping the area, the new edge and re-used interior piece went back together perfectly. That more than anything speaks to ease of the Titebond process.
For comparison, this is the veneer edge to edge on two pieces that were put down once.
Big props to Frank B again for telling me about the Titebond method. Hope this helps give you the confidence to do your project.
Thanks,
John
I would say you will be shocked at how simple this process works. For reference, I have owned Shambala for 10 years now. I have changed the cockpit side and transom panels three times now. I used white Formica on PVC board all three times and attached it with contact cement. While it is not a difficult project per se, contact cement takes the "pain in the ass" factor to a 9 out of 10 for me because I always seem to find a way to get one piece slightly misaligned so there is a bubble or something wrong. I'm sure I have averaged making four panels to get three good ones on that project.
This Titebond process by comparison easily takes the "pain in the ass" factor down on adhering veneer down to a 1 out of 10. No exaggeration there. This has to be one of the greatest tips I have gotten from this website...and I would say 85% of my knowledge base on how to address an issue has come from Bertram31.com.
Whatever your project is, just do it.
I will also preface these pictures by saying two things: 1) I am a weekend & evening warrior when it comes to woodworking. I work in an office, so I don't have anywhere near the skill set of some of the people here. My jaw dropped when I saw Buddy Boy and Bob H's Bahia Mar modification and I marvel at the technical knowledge guys like Bruce and Bob Lico have. 2) I often tell people that I own the nautical equivalent of a Shelby Cobra to drive the point home that I am the steward to a living piece of history. I love history and while I like to upgrade things on Shambala, I want to keep her as true to original as possible. I tend to get all geeked up when I find Shambala's hull number hand written by the workers at Bertram somewhere like the bottom of the drawers.
So with that said here are the pictures that should not overwhelm you with anything but the simplicity of the work. I have not gotten one ounce of varnish on yet which is why the teak veneer doesn't look very amber yet.

The only disappointment here was that I could not get a cutout of the veneer after applying one solid piece to put on the drawer fronts. I was off by about 1/16". That's why the grain patter on the drawers doesn't match the frame perfectly.


This is the top of the radiused corner on the settee frame. I put this photo in because I accidentally nicked the veneer with the laminate trimmer and had to pull off the inside veneer (by heating it and removing it) and the edge piece shown so I could replace the piece shown. I think this is remarkable because I used the same interior piece of veneer. After re-prepping the area, the new edge and re-used interior piece went back together perfectly. That more than anything speaks to ease of the Titebond process.

For comparison, this is the veneer edge to edge on two pieces that were put down once.
Big props to Frank B again for telling me about the Titebond method. Hope this helps give you the confidence to do your project.
Thanks,
John
Bertram 31 - The Best Boat Ever Built
-
Todd Pearce
- Senior Member
- Posts: 285
- Joined: Jul 19th, '06, 08:46
- Location: New Zealand
Re: Teak Veneer Installation Question
nice work,cant wait to see it all finished,I`am going to have a go at the job My self In the next week or so,using the tips and info gained here,seems like there is a bottomless amount of help & knowledge from this brotherhood, my next quetion is ,What is the best way to remove the old varnish from the teak veneer ,most of mine is in fair contion with some panles looking like they have been stained or overcoated in some way,I`am scared to sand it for fear of going thru,I`am told that paint stripper can react and turn the teak very dark,generaly its a minefield for young players, any thoughts?
Last edited by Todd Pearce on May 28th, '13, 03:41, edited 1 time in total.
-
CaptPatrick
- Founder/Admin
- Posts: 4161
- Joined: Jun 7th, '06, 14:25
- Location: 834 Scott Dr., LLANO, TX 78643 - 325.248.0809 bertram31@bertram31.com
Re: Teak Veneer Installation Question
Todd,
The safest varnish removal over veneer will be with an orange oil stripper. Here's an article that sums it up nicely.
I've used Citristrip before with good results. That was on solid wood, but I'd have no reservation if using it on veneer...
The safest varnish removal over veneer will be with an orange oil stripper. Here's an article that sums it up nicely.
I've used Citristrip before with good results. That was on solid wood, but I'd have no reservation if using it on veneer...
Br,
Patrick
Molon labe
Patrick
Molon labe
-
Todd Pearce
- Senior Member
- Posts: 285
- Joined: Jul 19th, '06, 08:46
- Location: New Zealand
Re: Teak Veneer Installation Question
Thanks captain,great article,i`ll start with the least agressive and go from there, Thanks again for the support,just outstanding
-
Gert van Leest

- Senior Member
- Posts: 314
- Joined: Jan 17th, '11, 16:30
- Location: Warmond, NL
- Contact:
Re: Teak Veneer Installation Question
Nice Job !!
is that BEER DOWN ore BEAR DOWN ??
Gert
is that BEER DOWN ore BEAR DOWN ??
Gert
Women are like boats ,the older they get , the more money and professional help they need to look beautiful.
Who is online
Users browsing this forum: No registered users and 294 guests