Lookin for Good V..v..v..v..vibrations….

The Main Sand Box for bertram31.com

Moderators: CaptPatrick, mike ohlstein, Bruce

Post Reply
Stephan
Senior Member
Posts: 655
Joined: Mar 30th, '11, 05:41
Location: Providence, RI

Lookin for Good V..v..v..v..vibrations….

Post by Stephan »

Image

Gentlemen-
I’m getting set up for some winter projects. Among them is re-installing the shaft logs. There is corrosion on the fasteners and the starboard shaft log weeps. I’ve pulled the props each winter and had them balanced. The boat does not vibrate offensively (Crusader 454s, Velvet Drive 1.52:1 gears, 17.5x17 props, cutlass bearing tight) but I am wondering if the shafts are worth checking. Is rolling the shafts out on a good cement floor useful for a first check or is this something that needs to be done by an adult?
Fair warning, there are more of these questions coming…
Thank you,
Stephan
Possunt quia posse videntur
User avatar
Harry Babb
Senior Member
Posts: 2354
Joined: Jun 30th, '06, 21:45
Location: Fairhope Al
Contact:

Re: Lookin for Good V..v..v..v..vibrations….

Post by Harry Babb »

Stephan
I can help with this request.......

No to the "concrete floor Test Method"

Depending on the equipment and mechanical ability you have available......its very possible to check and even straighten the shaft your self.......assuming that it needs straightening.

And YES.....since you are right there....I would at least check it.

I can even supply you a copy of "Good Vibrations"......one of my many favorites from the 60's


hb
hb
User avatar
Carl
Senior Member
Posts: 5928
Joined: Jul 5th, '06, 06:45
Location: Staten Island NY

Re: Lookin for Good V..v..v..v..vibrations….

Post by Carl »

You'd be singing "Bad Vibrations" if you can detect your your shaft is bent from just a roll on a concrete floor.

I cannot speak for shops in your area...but we don't charge for checking a shaft for wear and straightness.
We say its a free service...but that service gets customers in the door with their running gear.
IRGuy
Senior Member
Posts: 1767
Joined: Jun 29th, '06, 07:48
Location: Wilmington, NC

Re: Lookin for Good V..v..v..v..vibrations….

Post by IRGuy »

When I had new engine isolators installed and the props scanned the shop pulled the shafts and checked them by simply rolling them on a steel plate covered welding shop table. You might be able to visit a shop and ask them if you can use a space on their table for about two minutes.

When a company I once worked for closed a mfg plant I was the plant engineer, and mgt told me to give away any tools and stuff in the maintenance shop to the guys who worked for me. They all fell over themselves getting hold of a chintzy clapped out electric hand drill and a bunch of other cheap power tools.

Me? I took home about 20 sq ft of stainless steel window screen and a 5' long stainless steel straight edge. How many guys do you know with one of those? My guys who took the power tools probably threw them out 20 years ago. I still have about half the screen.. and I use the straight edge often! I even checked a friend's shafts for him.

The Beach Boys will live forever!
Frank B
1983 Bertram 33 FBC "Phoenix"
--------------
Trump lied! Washington DC isn't a swamp.. it is a cesspool!
User avatar
Harry Babb
Senior Member
Posts: 2354
Joined: Jun 30th, '06, 21:45
Location: Fairhope Al
Contact:

Re: Lookin for Good V..v..v..v..vibrations….

Post by Harry Babb »

We use a pair of bearings mounted on a heavy base. The bearings make somewhat of a "Vee Block".

But in the field you can use 2 x 4's to construct a Vee block and the results will be very accurate.

You Aint Gotta have real elaborate equipment to do this.

Take a 2 X 4 about 6" long and with it standing on edge......right in the middle cut a shallow VEE in it......just deep enough so that the shaft will rest in the vee and the centerline thru the shaft is slightly below the top edge of the 2 X 4.

Now cut another 2 X 4 about 6" long and nail it "Flat Ways" to the bottom of the 2X4 with a vee (makes a TEE when viewed from the end).............you will need 2 of these.

The most precise piece of equipment that you will need is a dial indicator with a magnetic base......can probably get one from Harbor freight or a local tool house......a cheap one will work just fine (may be $40 or so)

Now lay the shaft in your Vee Block assemblys......let the ends of the shaft hang over the ends of the vee blocks a foot or so.

Next place the dial indicator stylus on the shaft and slowly spin the shaft watching the dial indicator readings.

If the shaft is bent you can use an Acetlyene torch to very slightly "Spot Heat" the shaft (it don't take much heat) in the area that shows the highest reading. You apply the heat only for a second or so......just enough time that will put a spot of heat shown by a blue mark that is about the size of a pencil eraser.......then just let it cool or you can cool it with water to speed up the process.....DO NOT OVER HEAT THE SHAFT! ! !

You can also use a ball pein hammer to "Ding" shaft as a source of energy to straighten it .

If any of this stuff interest you let me know and i will walk you thru it.......I am sure that Carl can provide lots of input also.

The most difficult area to straighten is when the shaft is bent between the cutlass bearing and the prop taper.

Let me know what you think

hb
hb
Stephan
Senior Member
Posts: 655
Joined: Mar 30th, '11, 05:41
Location: Providence, RI

Re: Lookin for Good V..v..v..v..vibrations….

Post by Stephan »

Woo HOO!!!
I get to make a Harbor Freight trip and channel Harry Babb...
OK so the better question was that I'm going to have the whole kit apart and I would like to take that opportunity to do everything I can so that next season when the 454s rumble to life it will be a long silken roar of thrust and less of shimmies and shakes.
I have a little time, a less talent and almost no cash... what do y'all suggest?
Thank you,
Stephan
Possunt quia posse videntur
User avatar
Craig G
Senior Member
Posts: 130
Joined: Feb 28th, '10, 00:03
Location: Pompano Beach Florida

Re: Lookin for Good V..v..v..v..vibrations….

Post by Craig G »

I know they are about 7 feet long, too long to roll them on a regulation size pool table?
Thanks,
Craig
1968 31 Bahia Mar 316-664 SeaZAR
2003 17 Cape Horn
1999 35 Contender Side Console
User avatar
Carl
Senior Member
Posts: 5928
Joined: Jul 5th, '06, 06:45
Location: Staten Island NY

Re: Lookin for Good V..v..v..v..vibrations….

Post by Carl »

Skip the rolling on tables and floors.
Shafts have to be straight within .005 or less over a 2-3' span. That is less then two sheets of paper.
Even is you could "see" shafts out along the length you'd have no way of checking taper...the part that holds the prop and most often the area that is out of spec.
Cheap rollers mounted using Ball Bearings mounted in line or V- Blocks like Harry mentioned along with a dial indicator are best. You can measure how far "out" it is or see if it is "in" spec. Shaft needs clean on surfaces you use to rotate.

Wanna check on a floor, table or with a straight edge...you'll know if your "way out" or "not way out". I'd liken that to pushing on your tire to see if it is inflated correctly. Occasionally, I'll Spin a shaft to see if bent cause someone wants to know "right now" I just stand on end and roll while sighting down the length...I can usually tell if its "really bad"...but that's about it. But that seems to make people happy till I can pull rollers, indicator and really give a check.

Pulling shaft...do it right.

Harry, for straightening, we use a hydraulic press setup with two rams, rollers and indicators...one Ram is to hold Shaft in position and one to push. We mark up shaft and figure out where to start depending on how and where the bend or bends are. Then it is a series of pushes and measurements moving the entire shaft length in small increments. Tedious process that we gave up years ago...I'll do mine, a few close friends or for our old time customers. Flame Straightening I have not been able to dial in tight enough...maybe just not enough practice.
User avatar
Rawleigh
Senior Member
Posts: 3432
Joined: Jun 29th, '06, 08:30
Location: Irvington, VA

Re: Lookin for Good V..v..v..v..vibrations….

Post by Rawleigh »

Harry: Are you heating the high spots or the low?
Rawleigh
1966 FBC 31
User avatar
Harry Babb
Senior Member
Posts: 2354
Joined: Jun 30th, '06, 21:45
Location: Fairhope Al
Contact:

Re: Lookin for Good V..v..v..v..vibrations….

Post by Harry Babb »

Rawleigh wrote:Harry: Are you heating the high spots or the low?
Rawleigh.....I have been out of town since Wednesday.....just saw your post and Carl's post tonight.

Put the indicator on top of the shaft in the area between the rollers or vee blocks. Rotate the shaft and determine the "High Spot"......that is where you apply the heat.

When you are working on the outside of the rollers you will apply the heat on the low spot.

There is a technique in applying the heat. This proceedure requires very little heat to move the shaft but the heat needs to be intense and accruately placed on the shaft

If you leave the indicator in place and heat the shaft near the indicator...you will first see the indicator continue to rise (get higher) but when the shaft cools, the indicator will fall below it starting point.

Carl, if you very accruately control the amout of heat and the posistion of the heat you can actually move the shaft .001" and feel comfortable that you can control shaft movement.

But the trick is to adjust the torch to burn with a neutral flame, then put the torch so close to the shaft that the 4 (or 6) small points of blue flame actually touch the shaft......for only one second or less.

Some shafts are bent so that they sort of resemble a "Crankshaft"......these guys are buggerbears to straighten.....but it can be done.

hb
hb
User avatar
Rawleigh
Senior Member
Posts: 3432
Joined: Jun 29th, '06, 08:30
Location: Irvington, VA

Re: Lookin for Good V..v..v..v..vibrations….

Post by Rawleigh »

Thanks Harry!!
Rawleigh
1966 FBC 31
Stephan
Senior Member
Posts: 655
Joined: Mar 30th, '11, 05:41
Location: Providence, RI

Re: Lookin for Good V..v..v..v..vibrations….

Post by Stephan »

Harry-
Thanks for your very generous offer of guidance here. This has the potential for great video... I mean literally playing with fire! Capt Pat where should I post videos?? Just put them in-line here?
Stephan

Image
Possunt quia posse videntur
User avatar
CaptPatrick
Founder/Admin
Posts: 4161
Joined: Jun 7th, '06, 14:25
Location: 834 Scott Dr., LLANO, TX 78643 - 325.248.0809 bertram31@bertram31.com

Re: Lookin for Good V..v..v..v..vibrations….

Post by CaptPatrick »

Stephan,

If it's a youtube video, there is a "youtube" button on the post/reponse interface.
Image

To use it, use only the url of the youtube video bracketed between the bbcode. i.e.:

Code: Select all

[youtube][/youtube]

Code: Select all

[youtube]http://www.youtube.com/watch?v=bOT4cSTJyqw[/youtube]
Notice that a lot of youtube urls have more information than you want, or can, use. i.e.:
In this url, http://www.youtube.com/watch?v=G2CfVyRG5Z8&NR=1&feature=endscreen, the later end of the string cannot be used -> &NR=1&feature=endscreen

So only use the portion of the url up to the first "&" symbol, deleting the remaining portion.

Code: Select all

[youtube]http://www.youtube.com/watch?v=G2CfVyRG5Z8[/youtube]
Done right, the youtube video will play:


Also, there can be no blank spaces anywhere in the code or url string. A space will cause it to fail. So will most special characters such as: &, !, @, etc. The youtube code will work for most youtube videos but won't work for non-youtube videos...
Br,

Patrick

Molon labe
Stephan
Senior Member
Posts: 655
Joined: Mar 30th, '11, 05:41
Location: Providence, RI

Re: Lookin for Good V..v..v..v..vibrations….

Post by Stephan »

Thank you.
Stephan

Hey- not only a nice example of posting videos but...
on topic about straightening shafts and...
only about an hour and a half from me if it don't come out purdy....

subtle......
Possunt quia posse videntur
Stephan
Senior Member
Posts: 655
Joined: Mar 30th, '11, 05:41
Location: Providence, RI

Re: Lookin for Good V..v..v..v..vibrations….

Post by Stephan »

Gents-
Rather than try and write it all out here's what I found with my Starboard shaft:
Possunt quia posse videntur
User avatar
Bob H.
Senior Member
Posts: 1279
Joined: Jul 10th, '06, 19:49
Location: Rehoboth, Mass.
Contact:

Re: Lookin for Good V..v..v..v..vibrations….

Post by Bob H. »

Very impressive...id say youve got a lil whip in the middle...lets see the fire n fix on the next video...now Ive got to learn how to post videos..raising the bar..BH
1966 31 Bahia Mar #316-512....8 years later..Resolute is now a reality..Builder to Boater..285 hours on the clocks..enjoying every minute..how many days till spring?
User avatar
Harry Babb
Senior Member
Posts: 2354
Joined: Jun 30th, '06, 21:45
Location: Fairhope Al
Contact:

Re: Lookin for Good V..v..v..v..vibrations….

Post by Harry Babb »

Hey Stephan

Your setup is quite clever and more than adequate to check your shaft. Like Bob said.....you got a pretty good whip in the middle.

Any runout that is showing up "Outboard" of the supports does not even need to be considered until you get EVERYTHING between the supports running true.

Are you ready to straighten it? All ya need is a torch and a bucket of water......

hb
hb
Stephan
Senior Member
Posts: 655
Joined: Mar 30th, '11, 05:41
Location: Providence, RI

Re: Lookin for Good V..v..v..v..vibrations….

Post by Stephan »

Gents-
Thanks for the responses and encouragement.
Before straighening I want to check for cracks. Am I on the right track with http://www.grainger.com/Grainger/SPOTCH ... Pid=search" onclick="window.open(this.href);return false;?Image
I also can figure that MAP gas is not goign to get it done. What do I need for a torch? Somethin like http://www.harborfreight.com/portable-t ... 65818.html" onclick="window.open(this.href);return false;?Image
My palms are getting sweaty already....
Stephan
Possunt quia posse videntur
User avatar
Harry Babb
Senior Member
Posts: 2354
Joined: Jun 30th, '06, 21:45
Location: Fairhope Al
Contact:

Re: Lookin for Good V..v..v..v..vibrations….

Post by Harry Babb »

Your right on target with the Dye Pen kit Stephan. Sand and clean very very well then follow the instructions exactly.

I have never tried the Mapp gas torch to straighten a shaft......only because I just never had the opportunity.....but I am thinking that the Mapp torch may very well have enough heat to straighten the shaft. It don't take as much heat as you may think.

Its certainly worth a try before spending the money for an accetlyene rig.

Now......go dry those sweaty palms and lets get to work.

Tell me when your ready.....

hb
hb
Stephan
Senior Member
Posts: 655
Joined: Mar 30th, '11, 05:41
Location: Providence, RI

Re: Lookin for Good V..v..v..v..vibrations….

Post by Stephan »

Harry-
I am working on a new holder for my dial gauge. The one I have is not stable enough. If I can get the dye check I will be ready to go later this weekend.
Do you use Skype??
Best and Thanks,
Stephan
Possunt quia posse videntur
User avatar
Harry Babb
Senior Member
Posts: 2354
Joined: Jun 30th, '06, 21:45
Location: Fairhope Al
Contact:

Re: Lookin for Good V..v..v..v..vibrations….

Post by Harry Babb »

Stephan.....I do not use Skype.....but I can and will work with you thru this board and email and if its on the weekend we can talk our way thru this project.

Its not really very difficult once you get a very accruate mental picture of the bend in the shaft.....meaning where is the "Worst" part of the bend, and more importantly if the bend is all on one side of centerline or not.

Things do get a bit crazy when the shaft has more than one bend......in opposite directions from centerline......but even that is workable.....once you develop a good mental picture of the shaft.

I am really curious to see if the Mapp Torch will straighten a shaft or not....it will not take very long to see.

hb
hb
Stephan
Senior Member
Posts: 655
Joined: Mar 30th, '11, 05:41
Location: Providence, RI

Re: Lookin for Good V..v..v..v..vibrations….

Post by Stephan »

Verry Good Harry - Thanks.
Off to Grainger in the AM to get the Dye check. Then try out my new stand for the dial gauge tomorrow night. My plan is to take measurements every inch down the shaft to develop a map of the shaft. I'm guessing I'm looking for the peak(s?) in the bend...
Stephan
Possunt quia posse videntur
User avatar
Harry Babb
Senior Member
Posts: 2354
Joined: Jun 30th, '06, 21:45
Location: Fairhope Al
Contact:

Re: Lookin for Good V..v..v..v..vibrations….

Post by Harry Babb »

Yup.....that's right Stephan.....look for the "High Spots" or Peaks. Be sure to put a majic marker mark on the high and write the indicator reading right next to the mark.

Its not really necessary to take a reading every inch, you can do very well taking a reading every 6 inches.

In the end.....the best situation is that "ALL" of the "Peak" readings will be in a straight line......all on the same side of the shaft.

I suggest that you run the Vee blocks (or shaft supports)........one in the area between the worn cutlass area and the prop taper on one end and the on the coupling end put the support near the end of the keyway (an inch or so away from the keyway)

hb
hb
Stephan
Senior Member
Posts: 655
Joined: Mar 30th, '11, 05:41
Location: Providence, RI

Re: Lookin for Good V..v..v..v..vibrations….

Post by Stephan »

Ok Gents-
I didn't get out of work in time to get to Grainger before closing so the dye check will have to wait for Monday.
After finishing up the clean-up I did find some rash that is on the shaft near where the stuffing would ride on the shaft.
Image

I set the shaft up like Harry said and ran the dial gauge every six inches. Inch 0 is at the coupling and inch 82 is the end of the threads for the prop.

The chart below presents the data I found:
Image

I measured twice - one marked in red and once in black. The results correlated closely. I then spun the shaft to the high spots were on the side and then shot a laser across it. The high spots lined up almost exactly...
Image
Image

Here's a quick look over the marked up shaft.


And here's an artsy shot:
Image

How to proceed??
Last edited by Stephan on Dec 16th, '17, 19:51, edited 1 time in total.
Possunt quia posse videntur
Stephan
Senior Member
Posts: 655
Joined: Mar 30th, '11, 05:41
Location: Providence, RI

Re: Lookin for Good V..v..v..v..vibrations….

Post by Stephan »

I found the info below at http://www.repairengineering.com/shaft- ... ening.html. Does it look like good guidance to you? Also, what should I look for as indicators it's time to quit and take it to the machine shop for a pro to repair before I have to buy a new one...
Thanks,
Stephan

Spot Heat Shaft Straightening Method
What is the procedure to straighten a bent shaft using the Spot Heating method?


Image


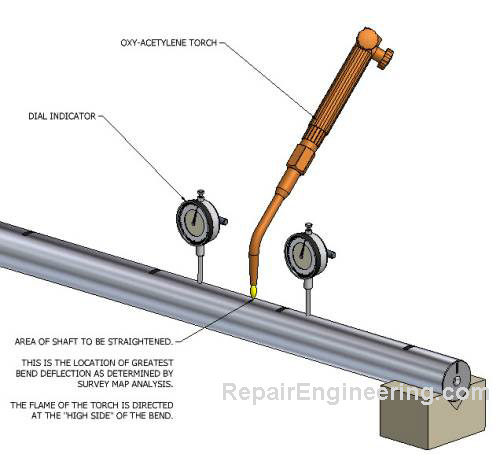
Figure 4. Typical spot heat shaft straightening set-up.


Procedure: 1.Create a Bent Shaft Survey Map to determine the location and amount of bend correction required. Rotate the shaft so that the "high side" of the bend with the greatest magnitude faces upward as shown in Figure 4. Part of the success of the spot heat shaft straightening method relies on the weight of the shaft itself to assist in correcting the bend.


2.Position dial indicators adjacent to the bend location as shown in Figure 4. If the shaft is supported between centers in a lathe, relax the center preload slightly so that the shaft can flex during the shaft straightening process without binding.


3.Working quickly, heat an area of the shaft about .5 in - 1 in. (12mm-25mm) diameter using the welding tip of an oxy-acetylene torch. The objective is to achieve a temperature differential, or local hot spot, between the area being heated and the surrounding area. Therefore, apply the heat evenly and steadily while monitoring the dial indicators.


It is really important to watch the dial indicators during the entire heating process as things will happen quickly, usually within several seconds.

As the shaft is heated, the dial indicators will climb - indicating that the amount of the bend is increasing, temporarily. This is the desired result, even though it seems counter-intuitive.


It is important to get a initial feel for the responsiveness of the shaft to bend reversal. During the first spot heating cycle, heat the shaft until the dial indicators show a thermal-caused deflection of three times the orginal bend.

Using the results from the first shaft straightening cycle, adjust the actual amount of indicated thermal deflection required on subsequent straightening cycles.

If this seems to be more art than science... it is.

Spot heating shaft straightening involves careful observation and educated trial-and error. However, it is generally possible to achieve good results by a methodical application of the process.


4.When the dial indicators show that the desired deflection is achieved, remove the heat and allow the shaft to cool. To speed-up the process, the cooling cycle can be accelerated by various methods such as pouring water on the shaft, or by the use of compressed air, a spray mist system, or by simply using a wet sponge or wet cloths.

If the shaft is straightened in a machine with a water-based flood coolant system, that can also be used to cool the shaft as shown here.

As the shaft is cooled, the dial indicators will move in the opposite direction as they did during the heating process. Continue cooling until the area that was heated is the same temperature as the rest of the shaft.


NOTE: Be sure to allow the shaft to cool completely prior to making measurements or further corrections because it will continue to move throughout the cool-down process.

5.After the cooling is complete, measure the magnitude of the bend that now exists in the area that was just straightened. Compare this new value with the previous bend deflection prior to the repair.

If no improvement in the bend is measured after the first repair cycle, repeat the spot heating process by increasing the heat-induced deflection in small increments of .010-.020 in (.25-.50 mm) more than used in the previous attempt.


NOTE: At any point, if the amount of heat required causes the shaft to become dull cherry red in color without having an effect on correcting the bend, the spot heating approach in unsuited as a repair method for that particular shaft and an alternate process needs to be used.


6.Repeat the process until the desired shaft straightness is obtained.


How does the spot heat shaft straightening process work, in principle?
Experienced welders are familiar with metal distortion, known as "drawing" or "heat affected zone", that occurs during the welding process. Spot heat shaft straightening uses the same principle. The mechanics of the process are as follows:
1.A small area is heated quickly so that the material in the localized area is in a softened, semi-plastic state while the surrounding material remains relatively cool and solid.


2.The spot-heated material expands as it is heated. Because the locally heated area is surrounded by solid (cooler) shaft material, the thermal expansion causes growth in the only unrestrained space available... toward the surface of the shaft. This expansion creates the raised bump on the surface of the shaft that is characteristic of the process.


3.As the shaft is cooled, it would be natural to assume that the material in the raised bump would return to its original state prior to heating. In actuality, the exposed surface of the bump cools the most quickly - and becomes solidified in the raised condition.


4.The very center of the heated spot is the last to cool and, as it cools, the material contracts. At this stage of the process, the center spot is surrounded on all sides by material that is in a cooler, solidified condition.


5.The contraction of the center creates a tensile stress at that location that is very close to the yield point of the material. The localized tensile stress exerts a force that pulls on the surrounding material and causes the shaft to deflect.


In Figure 5, the red lines indicate the shaft forces generated as a result of the localized area of tension. When performed properly, in the correct location, the tension forces can pull the shaft toward straightness.


Image


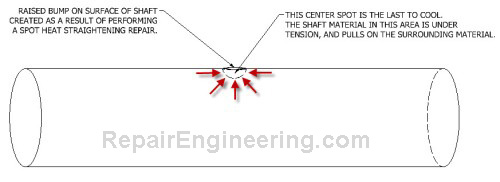
Figure 5. Spot heated shaft.
Possunt quia posse videntur
Stephan
Senior Member
Posts: 655
Joined: Mar 30th, '11, 05:41
Location: Providence, RI

Re: Lookin for Good V..v..v..v..vibrations….

Post by Stephan »

If there isn't a rule about not posting three times in a row to your own thread there should be....

Finally got to heating things up and here's how I did it and what I got for results.
I do not have an oxy torch so I am trying with a MAPP gas plumbing torch. I do not have much control over the flame.


After that I re-measured the shaft and got the following results:
Image

Is there good reason to continue and are there improvements to my methods?
Possunt quia posse videntur
User avatar
Harry Babb
Senior Member
Posts: 2354
Joined: Jun 30th, '06, 21:45
Location: Fairhope Al
Contact:

Re: Lookin for Good V..v..v..v..vibrations….

Post by Harry Babb »

Stephan

I was curious about the MAPP gas torch and from the video I see that it does not deliver nearly enough concentrated heat.......and the keyword here is CONCENTRATED.

Although you are getting the correct results an Oxy Fuel torch will be a better choice. Using an Oxy Fuel torch the amount of time that the heat is in contact with the shaft is less than one second per spot. The trick is that the flame is so concentrated that the heat can be applied to a spot the size of a pencil eraser and will deliver drastic results and in the end you will not get the shaft nearly as hot as with the MAPP gas torch.

As far as cooling its not necessary to apply the water immediately after heating.....in fact if you do not apply coolant at all you will get the same results......just takes longer. Generally I apply the heat and watch the indicator needle increase in value and do not appy coolant until it returns back to its starting point. Then when I do apply the coolant the shaft is already cool enough that it does not "Steam" much at all and the needle drops below its starting value.

Using an Oxy Fuel torch adjust the flame to be a "Netural Flame". I call the heat application "Stinging" the shaft. Apply the CONCENTRATED heat to the shaft by positioning the Tiny Cone of flame coming out of the torch tip to the shaft until the indicator moves the amout you want......on a shaft the size of yours it takes less than one second of flame contact and the shaft will have a very small "Blue" mark right where you applied the heat.

Start straightening where the shaft is bent the worst but DO NOT take this area right back to ZERO. Try to make the .073 area correct to .058 then reevaluate and continue to "Iron Out" the highs until you get to zero. If you get to agressive the results will give you shaft with several "Highs" inbetween several "Lows" (Not good)

Your on the right track as you can seen by the graft and I certainly have to commend you for what you have accomplished.......keep going.....you'll have this processed mastered.

hb
hb
Stephan
Senior Member
Posts: 655
Joined: Mar 30th, '11, 05:41
Location: Providence, RI

Re: Lookin for Good V..v..v..v..vibrations….

Post by Stephan »

I kept going with my pussy MAPP gas torch, hitting spots on the shaft for like 30+ sec at a shot and then again and again and again...
I think this is like the metal version of varnishing... Prepare as well as you can - be diligent - be patient and sometimes it comes out good and other times maybe just ok but unless you 'da man it ain't gonna come out perfect....

So here's what I did and what I got...
Image

The worst point is 5 thou. with most < 3 thou. As I've gotten close I didn't have a good repeatable way to move a small segment of the shaft 2-3 thou. I was fortunate that the bend stayed simple for like the first 6 trys. After that the spine of the bend started wandering its way around the shaft and the understanding of where to present the heat was not as clear. The graph can't show the wander in the peaks of the bends

I plan to check the other shaft, soda blast the couplers/paint and then take it all to Turn Wright out on Cape Cod (see the movie in Capt. Patrick's post above) to have 'em checked at the couplers faced...

Thanks everybody I appreciate the guidance and encouragement.. I am really ready for a different job now.

Stephan
Possunt quia posse videntur
Navatech

Re: Lookin for Good V..v..v..v..vibrations….

Post by Navatech »

Just a word of advice/warning, I have the HarborFreight welding kit shown above... The hoses it comes with are barely adequate!... Mine were leaking in less then a year even though my usage is very low... Nothing more then an occasional treatment of something that refuses to come apart...

IOW, plan on replacing the hoses soon with quality hoses... Both the oxygen and the acetylene present significant dangers on their own...
User avatar
Rawleigh
Senior Member
Posts: 3432
Joined: Jun 29th, '06, 08:30
Location: Irvington, VA

Re: Lookin for Good V..v..v..v..vibrations….

Post by Rawleigh »

Harry: Does this work on pipe as well as solid shafting?
Rawleigh
1966 FBC 31
User avatar
Harry Babb
Senior Member
Posts: 2354
Joined: Jun 30th, '06, 21:45
Location: Fairhope Al
Contact:

Re: Lookin for Good V..v..v..v..vibrations….

Post by Harry Babb »

Rawleigh wrote:Harry: Does this work on pipe as well as solid shafting?
Rawleigh

I have tried to straighten pipe with the torch method and have not had near the success as with solid shafting.

Also Bronze shafting does not respond very well to this method either
hb
User avatar
Rawleigh
Senior Member
Posts: 3432
Joined: Jun 29th, '06, 08:30
Location: Irvington, VA

Re: Lookin for Good V..v..v..v..vibrations….

Post by Rawleigh »

Thanks Harry. I have a post hole digger auger for my tractor that needs straightening after wrestling with a large root!
Rawleigh
1966 FBC 31
Post Reply

Who is online

Users browsing this forum: Bing [Bot], Google [Bot] and 41 guests