I was hoping to get some advise on battery connections... I am trying to finish-up the engine room wiring an prepare to bolt the new 6BTA 270's down, for the last time. (I hope)
I currently have 4 optima gel batteries, and have wired bilge pumps to the outboard Port battery, and the house electric panel to the outboard Starboard battery. I also have some in-line breakers and Cole Hersey switches connected to these batteries, for a wash-down pump and live-well pump. (one on each side) Currently I have nothing connected to the inboard batteries, and I would like to reserve them for cranking-only, but still be able to put them in relay. I have a Blue Seas selector switches on each side, and have made a place to add a third switch to parallel port and starboard. (in emergencies) I also have one of those Blue Seas ACR switches, but have no idea how it works or what to do with it... Do I need one ACR for each side? Should the alternators connect to the ACR? Does anyone have a drawing or picture of an instillation? My main concern is the charging of batteries by either the alternator or an on-board charger, and drawing too much current through each battery. Any advise is much appreciated.
From the way you are describing your setup, you will need an ACR for each engine/bank. The alternator output will go to the starting battery, and the ACR will connect to the positives on both the starting and house battery. When the starting battery gets to full charge, the ACR will send the excess charge to the house battery.
Nice thing about the Blue Sea ACR is that it is dual-sensing, so it doesn't matter which side you connect the charger to. If you connect it to the starting battery, the charger won't begin to charge the house battery until the starting battery is fully charged, and vice-versa. It does depend on your usage, but I would probably attach the charger to the house battery, reasoning that the starting battery is always at full charge from the alternator, and the house battery may not be (if you've spent time on the hook, etc.).
This sounds a lot more simple that I had figured. I am goint to install two ACR's, one between each bank of batteries, and just connect the postitves from each battery to it... I will connect the alternator wires to the outboard battery on each side, as this is likely the one that will mostly require the charge. Thanks for the help!
Just a suggestion - consider moving the batteries to the rear of the engine compartment. Leaning over the engine, pulling those things out and dropping them back in can be tough on the back and shoulders, particularly if you ever use heavier batteries like the Odessey.
Another suggestion - make sure you ground both batteries coming out of the ACR. If you don't, weird things happen. None of it good, I can say from experience.
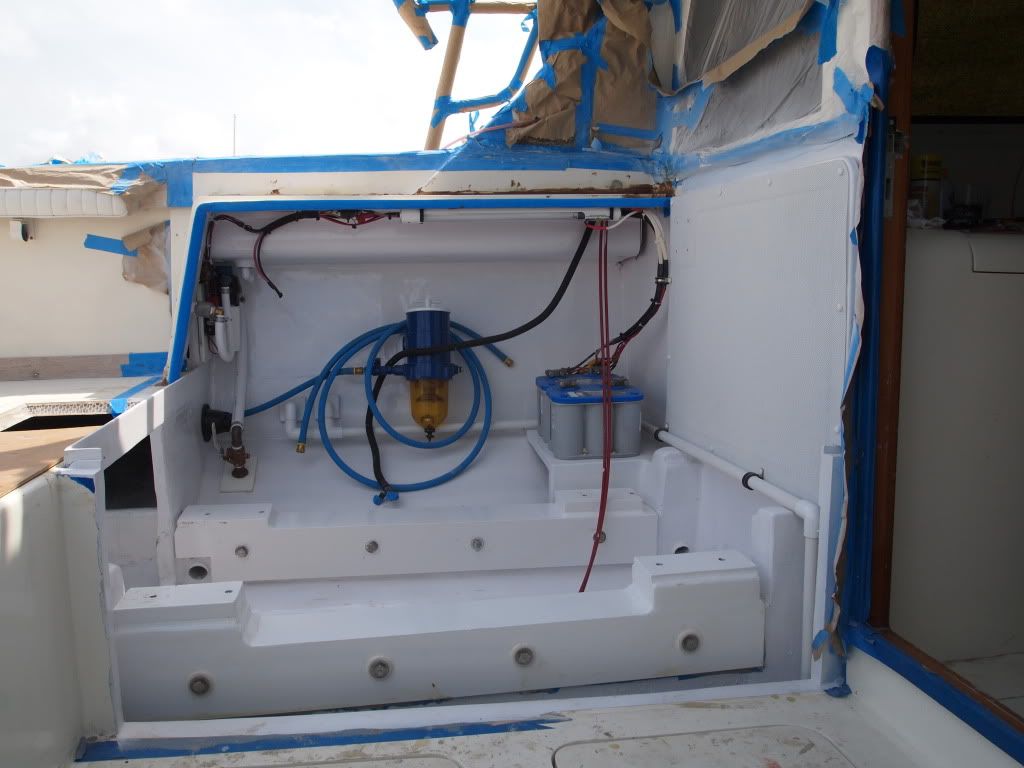
Nice clean layout... I like your washdown config.. but Hey whats up with the sprinkler line & 2 output holes? That come from the midship bilge pump.. ?
The washdown hose coming from the thru hull should have two hose clamps. Just my two cents. Also I have found that the white hose does not do well when filled with pressure. Ask me how I know.
I connected each bilge pump to a different battery, just to be safe. When you install the Cummins will you be able to access the bottom of the fuel filters to drain the smutch and water? Looks kind of tight.
Mikey
3/18/1963 - -31-327 factory hardtop express, the only one left.
The difference between genius and stupidity is that genius has its limits.
-Albert Einstein
I agree, Mikey, and hot if and when you change filters while underway. Mine are under a deck hatch not even close to the engine. Might even consider moving battery shelf back w/the engine in mind.
I'm not sure but indecision may or may not be my problem.
"People sleep peaceably in their beds at night only because rough men stand ready to do violence on their behalf." - George Orwell
Ok they started it. The filters should be someplace easy to get to. It will be snotty when they pack up and leaning across a hot engine is not the spot to change a filter. Also the PVC pipe might crack. There is nothing to stop it from filling the boat with water if something goes wrong. The heat from the engines will affect the PVC over time. I am not saying these thing to be a jerk. I already am.
I put my racors at the rear of the engine compartment. That way I can get at them by opening the engine cover and I am not leaning over a hot engine. Close but better than were you are. I can fit a small cup uner mine.
I like the PVC idea but Brew might be rigth. Gets pretty hot in there. You can wrap it in heathsield maybe. You can get it at the auto parts store.
BC Bertie,
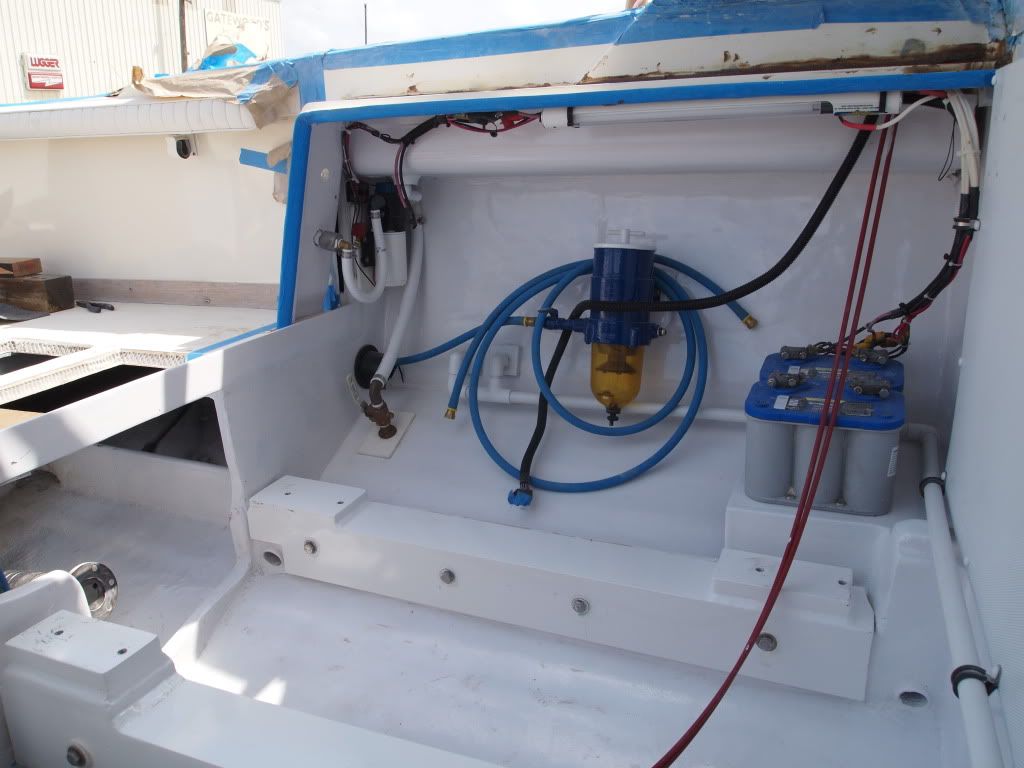
A few more suggestions, on your battery conections no more than 4 connections on the postive posts. The location of your washdown inatkes should be lower in the bilge, when a 31 rocks back and forth you will loose suction on the pump, also when under way unless youv'e got a scoop strainer that actually in the water at speed the water is going right by the pick-up.
PVC fittings in the engine space can crack because of the heat build-up from hot engines, and the Racors should be moved so you don't have Zebra burn stripes on your arms and chest from hot engine when you lean across trying to change elements. Also like Brewster said white sanitation hose does not like pressure, It's Ok for head discharge and pump outs, I would rather see re-enforced plastic hose( one with criss- cross mesh inside) or wire re-enforced Trident hose. All thru hull fittings should be double clamped and bonded to the main bonding system. The 2 fittings with the PVC pipe lines and elbows should be smooth bore inside (friction loss/head pressure on bilge pumps) re-enforced hose and bronze or stainless elbows and thru hulls. Movement and heat will crack PVC in a very short time.
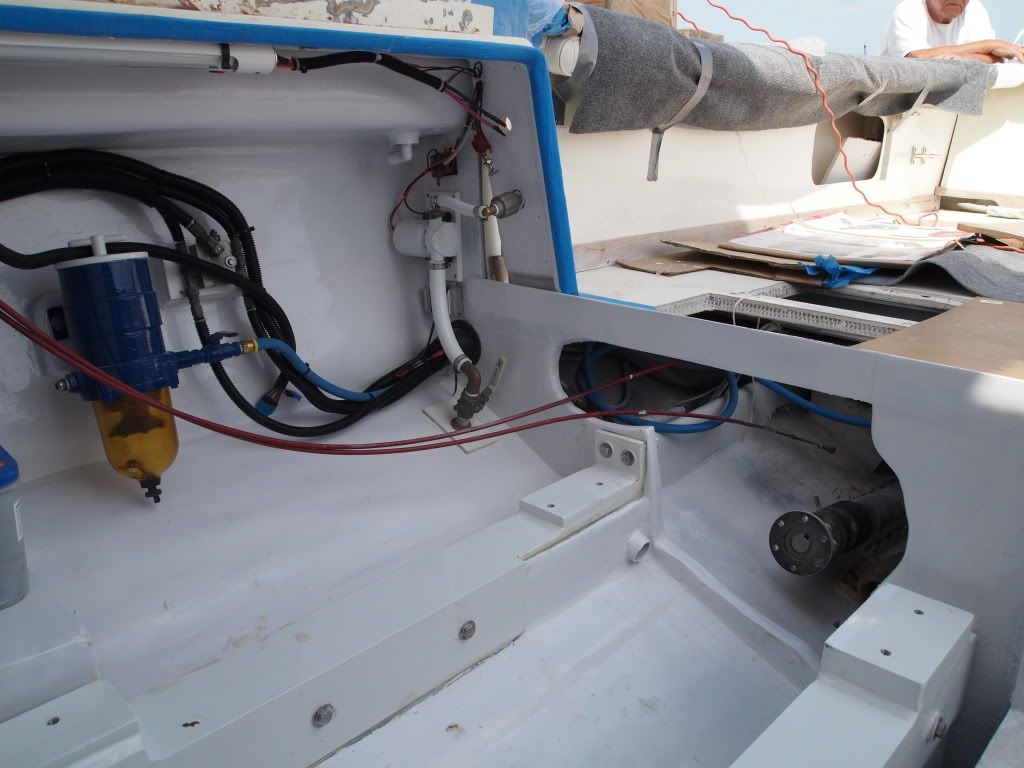
Another thing, I would add compression plugs to the pipe that comes out of the engine spaces for water drainage. If you blow a oil pan, oil line, transmission line or any thing with oil, it's going to go into your bilge and then overboard via auto bilge pump( Big fines for oil discharge overboard, USCG or EPA can fine you up to $5000. per occurance). Keep it contained under the engines until you can get oil into a container for proper disposal.
lI have the same type set-up but have the plugs in all the time.
Youv'e done a very nice job with the engine spaces just take a few tips from the guys that have been doing this for a lot of years. I survey for a living and have done over 35 31's and I have rebuilt mine twice in 35 years.
Pete Fallon
Where to start? All thru-hulls are stainless. The engine bed-area is water tight, so no problem with spillage. I can retain an oil-spill and pump it out, or drain it, if necessary. Both of the forward bilge pumps go to the PVC pipe, and both have a short piece of hose, and a check-valve, about 10" from the pump. This keeps the bilges very dry. I also have flapper valves that keep water from entering from the outside of the boat. This is something that I've been doing for 15+ years, with no problems due to heat. In fact, I worked on one boat that had all PVC plumming, even for engine raw-water pick-up to the sea chest, and it worked great. We traveled 30,000 miles on our own bottom, to 12 different countries in a 3 year period, and never had a leak, with an engine room that mostly ran around 180 degrees, all the time. I had the same concerns, but I'm a believer now.
I do have scoops on the washdown and live-well thru-hulls. They are GROCO thru-hulls, with Apollo valves, and I will be bonding everything, shortly. As you know, the deadrise is 20 deg., so I had to center the holes, between the chines, to allow for the angle, not to mention to keep some uniformity. The previous owner had them mounted aft of the eng. compartment, and it was difficult to acces the sea cocks, and they were in the way of the new 2" engine thru-hulls & valves. I glassed every hole in the boat and moved everything, to accomodate the new engines.
I agree with your concerns about the sanitation hose, but I was limited on selection here, and it's easy to replace. I made the hose short, and I don't expect much issue. I didn't have room to insall a venting valve on these pumps, so I went with one hose clamp, in order to have the ability to prime or vent the line, with ease.
The racors have been in this place for the past 4 years, and I've been very happy with the location. There is plenty of room to acess the top and drain the bottom, all of wich is done from aft of the engine, so no Zebra burning. I had V6's in the boat, before, so the room with the new engines is huge! I am not a big guy, and can actually crawl around on the outboard side.
All of this work was done with the cock-pit sole in place. I will likely be replacing the deck, in a couple of years, but that is another can of worms. Right now, I have access to everything from the engine compartments, and can keep an eye on all systems without worrying about them getting wet.
I'm working on the battery connections and ACR hook-up, now. What a pain in the ass! I didn't realize that i would have to install six 120 amp fuse blocks, to the tune of $40.00 a piece. Not to mention cutting and connecting all of the No. 2 guage cables, and heat shrink, and so on. Anyway, thanks for all of the support and input. It's nice to have people to talk to about this stuff... Eveyone here is tired of hearing about it!
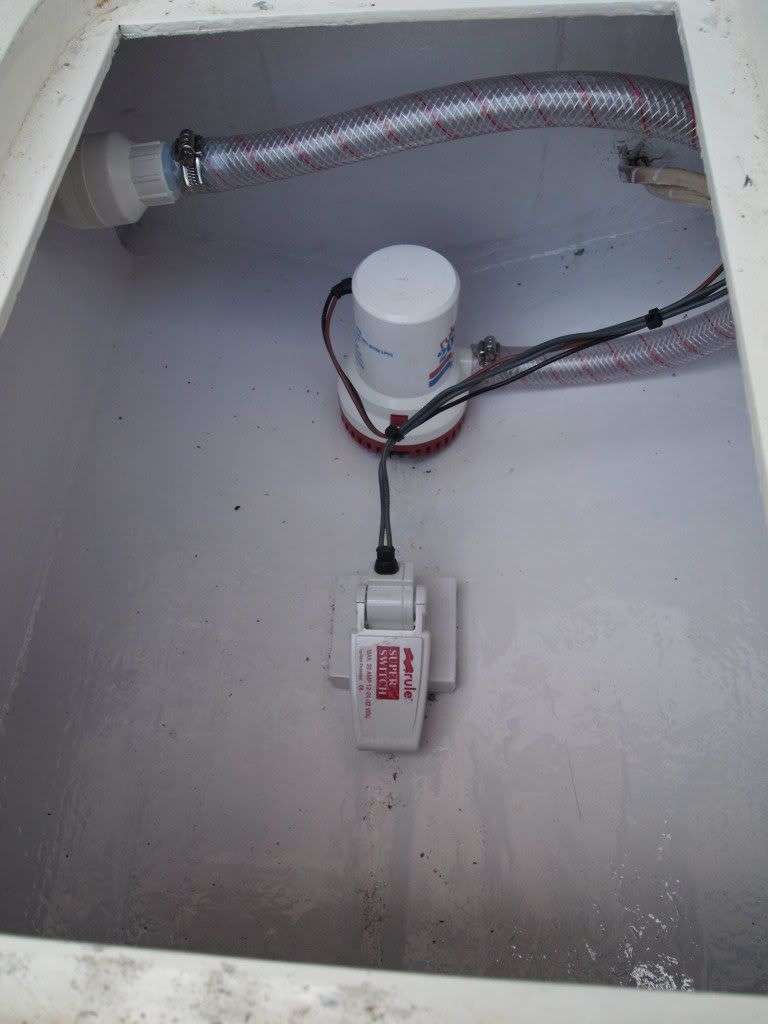
Here is a picture of one of the bilge pump check valves. I have made the hose-run a little shorter since this picture, but this is the general idea, and It has worked well for me in the past.
I forgot to respond to that one... I only have three bilge pumps, so I don't know where the forth positive connection would come from. They are currently all connected to the 1/4" terminals, leaving the larger terminals for the ACR, starter, and selector switch connections. I guess I could run them all to a terminal bus, but I'm not sure that it's necessary. The ACR's and wiring configuration will give me an isolated battery for bilge-pumps and wash-down, on the Port-side, with the inboard battery reserved for engine cranking. The Starboard outboard battery is for house electronics and live-well pump, and the inboard is reserved for engine cranking. I am trying to keep things fairly simple, with no generator.
The ABYC states "11.16.4.1.11. No more than four conductors shall be secured to any one terminal stud. If additional connections are necessary, two or more terminal studs shall be connected together by means of jumpers or copper straps."
It doesn't refer to the positive post of the battery, it refers to any terminal stud, anywhere on the boat, and the underlying cause is that it is very difficult to ensure that the connections will stay tight. Loose connections increase resistance, increasing heat, leading to fires...
It is legal to connect four ring connectors to the threaded stud on a battery, and four more to the side terminal bolt if so equipped, and four more to a terminal adapter clamped to the post if so equipped. But it is a very bad practice, and makes it hard to comply with the overcurrent protection requirements.
In your case, the starting battery positive posts would have the cable to the the battery switch, the output from the alternator, and the feed from the ACR. The house battery positive posts would have the cable to the battery switch, the feed from the ACR, and the feed from the battery chargers. The bilge pumps could be fed from either the house battery positive post or (preferred from my point of view) from the battery side of the switch (since it would probably be easier to locate the overcurrent protection there).
Lastly, it's a drag to attach a lot of terminals to your battery; makes getting 'em out more of a pain...
I was just wondering the other day as to why not install check valves on the discharge side of bilge pump's so as to prevent some of the back flow on the discharge side when the pump cuts out as well as to prevent siphoning.
Brian's photo showing such an arrangement is the first I've ever seen of a check valve so installed.
So I ask is this fair / good practice to install check valves on a bilge pump's discharge side, or is the standard practice not to so as to negate any possibility at all of blockages on the discharge side due to the check valve failing?
With respect to double clamping the hoses most bilge pump brands I've ever seen ,and certainly ever used,only have enough space on their 'tailpiece' for one clamp to be properly secured, see Brian's photo.....I always install a second clamp regardless.... however it is more of a 'show' clamp as it does not seat fully over enough of the bilge pump's tailpiece to provide a secure fit......so my thinking is that it's more of a spare already in place than a fully functioning clamp....and what little part of the clamp that 'secures' is better than just one clamp fully secured!
Of course on the through hull discharge the tailpiece is long enough for 2 clamps to be properly secured......provided of course you have installed or have already in place a discharge with a long enough tailpiece so as to allow for 2 fully secured clamps !
The use of pvc pipe and fittings would concern me for several reasons.....no shut off valves,easily broken underfoot or otherwise, and eventual failure of the glued joints due to heat.
What are the pvc lines for?
My first thought was perhaps for the head and galley's sink discharges however their configuration appears to defy gravity in that regard.
IMHO.. all clamps below waterline should b doubled.. you can butt them to each other. (Tony Athens alway butts them togerther.. ) I have a secondary bait pump intake along the same midship area as your washdown but more to the keel.. It sucks air sometimes & I burn up a pump now & then & kill off ba8t .. I have drilled out the front area of the strainer & that helps .
Wayne
Preston,
The double clamping is only ment to be on the thru hull fittings at the sea cocks, not the bilge pump out let it self.
As for check valves you can go either with or without them, I prefer not to have them, I think it's just another fitting to break or clog up or freeze in the winter. The Johnson 2200 gph pumps come standard with a rubber flapper that can be used inline if you want.
As for back siphoning the outlet fitting should be way above the waterline anyway. I seen too many Sea Rays with plastic fittings for overboard discharge break either from UV damage or impact, they are placed very close to the waterline and after 5 to 8 years the fittings are very brittle and most have damaged flanges.
I might be a purist but any fitting that discharges or intakes water should be either stainless, bronze or Marlon.
I must agree with all of the concerns mentioned, regarding plastic, check valves, and potential failure, due to wear & tear or neglect.
With that said, I can speak with a little experience, regarding the use of these check-valves. I have installed many of them, and have used them for as much as five years, without issue. There is not doubt that they could potentially provide a clogged line, if trash or debris were to enter the line, and was not caught by the strainer on the bilge-pump. I"ve just never had it happen to me... I generally carry a couple of spares, that are already fitted with MPT & Hose barb, so replacement takes a couple of seconds at a cost of about $8.00... I have'nt used one, yet. It does not freeze where I live or travel to and I am constantly watching these items for wear. If I were up-North, I would probably reconsider some of this. Also, please note that in addition to the check-valve, I always install a bronze flapper valve, just before the thru-hull discharge. This prevents any water from entering at this point. They can be purchased at ACE hardware, and are pretty cheap. All of my thru-hulls are bronze, below the water-line, and the three the exit above the water-line are stainless.
I went with PVC, on the discharge of the bilge-pumps, simply because I have a tight space to work with, and it really cleans-up the engine-room area. Most new boats come with a PVC minifold for all discharge of pumps, and often flow into one single port, either out the side or out the exhaust. I'm not a fan of this design, as it's difficult to determine which pump is running, by watching the discharge of water. Scarry when thinking about A/C pumps. Hatteras and Viking are two that I have experience with. If heat is a concern, then one could always use CPVC or shchedule 80, although I've found that it's not necessary.
I must admit, I am guilty of building similar manifolds on other boats. I once built a boat with all PVC plumming, including supply to all systems, and multiple manifolds for discharge and supply. We had a pump-room with a sea-chest, and all manifolds were located there. We installed two large HP Baldour motors, with high-volume pumps, stainless shafts and ceramic seals. One pump ran all ship systems that require water. The motors were 240 volt, and therefore drew half the amps. Both pumps were plummed with ball valves, so that either could be used a the primary pump or a spare, with the turn of a valve and flip of a switch. We then installed electronic valves on everything, such as icemakers, watermaker, etc, that would require raw-water. This system worked for years without issue.
I appreciate the info. regarding survey regulations on electrical and hose clamps. I just spent the day adding clamps (not Ideal brand), terminal busses, breakers and fuses. I swear, I think I could qualify for ABS status, at this point!
Brian, This group will make sure you do it right thats for sure...your knee deep in experience here, when one of the faithful says ask me how I know..trust me he KNOWS..do overs are just part of the fun...lookin good now put the iron in there...BH
1966 31 Bahia Mar #316-512....8 years later..Resolute is now a reality..Builder to Boater..285 hours on the clocks..enjoying every minute..how many days till spring?
i have two acrs and have never really understood how they worked. i do know that i kept blowing fuses to my house battery bank and had to have someone come back and install a wire from the starter to the acr that temporarily disconnected the acr while the starter was engaged. i have not had any problems since. i have also heard instances where someone had an alternator out but did not know this because the acr was doing its job and keeping that cranking battery charged.