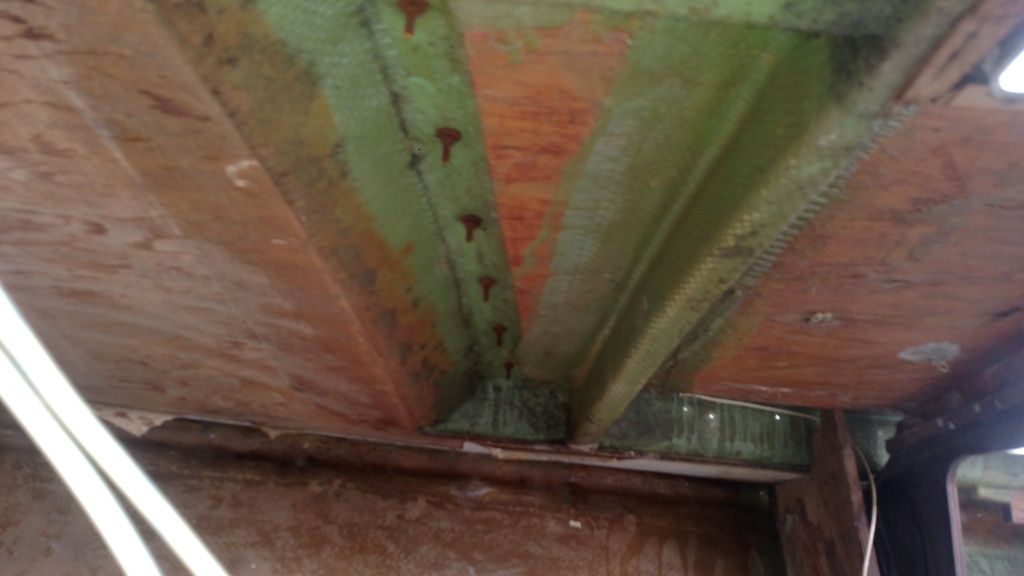
Water flows downhill... Therefore I wouldn't expect the underside of the console to be bad... It just looks bad... Take a largish flat screw driver and start tapping... Not too hard... Unless you find soft spots some sanding and painting will work...
The molding where the flybridge construction meets the deck (top of the cabin) is another story... That looks like an area where water might accumulate... Same thing though... Take a largish flat screw driver and start tapping...
If you do find rot the question is how extensive is it... If you find yourself needing to replace (ply)wood consider replacing it with a synthetic (e.g. King Starboard)...
New Project B25!
Moderators: CaptPatrick, mike ohlstein, Bruce
-
Corey Mason
- Posts: 139
- Joined: Aug 19th, '14, 07:31
Re: New Project B25!
Ok thanks guys!
I did kind of knock on it with my fist, and pushed/pried some of it. It actually was still rather strong to me. I was just worried if that was acceptable or not. Looking again at the lower portion, it does seem that is worse off.
I'll have to get that screwdriver out and give it a test.
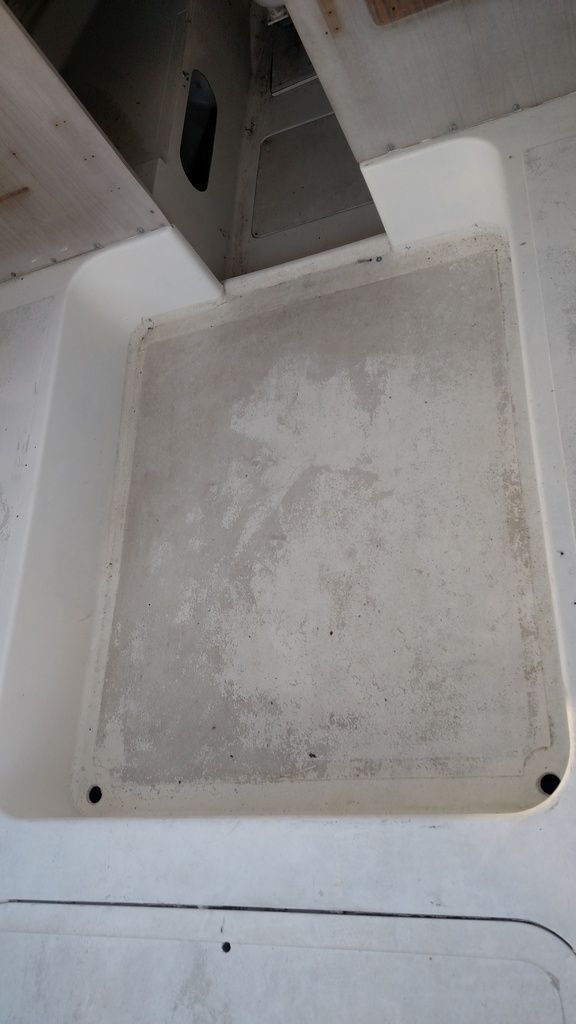
I did also noticed yesterday that the hatch that covers the gas compartment bounced a little. I was standing on it and I could feel it sink ever so slightly. That is all fiberglass if I remember correctly, so it shouldn't rot. Is that normal for it to be soft? Keep in mind, the gas tank is out; its just an empty hole. But, I don't see how the gas tank would help strengthen the deck lid at all. Could I just go back and reinforce it with another layer of glass?
I did kind of knock on it with my fist, and pushed/pried some of it. It actually was still rather strong to me. I was just worried if that was acceptable or not. Looking again at the lower portion, it does seem that is worse off.
I'll have to get that screwdriver out and give it a test.
I did also noticed yesterday that the hatch that covers the gas compartment bounced a little. I was standing on it and I could feel it sink ever so slightly. That is all fiberglass if I remember correctly, so it shouldn't rot. Is that normal for it to be soft? Keep in mind, the gas tank is out; its just an empty hole. But, I don't see how the gas tank would help strengthen the deck lid at all. Could I just go back and reinforce it with another layer of glass?
Re: New Project B25!
To give the hatch some strengh you would have to glass in a couple of pieces of 1" x 2" just like stringers.
You have a great looking b25 I talked to the seller last summer at that time he didn't think the trailer would make it to Canada and to
costly to ship both trailer and boat on a lowbed.
Glad to see you got the boat , you have your work cut out for you but it will be worth it when you get out on the water.
Bill
Re: New Project B25!
Here is my favorite set up.


-
Joseph Fikentscher

- Senior Member
- Posts: 610
- Joined: Jun 29th, '06, 07:36
- Location: Southport, NC
- Contact:
Re: New Project B25!
Captbone that picture has been in my mind a lot lately. I plan to make similar seating on both sides. Hopefully over this winter.
Sea Hunt Triton 207, a step down, but having fun till my next Bertram!
[url]https://www.instagram.com/endurance_ber ... hl=en/[url]
[url]https://www.instagram.com/endurance_ber ... hl=en/[url]
-
Corey Mason
- Posts: 139
- Joined: Aug 19th, '14, 07:31
Re: New Project B25!
Captbone,
Funny thats the picture you were talking about. I just found that picture a couple days ago and thought "Damn...that's good!" I think I'm going to go with something like that. Instead of the sink though, it may be a livewell; and if theres room a storage cabinet for tackle. Won't have carpet and I'll probably also install a foldable transom bench and call it a day.
It looks like they also made small cubbies in that step down area if I'm seeing it correctly. I like that as well.
Re: New Project B25!

Captbone
I cut a piece of plywood and tried this last month used the forward backrest cushion so I could try this layout, so far the wife and I like it.
I think this fall I will make up some new cushions for the backrest it seems to open up the boat.
I have been searching b25 and b26 interiours for months to get ideas and have not seen the pic you posted that b25 looks great.
-
Corey Mason
- Posts: 139
- Joined: Aug 19th, '14, 07:31
Re: New Project B25!
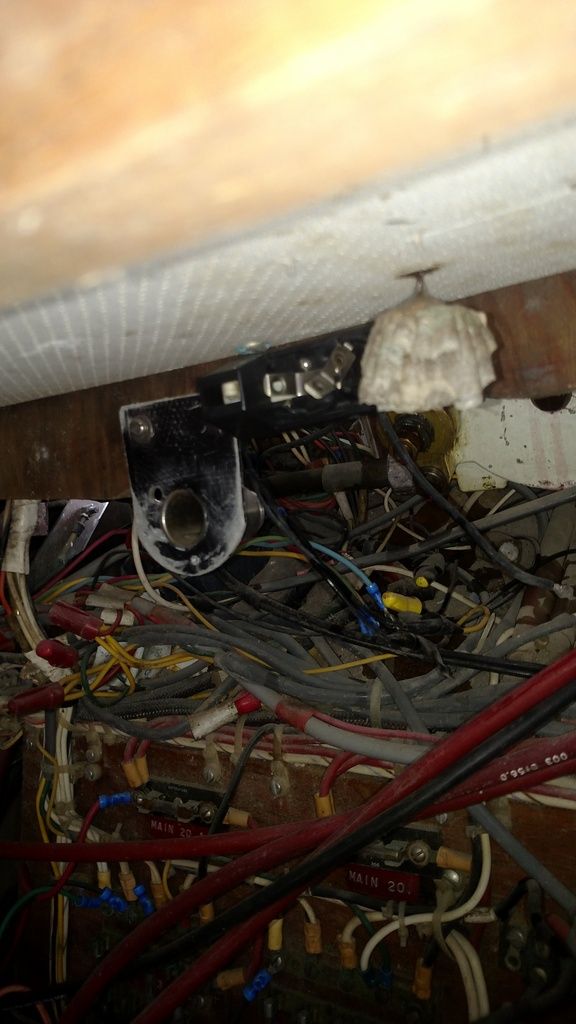
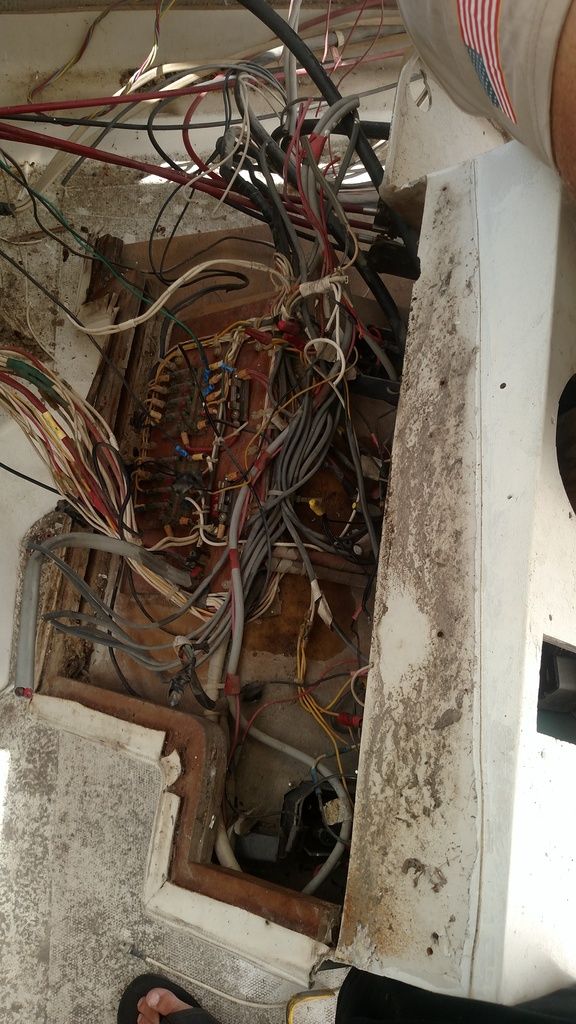
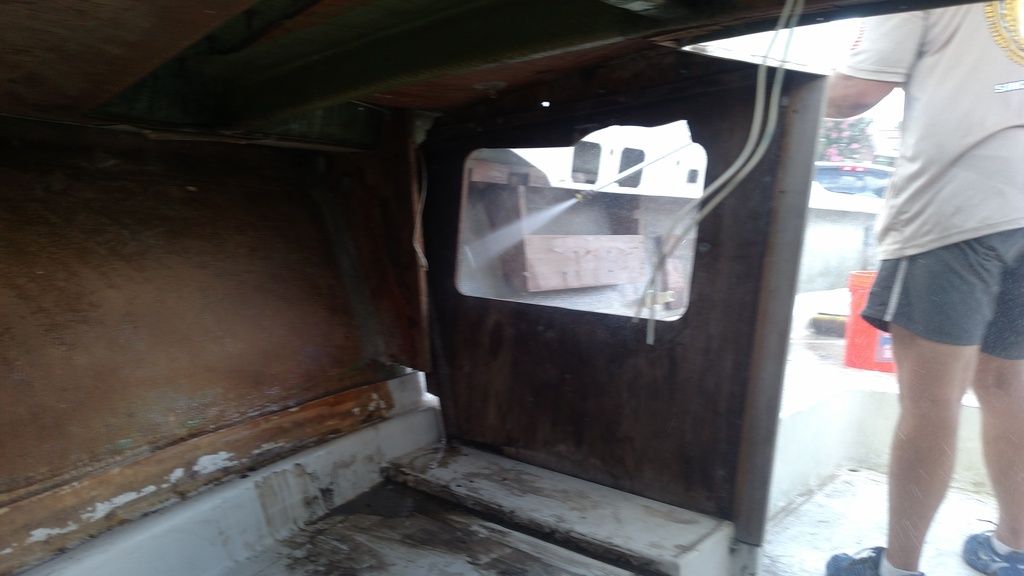
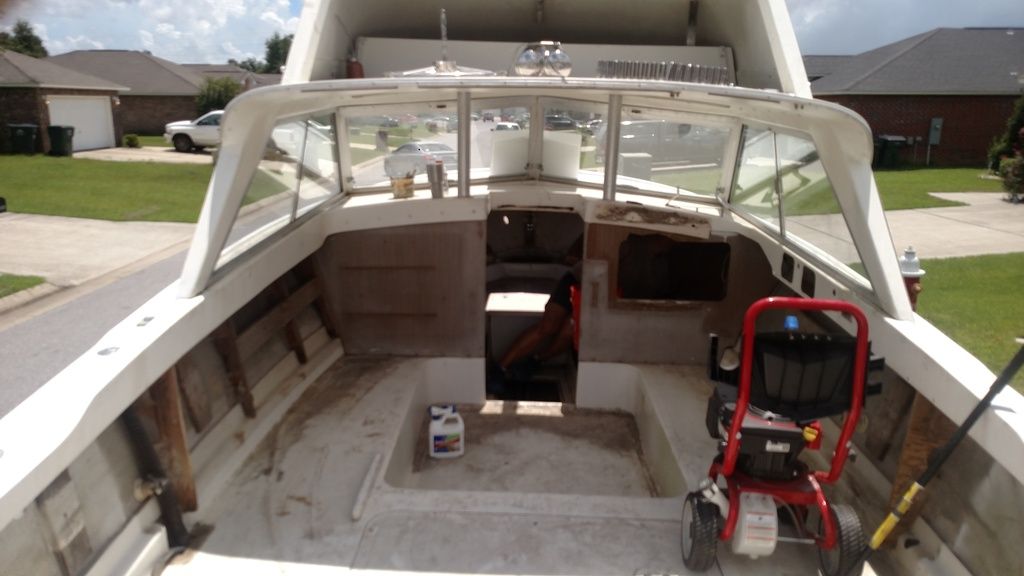
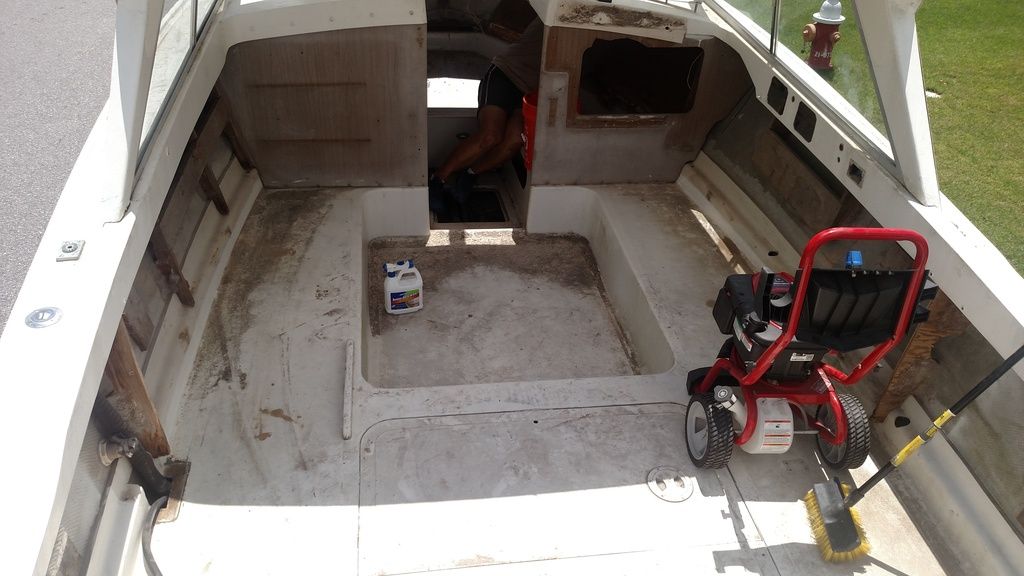
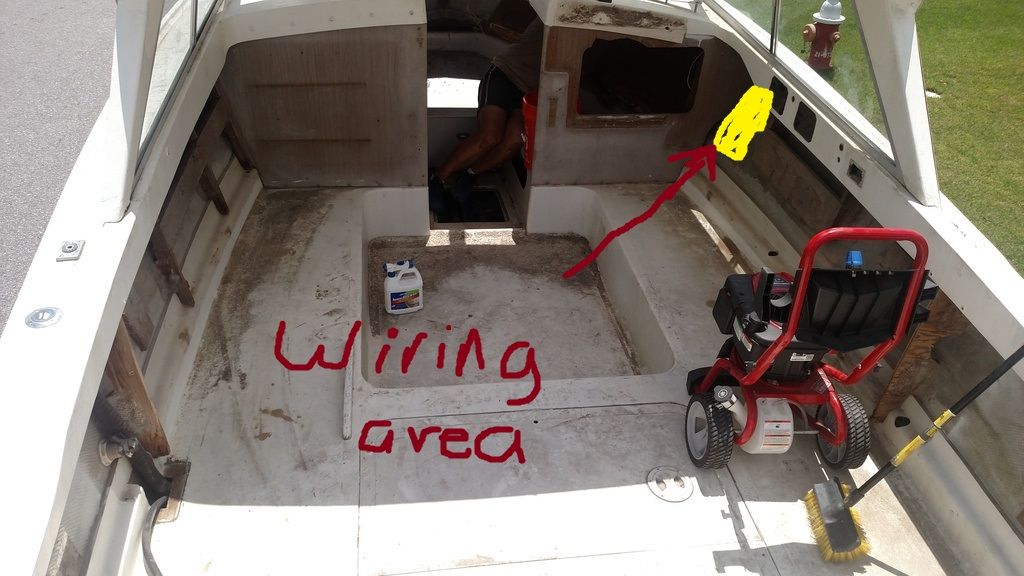
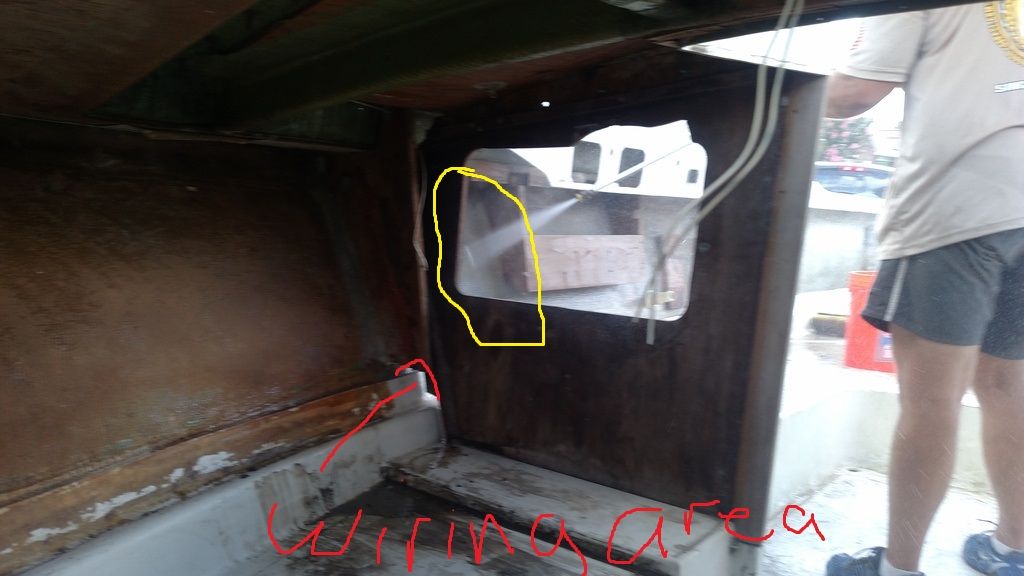
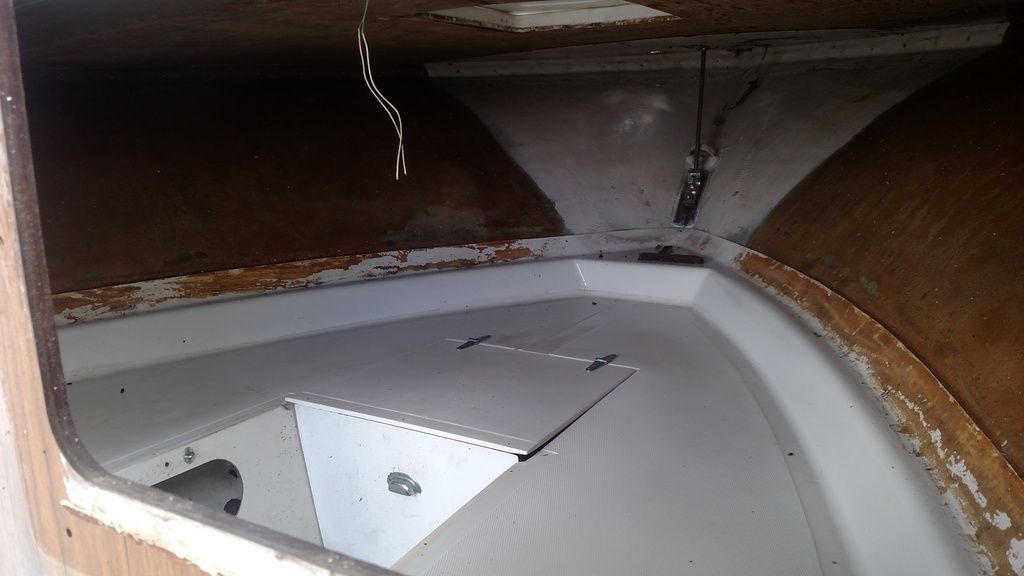
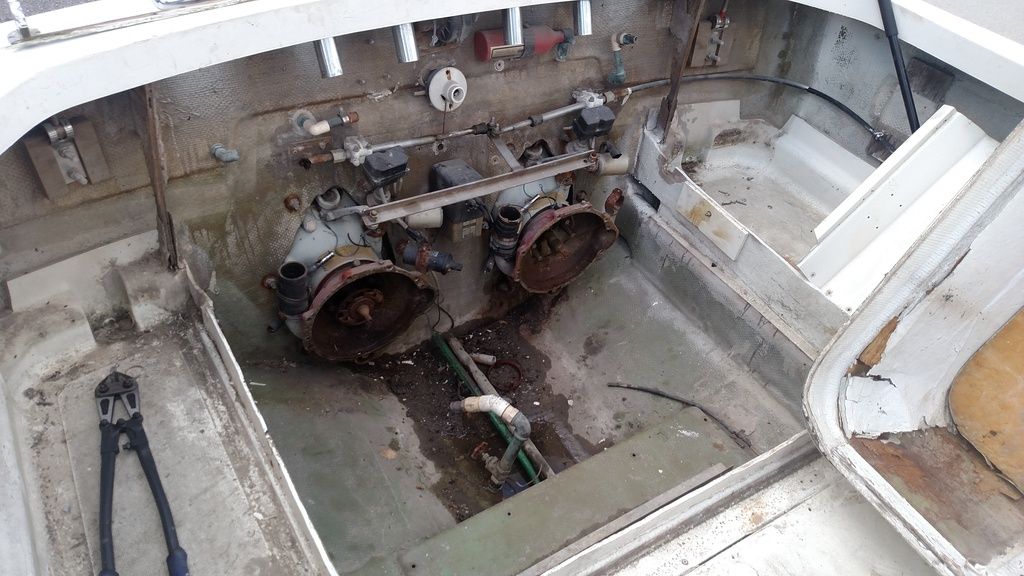
Finally got some time to work on the boat this weekend. We are in the process of removing all the wiring and basically just stripping the entire boat of everything except the bare bones.
We have removed the main helm console, cut and removed all wires/controls. They were so rusted and the plastic was so old that bolt cutters only "mushed" them down. You have to fold the plastic wrap around the cable to break it off, and then use the bolt cutters on the bare cable/wires.
We learned a the previous owner must have been a smoker haha. We found a total of 3 cigarette lighters (like the ones in your car) installed in wired up ha. He rigged up 110v power and placed some things in strategic places ha. Nice "marine" grade cord pull light in the engine bay gave us a chuckle...but hell, guess it made sense. There was also a power outlet in the fuel tank area...that made no sense to us.
We have some more cleaning up to do. Removing some of the headliners and some more wires from the flybridge and what not. Then we should be pressure washing today.
I was able to show father some pictures that I have saved during the few years of research I've done along the way. I think we're more on the same page and have a better understanding of where we want to head from here. Perhaps I'll give you guys a little diagram of what we're thinking once we get the boat cleaned up and I get some better pictures to show you guys hopefully later today.
anyway, here are some random pictures just because I know yal like pictures.
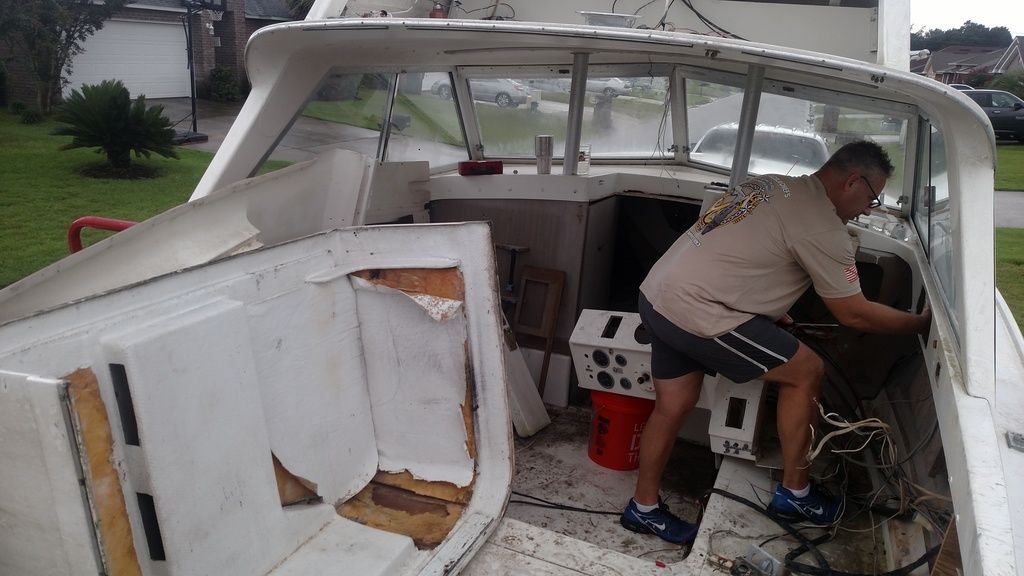
Cigarette lighters:
Console removed:
We have removed the main helm console, cut and removed all wires/controls. They were so rusted and the plastic was so old that bolt cutters only "mushed" them down. You have to fold the plastic wrap around the cable to break it off, and then use the bolt cutters on the bare cable/wires.
We learned a the previous owner must have been a smoker haha. We found a total of 3 cigarette lighters (like the ones in your car) installed in wired up ha. He rigged up 110v power and placed some things in strategic places ha. Nice "marine" grade cord pull light in the engine bay gave us a chuckle...but hell, guess it made sense. There was also a power outlet in the fuel tank area...that made no sense to us.
We have some more cleaning up to do. Removing some of the headliners and some more wires from the flybridge and what not. Then we should be pressure washing today.
I was able to show father some pictures that I have saved during the few years of research I've done along the way. I think we're more on the same page and have a better understanding of where we want to head from here. Perhaps I'll give you guys a little diagram of what we're thinking once we get the boat cleaned up and I get some better pictures to show you guys hopefully later today.
anyway, here are some random pictures just because I know yal like pictures.


Cigarette lighters:


Console removed:


-
Corey Mason
- Posts: 139
- Joined: Aug 19th, '14, 07:31
Re: New Project B25!
Ps. Do any of you guys have any good cutaway pictures or any idea how much room we could salvage from the seating area in the vberth?
Were thinking about making some type of storage or compartment from both sides of the seating areas in the vberth and then just throwing covers over top of them.
Can any of yal give me a general idea of how much room we might have to work with, to see if its even worth it?
Were thinking about making some type of storage or compartment from both sides of the seating areas in the vberth and then just throwing covers over top of them.
Can any of yal give me a general idea of how much room we might have to work with, to see if its even worth it?
-
Corey Mason
- Posts: 139
- Joined: Aug 19th, '14, 07:31
Re: New Project B25!
Well, this next post or two will be really picture heavy.
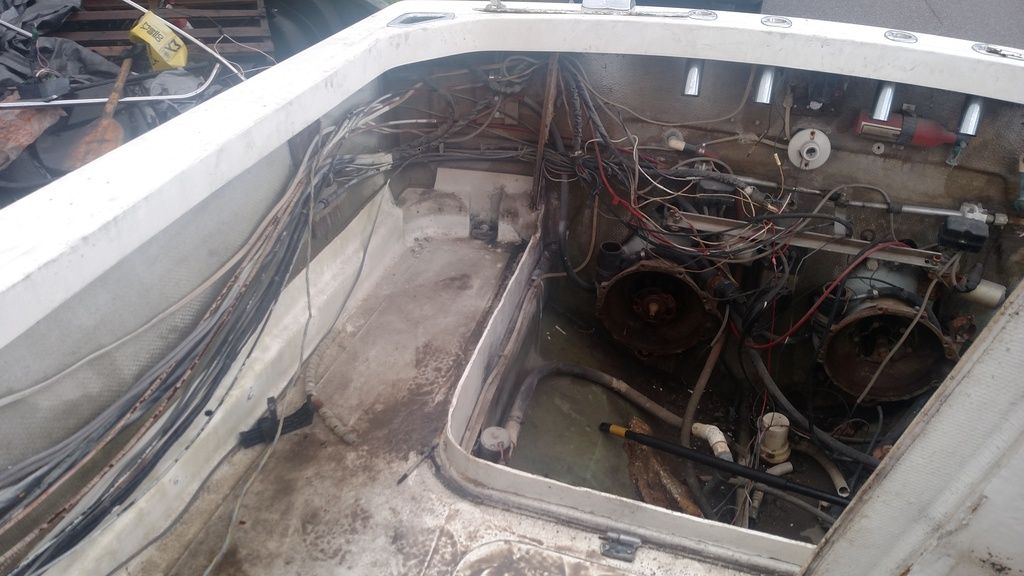
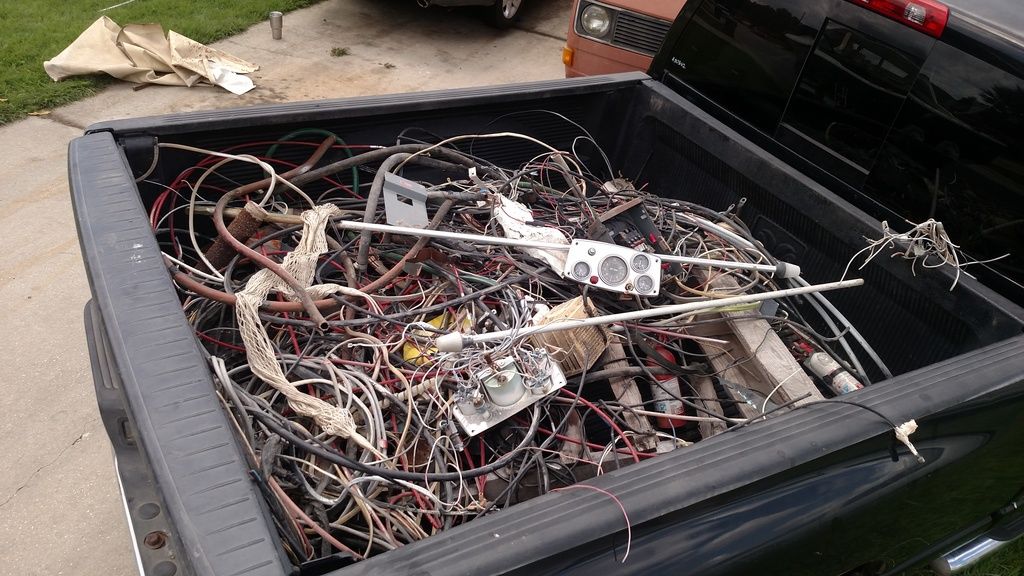
Today we finished pulling all of the wiring out. Not a single piece of wire left on the boat. We did leave the fuel filler hose for now and maybe one or two more things, but it is pretty much completely stripped.
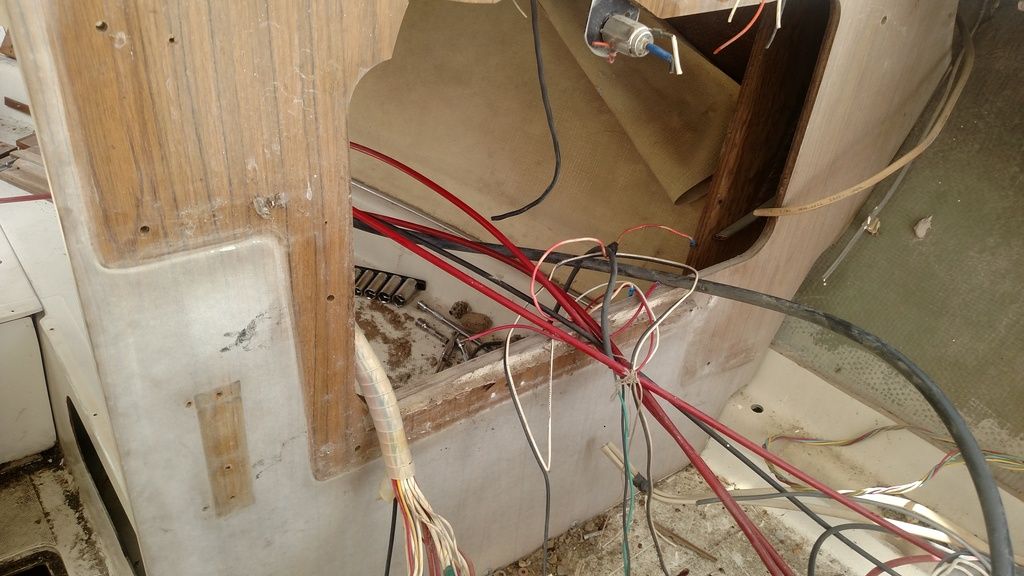
We took out the headliner from the cabin, and the yucky "wallpaper" that was put on the side. Looked hiddeous anyways.
We also removed the wall that was in front of the cabin that stored the anchor. The wood was warped and we will probably be going a different route. We are trying to design something so that it is 1) sealed off entirely to prevent the musty smell from coming in the cabin from having soaked anchor rope right in front of you ...and 2) figure out a way to make a drain that will drain from the anchor compartment, down into the bilge (this shouldn't be too hard) and 3) a way that we will have access up top. We don't need anything too big since the anchor itself will not be going in the compartment (it will be held up top) so we only need room for the rope pretty much.
We also noticed that the bolts that hold the windows and the top portion of the boat in place are extremely rusted. Obviously it hasn't been sealing well and we plan on addressing that issue and sealing it of better and replacing hardware. This will probably involve removing the top portion of the boat (windows and up) entirely. Which, wouldn't be bad to get it out of the way anyways to help prep.
We removed the different little "cabinets" between the helm are and the cabin. We left one side of the wood/cabinet in there to help support the upper portion of the boat, but it will eventually come out to be replaced as well.
We also removed the entire console in the helm. We'll be designing something else to go there. Not exactly sure how we are going to do that yet, but were thinking of putting the guages inside a wooden box on top of the cabin area and then the throttle and wheel on the new console were making. We want to make it so that it rises above the knees. This will help to push the captains chair forward some, so we have more room behind the captains chair to work with.
We have learned that we are going to put all of the wiring where the old throttle controls used to be on the console, on the side of the boat. We plan on sealing off this area so water can not intrude, and when we run wires to different area's, we'll make the through holes up high. Not sure what we'll use the extra "cabinet" space for, but better to have and not need I guess. Could possibly use it for storing personal things (wallets, phones, etc). We did notice that there was a lot of gap on the old cabinets, so when we make the new wood pieces from the template, we're going to oversize them to rid the gap and also seal them up to prevent water intrusion in there as well. (Unfortunately I don't have a good pic of the area, but there is plenty of room!)
extra gap

We also plan on cutting in some hatches/compartments in the seating area in the cabin. We'll see how that goes.
We noticed some of the wood pieces are not in good shape. Not that they are completely rotted, but are getting there, and are warping and what not. This isn't an issue because we'll be replacing all the wood pieces anyways.
We pressure washed it very well inside and out. We focused on the bilge area as well. If you look at some of the pictures of where the gas tank was (may have to look at an old picture), you can see that the glass was cut open. They cut it because the old fiberglass tank was actually glassed in down there. So you practically have to cut it to get it out. But, that left a little cubby hole right in the middle of the bilge where I'm sure there all kinds of crap blocking the drainage. It still drains, but not very well. Because of this, we're going to cut out that flat level piece, clean everything out and we will be replacing that; keeping it pretty much as is.

Today we finished pulling all of the wiring out. Not a single piece of wire left on the boat. We did leave the fuel filler hose for now and maybe one or two more things, but it is pretty much completely stripped.

We took out the headliner from the cabin, and the yucky "wallpaper" that was put on the side. Looked hiddeous anyways.


We also removed the wall that was in front of the cabin that stored the anchor. The wood was warped and we will probably be going a different route. We are trying to design something so that it is 1) sealed off entirely to prevent the musty smell from coming in the cabin from having soaked anchor rope right in front of you ...and 2) figure out a way to make a drain that will drain from the anchor compartment, down into the bilge (this shouldn't be too hard) and 3) a way that we will have access up top. We don't need anything too big since the anchor itself will not be going in the compartment (it will be held up top) so we only need room for the rope pretty much.

We also noticed that the bolts that hold the windows and the top portion of the boat in place are extremely rusted. Obviously it hasn't been sealing well and we plan on addressing that issue and sealing it of better and replacing hardware. This will probably involve removing the top portion of the boat (windows and up) entirely. Which, wouldn't be bad to get it out of the way anyways to help prep.

We removed the different little "cabinets" between the helm are and the cabin. We left one side of the wood/cabinet in there to help support the upper portion of the boat, but it will eventually come out to be replaced as well.


We also removed the entire console in the helm. We'll be designing something else to go there. Not exactly sure how we are going to do that yet, but were thinking of putting the guages inside a wooden box on top of the cabin area and then the throttle and wheel on the new console were making. We want to make it so that it rises above the knees. This will help to push the captains chair forward some, so we have more room behind the captains chair to work with.


We have learned that we are going to put all of the wiring where the old throttle controls used to be on the console, on the side of the boat. We plan on sealing off this area so water can not intrude, and when we run wires to different area's, we'll make the through holes up high. Not sure what we'll use the extra "cabinet" space for, but better to have and not need I guess. Could possibly use it for storing personal things (wallets, phones, etc). We did notice that there was a lot of gap on the old cabinets, so when we make the new wood pieces from the template, we're going to oversize them to rid the gap and also seal them up to prevent water intrusion in there as well. (Unfortunately I don't have a good pic of the area, but there is plenty of room!)


extra gap

We also plan on cutting in some hatches/compartments in the seating area in the cabin. We'll see how that goes.


We noticed some of the wood pieces are not in good shape. Not that they are completely rotted, but are getting there, and are warping and what not. This isn't an issue because we'll be replacing all the wood pieces anyways.
We pressure washed it very well inside and out. We focused on the bilge area as well. If you look at some of the pictures of where the gas tank was (may have to look at an old picture), you can see that the glass was cut open. They cut it because the old fiberglass tank was actually glassed in down there. So you practically have to cut it to get it out. But, that left a little cubby hole right in the middle of the bilge where I'm sure there all kinds of crap blocking the drainage. It still drains, but not very well. Because of this, we're going to cut out that flat level piece, clean everything out and we will be replacing that; keeping it pretty much as is.


-
Corey Mason
- Posts: 139
- Joined: Aug 19th, '14, 07:31
Re: New Project B25!
There was ton of junk in the bilge. Actually had to use a flat scrapper to scoop up all the filth and crud. After doing this we were able to start working on getting the other parts to drain out of the boat. Does a lot better now but still needs some love. We're going to gelcoat the entire bilge area to help make it smoother for the water to drain. It will also look a lot nicer too.
Before
After
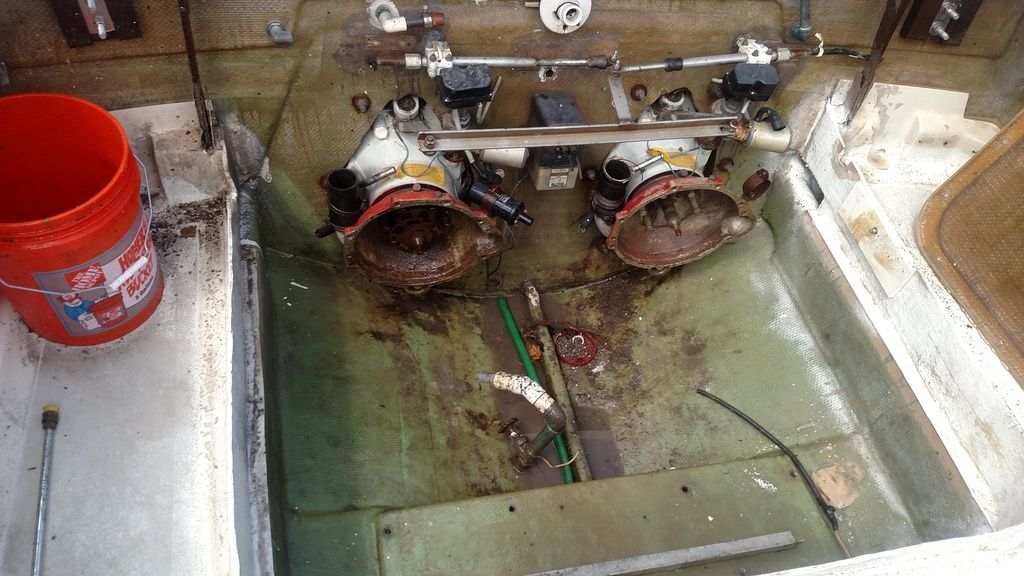
We started thinking about where to place bilge pumps. The original bilge was were the motors are. However, we are turning that into a fish box. Theres just not enough room to put a bilge down there. Instead we are planning on sealing off that entire compartment and placing a bilge where the gas tank is. The reason we are going to seal it off, is because the back of the boat where the fish box is going to be, is the lowest part of the boat and where the water would drain to. If we seal it off, it will force it to stay in the gas tank area where our bilge pumps will be. We're still working on how to work in the bilge pumps in there. We will probably also have one in the cabin area as well.
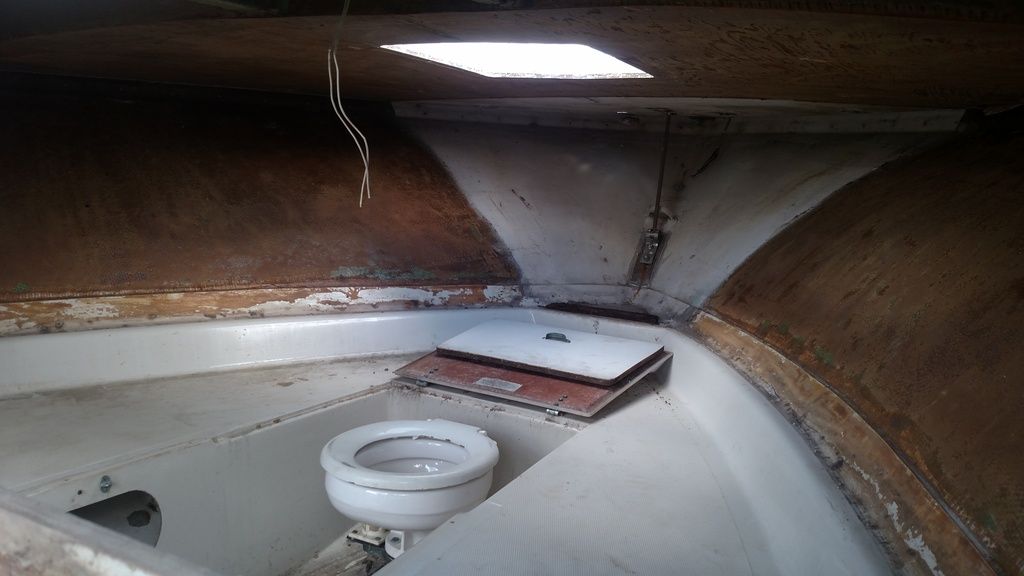
We didn't really do anything with the head today...just worked around it. We do plan on keeping a head in the boat though. Not sure if we need a new one or not. Cross that bridge later.
Before


After


We started thinking about where to place bilge pumps. The original bilge was were the motors are. However, we are turning that into a fish box. Theres just not enough room to put a bilge down there. Instead we are planning on sealing off that entire compartment and placing a bilge where the gas tank is. The reason we are going to seal it off, is because the back of the boat where the fish box is going to be, is the lowest part of the boat and where the water would drain to. If we seal it off, it will force it to stay in the gas tank area where our bilge pumps will be. We're still working on how to work in the bilge pumps in there. We will probably also have one in the cabin area as well.
We didn't really do anything with the head today...just worked around it. We do plan on keeping a head in the boat though. Not sure if we need a new one or not. Cross that bridge later.
-
Corey Mason
- Posts: 139
- Joined: Aug 19th, '14, 07:31
Re: New Project B25!


Forgive the horrible MS paint and writing...all I had to work with.
This is going to be the basic design I think of what we are thinking about.
So far I think we like this design and will probably follow something close to this.
There will be a Bench seat/couch something like this:

That is what the black lines are indicating.
Underneath that (the blue lines) that is showing where we are thinking about installing the freshwater tank. Depending...we may move it further back.
On the right side, we plan to have the guages mounted on top, and then some type of console made out of wood that we'll put there with a few of the other controls as well.
The captains chair may be squished in the front...but the way we are going to try to design the console so that your legs are underneath...it should be comfortable still. This is to hopefully save space for the other things. The captains chair will be about as far back as the Red line with the "X"
Next we are going too have our tackle storage behind the captains chair (the peach color with the "hooks" On top of that, we may even put a sink, not sure yet.
Behind all of that, we are going to install the livewell. Thats what the blue box with the "fishies" is for.
On the side of the boats we are thinking about getting 2 foldable benches that will hopefully fold away far enough so your legs don't touch them. I think we are going to install extra thick bolsters to try to create more depth for the bench seat. We are probably going to have to rework some of the area that the panels go to push them back further.
If we put the benches on both sides, we may end up putting the live well in the very back center of the boat, and creating something else instead of the livewell around the helm. Maybe just an empty storage space, or a larger tackle drawer/sink.
If we end up not liking the benches on the sides, we're going to put a large foldable bench seat at the transom, and following this design.
You guys have any thoughts or input in this design set up?
-
Navatech
Re: New Project B25!
How much water are you going to carry?!... To what purpose?!... I'm asking because most boats your size just carry bottled water for drinking purposes... I carry about 200 gallon fresh water but mine is a 46'... And I have full sized shower and galley... Plus I have an admiral and 4 mates... If you only want it to wash hands from fish goop and so forth you can do that with seawater and just rinse your hands afterwards with bottled water...
Have you considered the fact that you're putting a lot of weight on one side?!... And that people will be sitting on the same side (i.e. adding more weight on that side)?!...
As for the idea of sealing the rear part so as to not put a bilge pump there, when you back into a fish you're going to get water over the transom... It will find it's way into that area... How are you going to get rid of it?!... My suggestion is to make the fish box one foot shorter and use the space to put in two bilge pumps... Make them as big (capacity wise) as you can... Depending on your head and your hoses (type and run) you'll get between 1/3rd to 2/3rd of the rated capacity...
Don't forget, copper wiring has scrap value!... Even if it's just a 6 pack worth...
I'm definitely in favor of a toilet... Especially if you're going to have members of the fair gender on board... However, unless you're going to put in a treatment system or a holding tank you're going to be limited to dumping beyond the 3 mile line... Maybe a port-a-potty is something you should consider?!...
-
Corey Mason
- Posts: 139
- Joined: Aug 19th, '14, 07:31
Re: New Project B25!
Good questions.
Approximately 375lbs of water...if it's a 45gallon freshwater tank as I was told. And theres a few things that were going through my head in regards to this. First, id like to note, 375lbs is about the average weight of 2 men.
1) yes it's a lot of weight on one side. However, I was thinking the live well on the other side would certainly balance it out would it not?
2) I'm only using 45gal tank because that's what was in/came with the boat...for free. I'm trying to keep expenses as low as possible. There is a good chance that I'll be cutting and rewelding the tank to get it to fit better.
.thus reducing the size.
3) I don't have to fill it full.
4) I'm sure there will be plenty of overnight fishing and beach/camping trips. Taking showers is a nice luxury out there. I plan on making something that will hold a shower head that can be used to shower, then stowed away.
Still probably overkill, but the biggest thing is...I don't have to fill it full. The tank weighs nothing, so the tank weight isn't an issue.
5) I can't see it making any more sense to go on the right...live well side. And there's honestly not really anywhere else to put it that would be directly in the middle. I was honestly expecting somebody to mention it was too far forward than which side.
I'm by no means a boating guru, or engineer, or anything. This literally is my first boat...so I'm open to teaching...but tell me why this or that please.
I think maybe I should take a better picture and show what I mean by sealing off the rear. So, where the old motors were, the stringers on the side went from the bottom of the hull all the way to the top of the deck. And all the way back to the transom. So, if I just make the 4th wall in the front and glass it in (and possibly glass in the top of the stringers to the deck to make a perfect seal) then I don't see how any water would get in. We are going to make the entire motor compartment a big fish box. It would be completely sealed off. And the lid of the box will be sealed as well...but even if water got into the fish box...it would stay there...or overflow and go onto the deck and then drain/bail out. And then we'll put a drain plug at the back of the fish box through the transom to drain when we get out of the water.
Although, making the fish box a little shorter, but still make it flush with bottom of hull would be a good idea to think about too. Would give us enough room for 3 large bilge pumps.
One question I do have though, is what about the outside stringers? I have two stringers that run all the way through the boat. They have a couple access holes (3_4") to run gas lines and stuff...but what if water does get in there? The holes are at the very top, so it won't drain into the main bilge area to be pumped out. There is no way to check to see if water is there or get it out. We were thinking about sealing off the access holes with some kind of PVC that would be water tight, but could easily unscrew if needed. And possibly having a drain plug on each side. But that would mean we gave 3 drain plugs now.
The toilet us definitely staying. Pretty sure of that. Can almost promise anytime the boat is out, ladies will be aboard. Also, father is thinking about using the boat as a charter during his retirement. Wants to run it for other retired service members. Not sure how probably this is, but it's an option.
And most of the time, unless camping on a beach overnight, Wed be 3 miles out and good to go as far as regulations. I'm familiar with holding tanks, but what is this treatment system you are referring to?
-
Navatech
Re: New Project B25!
I'd say that 375 lbs is a bit on the light size for 2 average men... But yes, even if you fill it up, it will be mostly offset by a live bait tank on the opposite side... And it won't stay full so you're good there...Corey Mason wrote:Approximately 375lbs of water...if it's a 45gallon freshwater tank as I was told. And theres a few things that were going through my head in regards to this. First, id like to note, 375lbs is about the average weight of 2 men.
I'm not sure I'd mess around with a plastic tank... Resizing a stainless steel tank is another matter...Corey Mason wrote:There is a good chance that I'll be cutting and rewelding the tank to get it to fit better.
A lot of the members are happy enough using the "solar" camping shower things that are basically a black bladder that you leave in the sun...Corey Mason wrote:I'm sure there will be plenty of overnight fishing and beach/camping trips. Taking showers is a nice luxury out there. I plan on making something that will hold a shower head that can be used to shower, then stowed away.
The thing is that by removing the I/O power and hanging outboards of the stern you will have moved the longitudinal GC (Gravity Center) backwards so adding weight forward isn't a bad thing...Corey Mason wrote:I was honestly expecting somebody to mention it was too far forward than which side.
One thing you'll learn is that water has a way of getting everywhere on a boat... Even if it didn't, how are you going to pump that area if you get a hull breach there?!... Honestly, I don't see how leaving a 1' space between the transom and your fish box is not the best option for you...Corey Mason wrote:I think maybe I should take a better picture and show what I mean by sealing off the rear. So, where the old motors were, the stringers on the side went from the bottom of the hull all the way to the top of the deck. And all the way back to the transom. So, if I just make the 4th wall in the front and glass it in (and possibly glass in the top of the stringers to the deck to make a perfect seal) then I don't see how any water would get in. We are going to make the entire motor compartment a big fish box. It would be completely sealed off. And the lid of the box will be sealed as well...but even if water got into the fish box...it would stay there...or overflow and go onto the deck and then drain/bail out. And then we'll put a drain plug at the back of the fish box through the transom to drain when we get out of the water.
Whenever you have people (especially of the fair gender) on board for the first time, have a chat with them regarding the toilet... You really don't want to take apart the toilet because somebody tried to flush away a "feminine hygiene" product... http://www.thehulltruth.com/boating-how ... -line.htmlCorey Mason wrote:The toilet us definitely staying. Pretty sure of that. Can almost promise anytime the boat is out, ladies will be aboard.
If he wants to do more then share fuel costs he'll have to get a so called "6 pack"... That's the most basic commercial license... And you'll have to think about insurance...Corey Mason wrote:father is thinking about using the boat as a charter during his retirement. Wants to run it for other retired service members. Not sure how probably this is, but it's an option.
Something like this: http://raritaneng.com/raritan-product-l ... ectroscan/ More reading: http://raritaneng.com/wp-content/upload ... oscan1.pdfCorey Mason wrote:what is this treatment system you are referring to?
Last edited by Navatech on Aug 16th, '16, 15:41, edited 1 time in total.
-
Joseph Fikentscher
- Senior Member
- Posts: 610
- Joined: Jun 29th, '06, 07:36
- Location: Southport, NC
- Contact:
Re: New Project B25!
That's alot of work done so far. Congrats.
All my connections are now in the Vberth area on the bulkheads so they are out of the weather/water and accessible. Use terminal blocks for connections. Neat and easy to troubleshoot wiring if there is a problem. Wire ties help also as well as expandable wire chases, cleans it up and makes it look neater. On the starboard side is the house battery, Blueseas ACR, hour meters, house battery switch and bilge pump switches.


I used Perfection Paint, Oyster White. The bulkheads take this very well after a thorough sanding. Ill do the inside of the Vberth area over this winter.

All my connections are now in the Vberth area on the bulkheads so they are out of the weather/water and accessible. Use terminal blocks for connections. Neat and easy to troubleshoot wiring if there is a problem. Wire ties help also as well as expandable wire chases, cleans it up and makes it look neater. On the starboard side is the house battery, Blueseas ACR, hour meters, house battery switch and bilge pump switches.
I used Perfection Paint, Oyster White. The bulkheads take this very well after a thorough sanding. Ill do the inside of the Vberth area over this winter.
Sea Hunt Triton 207, a step down, but having fun till my next Bertram!
[url]https://www.instagram.com/endurance_ber ... hl=en/[url]
[url]https://www.instagram.com/endurance_ber ... hl=en/[url]
-
Bo Toepfer
- Posts: 40
- Joined: Jun 13th, '16, 18:54
Re: New Project B25!
Corey here is some pics of my rebuild
Went with twin 150 merc 4 strokes on bracket
There is a seat to the port with a freshwater storage sink under the cushion , starboard under cushion is live well / cooler its insulated
180 gallons fuel tank
http://s1113.photobucket.com/user/drspe ... rtram%2025
Went with twin 150 merc 4 strokes on bracket
There is a seat to the port with a freshwater storage sink under the cushion , starboard under cushion is live well / cooler its insulated
180 gallons fuel tank
http://s1113.photobucket.com/user/drspe ... rtram%2025

Re: New Project B25!
Corey,
There is no "hidden" space in the V-berth...what you see is what you have. You could build vertically to create storage, but will you lose the seats.
Regarding the bilge pump. I would install it against the transom. All the water should freely flow down the keel line from bow to stern. There are a few openings in the stringers to allow water to pass through from the the outside stringer area to the the keel area. Use the keel "stringer" as the low point for your structures - tank bed and fishbox bottom and you should be fine. You'll have a heck of time routing hoses, wires
Idea - leave about 8" or so of space between the transom and the fishbox to install bilge pump and for access to your bracket bolts, crash valve, transducer, and for motor rigging, etc. Install a sealed, removable lid hatch in the back wall of the fishbox as an access point. OR...make the fish box a drop in.
cam
1963 Bertram 25
1973 Boston Whaler 13 - sold!
1998 Scout 172 SF - beach taxi
1973 Boston Whaler 13 - sold!
1998 Scout 172 SF - beach taxi
-
Bo Toepfer
- Posts: 40
- Joined: Jun 13th, '16, 18:54
Re: New Project B25!
I had time to study this thread, very impressive Corey..
Southern Maryland
Keep seeking the treasure!
Keep seeking the treasure!
-
Joseph Fikentscher
- Senior Member
- Posts: 610
- Joined: Jun 29th, '06, 07:36
- Location: Southport, NC
- Contact:
Re: New Project B25!
From the inboard version, what is needed for the transom to convert to outboards?
Sea Hunt Triton 207, a step down, but having fun till my next Bertram!
[url]https://www.instagram.com/endurance_ber ... hl=en/[url]
[url]https://www.instagram.com/endurance_ber ... hl=en/[url]
-
Navatech
Re: New Project B25!
I'd say strengthening of the transom, beefing up of the transom to bottom and to sides connection, adding a bracket for the outboard(s)...Joseph Fikentscher wrote:From the inboard version, what is needed for the transom to convert to outboards?
Last edited by Navatech on Aug 18th, '16, 00:47, edited 1 time in total.
-
Corey Mason
- Posts: 139
- Joined: Aug 19th, '14, 07:31
Re: New Project B25!
I'm not sure about your transom. Mine I would trust all day to hold a bracket with twin 150's. That transom on mine is extremely thick. But, I'm assuming you're is probably thinner since it didn't have the outdrives?
-
Corey Mason
- Posts: 139
- Joined: Aug 19th, '14, 07:31
Re: New Project B25!
spencer wrote:Corey here is some pics of my rebuild
Went with twin 150 merc 4 strokes on bracket
There is a seat to the port with a freshwater storage sink under the cushion , starboard under cushion is live well / cooler its insulated
180 gallons fuel tank
http://s1113.photobucket.com/user/drspe ... rtram%2025
Wow that thing really is beautiful!
I really appreciate how clean everything is! It's very simple, but very methodical!
For you gas tank area, did you have to push back that horizontal stringer? Was your's an inboard? Mine doesn't look like that at all. I don't have the center stringer at all, and I dont have any horizontal stringers. There's no way I would get a gas tank that size in there at all!
I may actually rethink the seating option I was planning on my starboard side. I think the ladies would prefer to lay out rather than sit in a booth haha. Hell, Id probably rather them lay out as well ;)
Thank you for the pictures!
Re: New Project B25!
The horizontal bulk head was added to support the rear of the new tank, also there is a new support added to bottom of the gass tank aft to stern,
water can also pass thru under the tank but it is sealed its a good set up.
The original was two io , holes filled and bracket added
the original tank(1966) was used for about 10 years with a second auxiliary where the engines were, but the second tank and original was removed and went to one with the 2nd repower
first repower had twin 225 mer 2 strokes
so in your pics of your engine compartment imagine making that about four inches narrow port and starboard sides all the way to the stern and fabricate the fish box sides
also there is a horizontal support where the batteries are glassed to the transom and one above it if u look to add strength
I used the original deck from the gass tank and created the aft deck piece so there are two pieces which can be removed
-
Joseph Fikentscher
- Senior Member
- Posts: 610
- Joined: Jun 29th, '06, 07:36
- Location: Southport, NC
- Contact:
Re: New Project B25!
I found this to be a pretty useful spot (easy to see but out of the way) for Bilge Pump Switches, Engine Hour Meters, House Battery Switch, and Fuel Gauges.

Last edited by Joseph Fikentscher on Aug 22nd, '16, 08:31, edited 1 time in total.
Sea Hunt Triton 207, a step down, but having fun till my next Bertram!
[url]https://www.instagram.com/endurance_ber ... hl=en/[url]
[url]https://www.instagram.com/endurance_ber ... hl=en/[url]
-
Corey Mason
- Posts: 139
- Joined: Aug 19th, '14, 07:31
Re: New Project B25!
Joseph Fikentscher wrote:I found this to be a pretty useful spot (easy to see but out of the way) for Bilge Pump Switches, Engine Hour Meters, House Battery Switch, and Fuel Gauges.

That picture isn't working Joseph.
-
Joseph Fikentscher
- Senior Member
- Posts: 610
- Joined: Jun 29th, '06, 07:36
- Location: Southport, NC
- Contact:
Re: New Project B25!
Fixed.
Sea Hunt Triton 207, a step down, but having fun till my next Bertram!
[url]https://www.instagram.com/endurance_ber ... hl=en/[url]
[url]https://www.instagram.com/endurance_ber ... hl=en/[url]
Re: New Project B25!
Find your mask and Get Your Grind On!


1963 Bertram 25
1973 Boston Whaler 13 - sold!
1998 Scout 172 SF - beach taxi
1973 Boston Whaler 13 - sold!
1998 Scout 172 SF - beach taxi
-
Corey Mason
- Posts: 139
- Joined: Aug 19th, '14, 07:31
Re: New Project B25!
hanks Joseph. That used to open and close didn't it? Mine does. I'm assuming you just made it permanent. It's a good idea. I think we may go a diff route, but it's a good concept.
By the way, I spent a long time last night stalking you're b25 Facebook page ;).
Cam, I just placed about a $400 order worth of supplies last night from Amazon and eBay.
1gal of poly resin
Some fiberglass
4 tyvek suits
2 goggles
New respirators
A new sheet sander
3 diff types of sandpaper for the round orbital, sheet, and mouse sanders. I got 60-120-240 grit. That was really the lowest grit I could find.
40 pack of brushes
And all kinds of other goodies.
Question...can somebody give me a better run down on this "grinding" situation? I keep hearing grinding...but that basically just means sanding with very low grit am I right? Lowest I could find was 60.
What about the non slip on the deck? Do I sand that down and then just redo it when I paint/gelcoat?
Am I just sanding to get things flush and smooth? Sanding to take off all the gelcoat? Sanding just enough to rough it up for paint?
Sorry if I'm asking for it to be dumbed down, I've just never had to do it before and kind of not sure what to expect.
Re: New Project B25!
Caveat: Based on my experience
in my opinion sanding is for wood and finishing work. Grinding is for fiberglass, paint and gel coat...material removal
That picture was from Friday. I was grinding off the Imron paint and primer on the hull side to expose and roughen the original gelcoat layer for new finishes - primers and paint. Tools used:
- Festool RO125 with 40 grit Granat paper
- D/A air sander with 80 grit
- D/a air strightline sander with 80 grit (just for the flat chine area)
- dust collector for the RO125
- fans and lots of water (sweat lodge)
Time to complete - 5.5 hours. Port side required 8...I must have improved my technique!
The 40 grit worked pretty well to remove the paint. primer and scratch the original gelcoat. 80 grit was used to smooth the exposed surface somewhat for Hullgard Extra epoxy primer. There are a few cracks in the old gel coat that I will grind out and fill before priming. In general, I think the prep job for that old paint job was quite good. The surface is in good shape.
For grinding crazy gelcoat or anitskid, I think you need bigger, faster tools. Gel coat is very hard and you will need to remove all the old crazed gel coat to prep for new paint finishes. A 4.5" grinder with 36 grit green disks works pretty well. It's loud, dusty and high vibration...and if you are not careful, you can create a cratered surface. I have also used 6" adn 7" electric orbital sanders (big versions) with 40 grit. Used these after the 4.5" grinder to take the last micron or two of gelcoat off while leaving a fairly smooth surface.
Alternatives to hours and hours and hours of grinding fairing sanding painting the deck surface include - teak, faux teax, Seadek or similar. Cover the surface with another material. I'm probably going to use 3M PVA foam (seadek and others) for the antiskid areas of my deck instead of painting with particles.
Cam
1963 Bertram 25
1973 Boston Whaler 13 - sold!
1998 Scout 172 SF - beach taxi
1973 Boston Whaler 13 - sold!
1998 Scout 172 SF - beach taxi
-
Corey Mason
- Posts: 139
- Joined: Aug 19th, '14, 07:31
Re: New Project B25!
Gotcha, ok...I'm on the right track though.
Maybe went a little high with 240 though ha.
I do have a grinder, I've always used it for a metal cut off though, but I'll go find a different disk.
Maybe went a little high with 240 though ha.
I do have a grinder, I've always used it for a metal cut off though, but I'll go find a different disk.
Re: New Project B25!
These are the disk pads that I have used with my 4.5" dewalt grinder:
http://solutions.3m.com/wps/portal/3M/e ... 37281&rt=d
If you have a HUGE air compressor, choose air tools over electric tools. I have a 5.5 cfm compressor and I'm using 15cfm sanders....doesn't work very well...so I use alot of electric tools. I'll be renting a big compressor at some point when I final sand the epoxy primer. If I had this shop at the beginning of the project I would have purchase a big ass compressor for this work.
1963 Bertram 25
1973 Boston Whaler 13 - sold!
1998 Scout 172 SF - beach taxi
1973 Boston Whaler 13 - sold!
1998 Scout 172 SF - beach taxi
-
Navatech
Re: New Project B25!
When I had to do some rough stripping on my Berty (I had a hole where the generator exhaust thru hull had been) and for the repair I needed to "feather" the existing hull before fixing the hole so I used something like this http://www.homedepot.com/p/Avanti-Pro-4 ... /202830907 Less then 10 bucks and very effective for rough work...Corey Mason wrote:I do have a grinder, I've always used it for a metal cut off though, but I'll go find a different disk.
One thing though, you have to work in a controlled manner because I think that disc can do a whole lot of unwanted damage...
-
Corey Mason
- Posts: 139
- Joined: Aug 19th, '14, 07:31
Re: New Project B25!
Navatech,
That's what I had in mind. I just always thought it would be too rough. I think it will be good for the non slip area though. I'll give it a go
That's what I had in mind. I just always thought it would be too rough. I think it will be good for the non slip area though. I'll give it a go
Re: New Project B25!
I've tried those disks without success. They gum up quickly and stop cutting.
Consider options - soda blasting, or covering the deck with a new material, or leaving it be for now.
Consider options - soda blasting, or covering the deck with a new material, or leaving it be for now.
1963 Bertram 25
1973 Boston Whaler 13 - sold!
1998 Scout 172 SF - beach taxi
1973 Boston Whaler 13 - sold!
1998 Scout 172 SF - beach taxi
-
Corey Mason
- Posts: 139
- Joined: Aug 19th, '14, 07:31
Re: New Project B25!
Father and I had some time to work on the boat again. Hopefully we'll be able to get some more work in this coming month. Time will soon be a little harder to find except on the weekends. I'm ironically starting Marine Mechanics school. Just had the itch to go back to school for something. Figured this would be the best choice.
Here are some before shots. If you noticed where the batteries are placed, that is no longer there. There were two separate heights of the "platforms" between the tank, and the area where the batteries were between the tank and the engines.
We decided it would be much easier to cut it all out entirely and replace it with a support that is 1 height level all throughout. We had to cut out the platform underneath the gas tank because it was completely rotten (Fiberglass on the top, but not on the bottom by the bilge).
Here are some "after" shots after it was cut out.

As you can see, it's been cleared up quite a bit. You can follow the darker/lighter color in the bilge where the previous support was. Heres a pic of the "new" tank that came with the purchase. As you can see, its very small (75gal) and can easily be upsized. We are going to expand it around where the latches are give or take a few inches. It will most likely butt-up, or come very close to the fix box where the old engines used to be.
Where the fiberglass stops, were going to put replace the tank support at the exact level of the old one, resting on the center stringer and sides of the hull. Plan to use small "blocks" glassed into the bottom/side of the bilge that will be level with the center stringer. These blocks will have female anchors for bolts. Our new support board will be able to be bolted in. This will help if we ever want to check/work in the bilge later on.
Along with removing the outdrives, this will be next on the agenda.
Cutting an access hatch here in this step down. There's two reasons for this. 1) so we can clean all the gunk and filth that is currently restricting water flow to the stern. Also so we can clean it up and gelcoat it to increase a smoother flow.
Second reason is because of these

These are extremely flimsy (can easy break with 1 hand) little moldings. I have no idea why they installed these along the center stringer but it makes no sense to me. It basically funnels the water into a smaller opening that is easily block with slugdge/grime.
And of course, there is one right underneath the step down. These provide no support at all, so we are simply removing them completely.
It's going well, life is hard to time out. Father and I are trying to work on it all together, so setting times that we are both are free is rare to find. It's very enjoyable though!
Here are some before shots. If you noticed where the batteries are placed, that is no longer there. There were two separate heights of the "platforms" between the tank, and the area where the batteries were between the tank and the engines.
We decided it would be much easier to cut it all out entirely and replace it with a support that is 1 height level all throughout. We had to cut out the platform underneath the gas tank because it was completely rotten (Fiberglass on the top, but not on the bottom by the bilge).
Here are some "after" shots after it was cut out.


As you can see, it's been cleared up quite a bit. You can follow the darker/lighter color in the bilge where the previous support was. Heres a pic of the "new" tank that came with the purchase. As you can see, its very small (75gal) and can easily be upsized. We are going to expand it around where the latches are give or take a few inches. It will most likely butt-up, or come very close to the fix box where the old engines used to be.

Where the fiberglass stops, were going to put replace the tank support at the exact level of the old one, resting on the center stringer and sides of the hull. Plan to use small "blocks" glassed into the bottom/side of the bilge that will be level with the center stringer. These blocks will have female anchors for bolts. Our new support board will be able to be bolted in. This will help if we ever want to check/work in the bilge later on.

Along with removing the outdrives, this will be next on the agenda.

Cutting an access hatch here in this step down. There's two reasons for this. 1) so we can clean all the gunk and filth that is currently restricting water flow to the stern. Also so we can clean it up and gelcoat it to increase a smoother flow.
Second reason is because of these


These are extremely flimsy (can easy break with 1 hand) little moldings. I have no idea why they installed these along the center stringer but it makes no sense to me. It basically funnels the water into a smaller opening that is easily block with slugdge/grime.
And of course, there is one right underneath the step down. These provide no support at all, so we are simply removing them completely.
It's going well, life is hard to time out. Father and I are trying to work on it all together, so setting times that we are both are free is rare to find. It's very enjoyable though!
Re: New Project B25!
Corey,
You might want to consider cutting out some parts of this useless(?) longitudinal protrusion, or you'll have a hard time catching the bilge water with your pumps.
Who can tell us if this is structural ?
You might want to consider cutting out some parts of this useless(?) longitudinal protrusion, or you'll have a hard time catching the bilge water with your pumps.
Who can tell us if this is structural ?
1973 B28 FBC/2007 4LHA STP's - "Phantom Duck" - Hull "BER 00794 1172"
-
Corey Mason
- Posts: 139
- Joined: Aug 19th, '14, 07:31
Re: New Project B25!
I'm sorry I'm not following.
Are you talking about those flimsy molding pieces? Are you implying that they somehow funnel water to my bilge pumps?
Just trying to understand, not quite following.
Are you talking about those flimsy molding pieces? Are you implying that they somehow funnel water to my bilge pumps?
Just trying to understand, not quite following.
Re: New Project B25!
From bow to stern, there is a longitudinal protrusion at the very bottom of the inside of the hull (or of the keel).
My 28 has the same.
I took the liberty and cut out 3 X 40cm pieces of it, and glassed thoroughly with layers of mat and roving to substitute for the lost(?) strength.
In those "flatter" places I put my 3 bilge pumps. Otherwise you have this lovely bilge water that comes and goes without being able to pump it out.
1973 B28 FBC/2007 4LHA STP's - "Phantom Duck" - Hull "BER 00794 1172"
-
Corey Mason
- Posts: 139
- Joined: Aug 19th, '14, 07:31
Re: New Project B25!
Oh OK I'm following now.
I just assumed that was a stringer and vital to structure.
We are actually planning on installing a smaller bilge pump underneath the new access hatch we make in the step down area. We may just cut a small notch there for the pump/hose.
Thanks for the heads up.
I just assumed that was a stringer and vital to structure.
We are actually planning on installing a smaller bilge pump underneath the new access hatch we make in the step down area. We may just cut a small notch there for the pump/hose.
Thanks for the heads up.
-
Corey Mason
- Posts: 139
- Joined: Aug 19th, '14, 07:31
Re: New Project B25!
So far we are planning on using 3 bilge pumps. 2 bigger ones all the way at the stern, and 1 smaller one under the step-down.
Re: New Project B25!
Good.
If you ever find out if this "stringer" is a structural item, please let me know!
PS: Over the many years and the many PO's, this thing was full of screw holes. These holes were made to secure the various bilge pumps. As the various pumps were coming and going, NOBODY thought to ever seal those screw holes. As a result when we first cut the initial part out, there was live water that came out as a surprise. This is to say that at least the wooden core is fried and it doesn't serve any purpose any more. For the glass part that we removed we kind of made sure to substitute, as I said before, with layers of glass at a radius of 40 cm each side. If you hear that a Bert was cut in pieces while cruising in the Med, that's me!
1973 B28 FBC/2007 4LHA STP's - "Phantom Duck" - Hull "BER 00794 1172"
-
Navatech
Re: New Project B25!
FWIW, I would NEVER remove a piece of any stringer... Certainly not the one running as the keel... The proper way to handle water on either side would be one of the following:
1) Install two pumps... One on either side of the stringer... They're cheap enough...
2) Create a limber hole for the water to pass through...
1) Install two pumps... One on either side of the stringer... They're cheap enough...
2) Create a limber hole for the water to pass through...
Re: New Project B25!
Nav, don't panic !
First of all, who says this is a stringer. And if it is, it was a rotten stringer.
Second, a while back, BEFORE I started cutting out pieces, I asked the faithful about my prospect, and the general consensus was that it was OK to proceed.
Also, some of them showed pics where it was visible they had done the same thing.
Although their opinions are NOT equivalent to Lloyd's, still, as I said, I took the liberty to do what I thought right, while, as I also said, reinforced the area with a lot of layers of glass.
Sometimes you gotta take a risk. I did. Let's hope for the best!
1973 B28 FBC/2007 4LHA STP's - "Phantom Duck" - Hull "BER 00794 1172"
-
Joseph Fikentscher
- Senior Member
- Posts: 610
- Joined: Jun 29th, '06, 07:36
- Location: Southport, NC
- Contact:
Re: New Project B25!
On my 25, I have a pump on either side of the center stringer under the engines (inboard VDrive) not at the stern. This is where the water sits when docked. Also oneunder the forward deck hatch between the V Berths. This is for if the others fail. There is a limber hole at the stern by the transom.
Sea Hunt Triton 207, a step down, but having fun till my next Bertram!
[url]https://www.instagram.com/endurance_ber ... hl=en/[url]
[url]https://www.instagram.com/endurance_ber ... hl=en/[url]
-
Navatech
Re: New Project B25!
What makes you think I was panicked?!... It's your boat after all... I merely expressed my opinion... I'm perfectly happy with other people having other opinions...Yannis wrote:Nav, don't panic !
As for the stringer being rotten... I'm not a big fan of removing and renewing stringers... Bertram used to fiberglass over the wood stringer... So another option would be to just fiberglass OVER the stringer... Depending on your glass schedule the resulting U beam would be equal or better then the original... Regardless of whether the wooden core has any remaining structural integrity...
Re: New Project B25!
Corey
https://vancouver.craigslist.ca/rch/boa/5965568981.html
B25 for sale in Vancouver B.C converted to twinn 150hp o/b
might give you a few ideas nice looking boat but way to rich for me
I like the way he cut down the engine cover leaves bilge access for pumps batterey's.
Bill
https://vancouver.craigslist.ca/rch/boa/5965568981.html
B25 for sale in Vancouver B.C converted to twinn 150hp o/b
might give you a few ideas nice looking boat but way to rich for me
I like the way he cut down the engine cover leaves bilge access for pumps batterey's.
Bill
-
Tony Meola
- Senior Member
- Posts: 6932
- Joined: Jun 29th, '06, 21:24
- Location: Hillsdale, New Jersey
- Contact:
Re: New Project B25!
NavNavatech wrote:As for the stringer being rotten... I'm not a big fan of removing and renewing stringers... Bertram used to fiberglass over the wood stringer... So another option would be to just fiberglass OVER the stringer... Depending on your glass schedule the resulting U beam would be equal or better then the original... Regardless of whether the wooden core has any remaining structural integrity...
As an FYI, Capt. Pat always said not to worry if the wood encapsulated in the glass rotted away. The stringer would still do its job as designed even with rotted wood.
1975 FBC BERG1467-315
Who is online
Users browsing this forum: Bing [Bot], mike ohlstein and 72 guests