
Been trying to figure this one out for about 9 years and never thought to ask until now.
In the center of the bilge there is a raised "tube" like portion of the hull. It runs the length of the boat. It is right where you want your bilge pump to sit but it is in the way.
Is it part of the mold process or something?
Can it be cut out or ground smooth/out of the way?
I will post a picture if my description sucks.
Part identification...without photo!
Moderators: CaptPatrick, mike ohlstein, Bruce
-
TailhookTom

- Senior Member
- Posts: 985
- Joined: Jul 3rd, '06, 14:12
Re: Part identification...without photo!
I don't remember mine having that -- mine was a 1973.
Tom
Tom
-
MarkS

- Senior Member
- Posts: 1160
- Joined: Jun 29th, '06, 08:40
- Location: The Frozen Tundra/EX-democratic stronghold Wisconsin
Re: Part identification...without photo!
Doesn't the bonding run inside that tube?
72 Bertram 25 FBC "Razorsharp" Hull #254-1849
Things of quality have no fear of time.
Bondage to spiritual faith faith to great courage courage to liberty liberty to abundance abundance to complacency to apathy to dependence to bondage
Things of quality have no fear of time.
Bondage to spiritual faith faith to great courage courage to liberty liberty to abundance abundance to complacency to apathy to dependence to bondage
-
TailhookTom
- Senior Member
- Posts: 985
- Joined: Jul 3rd, '06, 14:12
Re: Part identification...without photo!
Mark:
That would make a lot of sense -- on mine the bonding was screwed (with copper slotted screws every 6") on the outboard side of the stringer to the starboard side of the fuel tank -- once it reached the engine bulkhead it went over the top of that stringer and ran on the the inside of that stringer - same screws up to the bow.
Tom

Re: Part identification...without photo!
Kevin,
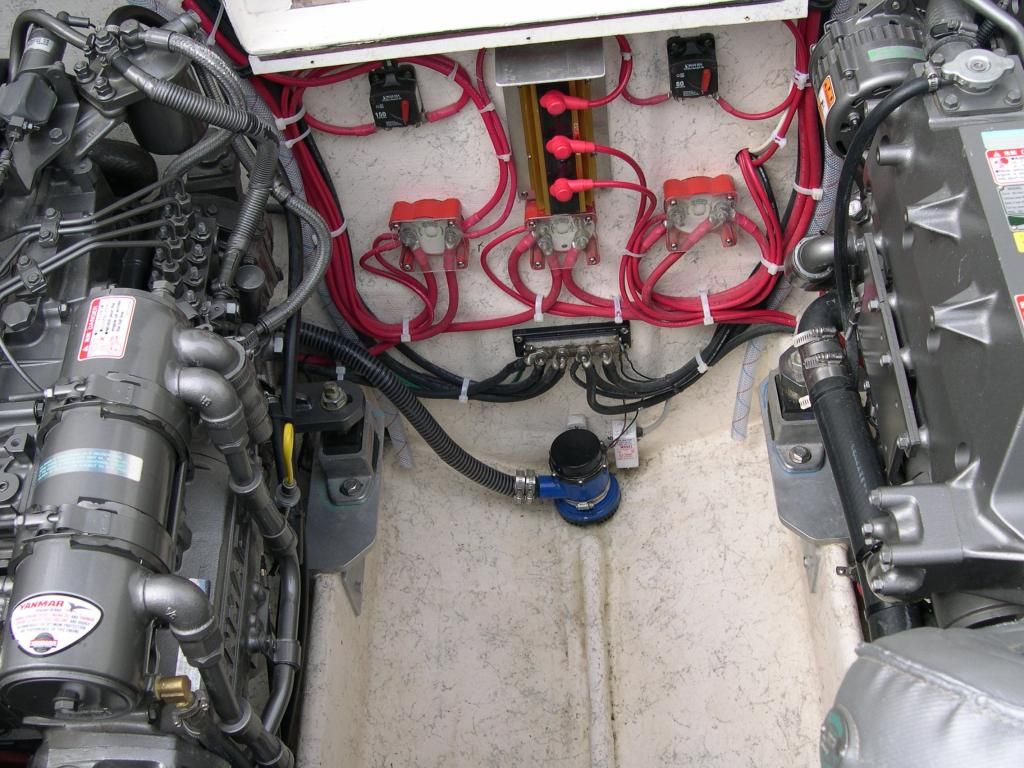
Sounds similar to the center stringer in the older B25s. This third stringer runs the length of the boat and covers the hull seam from the two piece mold. There is a piece of plywood on edge that runs the length of the boat. You can see part of it in this picture. On my boat we remove the center stringer and the plywood aft of the battery area to have a better surface for bilge pumps, etc, as shown.

Sounds similar to the center stringer in the older B25s. This third stringer runs the length of the boat and covers the hull seam from the two piece mold. There is a piece of plywood on edge that runs the length of the boat. You can see part of it in this picture. On my boat we remove the center stringer and the plywood aft of the battery area to have a better surface for bilge pumps, etc, as shown.

1963 Bertram 25
1973 Boston Whaler 13 - sold!
1998 Scout 172 SF - beach taxi
1973 Boston Whaler 13 - sold!
1998 Scout 172 SF - beach taxi
Re: Part identification...without photo!
Kevin,
My 28 is exactly as you describe it. I'm very curious to see what the answer will look like.
My 28 is exactly as you describe it. I'm very curious to see what the answer will look like.
1973 B28 FBC/2007 4LHA STP's - "Phantom Duck" - Hull "BER 00794 1172"
Re: Part identification...without photo!
I want to put a transducer in and need the real estate along with I want it to be in the middle. What do you all think about cutting it out or at least a small section of it? I don't think it is structural?!
-
Captn Bruce
- Posts: 20
- Joined: Jun 29th, '06, 23:18
- Location: Woodland Hills, CA
Re: Part identification...without photo!
Hi Kevin,
I cut out the hump in the low section forward and just aft of the engine room for ward bulk head. I did this to make the bilge pumps more effective. There is a piece of wood inside the hump. Mine was wet and we waited about 4 weeks to dry it out before re-glassing.
I cut out the hump in the low section forward and just aft of the engine room for ward bulk head. I did this to make the bilge pumps more effective. There is a piece of wood inside the hump. Mine was wet and we waited about 4 weeks to dry it out before re-glassing.

Bruce D.
28 Bertram "Noelle Mae"
28 Bertram "Noelle Mae"
Re: Part identification...without photo!
Thanks Bruce. I have always had a extreme prejudice towards the water that collects on either side of it. Yours looks like it gets almost all the water out. That is one clean engine space if I have ever seen one! Nice work and thanks for posting the photo.
Re: Part identification...without photo!
Interesting!
How do you know it's not structural?
Kevin, can't you put 2 wedges, one inside and one outside to acquire the horizontality needed?
The furuno I removed was sitting on such a double wedge; I saved the 2 pieces if you want I can take a pic and post it.
Capt Bruce, what an awesome bilge !
How do you know it's not structural?
Kevin, can't you put 2 wedges, one inside and one outside to acquire the horizontality needed?
The furuno I removed was sitting on such a double wedge; I saved the 2 pieces if you want I can take a pic and post it.
Capt Bruce, what an awesome bilge !
1973 B28 FBC/2007 4LHA STP's - "Phantom Duck" - Hull "BER 00794 1172"
-
Captn Bruce
- Posts: 20
- Joined: Jun 29th, '06, 23:18
- Location: Woodland Hills, CA
Re: Part identification...without photo!
Hi Kevin,
Regarding the structural issue: This was my concern when I initially considered cutting the hump out. Tony Athens who did the repower 5 years ago insured to me it would not be a problem. To date and 15000+ nm later - no issues. We get some nasty seas here in the Santa Barbara channel and the outer islands. A few times I thought the engines were going through the bottom of the boat.
Prior to redoing the bilges the transducer(s) were adjacent to the hump. With the proper cut spacers they performed very well in that location. The current transducers are located outboard of the inside stringers. They work OK, but not as well as when they were located closer to center.
I hope this helps.
Thanks for the comments about the bilge and engine room.
Bruce D.
28 Bertram "Noelle Mae"
28 Bertram "Noelle Mae"
Re: Part identification...without photo!
Kevin,
What did you do finally?
Did you trim the hump out of the way?
I need to do the same and need any feedback available.
Thanks.
What did you do finally?
Did you trim the hump out of the way?
I need to do the same and need any feedback available.
Thanks.
1973 B28 FBC/2007 4LHA STP's - "Phantom Duck" - Hull "BER 00794 1172"
Re: Part identification...without photo!
Yannis,
I never addressed it due to time constraints. When the weather cools and time allows I am going to cut a portion of it out so the pump and switch can do a better job of getting the water out. I will post a photo after the job gets done. It might be a while though.
I never addressed it due to time constraints. When the weather cools and time allows I am going to cut a portion of it out so the pump and switch can do a better job of getting the water out. I will post a photo after the job gets done. It might be a while though.
Re: Part identification...without photo!
Thanks Kevin,
I will do the same, as a matter of fact I will do it twice; both forward like Cptn Bruce posted, but also aft, so that all water gets out while underway. Only for the latter it's a bit cramped in there with the steering rod etc., I might have to employ a monkey...
In the meantime I removed the bow pulpit and I will rearrange the bow rail accordingly. During this process I had to undo the top part of the fwd cabin side liner so as to get access to the bow rail's holding screws; As this side liner is old and not to my liking, I thought removing it altogether and smoothing out the cabin sides, paint or gel coat (?) them and adding some nice teak trim. Can I do so over the dry glue that retained the liner, or do I have to remove the glue first?
Do you know if this glue removal has to be done mechanically (sand paper or similar) or by any appropriate solvent? Or could I just even it out on top of the glue?
Thanks.
1973 B28 FBC/2007 4LHA STP's - "Phantom Duck" - Hull "BER 00794 1172"
-
Pete Fallon

- Senior Member
- Posts: 1313
- Joined: Jun 29th, '06, 23:10
- Location: Stuart Fl. and Salem, Ma.
Re: Part identification...without photo!
Yannis,
You asked about re-doing the V berth sides, you have to remove all the old glue and pieces of rug, if you want to paint the hull sides. It has to be faired and sanded smooth to look good. Think about re covering it instead. When I redid my 31 hull v berth sides I used Acetone and MEK, to get the old glue off. Make sure you have a good mask, preferably a self contained breathing style or a dive tank or Brownie. The acetone and MEK will kill you with out the proper equipment, plenty of ventilation and dispose of the rags properly, very flammable stuff.
I redid the area with foam backed white vinyl, I added a couple of pieces of teak trim at the bow joint and at the aft bulkhead near the hanging locker. It is not a job for the feint hearted slow nasty work but it looked great when I was finished. While you have everything down make sure to re-bed the fittings on the forward deck and rail bases, also check the condition of the rub rail bolts if you have any, the 31 has at least 6 to hold the curved section of the rub rail in place. I overkilled all the rub rail fasteners, every single screw is now 1/4 x20 flat head Phillips machine screws with 3/4" washers and plenty of life caulk bedding compound, I re-used the old aluminum rail that was in good condition, sanded to bare metal, alodined, primed and painted flat black.
Pete Fallon
..
1961 Express Vizcaya Hull 186 12-13-61
Re: Part identification...without photo!
Pete,
its always worthwhile listening to what you're saying... so, I'll recover the sides ! I will not go through the acetone process. As for the stanchion bases they look and hold fine, shall I still remove and rebed them ?
The rub rail I haven't looked at yet, I'll let you know what happens with it.
Good luck with your knee, it should be soon, no ?
Yannis.
1973 B28 FBC/2007 4LHA STP's - "Phantom Duck" - Hull "BER 00794 1172"
-
Pete Fallon
- Senior Member
- Posts: 1313
- Joined: Jun 29th, '06, 23:10
- Location: Stuart Fl. and Salem, Ma.
Re: Part identification...without photo!
Yannis,
If I were you and the headliner is/ was in the process of coming down away I would re-fasten all the fittings on the forward deck, over the years they will have loosened up and the bedding compound will more than likely dried out. If you don't do it, they will leak for sure and you will be kicking yourself for not doing it.
The knee surgery is going to happen in mid October, I am going to Washington DC to have the nerves cut around the knee, a lot less complicated than having the entire knee replaced, if it works I might get away with just having some nerves snipped, compared to a 6 to 10 month recovery from a total knee replacement for the 4th time. I'll keep you posted.
Pete Fallon
1961 Express Vizcaya Hull 186 12-13-61
Re: Part identification...without photo!
Thanks Pete, good luck !
1973 B28 FBC/2007 4LHA STP's - "Phantom Duck" - Hull "BER 00794 1172"
-
conchy joe

- Posts: 153
- Joined: Jan 15th, '11, 03:06
Re: Part identification...without photo!
Kevin,
I cut mine out last years to recess my transducer, per Capt Pat's building tip. It's never caused me any issues.
Also, I FINALLY got my 5" exhaust in, turbo's freed up, generator rewound, reinstalled, and have put some miles on the boat locally. Now we are trying to make it look pretty.
Sorry I missed the Bahamas trip, what a disaster/nightmare, I went through. Hope you understand.
Troy & Daria
28 Bertram FBC, 3.9 Cummin BT's
Conchy Joe "ITS THE BOAT'S NAME, NOT MINE" -
Hypoluxo Point, FL
28 Bertram FBC, 3.9 Cummin BT's
Conchy Joe "ITS THE BOAT'S NAME, NOT MINE" -
Hypoluxo Point, FL
Re: Part identification...without photo!
Kevin, Troy,
I just started cutting out mine too. About 50 cm inside and 50 cm outside of the door bulkhead.
There are many layers of glass around a 5 cm high marine plywood that (in my case) was completely black; previous owners had drilled screws on it to attach various pumps, sensors, etc, so that the plywood absorbed the water/diesel mix that lay in the bilge through the screwholes. The water seemed to have evaporated but the diesel could not escape. Upon cutting, the plywood came out as black dust.
I'm waiting for my son to help me post pics as this new telephone is too complicated...
1973 B28 FBC/2007 4LHA STP's - "Phantom Duck" - Hull "BER 00794 1172"
Re: Part identification...without photo!
I took the risk and removed that hump. I hope it will make my life easier in water removal in the bilges.
Stain from 40 year old screw remnants pours out at the opening of the hump.

Cross cut view of the first cut part. The plywood was soaked in a water-diesel solution

The after pics of the interior bilge; 65 cm removed.


The after pic of the engine room bilge ; 95 cm removed.

Stain from 40 year old screw remnants pours out at the opening of the hump.
Cross cut view of the first cut part. The plywood was soaked in a water-diesel solution
The after pics of the interior bilge; 65 cm removed.
The after pic of the engine room bilge ; 95 cm removed.
1973 B28 FBC/2007 4LHA STP's - "Phantom Duck" - Hull "BER 00794 1172"

Re: Part identification...without photo!
Nice! I am planning to do the same thing on mine so the bilge pump can pick up almost all the water.
good work!
good work!
Jorge E.
1973 Bertram 28'
Yanmar 4LH-STE's
1973 Bertram 28'
Yanmar 4LH-STE's
Re: Part identification...without photo!
And that no water gets in, and that you can rinse ALL interior and the rinse water flows out, that you can keep both bilges relatively dry ....
Go for it JH.
Go for it JH.
1973 B28 FBC/2007 4LHA STP's - "Phantom Duck" - Hull "BER 00794 1172"
Who is online
Users browsing this forum: Bing [Bot] and 54 guests