Page 1 of 1
Capt. Pat
Posted: Apr 14th, '14, 23:40
by Bill Fuller
Capt. Pat,
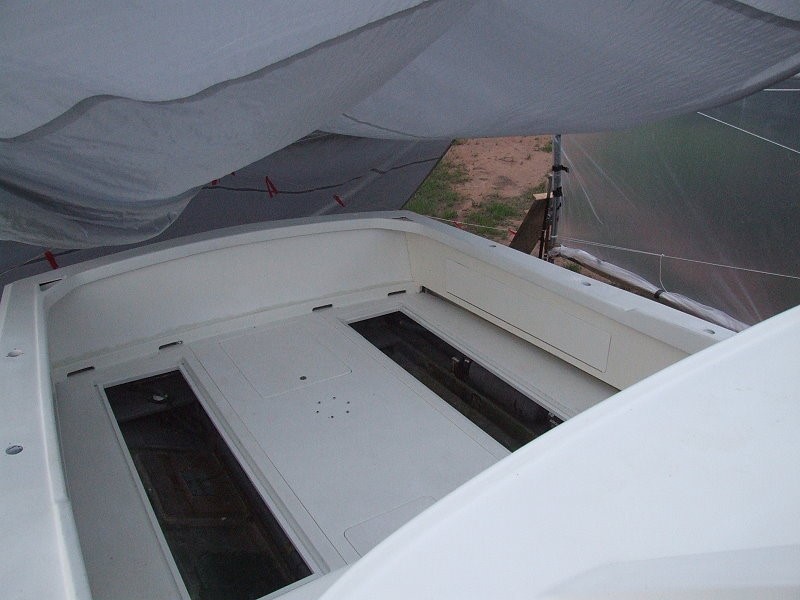
I am hoping that you can provide me with your opinion on what I am currently doing with my deck and how I am planning to allow the hatches to sit in the deck.
Here is what has been done so far.
Deck was removed.
All glass and balsa core removed to leave only the outer glass skin.
old hatches were cut out.
With the deck upside down, Coosa bluewater 26 was laminated to the skin with 3 layers (opposing direction) of 1.5 oz.
After curing, 2 additional layers of 1.5 oz. followed by 1 layer of 1708 and 1 layer of 10 oz.
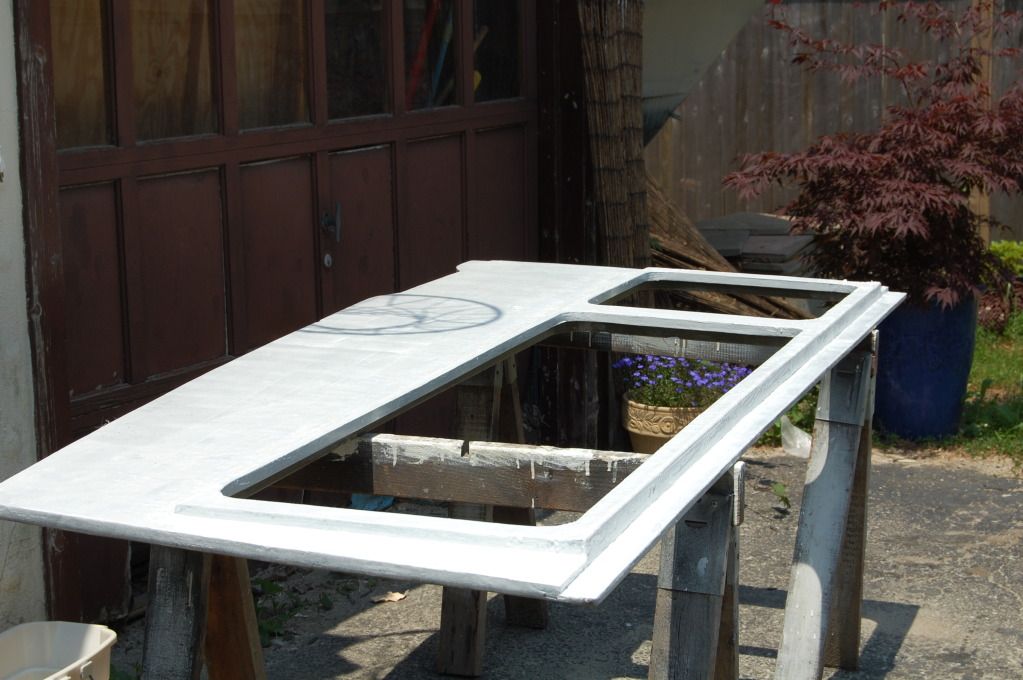
The top side old hatch areas were filled as needed and the top rendered smooth.
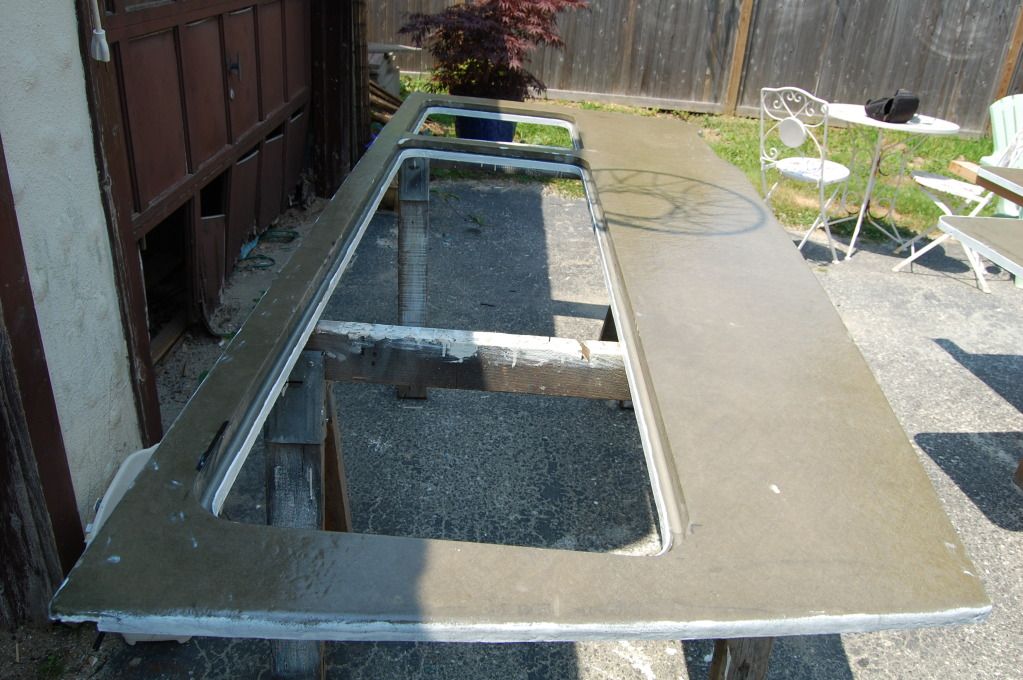
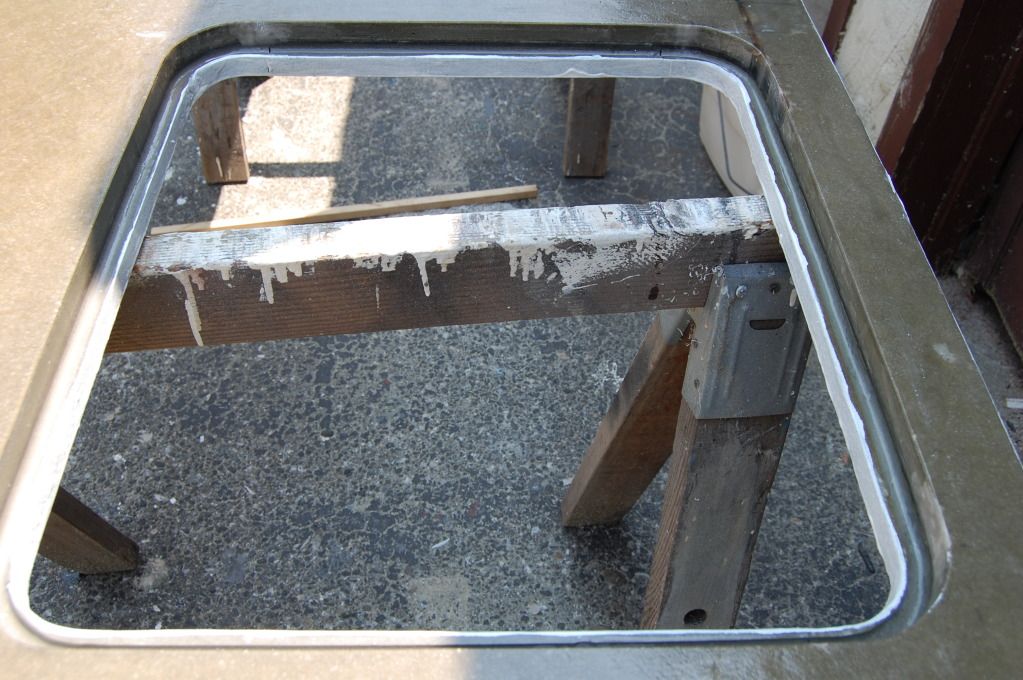
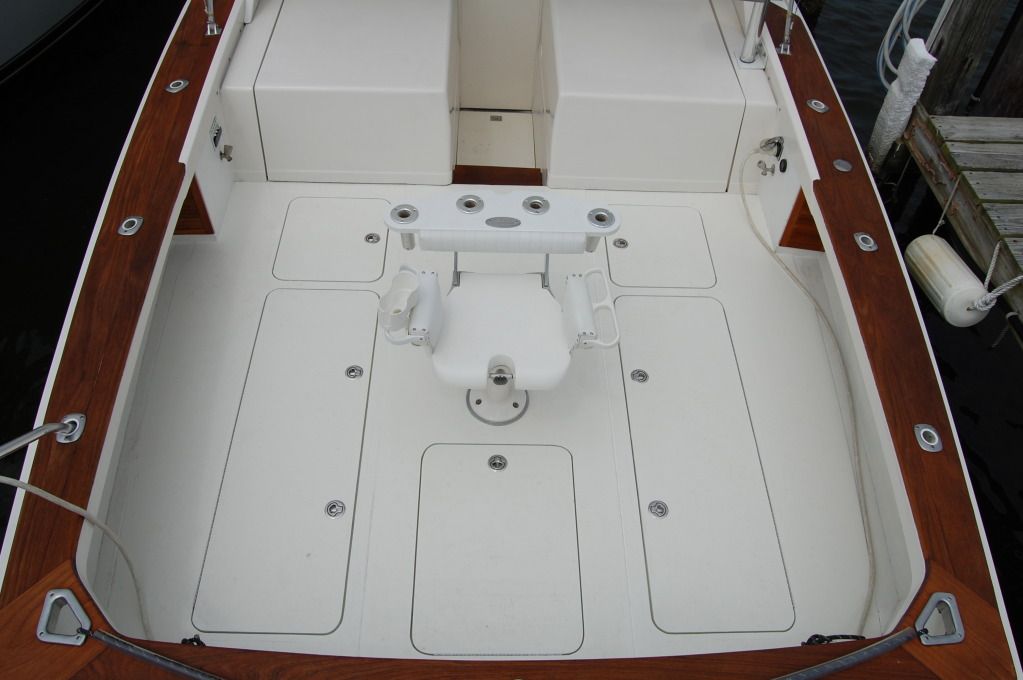
This is were we are now:
The plan has been to very carefully cut out the hatches which, simplistically, will provide us with both the open compartment and the hatch cover.
Now the question: we have thought of 2 ways to make the "lip" for the hatch lid to sit on. One is to use FRP angle, screw and laminate into the side of the hatch opening and glass over. The second is to simply glass in flat FRP under the deck with an appropriate amount of material protruding beyond the edge to generate the "lip".
Your thoughts and ideas would be greatly appreciated.
Also, I do not have the skill or knowledge to do the kind of work that you do but am trying to accomplish this project in the simplest possible way and still have a solid structure.
Thank you very much for your help
Bill
Re: Capt. Pat
Posted: Apr 15th, '14, 07:43
by CaptPatrick
Bill,
Not rocket science, nor overly difficult...
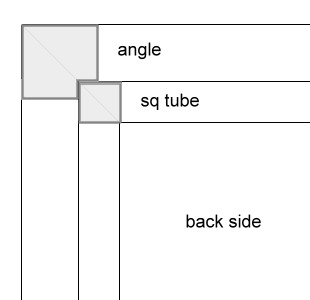
You'll start with a couple of structural fiberglass parts from
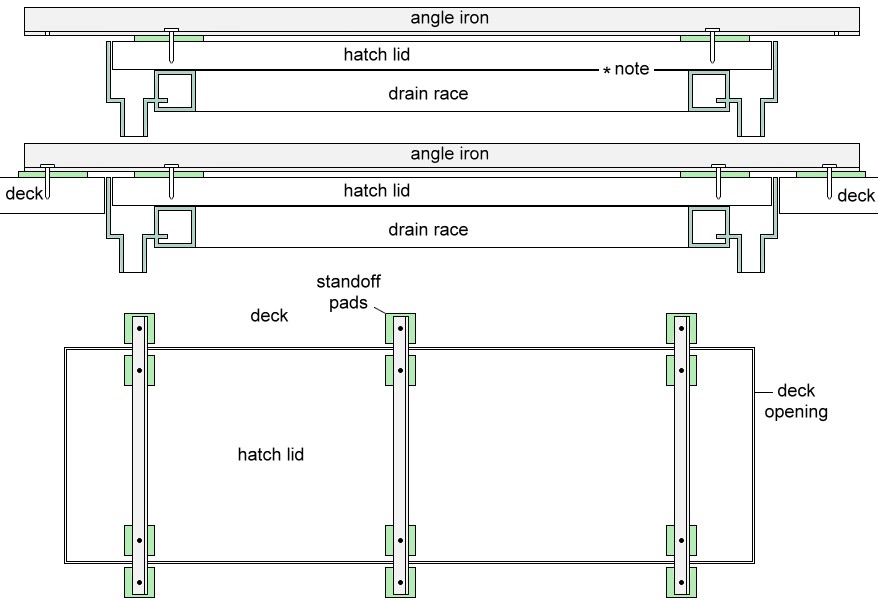
McMaster-Carr: 1" square tubing & 1 1/2" angle. From these items, you'll build the drain races as outlined in the graphic below.
Start by cutting a slot in the square tubing on a table saw, using a thin kerf carbide tipped blade. Next, fit the edge of the angle into the square tubing. Sand all surfaces before assembly. Make up a few wooden blocks to act as spacers. Once fitted, turn the piece upside down and tack the tubing and angle together with super glue and allow about 5 min the glue to cure.
Remove the spacer blocks and place the assembly, race up, at an angle of about 30 degrees. One end supported at about 3' and the other end resting on the ground should do it. Place a piece of wax paper under the end on the ground.
Mix up epoxy, hardener, and cabosil to a consistency that is slightly runny. Slowly pour this mix into the tube so that the epoxy mix flows gradually down coating both sides of the angle lip. Continue pouring until the epoxy starts to exit at the low end of the tube.
As soon as the epoxy has made the trip all the down the tube, pick up the assembly and place it horizontally and level on the face of the angle with the tubing up. Plug both ends of the tubing with modeling clay to keep the epoxy from seeping out. Allow to cure...
Next, you may want to create an
epoxy fillet in the inside corners. It's not really necessary, but would add to the cosmetics and be easier to clean the race.
Measure and miter cut lengths to your specifications. Carefully assemble and tack the joints with super glue. Be sure that the assembly is dead nuts square. You can use
miter clamps & you may want to make up a jig to assure this happens correctly...
Once the assembly has cured, turn it up side down and epoxy on flat tabs over the joints, (second diagram).
Drain holes can be made using 1/2" pvc pipe. Cut sections of pipe about 2 1/2" long and with a heat gun warm up on end of the pipe until it gets soft and pliable. Using a rounded tool of larger diameter, create a flair to the pipe end. Keep the tool in contact until the pvc cools and holds the shape. Drill a hole in the corner of the race just big enough for the un-flared pipe to fit into. On the top side of the race, counter sink the fiberglass so that the flair will rest into the counter sunk hole. Sand the flared end down so the drain pipe is flush with the fiberglass. Insert and tack with super glue.
On the back side glass around the pipe and on to the fiberglass angle using 1 1/2 oz mat. I prefer to use polyester resin for this joint, but epoxy will work if you don't have access to polyester resin.
Refine as desired before installation into deck opening. Once installed all further refinement will be done on your knees...
The back side of the race and deck joint will need to be glassed over.
Mark and cut the hatch opening into the deck. Place the deck upside down on a good flat surface. Place the hatch lid into the opening. If you're going to use a rubber gasket, cut some tabs of the same material and spot them around the square tubing to act as spacers. Insert the drain race into the opening and force the race down onto the lid. When you're happy with the fit, glass the race to the back of the deck. Keep the hatch lid in place throughout this process...
Work slowly, keep your eye on the ball, and think out each step before committing to permanent bonding and you should be good.
 Was this post useful to you? Donate
Re: Capt. Pat
Posted: Apr 15th, '14, 09:50
by bbtiller
Thank you, Capt. Pat, that is perfect and I encourage you to continue to ask the question:
"Was this post useful to you?"
Damn right it was useful, and I just sent a donation, again, and I respectfully challenge the sandbox users to do the same...support this site. (That's what we do, USE this site as a source to economically take care of our boats.) Look at the red line up top; we're almost half way through the year and have not reached half our goal.
http://bertram31.com/donor.html
Re: Capt. Pat
Posted: Apr 17th, '14, 10:20
by Bill Fuller
Capt. Patrick,
Thank you very much for your comments and suggestions. I had studied this procedure extensively from your previous posts and the tips section.
The limited room in my B28, having a large bait tank between the hatches, and wanting to have fish boxes with the largest possible volume, I am going to go without drains and consequently without the box tube system. I will simply use the FRP angle to generate the lip for the hatch to sit on. It will be hinged and latched down with compression latches. Hopefully water tight. I know this is not the "right" way to go, but I am going too give it a try. The fish boxes will be independent and set in the cradles where the auxiliary fuel tanks used to be.
I had planned to post picture and comments about this project so others could use the information I will gain. But with bbtillers comments, and the fact I have not donated to sight for a couple of years, it appears I am not welcome here any more. This will probably be my last post.
Thank you again for your comments, they are greatly appreciated.
Bill
Re: Capt. Pat
Posted: Apr 17th, '14, 10:54
by mike ohlstein
Bill,
Donations are encouraged but remain optional. You're welcome here any time.
As for the donation status, if you refresh your screen you'll see that the contribution level looks to be at about 85%.
Re: Capt. Pat
Posted: Apr 17th, '14, 11:18
by CaptPatrick
Bill,
PM sent your way...
Re: Capt. Pat
Posted: Apr 17th, '14, 14:38
by Dug
Bill,
What Mike said.
I didn't read either Pats as saying that, nor bbtiller's comments. Its unfortunate you took it that way.
Pat, great add to the bottom of a really informative post.
Keep asking.
Best,
Dug
Re: Capt. Pat
Posted: Apr 17th, '14, 15:04
by bbtiller
Bill, my sincere apologies, the comment was not directed at you, I was wanting to point out how valuable this site is. I was not meaning to offend or judge; my comments were meant to inspire, not chastise. Poor choice of words on my part. Totally not my intent, and I have no way of knowing, nor does anyone else who donated what. I was just looking at the red line up top. Please accept my apologies. If anyone else on site was offended, my apologies as well. Bradley Tiller
Re: Capt. Pat
Posted: Apr 17th, '14, 15:32
by IRGuy
I had started to post something in response to bbtiller's comment above, but thought better of it as I am not comfortable sticking my nose into someone else's business.
Glad this issue has been settled.. now lets all get back to playing in our sandbox!
Re: Capt. Pat
Posted: Apr 17th, '14, 18:34
by Capt.Frank
Patrick,
Do you use the fiberglass box to strenghten the hatch? It looks like you cut out one of the suports for the deck.
Re: Capt. Pat
Posted: Apr 17th, '14, 18:57
by Bob H.
Capt Pat one of my favorite tips love the simplicity of the design. My fish boxes will be the first redo of Resolute. Hatch openings are way to small for all but bass n blues, I plan on killing a few tuna and those fish boxes are the ticket. BH
Re: Capt. Pat
Posted: Apr 17th, '14, 20:06
by CaptPatrick
Frank,
Indeed I did cut a cross support, but between the drain race design and the hatch cover itself spreading the load that missing piece of support was of little consequence. Technically, Glasstech could have left that particular cross support off altogether...
Re: Capt. Pat
Posted: Apr 17th, '14, 21:34
by CaptPatrick
Bob,
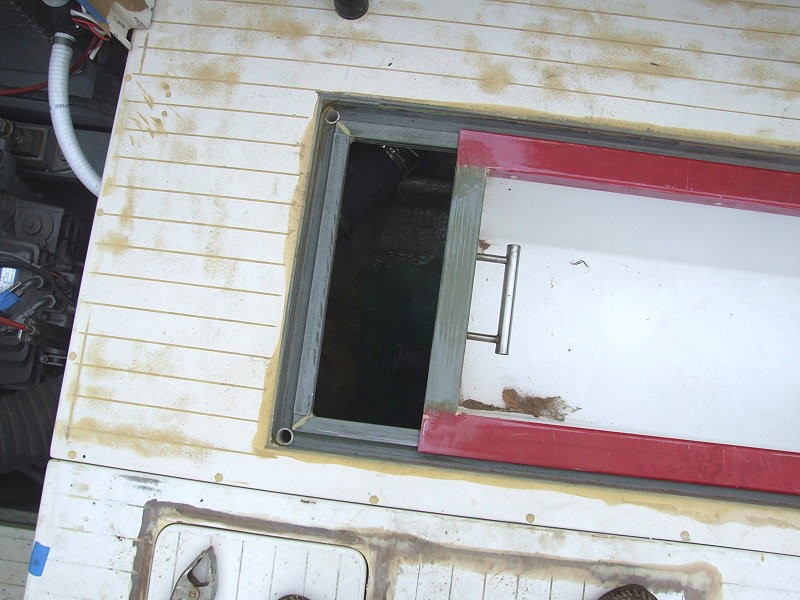
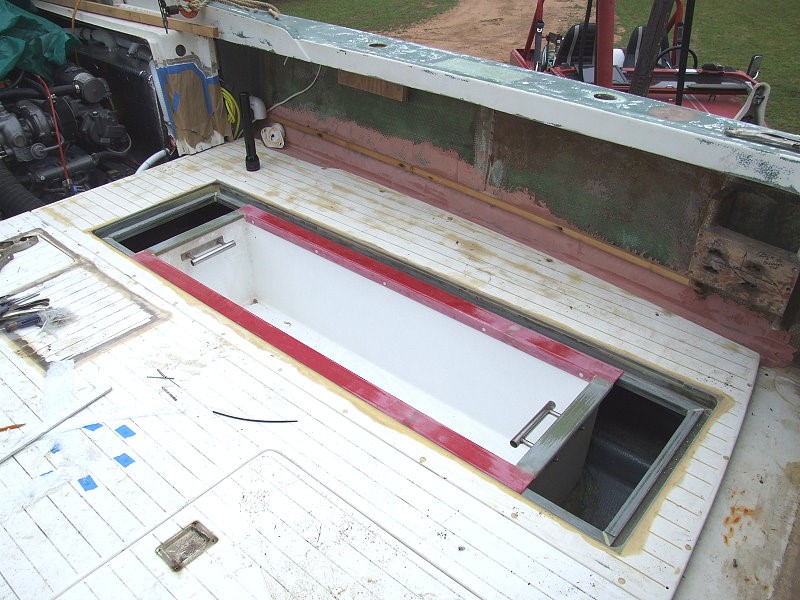
Here's one for you... I figured out this system when installing the hatches on Ricky Sanders' Bahia Mar.
Make up your hatch lid & the drain race to match. Allow for anything between the lid and the race, such as a gasket & overlay of the fishbox, if you do it like I did on Hancock's. The red rails in the image above are modified U channels and rides directly on the square element of the race.
Using a minimum of three cross supports, made from angle iron, assemble both the race and lid as one unit. With a matching hole cut into your deck, drop the assembly into place for a dry fit. When happy, butter up the outer wall of the race and the deck edge with epoxy. Set the assemby in place and screw it down while the epoxy hardens.
Remove the angle iron, hatch lid and proceed with glassing in the underside.
Re: Capt. Pat
Posted: Apr 18th, '14, 00:13
by Kevin
Now that I am a tad more comfortable with larger glass projects I am feeling inspired to modify mine. This could get really dangerous if I screw up bad enough........
Wife-Where the hell are we all supposed to sit?
Me-Two of you can fit comfortably on either side of the fuel tank and two on top of the tank. Just don't touch the shafts, they will rip your arm off.
Re: Capt. Pat
Posted: Apr 25th, '14, 11:05
by conchy joe
By coincidence, my project this weekend is to re-core the deck on my 28, I have two soft spots. I was planning on using divini cell, however I don't want over/under engineer for stiffness.
Capt Pat, after cutting the back side of the deck off and coring material what layup schedule would you recommend and the thickness of the divini cell?
Also if you give me a different recommendation, like coosaboard let me know I going to follow whatever you tell me too.
Thanks as always.
Re: Capt. Pat
Posted: Apr 25th, '14, 11:58
by CaptPatrick
Troy,
Divinycell, at least H60 or denser, or Coosa board will both be fine. Dig out and refit as necessary, bedding the new core with thickened epoxy. After the cure and cleanup, glass over with a couple of layers of e-glass 10 oz fabric 0/90 degree, no mat backing, & un-thickened epoxy. Glue products or Shop Man/US Composites will have the glass...
Re: Capt. Pat
Posted: Apr 25th, '14, 12:06
by conchy joe
What thickness? 1/2 on the diviny cell? I'm doing the entire deck
Re: Capt. Pat
Posted: Apr 25th, '14, 12:16
by CaptPatrick
Troy,
The cavity left by digging out the old core should be your gage to thickness. I'm guessing, but probably 3/4"...
Re: Capt. Pat
Posted: Apr 25th, '14, 15:28
by conchy joe
Just picked up some 80 diviny cell 3/4" and two layers of 10oz and vacuum bagging supplies. Will post some
pictures.
Re: Capt. Pat
Posted: Apr 27th, '14, 07:52
by Bill Fuller
Troy,
I am in the final stages of re-coring and re-configuring my B28 deck. What I have found is that starting at the top, you have a very thin "skin" and then under that a fair amount of glass, then the core which is 1/2 inch end grain Balsa. and then a substantial amount of glass with the final, lower layer being a heavy roving.
Are you keeping the original configuration for the hatches? If so, I would suggest very carefully cutting the glass just deep enough to hit the Balsa core. All around the hatches and outer edge etc. Then break out that glass and then chip out in whatever means you can the core. I would try to save the glass that is between the core and the "skin". This will make working the deck much easier and save a lot of work. I took mine all the way to skin and started over since I was adding hatches that were 63 inches long on each side. Removing all of the glass and core was not an easy process.
Once you have the core removed proceed as planned, but you may want to consider using 1/2 inch core. I would take a close look at the thickness of the glass below the core to decide what to replace it with, assuming you want to end up with the same thickness as original.
The coosa bluewater 26 core material is incredible stuff!
Good luck and I would like to hear how your project turns out.
Bill
Re: Capt. Pat
Posted: Apr 27th, '14, 09:01
by Kevin
Bill,
Can you post some pictures of your project please? I actually went dolphin fishing the other day and one less cooler on deck would be nice!
Re: Capt. Pat
Posted: Apr 27th, '14, 18:58
by bob lico
I spend days of labor just to gain a extra 11/2" to width to hatches deck became dangerous narrow dead even with uprights along fuel tank and made new deck supports kissing the 6" exhaust and lenth is the entire cockpit is hatch from edge of shaft log to transom maximun lenth and width for box inserts.entirelly made of coosa26 .eliminated usless hatch over tank fuel return .and rear center hatch clears chair by 1/2" exposing fuel vavles and fuel pick up.
Re: Capt. Pat
Posted: Apr 27th, '14, 19:02
by bob lico
Bottomside photo you can see the narrow edge to get maximim width.half lap of port and starboard lay on half lap of center board and directly on deck support. Some day 1000 lbs tuna ( unlikely) but 10 people in cockpit so it has to be bulletproof with multible biax build up.
Re: Capt. Pat
Posted: Apr 27th, '14, 19:04
by bob lico
Close up of water groove done with router .
Re: Capt. Pat
Posted: Apr 27th, '14, 19:08
by bob lico
Be real carefull cuting hatches out and you can make entire deck from three boards another words don't drill holes and insert jig saw you use router with 3/16" carbide bit to cut out and you end up with your hatches.
Re: Capt. Pat
Posted: Apr 27th, '14, 19:10
by bob lico
I started by first trial fitting then remove with hatches and scribe out to the max.lay up cloth,two layers of biax on bottom and cloth biax then vail on top. Easy job except laying up vail created air bubbles .working by yourself tough to remove because the brew is tacking up.I finish with 545 awlgrip primer then awlgrip top cote with sand .
Re: Capt. Pat
Posted: Apr 27th, '14, 19:13
by bob lico
Remove the old glass tec with modified hatches .
Re: Capt. Pat
Posted: Apr 27th, '14, 19:21
by bob lico
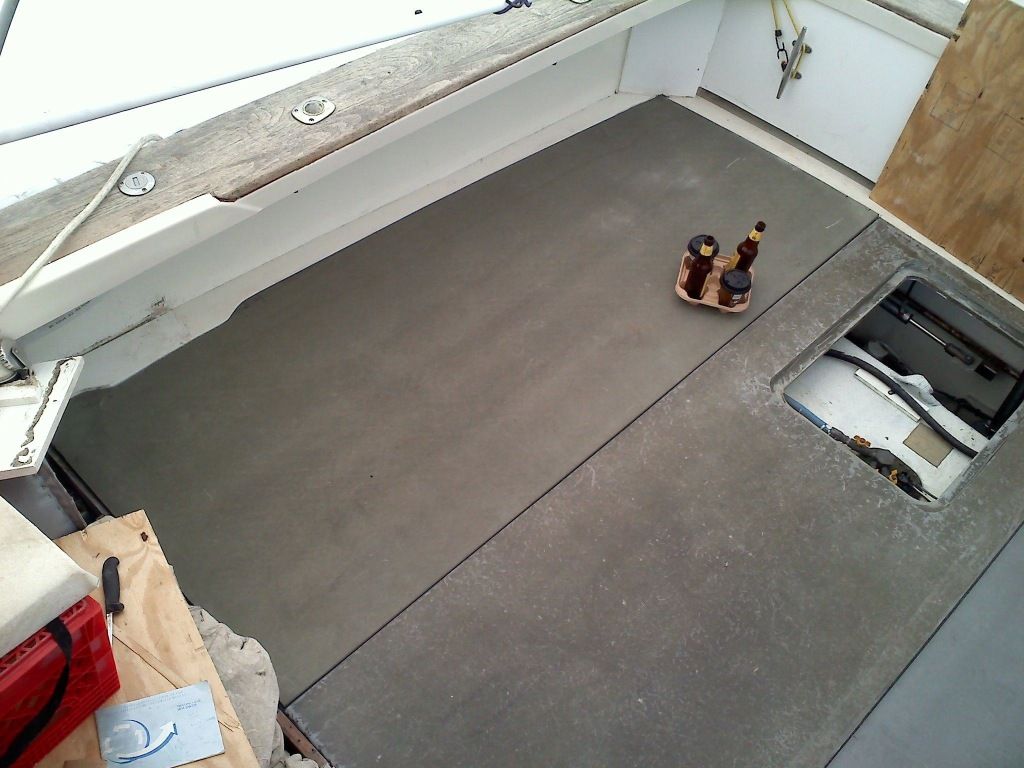
I did all work in my son's driveway and here is finished product .the best feature is after insulating kill boxes i use 20lbs of ice and salt water in boxes sea bass,fluke and stripe bass stay in such a cold state they are still alive after we get back to dock after being out all day.
Re: Capt. Pat
Posted: Apr 29th, '14, 07:33
by Bill Fuller
Kevin,
I am not at home right now and only have a couple of pictures on my phone. Actually in Pompano Beach FL.
I will post when I am home in about 2 weeks.
If you like, I can email you the pictures I have with me.
My email is
bullfuller@san.rr.com
or if you like you can give me a call
858-414-3904
I am not familiar with the B31 deck but I think It is substantially different than the B28 deck.
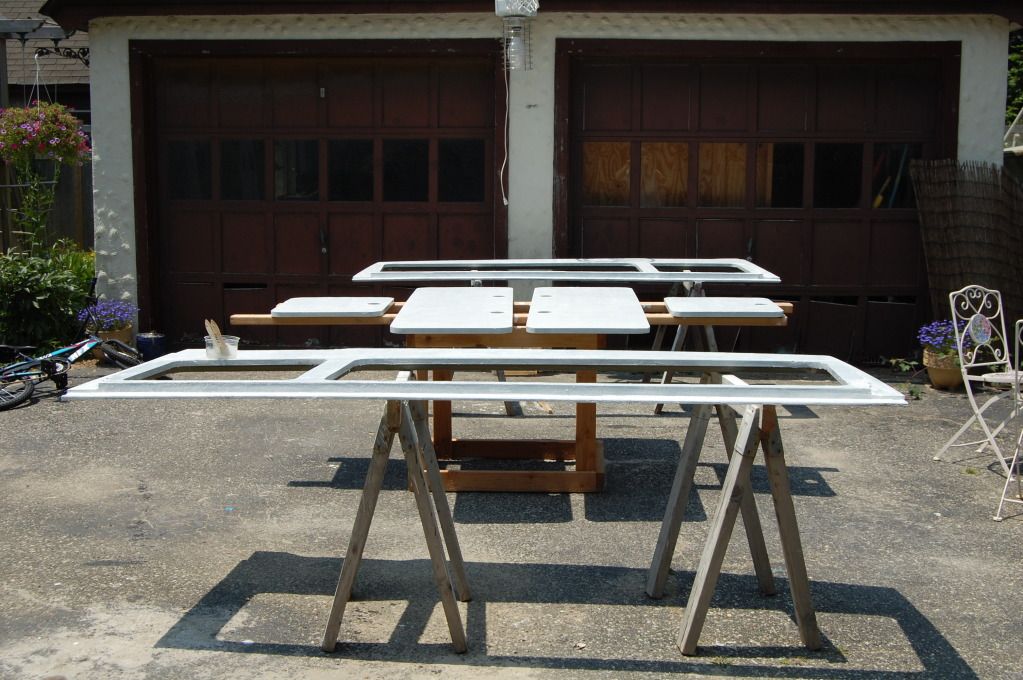
As Bob indicated, we carefully cut the hatches which provided the hatch covers. We did this with a skill saw and a jig saw for the corners. Then trimmed the hatch covers to provide the proper clearance (radial arm saw, but table saw would be better). We are trying to obtain a water tight seal so we did not incorporate drain rails. This may or may not be a good idea! Ultimately, the fish boxes will set in the cradles that used to hold the auxiliary fuel tanks. They will not "hang" from the hatch rail. We will see how it works.
Bill
Re: Capt. Pat
Posted: Apr 29th, '14, 10:43
by CamB25
How are the hinges installed?
Re: Capt. Pat
Posted: Apr 29th, '14, 10:55
by bob lico
Continuous piano hinge for maximum strength. When hatch opens the top edge leans against inner hull and clears bottom of coaming board by 1/2" .this 120 degree opening creates complete safety in rough seas to open hatch and have two hands to throw another fish in hole or the opposite side contains anchor and 1500' of line in basket with retrieval ball.both hatches are hands free when opened.
Re: Capt. Pat
Posted: May 1st, '14, 19:13
by scot
Outstanding post, but Bob..
first redo of Resolute
Seek help now, I hear the new psychiatric medications work wonders. :-)
Re: Capt. Pat
Posted: May 2nd, '14, 07:07
by Bill Fuller
Bob,
Very nice! I hope mine looks have as good when I am done.
Do you have a picture of you hinge system? I really like the concealed look but could not find a piano hinge that would do the job.
I am using 3 flush mount hinges for each of the large hatches. I have people who fish bare foot so I don't want anything on the deck that could cause injury. These are the ones.
http://www.gemlux.com/catalog/hinge-180-deg/2187
Hinges are not in yet and if I can see yours before tomorrow, I might go with them.
What latches did you use? Compression or jam (slam)?
Here are the ones I am using.
http://www.gemlux.com/catalog/latch-compression
Bill
Re: Capt. Pat
Posted: May 2nd, '14, 07:20
by bob lico
I cannot take credit for hinges. I captain a 45' cabo for a very wealthy guy. Took the boat to the best in the country Jarret bay for teak cockpit sole and coaming boards.i spoke with best of the best assign to do job and he explained and then show me why 316 ss 7/8" continuous hinge is only way to go again not my idea.with sanding block run on both side of hinge area making slight bevel then mount hinge slightly lower then you normally mount hinge ( i copy everything they did). Came out beautiful everybody including children have bare feet getting in and out of boat when docked at fire island with three families and friends never a problem.
Re: Capt. Pat
Posted: May 2nd, '14, 07:54
by Bill Fuller
Thanks Bob,
At this point I will probably just go with the hinges in the link above. I am in Florida right now and my son is working on the deck back home in San Diego. I think he is trying to finish it up before I get back. He will be fitting the hinges and latches this weekend. And then it will be ready for the final sanding and painting.
Bill
Re: Capt. Pat
Posted: May 2nd, '14, 08:40
by bob lico
A little word to the wise.diviniycell will not hold a screw unless you scoop out and fill with expoxy . Coosa 26 much better but if you really care and have guys slamming the hatch throwing there catch into kill box you have to take one extra step,that is put temp. Ist and last screw in hinge to keep in place then use tape to set depth . drill all holes with screw body size then dip each screw into expoxy with 50/50 high density filler with silica and screw tight. I use 316SS slam lacthes by Succo because that what the crew does all the time just let hatch fall and it locks.
Re: Capt. Pat
Posted: May 2nd, '14, 09:23
by Bill Fuller
Bob,
Agree, screws alone would be risky even though I am cored with Coosa Bluewater 26. My hinges will be through-bolted.
Bill
Re: Capt. Pat
Posted: May 4th, '14, 09:33
by bob lico
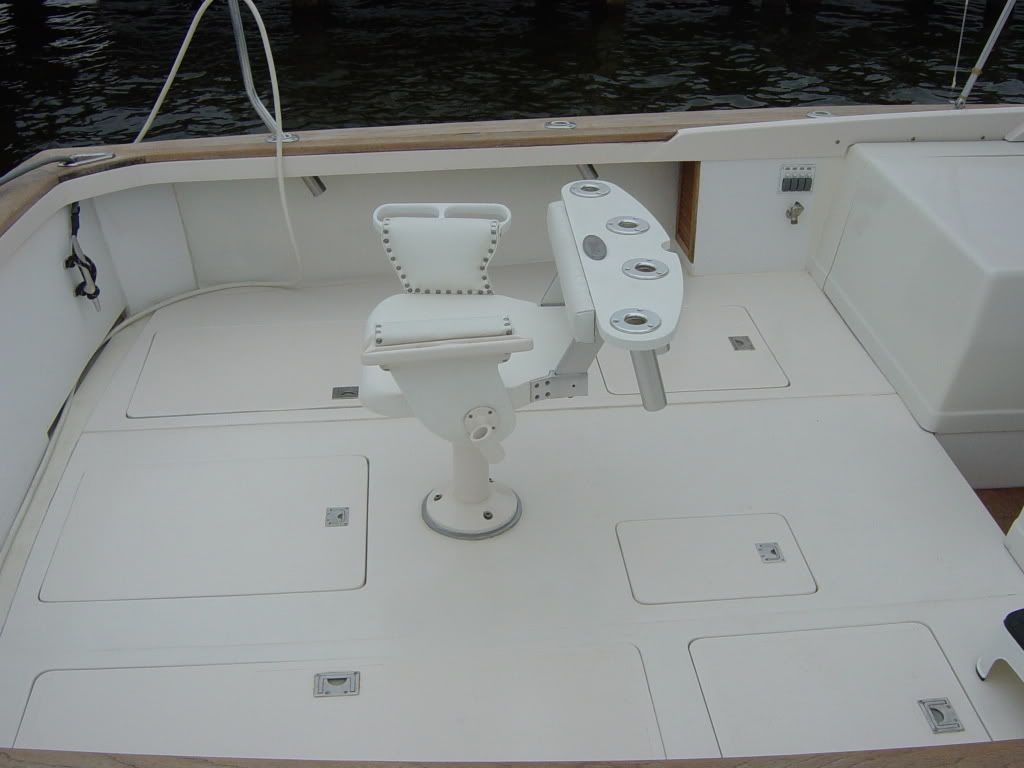
Bill here is the cockpit of 45' cabo that was built at Jarret Bay yards .the only change i made was to take full advantage of depth below deck i made bottom of boxes coincide with contour of bilge so the boxes rest on bilge and supported from tipping because they lay against deck supports on both lengths of boxes. There is a cleat on the inside of box at either end to lift and drain at transom end.

Re: Capt. Pat
Posted: May 5th, '14, 08:02
by Bill Fuller
Bob,
My plan is very similar to what you describe. The box will follow the contour of the hull, but will set in "cradles" that the old auxiliary fuel tanks sat in. The boxes should have a capacity of between 45 and 50 gallons.
Bill