Prop Install – Please check my homework

The Main Sand Box for bertram31.com

Moderators: CaptPatrick, mike ohlstein, Bruce

Post Reply
Stephan
Senior Member
Posts: 655
Joined: Mar 30th, '11, 05:41
Location: Providence, RI

Prop Install – Please check my homework

Post by Stephan »

Gentlemen-
I’ve exploited the “search” feature of the board to the best of my ability and have come up with the following schedule for reinstalling my props, please let me know if this is the preferred method.
1. Check prop shaft and keyway for cracks
2. Check keyway on shaft and prop for burs and key fit
3. Lock prop shaft
4. Coat shaft taper with felt tip marker
5. Check for prop seat on shaft
6. Apply lapping compound to shaft taper and rotate prop on shaft to hone. (Just as an aside, every post I read had the marking being put on the shaft and not the prop to check the seat and yet if I lap these together it’s going to be the prop that is honed to the shaft (and not the shaft that is honed to the prop) as the prop metal – SiBr is softer than the shaft stainless) is it just that it is so much easier to check the shaft visually than peek down the hole in the prop?
7. Clean shaft and prop thoroughly with mineral spirits. Check prop is not hot.
8. Drive prop on
9. Tighten large prop nut fully and mark forward edge of prop on shaft.
10. Remove large nut and prop
11. Coat keyway with Rectorseal #5, coat key with WD40 and install
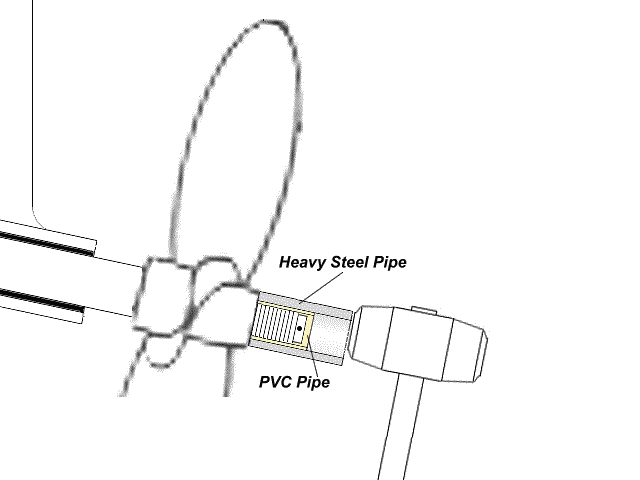
12. Coat prop shaft with Tef-Gel and slide prop back on and seat with pipe
Image
13. Coat with Tef-Gel and install and fully tighten small nut
14. Wait
15. Re-check small nut torque (75# ?)
16. Check front edge of prop against tape in #9 (if the prop is not that far forward it is sitting on the key… remove prop hone key and try again…)
17. Install and tighten with MarineTex large nut
18. ?
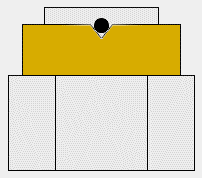
One discussion included the fabrication of a castellated spacer between the large (last) nut and the cotter pin.
Image
Alternatively, drilling out the large nut and safety wiring it to the prop shaft’s cotter pin hole is presented in Tony Athens article.
What do y’all think about drilling just a hole (and not a castellating channel) in the spacer and safety wiring it in place? Does the spacer need to be metal or could it be PVC?
Note: The link to Tony Athen’s article was moved from the link previously posted but I think I found it here http://www.sbmar.com/main/articles/prop ... ittle_nut/
Possunt quia posse videntur
User avatar
In Memory Walter K
Senior Member
Posts: 2912
Joined: Jun 30th, '06, 21:25
Location: East Hampton LI, NY
Contact:

Post by In Memory Walter K »

Given what I have seen at marinas, you wouldn't find many places that would give it that much time and attention no matter what they charged you.
User avatar
Bruce
Site Admin
Posts: 3783
Joined: Jun 29th, '06, 12:04
Location: Palm Beach Gardens, Fl.

Post by Bruce »

I wouldn't drive anything on with a hammer cause the gear case output bearing is gonna take the brunt of it.

Thats a no no.

If you do your work and everything fits well, the prop nuts will push the prop up on the taper.

Don't forget to put a light wipe of grease on the side of the prop nut against the prop and the two nut sides together to prevent binding. Tef gel would be okay also.

Never used rector seal and wd40. Always just used marine grease before tef gel was around and then used tef gel.

Again if everything fits well, theres no movement. The tef gel is for ease of getting it apart again and use sparingly

Oh and tighten the prop like its never ever comming off again and you won't have an issue the first time you put the boat in reverse.

Marine Tex on the large nut? Thats epoxy. Where did you find that tidbit?


On second thought, throw that list out.

1. Make sure the key slides in the shaft and prop hub with no binding and is not sloppy.

2. Use lite lapping compound and wipe on shaft taper. Install prop and nut.
Tighten nut by hand till you can just spin the prop. As the prop hub spins the clearance will increase and keep hand tightening the nut till it just spins.
Do this for a few minutes.

3. Remove prop and clean shaft and hub with mineral spirits or acetone. Look at hub to see if there is equal wear all they around it. It will be a dull finish. Any shiney spots and redo.
Redo till you get the dull finish.

4. Clean everything off and chek key fit again. Should slide back and forth thru both cuts smooth.

5. Wipe everything down with a lite film of tefgel.

6. Same with nuts on the sides.

7. Tighten first nut like your never gonna take it off. Then do the second one. If the second is a castle nut make sure you tighten to align the cotter pin hole.
Never untighten to fit.

If two regular nuts, install cotter pin after nuts are tightened down.

In 30 years never ever had a prop come loose. Some were a bitch to get off but then you don't put a prop on with the notion of getting it back off.

And never ever bang on a shaft with it attached to the gear box. No self respecting mechanic will ever tell you to bang on a bearing.
Stephan
Senior Member
Posts: 655
Joined: Mar 30th, '11, 05:41
Location: Providence, RI

Post by Stephan »

Bruce-
The MarineTex bit surprised me too but from Tomy Athens' article:
...Now comes my solution to prop nuts staying put, I clean the threads with spray brake-cleaner or whatever I have handy, smear a nice heavy dab of MarineTex or other common epoxy on the threads of the shaft (second nut only), and tighten up the small nut to something applicable to the shaft size. 3M 5200 or a similar high-strength urethane will also do an Okay job if it's allowed to cure first. But, an epoxied nut "don't go nowhere", (until you want it to). ...
and Capt. Pat's post of Dec 21, 2008:
... Tony makes some other good suggestions that I think are more important: Lots of greasey goo to help block crevice corrosion & the use of epoxy, (as opposed to my comment on Loctite), are two that will stick in my mind on my next installation. ...
Sooo, when it's time to take the prop off is it heat the shaft and nut to get the epoxy to release then go home and come back the next day after everythings cool to pop the prop off...
Possunt quia posse videntur
User avatar
Bruce
Site Admin
Posts: 3783
Joined: Jun 29th, '06, 12:04
Location: Palm Beach Gardens, Fl.

Post by Bruce »

Well all I can say is if you don't have enough lead in your pants to tighten the nut properly, then I guess epoxying it on is the answer.

Some unsuspecting home repair guy could transfer that same mentality to any engine bolt rather than make sure its tightened properly. I guess that might explain some of the abortions that used to come thru the shop.

I'm sorry but there a whole bunch of stuff I don't agree with on Athens, but then again I'm not trying to tell every idiot who owns a boat how to fix it. A lot more liability attached to it when you charge people to help em.

We gave up the general fix em up forum the turn of the century.

Epoxy away if you feel thats what you want to do.........
User avatar
Carl
Senior Member
Posts: 5948
Joined: Jul 5th, '06, 06:45
Location: Staten Island NY

Post by Carl »

So you wanna glue your nuts...


To each his own, but sounds like someone is overthinking the simplicity of just doing it right.

After fitting wheel, make a mark where the large end of prop hub stops with a marker, pull off wheel, install key and wheel, slide back making sure key does not ride up keyway and see that wheel is at "the Mark" if it is lock'em up good and install cotter pin. Move onto next wheel.

If prop hub does not go back to "the Mark", remove and find out why. Fix and re-try.

I'd Skip the glue and hammers...but thats just me.
User avatar
John F.
Senior Member
Posts: 2101
Joined: Jun 29th, '06, 07:58

Post by John F. »

Follow Bruce's second list. That's basically what I did except I used grease instead of tefgel. I would've used tefgel if it had occured to me, but it never did. Never had a problem. Again, I'm not a mechanic, and I just generally try to follow the advice of pros like Capt. Pat and Bruce. Epoxy to seal threads? Really?

There are very few things on a boat that I'd take a hammer to, period. Especially mechanical things that go into or connect to expensive things like engines and gears.
1968 B20 Moppie - Hull # 201-937
1969 B31 FBC - Hull # 315-881 (sold)
1977 B31 FBC - Hull # BERG1652M77J
User avatar
CaptPatrick
Founder/Admin
Posts: 4161
Joined: Jun 7th, '06, 14:25
Location: 834 Scott Dr., LLANO, TX 78643 - 325.248.0809 bertram31@bertram31.com

Post by CaptPatrick »

The hammer isn't meant to be used like you're driving a piling 10' into ground. A little common sense here is a prerequisite...

The idea is to tap the wheel firmly up the shaft taper. The reason I use a heavy machinist sledge is that a few taps from a heavy hammer does the job far better than beating with a light weight hammer. The steel pipe assures that full contact is made with the hub and distributes the force from the hammer equally and doesn't mar the hub.

The technique, by the way, comes from a underwater running gear machinist with over 40 years in the business...
FWHaas3
Posts: 50
Joined: Jul 5th, '06, 15:26
Location: Ocean City, New Jersey

Prop install

Post by FWHaas3 »

I hate to add to the confusion of this discussion, but I have seen conflicting suggestions as to which nut goes first. Any thoughts from the experts?
Frederick W. Haas
User avatar
Bruce
Site Admin
Posts: 3783
Joined: Jun 29th, '06, 12:04
Location: Palm Beach Gardens, Fl.

Post by Bruce »

Pat,
Since when did common sense and boating become related?

You know well that some tree swinger is gonna see that and beat the living hell out of his prop and then realize he can do the same to get it off.

If everything is well fitted together, no reason even to use a light hammer touch to assemble.

You know I've used the same underwater guy myself and like him very much, but I've also cringed at some of the suggestive measures I've gotten from him over the years :)
User avatar
CaptPatrick
Founder/Admin
Posts: 4161
Joined: Jun 7th, '06, 14:25
Location: 834 Scott Dr., LLANO, TX 78643 - 325.248.0809 bertram31@bertram31.com

Post by CaptPatrick »

Yup :^)
Stephan
Senior Member
Posts: 655
Joined: Mar 30th, '11, 05:41
Location: Providence, RI

Post by Stephan »

Well considering how confused I was in high school with 1 shaft and two nuts that were maintenance free I guess no big surprise I have been cautious here…
I will not epoxy my nuts.
Image
But I might sneak a little red Loctite under the second nut. And finish with regular cotter pin skipping the custom castellation of my nuts… might be against my religion anyway… glad I’m one of the heathens who will have next week free… I mean what boat would you rather have for the tribulation?
Is it looting/stealing if they’ve gone to the rapture??
Thanks.
Possunt quia posse videntur
User avatar
Bruce
Site Admin
Posts: 3783
Joined: Jun 29th, '06, 12:04
Location: Palm Beach Gardens, Fl.

Post by Bruce »

The only red that should ever grace a shaft nut comes from lipstick..................
User avatar
Carl
Senior Member
Posts: 5948
Joined: Jul 5th, '06, 06:45
Location: Staten Island NY

Post by Carl »

CaptPatrick wrote:The hammer isn't meant to be used like you're driving a piling 10' into ground. A little common sense here is a prerequisite...

The technique, by the way, comes from a underwater running gear machinist with over 40 years in the business...

There is aboslutely nothing Common about Common Sence.


Two perfect tapers should lockup with little need for tapping and driving further. If tapers are off...
Post Reply

Who is online

Users browsing this forum: Bing [Bot] and 34 guests