I'm finally getting around to replacing my raw water intake system. It currently consists of two 1 1/4 inch thru hull scoops to gate valves then through Perko 493/500 strainers then to the Mercruiser Horizon 300 hp engines. Besides being ugly and taking up too much room, the gate valves are inoperative now and I can't even open or close them any more.
So I am going to start from scratch with a new thru hull, backing plate and ball valve flange mounted to the new backing plate with silicon bronze bolts. This will also give me an oportunity to replace gaskets on the strainer and clean up the plastic tubes so you can see through them.
The port thru hull scoop has a missing grate, so it needs replacing. My thoughts are to just replace them both with mushroom thru hulls instead of scoops. I've researched the engine manual to see if it specifies a scoop and all it says is that the thru hull system should be no less than 1 1/4 inch with a strainer. Going with mushroom thru hulls would simplify the project for sure.
My question is: is there any good reason why I can't get away with this? I don't live in an area where sea grass is a problem.
Dick
Raw Water Intake
Moderators: CaptPatrick, mike ohlstein, Bruce
-
Skipper Dick

- Senior Member
- Posts: 330
- Joined: Jun 29th, '06, 08:22
- Location: Cape Coral, Florida
- Contact:
Raw Water Intake
1983 Bertram 28 FBC w/300 Merc Horizon
-
In Memory of Vicroy

- Senior Member
- Posts: 2340
- Joined: Jun 29th, '06, 09:19
- Location: Baton Rouge, LA
-
Whaler1777
- Senior Member
- Posts: 647
- Joined: Sep 10th, '06, 19:43
- Location: NY

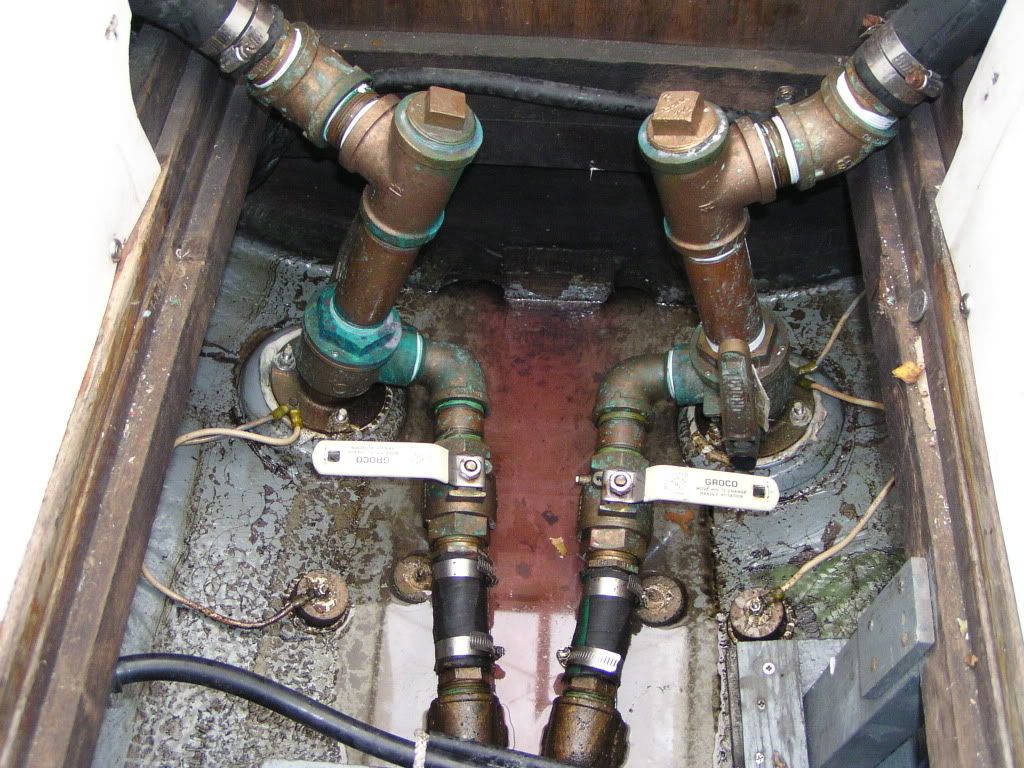
I did my whole system last year from the stock B 31 set up...similar to waht you described. I went to the the external stainers as recomended on this site by Capt. Patrick and removed the original strainers. One season down and no probelm though I do have a little growth on the stainer. !.5 " groco lever seacocks, with side ports to crash valves. Up to a T and into the engine inlet hose. I can open up from the line through the T and punch out any obstructions (like barbacles). I have some pix somewhare...will look and post later. The whle set up is much better than stock...I am please with how it came out.
Giff
-
scot

- Senior Member
- Posts: 1470
- Joined: Oct 3rd, '06, 09:47
- Location: Hurricane Alley, Texas
- Contact:
Ditto what these guys are saying, go back with 1 1/2" fittings. The cost is nearly identical and could save you grief down the road, also the system will flow better and not be as sensive to marine growth. The farther you go toward the engines with the 1 1/2" dia, the better the system will flow.
Moving up to a 2" iinlet is a bit of a cost increase, and not needed for most common B31 diesel applications....plus 2" strainers are freakin huge!
Moving up to a 2" iinlet is a bit of a cost increase, and not needed for most common B31 diesel applications....plus 2" strainers are freakin huge!
Scot
1969 Bertram 25 "Roly Poly"
she'll float one of these days.. no really it will :-0
1969 Bertram 25 "Roly Poly"
she'll float one of these days.. no really it will :-0

-
Whaler1777
- Senior Member
- Posts: 647
- Joined: Sep 10th, '06, 19:43
- Location: NY
The original scoops are more prone to barnacle/other sea life growth than the larger groco strainers... Groco even has a model with an access door so you can clean behind the screen... You don't have to go with the flanged valves but I think that the in-line valves have a slightly different thread than the thru hulls (npt I think) I initially bought the in-line 2" valves but just went to the flanged to save even more space in the hull...
'79 Bertram 31' Sedan
-
Skipper Dick
- Senior Member
- Posts: 330
- Joined: Jun 29th, '06, 08:22
- Location: Cape Coral, Florida
- Contact:
I decided to use the flanged seacocks to meet the current ABYC safety standard for a seacock installation and I want to eliminate the scoops because the mushroom thru hull is much simpler to install. There are no additional breeches in the hull for screws. I intent to remove the current scoops and fill in the screw holes. I can always eliminate the strainers for the hull mounted Groco strainers at a later date.coolair wrote:how important is it to use the flanged valves? and are the original scoops good enough or do you need the new style groco ones if you remove the big strainger?
I keep this boat on a lift, so I really do not have to worry too much about growth on the bottom. Also, I could never justify re-powering with diesels in this boat. It's just not cost effective and affordable for the use it gets. If I did decide to go diesel, I think it would be better for me to just buy a boat with them already installed. About the only interchangable part of the running gear would be the struts.
Besides, if I get too carried away, I'll be exiled to the dock with the geckos and little land crabs.
1983 Bertram 28 FBC w/300 Merc Horizon

one nice thing about the crash valves (besides the peace of mind) is how easy it becomes to run fresh water or antifreeze through the system. when i redid my raw water intakes i set up the plumbing so i could screw a pipe mounted in a spackle bucket directly into the system. makes it a piece of cake. give it some serious thought.
-
scot
- Senior Member
- Posts: 1470
- Joined: Oct 3rd, '06, 09:47
- Location: Hurricane Alley, Texas
- Contact:
Randall said:
I had one on my last boat and used it to flush after every run. Will have one on my current project as well. A marine engine's raw water pump can move 30-40, some over 50 gallons per MINUTE and are not subject to draining batteries.
Ditto, put the crash pumps in while you have it all apart, Bertams don't have foam floatation. They will settle in nicely on the sea bed in short order with a decent sized leak.one nice thing about the crash valves (besides the peace of mind) is how easy it becomes to run fresh water or antifreeze through the system. when i redid my raw water intakes i set up the plumbing so i could screw a pipe mounted in a spackle bucket directly into the system. makes it a piece of cake. give it some serious thought.
I had one on my last boat and used it to flush after every run. Will have one on my current project as well. A marine engine's raw water pump can move 30-40, some over 50 gallons per MINUTE and are not subject to draining batteries.
Scot
1969 Bertram 25 "Roly Poly"
she'll float one of these days.. no really it will :-0
1969 Bertram 25 "Roly Poly"
she'll float one of these days.. no really it will :-0

Groco safety ball-type seacocks full flow SBV series,, have a quick release plug and offer a safety ball valve servicing adapter for winterizing, available from Lewis on east coast, dont assume the 1 1/2 thru hull fits all, the 330 hp new cummins require 2" intakes, wish I had heard about these seacocks before I tackled the crash valves i recently installed, lots of pieces parts and take up valuable realstate

-
Tony Meola
- Senior Member
- Posts: 6929
- Joined: Jun 29th, '06, 21:24
- Location: Hillsdale, New Jersey
- Contact:
Marlin
I have the two inch Groco's with the plug. After using it a few times for winterization, I would say that it is not a good crash pump option. It takes too long to pull the plug and put in the adapter. Plus if water is rushing in, just not going to happen. Put in a separate crash pump set up.
I have the two inch Groco's with the plug. After using it a few times for winterization, I would say that it is not a good crash pump option. It takes too long to pull the plug and put in the adapter. Plus if water is rushing in, just not going to happen. Put in a separate crash pump set up.
1975 FBC BERG1467-315
-
PeterPalmieri

- Senior Member
- Posts: 2553
- Joined: Nov 12th, '10, 11:26
- Location: Babylon, NY
One of the things I need to upgrade on my boaat. It's a maze of piping and I believe my suyveyor said that the SW Intake system should be able to support 400lbs.
Sounds like this would be a good upgrade, since you guys are way ahead of is what your saying.....You normally turn off the sea cock to winterize the motor and run anti freeze. If done correctly this can also be used to pump water from the bilge?
Sounds like this would be a good upgrade, since you guys are way ahead of is what your saying.....You normally turn off the sea cock to winterize the motor and run anti freeze. If done correctly this can also be used to pump water from the bilge?
1969 31 Bertram FBC "East Wind" hull #315939
thats it. on my boat it takes literally 2 seconds to shut down the saltwater and open the crash valve. by making the opening in the crash valve threaded i can screw in a length of PVC pipe that goes to a bucket. anything i put in the bucket goes through the system with just the normal pressure..no hose pressure.
as someone who has opened his hatch and seen about 14 inches of salt water in the bilge (15 miles from home)i can assure you that having crash valves can be a real comfort.
as someone who has opened his hatch and seen about 14 inches of salt water in the bilge (15 miles from home)i can assure you that having crash valves can be a real comfort.
-
AndreF

- Senior Member
- Posts: 711
- Joined: Jun 29th, '06, 09:53
- Location: Baton Rouge, Louisiana
- Contact:
As UV told me one time after beating some mighty tall waves when we got back to Port Eads and saw alot of water in the bildge- "we were sinking and didn't even know it, but it made the boat handle better" Oh yeah, then - "I need a drink" Me too
I'm not sure but indecision may or may not be my problem.
"People sleep peaceably in their beds at night only because rough men stand ready to do violence on their behalf." - George Orwell
1981 FBC BERG1883M81E
"People sleep peaceably in their beds at night only because rough men stand ready to do violence on their behalf." - George Orwell
1981 FBC BERG1883M81E

Yea that's the stuff, only concern I thought was it can split under pressure if end grain dries? But I guess you have good results with it Bob, must be O.K. with the clamping action the nut puts on it. I'd actually like to get some just to see it to get an idea what the hipe is with it! Must be tough as you said. I've got to remove my old internal strainers for external now that rear bulkhead is out and now's the time to choose pad material
-
Skipper Dick
- Senior Member
- Posts: 330
- Joined: Jun 29th, '06, 08:22
- Location: Cape Coral, Florida
- Contact:
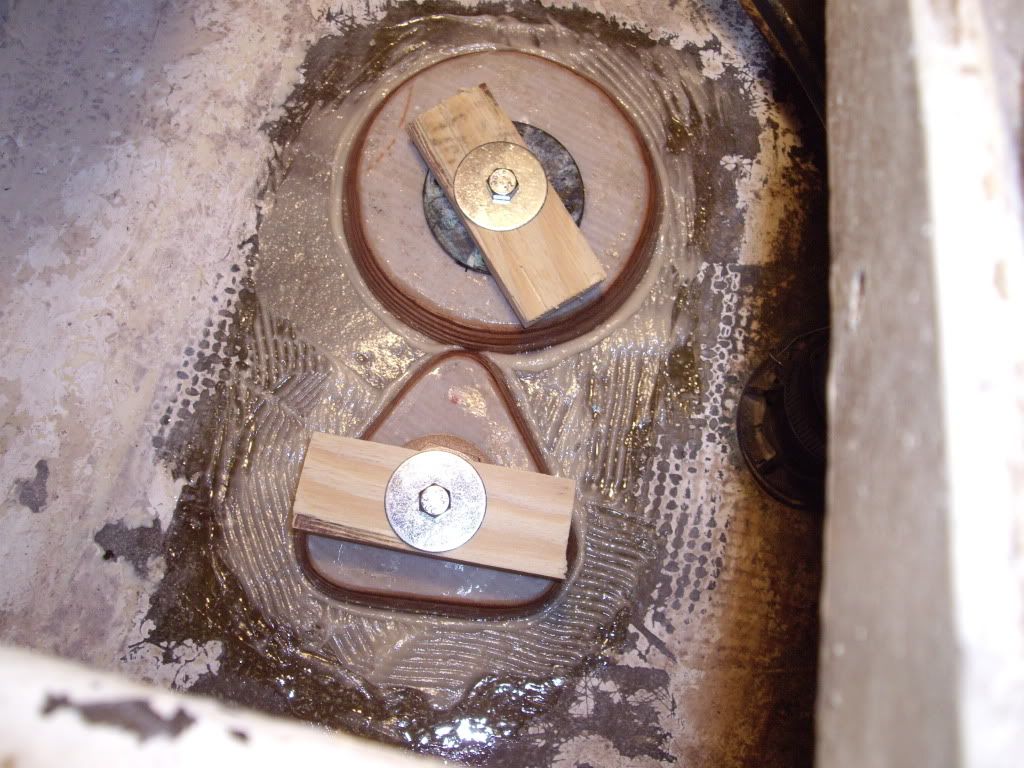
I found a simple way to make fiberglass backing plates using a heavy plastic, flat bottomed bowl with a slight outward bevel. I waxed the bowl with carnuba wax and then mixed enough resin and milled fiberglass until it was about the consistancy of mayonaise and spooned it in the bowl. The bowl measured 5 1/2 inches in diameter and I mixed the resin so it would be a little slower. Once it kicked, I popped it out of the bowl and had a perfectly round 5 1/2 inch plate 5/8th of an inch thick. I drilled the center hole and bolt holes for the flange and I believe the plate will outlast any wood backing plate. It seems to be bullet proof and I'll epoxy them in tomorrow after it cures for a bit more.
Dick
Dick
1983 Bertram 28 FBC w/300 Merc Horizon
-
PeterPalmieri
- Senior Member
- Posts: 2553
- Joined: Nov 12th, '10, 11:26
- Location: Babylon, NY
-
Skipper Dick
- Senior Member
- Posts: 330
- Joined: Jun 29th, '06, 08:22
- Location: Cape Coral, Florida
- Contact:
Pete,
I should be able to get most of it re-insalled tomorrow and the next day after waiting for the backing plate epoxy to cure. I'm waiting on the bronze bolts to arrive today, but every thing else is ready. It amaizes me that all the local marine shops that sell thru hulls and stopcock flanges do not carry the bronze bolts for the flanges and I had to go online.
I'll get some pics posted when it is complete. I even have a crash valve setup for each side.
Dick
1983 Bertram 28 FBC w/300 Merc Horizon
once again peter come to my boat at oakdale yacth and you can actually look, touch and work the vaves .i can also show you the bertram installed crash valves installed on the bertram 510 . i also run a 45' cabo express with the same system. you can check that also--------------bob
capt.bob lico
bero13010473
bero13010473
-
PeterPalmieri
- Senior Member
- Posts: 2553
- Joined: Nov 12th, '10, 11:26
- Location: Babylon, NY
-
Tony Meola
- Senior Member
- Posts: 6929
- Joined: Jun 29th, '06, 21:24
- Location: Hillsdale, New Jersey
- Contact:
The other option is to order fiberglass sheet. This is what we used. Pick your thickness. We used 1/2 inch and by the time we glassed it in and used the cloth it was an inch thick.
http://www.mcmaster.com/#fiberglass-sheets/=9r2ci8
http://www.mcmaster.com/#fiberglass-sheets/=9r2ci8
1975 FBC BERG1467-315
I can't beleive it, but I have no pix of my set up. I think you would like it. One lever to open inside valve, one to close seacock...into crash valve mode fast and furious if need be. I have threaded access plug for cleaning, and winterizing. The only pix I have are of the backing plates I did on may parents boat....(did both boats at the same time. so similar materials) Got the backing material from Bob Higgins B 31 restoration...its scrap bulkhead material. About 3/4 - 1 " marine plywood with glass epoxied on inboth sides. If you know Bob and have seen his work, then you know the materials are top shelf (thanks Bob!). I epoxied mine in with west system, and then epoxied the whole set up once installed. I am out of the water now, but will probably be down to the boat within the next week and will snap some photos. I really like the way my set up came out.
Giff
Below is my set up. (Bilge is a littly swilly by this time of year) I took inputs from everyone before doing the job. Got the exteranl strainers as recomended by Captain Patrick. The access port wroked really well for winterization. Very easy to go into crash pump mode. BTW, dod not want to have to replace the hoses(did that the year befiore), so extended outlet to where it was with my old seacock/strainer set up.
Giff
Gif looks like you did similar to Bob Lico's crash setup, looks great. Possible question for the Capt., on my 31 it sits on a trailer. I would really like to put my intakes were Gif/Bobs are, in looking at the cradle diagram it looks like for storage of the 31 only needs KEEL support at transom, and first 6' of bow area, otherwise bunk support on chines as stated. I have support were this shows so, no center keel support needed were intakes would go behind batteries, doable? It would seem to simplify getting to valves esp. in an emergency and uncluttering were trans/shafts are located.
http://www.bertram31.com/specs/B31CradleDiagram.pdf
http://www.bertram31.com/specs/B31CradleDiagram.pdf
-
Tony Meola
- Senior Member
- Posts: 6929
- Joined: Jun 29th, '06, 21:24
- Location: Hillsdale, New Jersey
- Contact:
Rocky
I think they all came from the factory with the intakes right under the step. I am assuming someone move yours to the shaft alley. My 31 sits on the factory cradle for the winter. The bunk is actually forward of the intake. The bunk sits right behind the bulkead going into the cabin is. I am assuming it is right there to support the weight of the engines.
You should actually have no problem with the intakes if you set them back under the step.
1975 FBC BERG1467-315
Tony I looked at my area were rear bulkhead is in bilge and see all uniform green glass, doesn't look like on mine they were ever there. I guess my question is a hull support question in that trailering boat and storing it want to make sure chine support only is fine at engines area without centerline/keel bunks. My trailer manufacturer said I'm overthinking support on centerline(keel), as the 31 has excellent strength under the inboard and outboard stringers were bunks are now. Just want to be sure BEFORE drilling new large holes in hull, I always love doin that. And then of course following the Capt's guidlines on glassing in holes.
-
CaptPatrick

- Founder/Admin
- Posts: 4161
- Joined: Jun 7th, '06, 14:25
- Location: 834 Scott Dr., LLANO, TX 78643 - 325.248.0809 bertram31@bertram31.com
Got it Capt Pat thanks., I went to those pics you had on handcock's boat for crash valves: another fairly simple effective design with just a plumbed "T" fitting between engine pump and intake. Now's the time while rear bulkhead is out lots of space to work. All made up, it's ready to be tabbed in. I'll use the 2" external strainers with 1 1/2" valves.
-
Capt.Frank

- Senior Member
- Posts: 641
- Joined: Jun 29th, '06, 21:20
- Location: Kill Devil Hills,NC
-
Tony Meola
- Senior Member
- Posts: 6929
- Joined: Jun 29th, '06, 21:24
- Location: Hillsdale, New Jersey
- Contact:
-
Skipper Dick
- Senior Member
- Posts: 330
- Joined: Jun 29th, '06, 08:22
- Location: Cape Coral, Florida
- Contact:
Round items are the hole plugs from drilling out the backing plates. I had a bunch of them around, and they looked like the right item to back the strainer bolts. I used them to back the bolts through that hold the external strainers in. Followed instructions from this site on mounting groco external strainers. Leading side bolted through.
Regarding the external strainers, I had ok results with the external strainers. A little blockage due to growth but nothing serious. I beleive this approach is good as long as you properly coat the strainer with antifouling somthing....I used some left over propspeed. I live in a very high growth part of narraganset bay, so strainer blockage was a concern for me.
Regarding the external strainers, I had ok results with the external strainers. A little blockage due to growth but nothing serious. I beleive this approach is good as long as you properly coat the strainer with antifouling somthing....I used some left over propspeed. I live in a very high growth part of narraganset bay, so strainer blockage was a concern for me.
Giff
By the way.......Anyone have any idea why Bertram put the drain plug in the center in late model hulls? (I have seen rearplugs on earlier models)
You see I have some water in my bilge, mixed with a little non tox antifreeze. Even after putting big arrows show wher ethe plug is, my yard neved seems to getthe pitch right so that the water flows to the drain.
Most years i go down and level the boat myself with a bottle jack.....but this year I did not get to it yet. Life would be easlier with a trear drain.
Giff
-
In Memory Walter K

- Senior Member
- Posts: 2912
- Joined: Jun 30th, '06, 21:25
- Location: East Hampton LI, NY
- Contact:
-
Tony Meola
- Senior Member
- Posts: 6929
- Joined: Jun 29th, '06, 21:24
- Location: Hillsdale, New Jersey
- Contact:
I should cosider my self lucky. I sit in a cradle for the winter. The yard got it right every year but one. However, they haven't moved my cradle for 15 years so it is now right every time. Plus I have a reserved spot and on one is usually behind me since I am right on the edge of the path the travel lift uses to move boats around.
1975 FBC BERG1467-315
Who is online
Users browsing this forum: Bing [Bot], Sriver43 and 3 guests