Cockpit Side Panels

The Main Sand Box for bertram31.com

Moderators: CaptPatrick, mike ohlstein, Bruce

Post Reply
Stephan
Senior Member
Posts: 655
Joined: Mar 30th, '11, 05:41
Location: Providence, RI

Cockpit Side Panels

Post by Stephan »

Gentelmen-
I have pulled the cockpit side panels out as part of some winter projects. They are vinyl covered and have been painted gray.
Image
I am considering stripping the vinyl (more lik helping it fall off...) and fairing/painting. I am concerned that I will need to cover with a layer of glass or at least veil to get a good outcome.
On the "someday" list is removing them all together - boxing the cap and fairing the inside of the hull. But, for now, what do you recommend?
Thanks,
Stephan
Possunt quia posse videntur
User avatar
JP Dalik
Senior Member
Posts: 1317
Joined: Jun 30th, '06, 21:03
Location: Pt. Pleasant NJ
Contact:

Re: Cockpit Side Panels

Post by JP Dalik »

Formica
KR


JP
1977 RLDT "CHIMERA"
User avatar
CaptPatrick
Founder/Admin
Posts: 4161
Joined: Jun 7th, '06, 14:25
Location: 834 Scott Dr., LLANO, TX 78643 - 325.248.0809 bertram31@bertram31.com

Re: Cockpit Side Panels

Post by CaptPatrick »

Stephan,

Seconded on Formica or silimar hard laminate. Use epoxy to laminate for exterior use. The edges can radiused and be glassed over wtih a couple of layers of epoxy and veil. Hard laminate readily takes paint after a good sanding and primer coat of 545.
Br,

Patrick

Molon labe
User avatar
CaptPatrick
Founder/Admin
Posts: 4161
Joined: Jun 7th, '06, 14:25
Location: 834 Scott Dr., LLANO, TX 78643 - 325.248.0809 bertram31@bertram31.com

Re: Cockpit Side Panels

Post by CaptPatrick »

Back side of transom panel w/ veil

Image

Image

Image

Image

Image

Image
Br,

Patrick

Molon labe
User avatar
MarkS
Senior Member
Posts: 1160
Joined: Jun 29th, '06, 08:40
Location: The Frozen Tundra/EX-democratic stronghold Wisconsin

Re: Cockpit Side Panels

Post by MarkS »

Patrick are you getting any time in on that hammock? :)
72 Bertram 25 FBC "Razorsharp" Hull #254-1849
Things of quality have no fear of time.

Bondage to spiritual faith faith to great courage courage to liberty liberty to abundance abundance to complacency to apathy to dependence to bondage
User avatar
mike ohlstein
Site Admin
Posts: 2382
Joined: Jun 29th, '06, 11:39
Location: So many things seem like no-brainers until you run into someone with no brain.
Contact:

Re: Cockpit Side Panels

Post by mike ohlstein »

Looks like my toe hold idea caught on.....
Mike
Mean Team Leader
PREDATOR

Burn Oil
Eat Food
1973 FBC 1286 0273-315
User avatar
CaptPatrick
Founder/Admin
Posts: 4161
Joined: Jun 7th, '06, 14:25
Location: 834 Scott Dr., LLANO, TX 78643 - 325.248.0809 bertram31@bertram31.com

Re: Cockpit Side Panels

Post by CaptPatrick »

MarkS wrote:Patrick are you getting any time in on that hammock? :)
Naw, Mark. I've probably laid in it 10 times for a total of 5 minutes...
mike ohlstein wrote:Looks like my toe hold idea caught on.....
Thanks Mike, I couldn't remember where I came up with that idea...
Br,

Patrick

Molon labe
Stephan
Senior Member
Posts: 655
Joined: Mar 30th, '11, 05:41
Location: Providence, RI

Re: Cockpit Side Panels

Post by Stephan »

Thank you gentlemen.
Not wishing to try anyone's patience... here's what I will do:
Image
- I will sand the striped plywood and coat with unthickened epoxy to pretreat the wood.
- Laminate Formica on to boards with West System (straight epoxy or with some cabosil?).
- Trim up edges with laminate trimmer and seal end-grain of the boards with thickened epoxy.
- Sand laminate with 60 grit paper
- Prime. Prime. Sand 220 grit paper. Prime with 545.
- Paint. Scuff. Paint with Interlux Brightside Polyurethane
Possunt quia posse videntur
User avatar
CaptPatrick
Founder/Admin
Posts: 4161
Joined: Jun 7th, '06, 14:25
Location: 834 Scott Dr., LLANO, TX 78643 - 325.248.0809 bertram31@bertram31.com

Re: Cockpit Side Panels

Post by CaptPatrick »

- Laminate Formica on to boards with West System (straight epoxy or with some cabosil?).
- Trim up edges with laminate trimmer and seal end-grain of the boards with thickened epoxy.
Use enough Cabosil to make a mix the consistancy of mayonaise...
Use a round over bit to avoid 90 deg corners. Use a couple of layers of veil. Epoxy by itseft will shrink and crack down the road...

Image
Br,

Patrick

Molon labe
Stephan
Senior Member
Posts: 655
Joined: Mar 30th, '11, 05:41
Location: Providence, RI

Re: Cockpit Side Panels

Post by Stephan »

This is excellent guidance. Thank you very much!
Stephan
Possunt quia posse videntur
bbtiller
Senior Member
Posts: 88
Joined: Aug 17th, '12, 07:41

Re: Cockpit Side Panels

Post by bbtiller »

Please excuse my ignorance, but what is "veil"?
BRUISER
BERG1552M76F-315
Bradley Tiller
bbtiller
Senior Member
Posts: 88
Joined: Aug 17th, '12, 07:41

Re: Cockpit Side Panels

Post by bbtiller »

Capt. Patrick, in the pics above with the new hatch and side panel/door, is that a Glass Tech deck? If so what did you do to "convert" it?
BRUISER
BERG1552M76F-315
Bradley Tiller
User avatar
CaptPatrick
Founder/Admin
Posts: 4161
Joined: Jun 7th, '06, 14:25
Location: 834 Scott Dr., LLANO, TX 78643 - 325.248.0809 bertram31@bertram31.com

Re: Cockpit Side Panels

Post by CaptPatrick »

bbtiller wrote:Please excuse my ignorance, but what is "veil"?
Image
Br,

Patrick

Molon labe
User avatar
CaptPatrick
Founder/Admin
Posts: 4161
Joined: Jun 7th, '06, 14:25
Location: 834 Scott Dr., LLANO, TX 78643 - 325.248.0809 bertram31@bertram31.com

Re: Cockpit Side Panels

Post by CaptPatrick »

bbtiller wrote:Capt. Patrick, in the pics above with the new hatch and side panel/door, is that a Glass Tech deck? If so what did you do to "convert" it?
Yup, Glasstech... Cut out the space between the two hatches and reconfigured the drain race.

Image
Br,

Patrick

Molon labe
User avatar
Bob H.
Senior Member
Posts: 1279
Joined: Jul 10th, '06, 19:49
Location: Rehoboth, Mass.
Contact:

Re: Cockpit Side Panels

Post by Bob H. »

Capt Pat, Did you make those removable fishboxes? Like more details on those if you did. Stephan, no such thing as a dumb question here...thats how you learn my friend..BH
1966 31 Bahia Mar #316-512....8 years later..Resolute is now a reality..Builder to Boater..285 hours on the clocks..enjoying every minute..how many days till spring?
User avatar
CaptPatrick
Founder/Admin
Posts: 4161
Joined: Jun 7th, '06, 14:25
Location: 834 Scott Dr., LLANO, TX 78643 - 325.248.0809 bertram31@bertram31.com

Re: Cockpit Side Panels

Post by CaptPatrick »

Bob,

A lot of "as you go" changes were made to the initial concept drawings to end up with the real life production. I started with a plug mold from a pervious fishbox I did for Jay Smith. I enlarged the width to fit the Glasstech deck, re-gelcoated the mold and went from there...

I know that you, (and probably a few others), like the long story from a graphic standpoint, so here ya' go:

http://www.bertram31.com/hancock/img/cockpit/fishboxes/" onclick="window.open(this.href);return false;

Image
Br,

Patrick

Molon labe
User avatar
Bob H.
Senior Member
Posts: 1279
Joined: Jul 10th, '06, 19:49
Location: Rehoboth, Mass.
Contact:

Re: Cockpit Side Panels

Post by Bob H. »

Capt Pat, You make it look so easy...a removable fishbox is on my list...after I get her floating... some times you get stuck thinking in one direction..your detail sure helps get over and round those hurdles..where do you get your fiberglass extrusions? McNichols or McMaster Carr? Thanks for sharing that..BH
1966 31 Bahia Mar #316-512....8 years later..Resolute is now a reality..Builder to Boater..285 hours on the clocks..enjoying every minute..how many days till spring?
User avatar
Joe E
Senior Member
Posts: 155
Joined: Oct 26th, '06, 09:36
Location: Long beach, ca

Re: Cockpit Side Panels

Post by Joe E »

Truly amazing capt. Pat what are you using to secure you decks down. I noticed you filled the screw holes. Did you expoy the screws in? Joe
4 1/2 years to build, Slashed Sept 16, 2016. 212 hours already and counting.
Stephan
Senior Member
Posts: 655
Joined: Mar 30th, '11, 05:41
Location: Providence, RI

Re: Cockpit Side Panels

Post by Stephan »

Holy crap what a link!
Possunt quia posse videntur
User avatar
Hueso
Senior Member
Posts: 358
Joined: May 19th, '08, 19:32
Location: San Juan, PR

Re: Cockpit Side Panels

Post by Hueso »

I have never seen that link before................Capt. Pat, you are a dang Rock and Roll Star! The amount of work and attention to detail is incomparable.
User avatar
CaptPatrick
Founder/Admin
Posts: 4161
Joined: Jun 7th, '06, 14:25
Location: 834 Scott Dr., LLANO, TX 78643 - 325.248.0809 bertram31@bertram31.com

Re: Cockpit Side Panels

Post by CaptPatrick »

Bob H. wrote:where do you get your fiberglass extrusions? McNichols or McMaster Carr? Thanks for sharing that..BH
All from McMaster Carr...
Joe E wrote:Truly amazing capt. Pat what are you using to secure you decks down. I noticed you filled the screw holes. Did you expoy the screws in? Joe
The center section of the deck has flanges on both sides, so the center is screwed down first. The out board sections are positioned and screwed down with three screws to the outboard joists. The inboard screws are set from below, angling up to the underside of the deck, then a latex caulk is run down the joint line. Only the out board screws need to be caulked over.

The original screw holes were epoxied over... Not only were those two rows of exposed screws butt ugly, but also every one of them was just a way for water intrusion to the deck core.

Image
Br,

Patrick

Molon labe
Tony Meola
Senior Member
Posts: 6935
Joined: Jun 29th, '06, 21:24
Location: Hillsdale, New Jersey
Contact:

Re: Cockpit Side Panels

Post by Tony Meola »

Capt. Pat

Did you close up the space between the outboard edge of the deck and the hull? If you keep the cockpit panels and leave that open, I find that something always finds a way of droping down in that space. A real pain.
1975 FBC BERG1467-315
User avatar
CaptPatrick
Founder/Admin
Posts: 4161
Joined: Jun 7th, '06, 14:25
Location: 834 Scott Dr., LLANO, TX 78643 - 325.248.0809 bertram31@bertram31.com

Re: Cockpit Side Panels

Post by CaptPatrick »

Tony,

The pink stuff along the out board side of the deck, in the image above is Awlfair over an 1/8" of glass atop the outboard deck joist and faired to the hull. It becomes the outboard water race directed to the scuppers.
Br,

Patrick

Molon labe
User avatar
Charlie J
Senior Member
Posts: 2207
Joined: Jun 29th, '06, 09:14
Location: freeport n.y

Re: Cockpit Side Panels

Post by Charlie J »

a work of art
1968 hull # 316 - 757
User avatar
John F.
Senior Member
Posts: 2101
Joined: Jun 29th, '06, 07:58

Re: Cockpit Side Panels

Post by John F. »

Amazing work.
1968 B20 Moppie - Hull # 201-937
1969 B31 FBC - Hull # 315-881 (sold)
1977 B31 FBC - Hull # BERG1652M77J
my other east
Senior Member
Posts: 92
Joined: Aug 15th, '12, 08:53
Location: on some list...

Re: Cockpit Side Panels

Post by my other east »

The center section of the deck has flanges on both sides, so the center is screwed down first. The out board sections are positioned and screwed down with three screws to the outboard joists. The inboard screws are set from below, angling up to the underside of the deck, then a latex caulk is run down the joint line. Only the out board screws need to be caulked over.

The original screw holes were epoxied over... Not only were those two rows of exposed screws butt ugly, but also every one of them was just a way for water intrusion to the deck core.
Capt, thanks for providing that info.
you must have done the same to the "Classic" after the replacement shaft pad work.
i now know to look for the screws up underneath, instead of drilling out the epoxy and not finding anything.
eric
Eric Vincent
1974 31 FBC hull # 315-1442
bbtiller
Senior Member
Posts: 88
Joined: Aug 17th, '12, 07:41

Re: Cockpit Side Panels

Post by bbtiller »

Capt. Pat, how did you fair the glass tech deck?
BRUISER
BERG1552M76F-315
Bradley Tiller
ljmauricio
Junior Member
Posts: 110
Joined: Oct 5th, '12, 07:02

Re: Cockpit Side Panels

Post by ljmauricio »

Patrick, where does the water go from the hatch drain tubes? Bilge, or have you devised something else? My fiberglass deck and drain trays were all molded as one piece and the drain tubes just went into the bilge. Is there a better way?
User avatar
CaptPatrick
Founder/Admin
Posts: 4161
Joined: Jun 7th, '06, 14:25
Location: 834 Scott Dr., LLANO, TX 78643 - 325.248.0809 bertram31@bertram31.com

Re: Cockpit Side Panels

Post by CaptPatrick »

Leo,

Water does go to the bilge, but all drains are hose directed to the center aft bilge, never dripping down on equipment or other unwanted spots...
Br,

Patrick

Molon labe
User avatar
Rawleigh
Senior Member
Posts: 3434
Joined: Jun 29th, '06, 08:30
Location: Irvington, VA

Re: Cockpit Side Panels

Post by Rawleigh »

I piped all of mine together and took them out the transom along with the drain from my on deck fishbox. It was tough getting fall, but they seem to work pretty well. I have to tie my boat out away from electricity during hurricanes and I wanted to keep as much water as possible out of the bilge. I also tape all of the deck seams during a hurricane.
Rawleigh
1966 FBC 31
Tony Meola
Senior Member
Posts: 6935
Joined: Jun 29th, '06, 21:24
Location: Hillsdale, New Jersey
Contact:

Re: Cockpit Side Panels

Post by Tony Meola »

CaptPatrick wrote:Tony,

The pink stuff along the out board side of the deck, in the image above is Awlfair over an 1/8" of glass atop the outboard deck joist and faired to the hull. It becomes the outboard water race directed to the scuppers.

Was wondering what the best way of handling that was. Thank You
1975 FBC BERG1467-315
Stephan
Senior Member
Posts: 655
Joined: Mar 30th, '11, 05:41
Location: Providence, RI

Re: Cockpit Side Panels - Again and some more

Post by Stephan »

Gentlemen-
Thanks to you for the guidance above which I have finally put to good use.
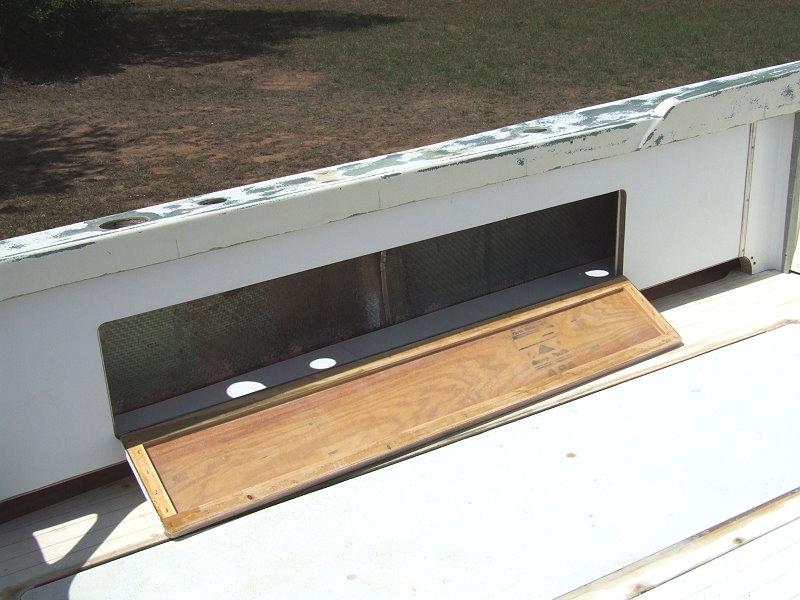
The cockpit panels had been covered with a thick marine vinyl that was glued and stapled to the plywood panels. Getting the vinyl off was easy but the glue was tenacious and soft. Any attempt at sanding it off immediately clogged the sand paper. I ended up using an IR heater to really soften the glue and then a sharp pull scraper.
Image
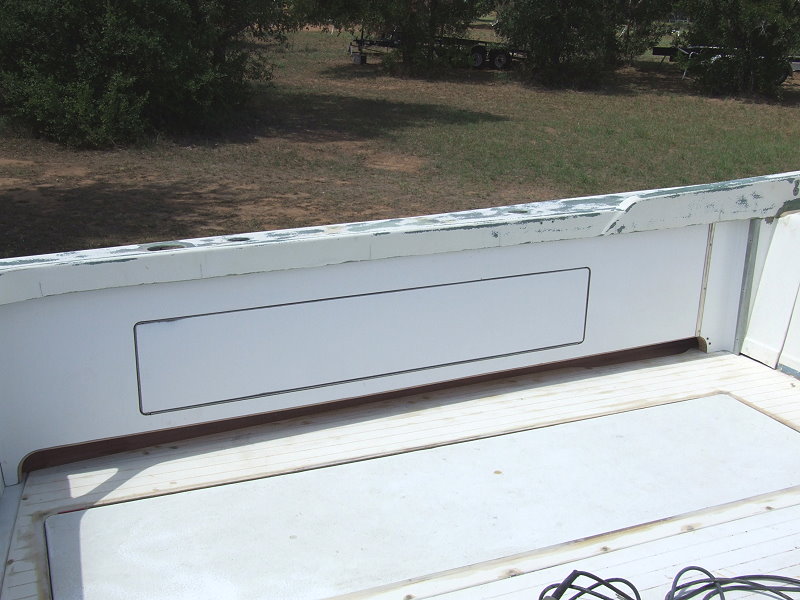
After this the panels could be sanded.
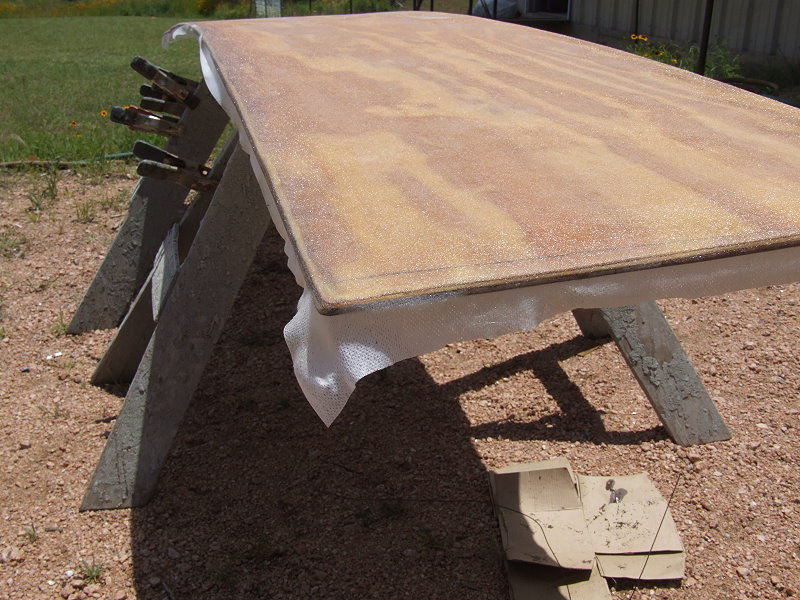
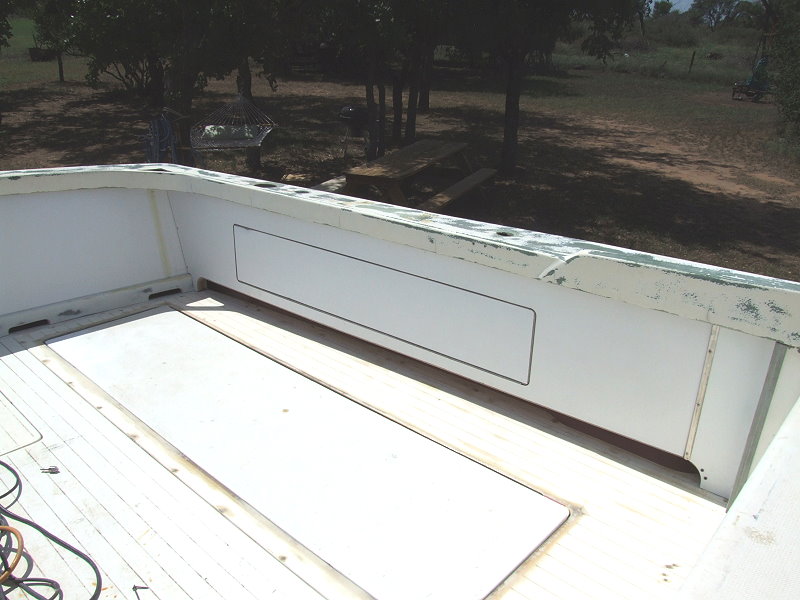
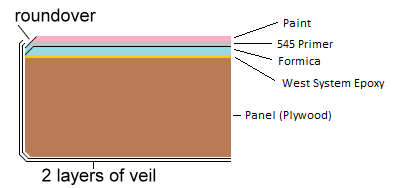
I collected everything heavy I had around and laid out the panels, gooped em' up and laid on the Formica.
Image

Despite your clear instructions I did manage to make a mistake.
Image

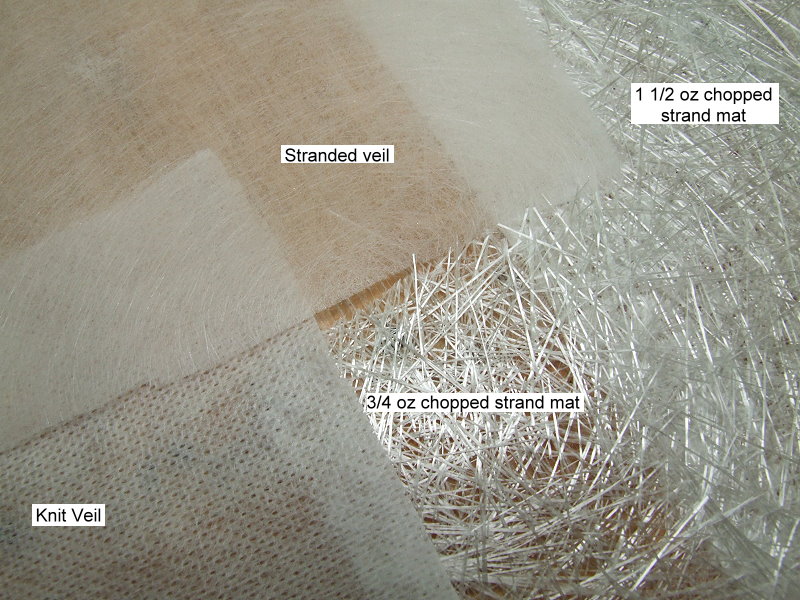
Though I used copious amounts of epoxy/cabosil and notched spreader I managed to have a big void.
Image

I fashoned a pastry bag out of a ZipLoc freezer bag and squeezed more epoxy/cabosil into the void while the panel was stood on end to get some help from gravity.
Image

Then I pressed it hard for 12+ hours.
Image

The other panels came out reasonably well and I have faired the the seams where two pieces of Formica met.

I have purchased Interlux Pre-Kote Image and Brightside Image realizing I am giving up some of the paint quality for the ease of a single part primer and paint to work with.

Any thoughts on how to avoid voids in the future are very welcome as is instruction on the painting phase.

Many thanks and best,
S
Possunt quia posse videntur
User avatar
scot
Senior Member
Posts: 1470
Joined: Oct 3rd, '06, 09:47
Location: Hurricane Alley, Texas
Contact:

Re: Cockpit Side Panels

Post by scot »

I like the toe boards! Does the stranded veil cloth wet out better than a light weight cloth? I hate working with the tight weave as I get bu-cu little piss-ant sized air bubbles trapped under the tight weave that is in a std cloth.
Scot
1969 Bertram 25 "Roly Poly"
she'll float one of these days.. no really it will :-0
Stephan
Senior Member
Posts: 655
Joined: Mar 30th, '11, 05:41
Location: Providence, RI

Re: Cockpit Side Panels

Post by Stephan »

Well, having fixed the void in the lamination of the panel there was a small ridge at the edge of the void. I'm not sure if this is a result of sliding some adhesive in the original lay-up or overfilling in the re-lamination. The ridge became apparent in long boarding out the primer.

Image

We'll see if this prints through significantly into the finish. What I have learned is that the Formica has saved tons of time from faring the panels and I think yield an end product that is lighter too.

Best,
S
Possunt quia posse videntur
User avatar
gplume
Senior Member
Posts: 455
Joined: Jan 2nd, '07, 21:23
Location: North Scituate, RI

Re: Cockpit Side Panels

Post by gplume »

Maybe this input is too late, but I made some nice side panels out of Azek. You can buy panels. Bang it and the color is the same all the way thru. I used white about 3/8 or 1/2 in thick( can 't remember).
Giff
Stephan
Senior Member
Posts: 655
Joined: Mar 30th, '11, 05:41
Location: Providence, RI

Re: Cockpit Side Panels

Post by Stephan »

Gif-
Thanks for this.
Azek would have been better as I am discovering the amount of time I'm spending priming-sanding-priming-sanding-painting-sanding-painting-sanding-painting... I may just scratch these in my garage to get the first one out of the way.
Best,
Stephan
Possunt quia posse videntur
Post Reply

Who is online

Users browsing this forum: Google [Bot] and 63 guests