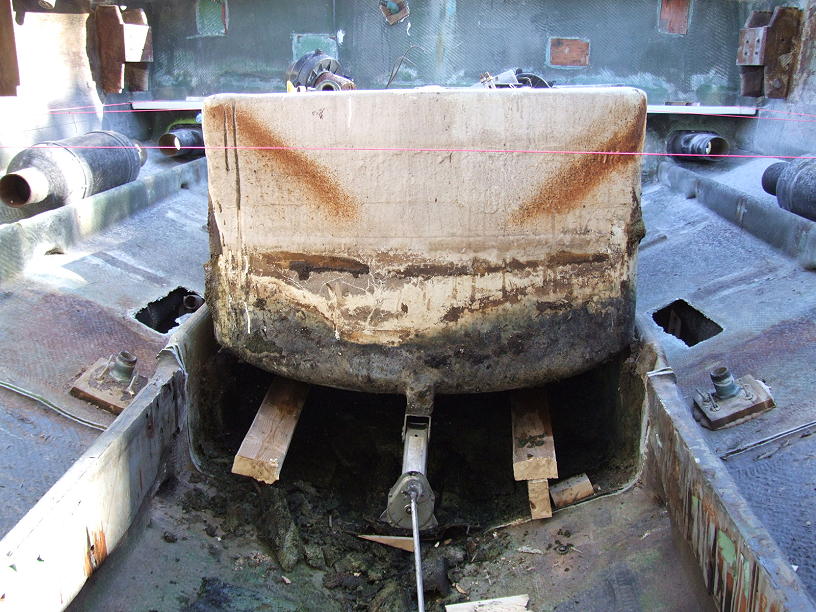
I’m finally getting around to removing the 190 gallon tank from my B28. What a joy this has been, especially in the SW Florida hot sun. I've used every four letter word in my vocabulary and then some I invented.
After cutting away part of the tank and cutting through the tabs that hold it, I finally had to winch the tank loose by hooking a logging chain to my lift and into the threaded hole for the siphon tube. The process nearly lifted the boat out of the water, but it finally broke free.
What I am wondering is what is the compound they used to glue the bottom of the tank to the plywood base under the tank. It must be nuclear.
Any info on this would be appreciated because I’d want to use something just as good along with tabbing the new tank that I’ll pick up tomorrow.
I’ve been taking digital pictures and will post them just to let anyone see what fun it has been.
Thanks in advance
Dick
Tank Removal
Moderators: CaptPatrick, mike ohlstein, Bruce
-
Skipper Dick

- Senior Member
- Posts: 330
- Joined: Jun 29th, '06, 08:22
- Location: Cape Coral, Florida
- Contact:
Tank Removal
1983 Bertram 28 FBC w/300 Merc Horizon


Pictures will never do the job justice. Looks easy, sounds easy, but is a major pain in the Arse. As the tank creeks and pops you start to wonder if that is the noise of a tank coming out of the bottom of the boat or the noise of a tank coming out WITH THE BOTTOM of the boat. I had a come-along, a bottle jack and my trucks screw jack all yanking and pushing before I started to hear creeking and popping.
If I had to do a second time, probly much easier...which I'm sort of glad as I put in an Alum tank so I know that will be coming out somewhere down the road.
If I had to do a second time, probly much easier...which I'm sort of glad as I put in an Alum tank so I know that will be coming out somewhere down the road.

John,
Mine was not as big a pain in the patoot as his and I still remember all the steps. When you see me in Annapolis we'll talk. I got it out by my tiny little self. Amazing.
Mine was not as big a pain in the patoot as his and I still remember all the steps. When you see me in Annapolis we'll talk. I got it out by my tiny little self. Amazing.
Mikey
3/18/1963 - -31-327 factory hardtop express, the only one left.
The difference between genius and stupidity is that genius has its limits.
-Albert Einstein
3/18/1963 - -31-327 factory hardtop express, the only one left.
The difference between genius and stupidity is that genius has its limits.
-Albert Einstein
-
Skipper Dick
- Senior Member
- Posts: 330
- Joined: Jun 29th, '06, 08:22
- Location: Cape Coral, Florida
- Contact:
Capt. Pat,
Do you have an idea what Bertram used as a cementing compound under the tank? The old tank as well as the new one I picked up in Miami on Monday has a slight "V". So it would actually be resting on a smaller surface while sitting on the plywood base they tabbed in the bilge.
I'm still working on some wood rot repairs, but I might be able to put the new tank in sometime this weekend. I just need an idea of what kind of goo to put under the tank beside tabbing to the bulkhead and stringers.
Dick
1983 Bertram 28 FBC w/300 Merc Horizon
-
CaptPatrick

- Founder/Admin
- Posts: 4161
- Joined: Jun 7th, '06, 14:25
- Location: 834 Scott Dr., LLANO, TX 78643 - 325.248.0809 bertram31@bertram31.com
Dick,
Any hard bedding compound that Bertram would have used will be a polyester, basically Bondo. Any soft compound will be 5200.
When installing a new tank or re-installing an old one, I don't use any compound below the tank. I do add a layer of closed cell foam below the tank to keep the tank from being in direct contact with the hull. The I add foam spacers either side, front & back & as necessary.
I rely only on the tabbing to secure the tank in place. With the weight of the fuel & tabbing, no other bedding is necessary.
Br,
Patrick
tank removal
Skipper,
Im working on replacing a tank on my 28. its 165gal i remember grinding the stuff they used to bond the tank down and it looked like thickened epoxy or polyester resin. did you have a new tank made? if you did im curious who you used and what your experience was. im ready to pull the trigger on a tank
matt
-
Skipper Dick
- Senior Member
- Posts: 330
- Joined: Jun 29th, '06, 08:22
- Location: Cape Coral, Florida
- Contact:
Thanks Capt. I'll do just that. I'll pick up some closed cell for the bottom and I alreeady have the foam I was going to use for the sides and the end where attached to the bulkhead. I picked up some aerosol cans to inject the foam along the sides in several spots on both sides and the end where needed. Then I'll tab it in with epoxy and roven.
Matt,
I got my fiberglass tank through Richard Kidd at Bertram. It is made not far from his office by Polyumac. They did an excellant job. I didn't want aluminum in case the bone heads decide we needed E85 and the cost of Stainless was almost as much as the fiberglass. I picked it up Monday and hope to put it in Sunday.
Dick
1983 Bertram 28 FBC w/300 Merc Horizon
-
CaptPatrick
- Founder/Admin
- Posts: 4161
- Joined: Jun 7th, '06, 14:25
- Location: 834 Scott Dr., LLANO, TX 78643 - 325.248.0809 bertram31@bertram31.com
Dick,Dick wrote:I picked up some aerosol cans to inject the foam along the sides in several spots on both sides and the end where needed.
Be careful with that one part squirt in stuff... It has a very long expansion phase that will continue to expand over a 24 hour period. During the first hour or so you'll get about 90% expansion. About another 5% over the 2nd & 3rd hour, the rest by 24 hrs.
I prefer to use 3/4" sheet constructon foam, (don't use styrofoam). Then if necessary, use the squirt in stuff only to fill any minor gaps that bug you. For large volume areas the squirt in stuff can be very destructive.
Br,
Patrick
-
Brewster Minton

- Senior Member
- Posts: 1795
- Joined: Jun 30th, '06, 07:44
- Location: Hampton Bays NY
- Contact:
-
Skipper Dick
- Senior Member
- Posts: 330
- Joined: Jun 29th, '06, 08:22
- Location: Cape Coral, Florida
- Contact:
-
CaptPatrick
- Founder/Admin
- Posts: 4161
- Joined: Jun 7th, '06, 14:25
- Location: 834 Scott Dr., LLANO, TX 78643 - 325.248.0809 bertram31@bertram31.com
Dick,
At Home Dildo, look in the insulating foam section for the 4x8 sheets of 3/4" material. White, blue, & pink sheets are all styrofoam, (no good). You'll find some that has a tan or yellowish color, usually with a foil applied to one side. Those are a Isocyanurate foam. That's the material you want...
Br,
Patrick
-
Skipper Dick
- Senior Member
- Posts: 330
- Joined: Jun 29th, '06, 08:22
- Location: Cape Coral, Florida
- Contact:
Mikey,
Well, it's fuel tank swap-out time for my B-28 this winter.
Would love to learn of your technique to remove the old tank! All advice sincerely appreciated.
Also, my old tank is the 230 (240?) gallon. Want to replace it with a 165-gallon. Are there any major problems with this.
Again, I appeciate the great advice!
Bob
Bob,
My tank swap was a 31 not 28. Don't know if there is a difference but Patrick will. First, remove the deck. Easy, huh? Now, I used a long thin piece of steel to run down between the tank and stringers and the tank and bulkheads to cut the foam. Lots of small passes and you will know when you bottom out. Feels and sounds different. Then same with the bottom if you can reach all of it. I could not. When all is cut and tank is empty (weight) I made some wedges from 2 x 4's and starting small, hammered them in to lift the tank loose from the remaining foam. Don't try to do it all at once. Hammer in the wedges until tight and let them sit. The pressure will do the job. When the wedges appear loose add more wedges. Eventually you will lift the tank loose. When loose I ran a rope around the tank at the ends and lifted it out, working back and forth. Once loose it came right up. I don't think it weighed much as I was able to get it out alone. Probably less than 200 lbs.
Good luck.
Mikey
3/18/1963 - -31-327 factory hardtop express, the only one left.
The difference between genius and stupidity is that genius has its limits.
-Albert Einstein
3/18/1963 - -31-327 factory hardtop express, the only one left.
The difference between genius and stupidity is that genius has its limits.
-Albert Einstein
-
Skipper Dick
- Senior Member
- Posts: 330
- Joined: Jun 29th, '06, 08:22
- Location: Cape Coral, Florida
- Contact:
I just got the new tank in today with 3 other guys I recruited. I've taken pictures of the process and I'll say that I do not want to do it again. It's a real b__ch in the hot SW Florida sun, but I'll have the big Mercs fired up tomorrow and the one piece deck with 33 screws put back on thursday morning. Then clean up and ready for the next project.....making a fiberglass half tower. I'll post all the pictures when I get the deck back on.
BTW, I used the lifting power of my lift to pop the tank loose. I didn 't think it would work for awhile, but eventually, I heard the ripping sound starting out gradually and then it broke loose. I had to cut the thing up into about 15 pieces to get the refuse guys to take it so I cut it up in the boat to make it easier to get it out with a bad shoulder. I had to cut the outboard wings off just to get to the stringer tabs.
But I'm smiling tonight with a Miller light in my hand.
Dick
1983 Bertram 28 FBC w/300 Merc Horizon
What did you do before you cut it up to make sure nothing blew up? Is that a real concern? The mechanic in a marina near my house got killed a few years ago welding a previously used gas tank--makes me a little nervous. If I need to cut it up, should I drain, refill with water, and drain again?
Thanks-
John
Thanks-
John
-
Skipper Dick
- Senior Member
- Posts: 330
- Joined: Jun 29th, '06, 08:22
- Location: Cape Coral, Florida
- Contact:
John,
First I removed every drop of gas through the siphon tube until it wouldn't pull any more. then I removed the siphon and used a hand pump until there was nothing left. Then I got a hose and one of those hose applicators that you would use on your lawn to apply weed killer. I put some diluted dish detergent in it and hosed the inside down using both the siphon hole and the filler hole. You could just as easily just dump some soap in and let it suds up rather than that.
You can't get too much of the inside that way because of the baffles, but I let a lot of water and soap in to cover as much of the inside as I could. I left it to sit and air out with the holes open for two days. Then I pumped out the water and let it dry out and sit for another two days. When I could not smell any signs of fuel, I started cutting. The baffles were made of aluminum, so you wouldn't have to worry about any sparks there, but I had to use a metal saw blade on the sawzall. I cut both sides off that hang out over the stringers just so I could get to the tabbing on the stringers. After seeing how loose the tank fit between the stringers and how easy it was to cut and pull them loose, I believe I could have lifted the whole tank out once the tabs on the front of the tank to the bulkhead were cut. I'm glad I went the route I did because that scenario was an uncertainty.
Today, I will finish the tabbing and replace my fuel filters, put some gas in and run the engines. If all goes well, I'll have my step son help me walk the deck back on and put the 33 screws back in and calk the whole thing. Then I'll have a cool one.
Dick
1983 Bertram 28 FBC w/300 Merc Horizon
-
CaptPatrick
- Founder/Admin
- Posts: 4161
- Joined: Jun 7th, '06, 14:25
- Location: 834 Scott Dr., LLANO, TX 78643 - 325.248.0809 bertram31@bertram31.com
-
Harry Woods
- Senior Member
- Posts: 269
- Joined: Jun 29th, '06, 13:46
- Location: Hampton Bays, NY
-
Skipper Dick
- Senior Member
- Posts: 330
- Joined: Jun 29th, '06, 08:22
- Location: Cape Coral, Florida
- Contact:
I'll post some pictures as soon as I complete one more task today and that's putting the deck back on. Then, of course, I have to check Capt. Pat's instructions on how to post the pics.
But, I ordered the tank through Richard Kidd. The tanks are made a couple of miles from his shop. The cost for the B28 190 gallon model was $3,900 and it is made of vinylester and glass fabric. I comes with all the fittings and fuel sensor and has inputs and out puts for generator and diesel returns. I picked it up since I'm only a couple of hours away.
I checked prices all over for aluminum and stainless as well, but the prospect of us getting weaned on to even higher ethanol content seems inevitable. I got aluminum quotes for under 2k and stainless for around 3k plus shipping. I decided on the fiberglass replacement just so I wouldn’t have to make another replacement or repair in the future.
Dick
1983 Bertram 28 FBC w/300 Merc Horizon
-
Skipper Dick
- Senior Member
- Posts: 330
- Joined: Jun 29th, '06, 08:22
- Location: Cape Coral, Florida
- Contact:


-
Skipper Dick
- Senior Member
- Posts: 330
- Joined: Jun 29th, '06, 08:22
- Location: Cape Coral, Florida
- Contact:
Doug,
I cut the tank up for two reasons. 1, I didn't have enough horse power in my right shoulder after losing a tendon a few years back and 2, so the Waist Management guys would take it on refuse pick up day.
I believe that the new tank was lighter than the old one even thjough it appeared to be just as thick with the same type of baffels as the old tank. I swear that one of the larger pieces weighed 40 pounds. Four of us picked up the new tank and marched it right into place. It fit like a glove. If that hadn't worked, my neighbor had a davitt that would have put it in.
I did not save any of the tank, but in the process of removing it, I got very intimate with it and noted that the gel coat inside had started to pit and looked a lot like a pitting hull, but not a severe pitting. To my knowledge, I had never put ethanol in the tank. In the latter months, I tested all the gas for ethanol before using it.
I'm glad that the job is done. Now to find a mold to make a half tower.
Dick
1983 Bertram 28 FBC w/300 Merc Horizon
John,
I am indeed located at Kent Narrows. I had planned to have Worton Creek (John Patnovik -sp?) do it, since he's a Bertram specialist. But that's a haul from Kent Narrows and I'm darn near out of fuel.
I'll do my research and lay out the plan, and then consult with a crew that I've been working with for years (including a repower) here at the Narrows.....I'll talk it through thoroughly with them and if my level of confidence is sufficient, I'll have the tank fabricated at Atlantic and ask my guys here to put it in. Probably to a rudder system upgrade (using Patrick's product) while I'm at it.
Bob
-
Skipper Dick
- Senior Member
- Posts: 330
- Joined: Jun 29th, '06, 08:22
- Location: Cape Coral, Florida
- Contact:
Just a footnote to this project. Most of you have probably already thought of this, but in case you haven't, then check your fuel lines. If they are as old ast the boat or more than 10 years old, you should change them for the new improved CG approved and ethanol proof lines. The hose itself should indicate that it is safe for ethanol. Watch that you don't buy lines for above deck when getting new hose. I almost did.
I replaced all my filters and then I poured 50 gallons in the new tank and added 3 cans of BG 44k and went off to the gulf. The 300 HP Mercs' purred like tigers and I feel a lot better. I don't have to carry around my little ethanol tester anymore and I know that the seals in these engines are good to go also.
Dick
1983 Bertram 28 FBC w/300 Merc Horizon
-
scooter28

When replacing the fuel lines, use the black with red stripe, don't use the gray with blue stripe.
Some have been using the pushloc type of fittings to eliminate clamps. Pushloc fittings require the use of push loc hose which is not CG approved to work 100%.
Using push loc fittings with the black/red hose without clamps is a no no.
Also don't buy the cheap short hose barb fittings. Get the long and wide barbs.
Hose should be tight going on even with clamps.
If you have to make a 90, use a street elbow with a straight barb for better flow.
Adding a sharp 90 fitting is like adding 15' of extra hose length resistance and will make the fuel pumps work that much harder.
-
scooter28
-
In Memory Walter K

- Senior Member
- Posts: 2912
- Joined: Jun 30th, '06, 21:25
- Location: East Hampton LI, NY
- Contact:
-
scooter28
-
Skipper Dick
- Senior Member
- Posts: 330
- Joined: Jun 29th, '06, 08:22
- Location: Cape Coral, Florida
- Contact:
Scooter28,
That's exactly the type of hoses I had. I replaced the fill hose with the new and improved 1.5 inch rubber hose and left the copper vent pipe since it was sound. I boiled all the old fittings in a mild acid solution and wire brushed them bright before putting them on the new tank. It's a great relief just knowing that the project is over and I feel very good about the installation. Going fishing this weekend.
Dick
1983 Bertram 28 FBC w/300 Merc Horizon
-
CaptPatrick
- Founder/Admin
- Posts: 4161
- Joined: Jun 7th, '06, 14:25
- Location: 834 Scott Dr., LLANO, TX 78643 - 325.248.0809 bertram31@bertram31.com
For those B31 owners anticipating a fuel tank removal, here's a image file of the R&R on the last one I did... Tank removal & re-instalation
Who is online
Users browsing this forum: Google [Bot] and 453 guests